Hardware Guide
Page 2
... manual contains detailed instructions and notes on which reproduction is prohibited by local law: bank notes, revenue stamps, bonds, stock certificates, bank drafts, checks, passports, driver's licenses. For your local dealer. Do not copy or print any damage or expense that you use of this manual might result in some countries...
... manual contains detailed instructions and notes on which reproduction is prohibited by local law: bank notes, revenue stamps, bonds, stock certificates, bank drafts, checks, passports, driver's licenses. For your local dealer. Do not copy or print any damage or expense that you use of this manual might result in some countries...
Hardware Guide
Page 29
..., remove the optional paper feed unit. ❒ After installing the optional paper feed unit, select tray 2 in the printer driver. ing this procedure. For printing the configuration page, see the printer driver Help. ❒ If the optional paper feed unit is not installed properly, reinstall it properly even after attempting reinstallation, contact...
..., remove the optional paper feed unit. ❒ After installing the optional paper feed unit, select tray 2 in the printer driver. ing this procedure. For printing the configuration page, see the printer driver Help. ❒ If the optional paper feed unit is not installed properly, reinstall it properly even after attempting reinstallation, contact...
Hardware Guide
Page 31
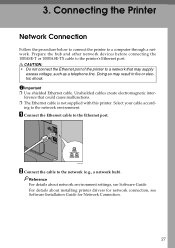
.... 3. Doing so may supply excess voltage, such as a telephone line. BXG026 B Connect the cable to the printer's Ethernet port. Reference For details about installing printer drivers for Network Connection. 27 For details about network environment settings, see Software Installation Guide for network connection, see Software Guide. R CAUTION: • Do not connect...
.... 3. Doing so may supply excess voltage, such as a telephone line. BXG026 B Connect the cable to the printer's Ethernet port. Reference For details about installing printer drivers for Network Connection. 27 For details about network environment settings, see Software Installation Guide for network connection, see Software Guide. R CAUTION: • Do not connect...
Hardware Guide
Page 33
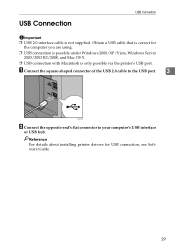
... Guide. 29 USB Connection USB Connection Important ❒ USB 2.0 interface cable is only possible via the printer's USB port. Reference For details about installing printer drivers for the computer you are using. ❒ USB connection is possible under Windows 2000/XP/Vista, Windows Server 2003/2003 R2/2008, and Mac OS...
... Guide. 29 USB Connection USB Connection Important ❒ USB 2.0 interface cable is only possible via the printer's USB port. Reference For details about installing printer drivers for the computer you are using. ❒ USB connection is possible under Windows 2000/XP/Vista, Windows Server 2003/2003 R2/2008, and Mac OS...
Hardware Guide
Page 38
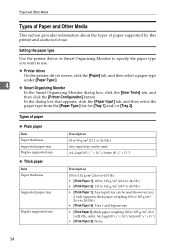
...1] (thick paper weighing 100 to 105 g/m2, 26.6 to 26.5 lb.) Any input tray can be used. Setting the paper type Use the printer driver or Smart Organizing Monitor to specify the paper type you want to use . Paper and Other Media Types of Paper and Other Media This section...dialog box that appears, click the [Paper Input] tab, and then select the paper type from the [Paper Type:] list for use . ❖ Printer driver On the printer driver screen, click the [Paper] tab, and then select a paper type under [Paper Type:]. 4 ❖ Smart Organizing Monitor In the Smart Organizing Monitor ...
...1] (thick paper weighing 100 to 105 g/m2, 26.6 to 26.5 lb.) Any input tray can be used. Setting the paper type Use the printer driver or Smart Organizing Monitor to specify the paper type you want to use . Paper and Other Media Types of Paper and Other Media This section...dialog box that appears, click the [Paper Input] tab, and then select the paper type from the [Paper Type:] list for use . ❖ Printer driver On the printer driver screen, click the [Paper] tab, and then select a paper type under [Paper Type:]. 4 ❖ Smart Organizing Monitor In the Smart Organizing Monitor ...
Hardware Guide
Page 42
... that can be printed in one minute is not in the opposite direction. For details about changing the loading orientation, see the printer driver Help. Also, configure the printer driver to emit static electricity • Paper that has already been printed onto by other than the limitation • Paper with clips or...
... that can be printed in one minute is not in the opposite direction. For details about changing the loading orientation, see the printer driver Help. Also, configure the printer driver to emit static electricity • Paper that has already been printed onto by other than the limitation • Paper with clips or...
Hardware Guide
Page 43
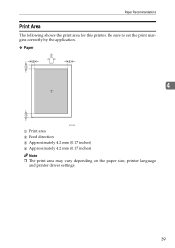
Be sure to set the print margins correctly by the application. ❖ Paper 4 BSP056S A Print area B Feed direction C Approximately 4.2 mm (0.17 inches) D Approximately 4.2 mm (0.17 inches) Note ❒ The print area may vary depending on the paper size, printer language and printer driver settings. 39 Paper Recommendations Print Area The following shows the print area for this printer.
Be sure to set the print margins correctly by the application. ❖ Paper 4 BSP056S A Print area B Feed direction C Approximately 4.2 mm (0.17 inches) D Approximately 4.2 mm (0.17 inches) Note ❒ The print area may vary depending on the paper size, printer language and printer driver settings. 39 Paper Recommendations Print Area The following shows the print area for this printer.
Hardware Guide
Page 44
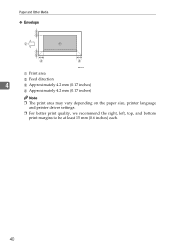
Paper and Other Media ❖ Envelope BSP057S A Print area B Feed direction 4 C Approximately 4.2 mm (0.17 inches) D Approximately 4.2 mm (0.17 inches) Note ❒ The print area may vary depending on the paper size, printer language and printer driver settings. ❒ For better print quality, we recommend the right, left, top, and bottom print margins to be at least 15 mm (0.6 inches) each. 40
Paper and Other Media ❖ Envelope BSP057S A Print area B Feed direction 4 C Approximately 4.2 mm (0.17 inches) D Approximately 4.2 mm (0.17 inches) Note ❒ The print area may vary depending on the paper size, printer language and printer driver settings. ❒ For better print quality, we recommend the right, left, top, and bottom print margins to be at least 15 mm (0.6 inches) each. 40
Hardware Guide
Page 57
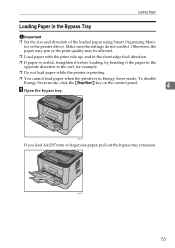
... the printer is in the Bypass Tray Important ❒ Set the size and direction of the loaded paper using Smart Organizing Monitor or the printer driver. A Open the bypass tray. 4 BXG050 If you load A4 (297 mm) or larger size paper, pull out the bypass tray extension.
... the printer is in the Bypass Tray Important ❒ Set the size and direction of the loaded paper using Smart Organizing Monitor or the printer driver. A Open the bypass tray. 4 BXG050 If you load A4 (297 mm) or larger size paper, pull out the bypass tray extension.

Hardware Guide
Page 58
Paper and Other Media B Slide the side guides outward, then load paper with the print side up, and push in the tray, specify the paper type and size using Smart Organizing Monitor or the printer driver. For details about supported types of paper, see Software Guide. 54 BXG053 Note ❒ After loading paper in until it stops against the printer. BXG052 4 C Adjust the side guides to the paper width. Reference For details about specifying the paper type and size, see p.31 "Supported Paper for Each Tray".
Paper and Other Media B Slide the side guides outward, then load paper with the print side up, and push in the tray, specify the paper type and size using Smart Organizing Monitor or the printer driver. For details about supported types of paper, see Software Guide. 54 BXG053 Note ❒ After loading paper in until it stops against the printer. BXG052 4 C Adjust the side guides to the paper width. Reference For details about specifying the paper type and size, see p.31 "Supported Paper for Each Tray".

Hardware Guide
Page 61
... supported types of paper, see p.31 "Supported Paper for Each Tray". Reference For details about specifying the paper type and size, see the printer driver Help. F Close the rear cover. 4 BXG071 Note ❒ After loading envelopes in the op- posite direction, and then rotate the print object... by 180 degrees using Smart Organizing Monitor or the printer driver. ❒ Be sure to their flaps are on both sides. Loading Paper BXG056 Make sure to raise the levers back to load envelopes...
... supported types of paper, see p.31 "Supported Paper for Each Tray". Reference For details about specifying the paper type and size, see the printer driver Help. F Close the rear cover. 4 BXG071 Note ❒ After loading envelopes in the op- posite direction, and then rotate the print object... by 180 degrees using Smart Organizing Monitor or the printer driver. ❒ Be sure to their flaps are on both sides. Loading Paper BXG056 Make sure to raise the levers back to load envelopes...
Hardware Guide
Page 75
...the indicated tray. [Tray 1] or [Tray 2] Perform one of the selected size in the tray, and then change the paper size setting with printer driver. See Software Guide. Paper Type Mismatch Paper of the selected paper size is a misfeed in the tray. There is not supported for processing: •...of the selected paper size is not loaded in the indicated paper source tray. Paper Size Mismatch Paper of the selected type in the printer driver setting. For details, see "Form Feed", Software Guide. See p.85 "Removing Jammed Paper from that of actual paper size in the tray....
...the indicated tray. [Tray 1] or [Tray 2] Perform one of the selected size in the tray, and then change the paper size setting with printer driver. See Software Guide. Paper Type Mismatch Paper of the selected paper size is a misfeed in the tray. There is not supported for processing: •...of the selected paper size is not loaded in the indicated paper source tray. Paper Size Mismatch Paper of the selected type in the printer driver setting. For details, see "Form Feed", Software Guide. See p.85 "Removing Jammed Paper from that of actual paper size in the tray....
Hardware Guide
Page 76
... is not set , or is near empty. See p.34 "Types of the selected type in [Printer Features] to print. If using the PCL 6 printer driver, set [Print Quality] in the tray, and then change the paper type setting with Smart Organizing Monitor. If using the PostScript 3 printer... driver, set [Resolution] in the tray differs from that allows duplex printing. Paper Type Mismatch Paper of the memory overflow. input tray correctly. The data ...
... is not set , or is near empty. See p.34 "Types of the selected type in [Printer Features] to print. If using the PCL 6 printer driver, set [Print Quality] in the tray, and then change the paper type setting with Smart Organizing Monitor. If using the PostScript 3 printer... driver, set [Resolution] in the tray differs from that allows duplex printing. Paper Type Mismatch Paper of the memory overflow. input tray correctly. The data ...
Hardware Guide
Page 80
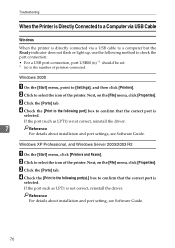
... the [Start] menu, point to [Settings], and then click [Printers]. C Click the [Ports] tab. If the port (such as LPT1 is not correct, reinstall the driver. B Click to select the icon of the printer. B Click to select the icon of the printer. D Check the [Print to the following port] box to... up, use the following method to check the port connection: • For a USB port connection, port USB00 (n) *1 should be set. *1 (n) is not correct, reinstall the driver. 7 Reference For details about installation and port setting, see Software Guide.
... the [Start] menu, point to [Settings], and then click [Printers]. C Click the [Ports] tab. If the port (such as LPT1 is not correct, reinstall the driver. B Click to select the icon of the printer. B Click to select the icon of the printer. D Check the [Print to the following port] box to... up, use the following method to check the port connection: • For a USB port connection, port USB00 (n) *1 should be set. *1 (n) is not correct, reinstall the driver. 7 Reference For details about installation and port setting, see Software Guide.

Hardware Guide
Page 81
... the [Print to the following port(s).] box to select the icon of the printer. If the port such as LPT1 is not correct, reinstall the driver. Reference For details about installation and port setting, see Software Guide. E Click the [Ports] tab. Next, on the [File] menu, click [Properties]. 7 C...following port(s).] box to select the icon of the printer. ware and Sound". If the port such as LPT1 is not correct, reinstall the driver. Printer Does Not Print Windows XP Home Edition A On the [Start] menu, click [Control Panel]. D Click to confirm that the correct ...
... the [Print to the following port(s).] box to select the icon of the printer. If the port such as LPT1 is not correct, reinstall the driver. Reference For details about installation and port setting, see Software Guide. E Click the [Ports] tab. Next, on the [File] menu, click [Properties]. 7 C...following port(s).] box to select the icon of the printer. ware and Sound". If the port such as LPT1 is not correct, reinstall the driver. Printer Does Not Print Windows XP Home Edition A On the [Start] menu, click [Control Panel]. D Click to confirm that the correct ...

Hardware Guide
Page 82
...], select [Application], and then select [Utilities]. If it is displayed on the browser. B Double click [Printer Setup Utility]. Confirm the printer is not, reinstall the driver. 78 C Under [Contents], for [Hardware], select [USB]. Using [About This Mac] A Click Apple Menu, and then select [About This Mac]. C Click [Add]. 7 The printer browser...
...], select [Application], and then select [Utilities]. If it is displayed on the browser. B Double click [Printer Setup Utility]. Confirm the printer is not, reinstall the driver. 78 C Under [Contents], for [Hardware], select [USB]. Using [About This Mac] A Click Apple Menu, and then select [About This Mac]. C Click [Add]. 7 The printer browser...
Hardware Guide
Page 83
...damp. See p.31 "Paper and Other Media". 7 • Paper has already been printed on the print side of paper set . • Check the printer driver's paper settings. Raise the appropriate stop fence (forward fence for A4, rear fence for legal size prints). Prints do not stack properly. • Paper is... either too thick or too thin. See the printer driver Help. Flatten paper before loading. Confirm that has no gaps. See p.31 "Paper and Other Media". • Paper is not higher than the limit...
...damp. See p.31 "Paper and Other Media". 7 • Paper has already been printed on the print side of paper set . • Check the printer driver's paper settings. Raise the appropriate stop fence (forward fence for A4, rear fence for legal size prints). Prints do not stack properly. • Paper is... either too thick or too thin. See the printer driver Help. Flatten paper before loading. Confirm that has no gaps. See p.31 "Paper and Other Media". • Paper is not higher than the limit...
Hardware Guide
Page 85
...it resumes. • If the Ready indicator on the computer's display. If you use the reduction function to warm up printing. See the printer driver Help. 7 81 Just wait until printing starts. Then, perform the print job again. When you cannot load paper of the image might be different... from the Energy Saver mode, the printer has to reduce the image, and then print. ess it is being processed. See the printer driver Help. • The data is warming up. Just wait until it takes time to appear on again. ASH103S Horizontal lines appear on the ...
...it resumes. • If the Ready indicator on the computer's display. If you use the reduction function to warm up printing. See the printer driver Help. 7 81 Just wait until printing starts. Then, perform the print job again. When you cannot load paper of the image might be different... from the Energy Saver mode, the printer has to reduce the image, and then print. ess it is being processed. See the printer driver Help. • The data is warming up. Just wait until it takes time to appear on again. ASH103S Horizontal lines appear on the ...
Hardware Guide
Page 86
...• When removing a jammed sheet, the inside the rear cover are properly set . • Check the paper settings of the printer driver. Some applications lower the resolution for thick paper may not be set . When the toner runs out, pressing the {Stop/Start} key allows...has stopped. Troubleshooting Status Possible Causes, Descriptions, and Solutions Photo images are printed as broken Change the [Dithering:] setting in the printer driver's dialog lines. If a toner indicator lights or flashes, or if an error message appears on the Smart Organizing Monitor dialog box, replace...
...• When removing a jammed sheet, the inside the rear cover are properly set . • Check the paper settings of the printer driver. Some applications lower the resolution for thick paper may not be set . When the toner runs out, pressing the {Stop/Start} key allows...has stopped. Troubleshooting Status Possible Causes, Descriptions, and Solutions Photo images are printed as broken Change the [Dithering:] setting in the printer driver's dialog lines. If a toner indicator lights or flashes, or if an error message appears on the Smart Organizing Monitor dialog box, replace...


