Hardware Guide
Page 1
Operating Instructions Hardware Guide 1 Guide to read "Safety Information" before you use , be sure to the Printer 2 Installing the Printer and Options 3 Connecting the Printer 4 Paper and Other Media 5 Replacing Consumables 6 Cleaning the Printer 7 Troubleshooting 8 Removing Misfed Paper 9 Appendix Read this machine and keep it handy for future reference. For safe and correct use this manual carefully before using the machine.
Operating Instructions Hardware Guide 1 Guide to read "Safety Information" before you use , be sure to the Printer 2 Installing the Printer and Options 3 Connecting the Printer 4 Paper and Other Media 5 Replacing Consumables 6 Cleaning the Printer 7 Troubleshooting 8 Removing Misfed Paper 9 Appendix Read this machine and keep it handy for future reference. For safe and correct use this manual carefully before using the machine.
Hardware Guide
Page 3
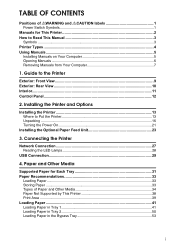
...Installing Manuals on Your Computer 5 Opening Manuals ...6 Removing Manuals from Your Computer 7 1. Connecting the Printer Network Connection 27 Reading the LED Lamps 28 USB Connection 29 4. Guide to Put the Printer 13 Unpacking ...16 Turning the Power On 21 Installing the Optional Paper Feed Unit 23 3. TABLE OF...Each Tray 31 Paper Recommendations 33 Loading Paper...33 Storing Paper ...33 Types of Paper and Other Media 34 Paper Not Supported by This Printer 38 Print Area ...39 Loading Paper ...41 Loading Paper in Tray 1 41 Loading Paper in Tray 2 50 Loading Paper in the ...
...Installing Manuals on Your Computer 5 Opening Manuals ...6 Removing Manuals from Your Computer 7 1. Connecting the Printer Network Connection 27 Reading the LED Lamps 28 USB Connection 29 4. Guide to Put the Printer 13 Unpacking ...16 Turning the Power On 21 Installing the Optional Paper Feed Unit 23 3. TABLE OF...Each Tray 31 Paper Recommendations 33 Loading Paper...33 Storing Paper ...33 Types of Paper and Other Media 34 Paper Not Supported by This Printer 38 Print Area ...39 Loading Paper ...41 Loading Paper in Tray 1 41 Loading Paper in Tray 2 50 Loading Paper in the ...

Hardware Guide
Page 4
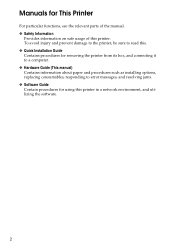
... Friction Pad and the Paper Feed Roller 66 7. Replacing Consumables Replacing the Print Cartridge 59 6. Appendix Moving and Transporting the Printer 95 Moving the printer in a short distance 95 Moving over a Long Distance 96 Disposal ...97 Consumables ...98 Print Cartridges ...98 Specifications...99 Main...Electromagnetic Interference 102 INDEX...103 ii Troubleshooting Error & Status Messages on Smart Organizing Monitor 69 Panel Indicator ...74 Printer Does Not Print 75 When the Printer is Jammed 85 Removing Jammed Paper from the Inner/Tray 1/Tray 2 85 Removing Jammed Paper from the ...
... Friction Pad and the Paper Feed Roller 66 7. Replacing Consumables Replacing the Print Cartridge 59 6. Appendix Moving and Transporting the Printer 95 Moving the printer in a short distance 95 Moving over a Long Distance 96 Disposal ...97 Consumables ...98 Print Cartridges ...98 Specifications...99 Main...Electromagnetic Interference 102 INDEX...103 ii Troubleshooting Error & Status Messages on Smart Organizing Monitor 69 Panel Indicator ...74 Printer Does Not Print 75 When the Printer is Jammed 85 Removing Jammed Paper from the Inner/Tray 1/Tray 2 85 Removing Jammed Paper from the ...
Hardware Guide
Page 6
... sure to read this. ❖ Quick Installation Guide Contains procedures for removing the printer from its box, and connecting it to a computer. ❖ Hardware Guide (This manual) Contains information about paper and procedures such as installing options, replacing ...consumables, responding to error messages, and resolving jams. ❖ Software Guide Contain procedures for This Printer For particular functions, see the relevant parts of the manual. ❖ Safety Information Provides information on safe usage of this...
... sure to read this. ❖ Quick Installation Guide Contains procedures for removing the printer from its box, and connecting it to a computer. ❖ Hardware Guide (This manual) Contains information about paper and procedures such as installing options, replacing ...consumables, responding to error messages, and resolving jams. ❖ Software Guide Contain procedures for This Printer For particular functions, see the relevant parts of the manual. ❖ Safety Information Provides information on safe usage of this...
Hardware Guide
Page 7
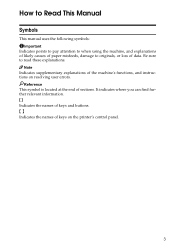
... where you can find further relevant information. [ ] Indicates the names of keys and buttons. { } Indicates the names of the machine's functions, and instructions on the printer's control panel. 3 Note Indicates supplementary explanations of keys on resolving user errors. How to Read This Manual Symbols This manual uses the following symbols: Important...
... where you can find further relevant information. [ ] Indicates the names of keys and buttons. { } Indicates the names of the machine's functions, and instructions on the printer's control panel. 3 Note Indicates supplementary explanations of keys on resolving user errors. How to Read This Manual Symbols This manual uses the following symbols: Important...
Hardware Guide
Page 8
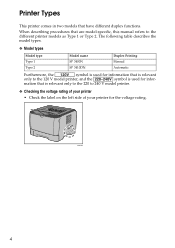
... two models that is relevant only to the 120 V model printer, and the symbol is used for information that have different duplex functions. The following table describes the model types. ❖ Model types Model type Type 1 Type 2 Model name SP 3400N SP 3410DN Duplex Printing Manual Automatic Furthermore, the symbol is used for infor...
... two models that is relevant only to the 120 V model printer, and the symbol is used for information that have different duplex functions. The following table describes the model types. ❖ Model types Model type Type 1 Type 2 Model name SP 3400N SP 3410DN Duplex Printing Manual Automatic Furthermore, the symbol is used for infor...

Hardware Guide
Page 9
.... • This manual uses procedures based on the included CD-ROM. Use the following procedure to complete the installation. When a printer error occurs, Smart Organizing Monitor may not work under certain operating system settings. C Select a language for this section before any other...the problem. G Click [Exit]. However, AutoRun may make reference to the HTML manual to notify the user of the procedure to read this printer are using . A Quit all applications currently running a Macintosh operating system, open "Manuals.htm" from the CD-ROM root directory. 5 ...
.... • This manual uses procedures based on the included CD-ROM. Use the following procedure to complete the installation. When a printer error occurs, Smart Organizing Monitor may not work under certain operating system settings. C Select a language for this section before any other...the problem. G Click [Exit]. However, AutoRun may make reference to the HTML manual to notify the user of the procedure to read this printer are using . A Quit all applications currently running a Macintosh operating system, open "Manuals.htm" from the CD-ROM root directory. 5 ...
Hardware Guide
Page 13
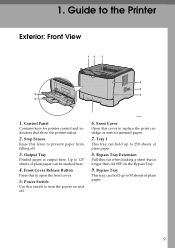
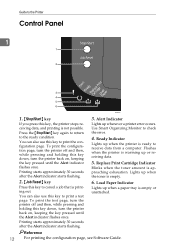
Control Panel Contains keys for printer control and indicators that is output here. BXG003 6. Front Cover Open this cover to open the front cover... Pull this fence to 250 sheets of plain paper. 8. Stop Fences Raise this out when loading a sheet that show the printer status. 2. Front Cover Release Button Press this switch to 50 sheets of plain paper can hold up to turn the power ... paper. 9 Power Switch Use this to replace the print cartridge or remove jammed paper. 7. 1. Up to the Printer Exterior: Front View 1. Bypass Tray This tray can be stacked here. 4.
Control Panel Contains keys for printer control and indicators that is output here. BXG003 6. Front Cover Open this cover to open the front cover... Pull this fence to 250 sheets of plain paper. 8. Stop Fences Raise this out when loading a sheet that show the printer status. 2. Front Cover Release Button Press this switch to 50 sheets of plain paper can hold up to turn the power ... paper. 9 Power Switch Use this to replace the print cartridge or remove jammed paper. 7. 1. Up to the Printer Exterior: Front View 1. Bypass Tray This tray can be stacked here. 4.
Hardware Guide
Page 14
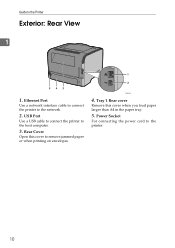
USB Port Use a USB cable to connect the printer to the Printer Exterior: Rear View 1 1. Guide to the host computer. 3. BXG004 4. Power Socket For connecting the power cord to remove jammed paper or when printing on envelopes. Tray 1 Rear cover Remove this cover to the printer. 10 Rear Cover Open this cover when you load paper larger than A4 in the paper tray. 5. Ethernet Port Use a network interface cable to connect the printer to the network. 2.
USB Port Use a USB cable to connect the printer to the Printer Exterior: Rear View 1 1. Guide to the host computer. 3. BXG004 4. Power Socket For connecting the power cord to remove jammed paper or when printing on envelopes. Tray 1 Rear cover Remove this cover to the printer. 10 Rear Cover Open this cover when you load paper larger than A4 in the paper tray. 5. Ethernet Port Use a network interface cable to connect the printer to the network. 2.
Hardware Guide
Page 16
...also use this key to receive data from a computer. Replace Print Cartridge Indicator Blinks when the toner amount is warming up whenever a printer error occurs. Load Paper Indicator Lights up when the toner is ready to print a test page. Printing starts approximately 30 seconds after the... a paper tray is printing out. Use Smart Organizing Monitor to cancel a job that is empty or unattached. You can also use this key to the Printer Control Panel 1 1 2 3 4 5 6 BXG220 1. {Stop/Start} key If you press this key to check the error. 4. Guide to print the ...
...also use this key to receive data from a computer. Replace Print Cartridge Indicator Blinks when the toner amount is warming up whenever a printer error occurs. Load Paper Indicator Lights up when the toner is ready to print a test page. Printing starts approximately 30 seconds after the... a paper tray is printing out. Use Smart Organizing Monitor to cancel a job that is empty or unattached. You can also use this key to the Printer Control Panel 1 1 2 3 4 5 6 BXG220 1. {Stop/Start} key If you press this key to check the error. 4. Guide to print the ...
Hardware Guide
Page 17
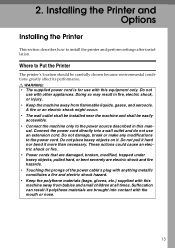
...heavy objects, pulled hard, or bent severely are brought into a wall outlet and do not use an extension cord. Installing the Printer and Options Installing the Printer This section describes how to the power cord. Do not use with the mouth or nose. 13 A fire or an electric ... use with this machine away from flammable liquids, gases, and aerosols. 2. Doing so may result in this equipment only. Where to Put the Printer The printer's location should be easily accessible. • Connect the machine only to the power source described in fire, electric shock, or injury. •...
...heavy objects, pulled hard, or bent severely are brought into a wall outlet and do not use an extension cord. Installing the Printer and Options Installing the Printer This section describes how to the power cord. Do not use with the mouth or nose. 13 A fire or an electric ... use with this machine away from flammable liquids, gases, and aerosols. 2. Doing so may result in this equipment only. Where to Put the Printer The printer's location should be easily accessible. • Connect the machine only to the power source described in fire, electric shock, or injury. •...
Hardware Guide
Page 18
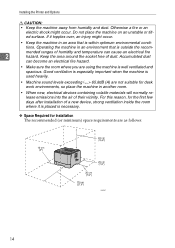
Keep the area around the socket free of their vicinity. Installing the Printer and Options R CAUTION: • Keep the machine away from humidity and dust. Operating the machine in an environment that is used heavily. • Machine sound ...
Keep the area around the socket free of their vicinity. Installing the Printer and Options R CAUTION: • Keep the machine away from humidity and dust. Operating the machine in an environment that is used heavily. • Machine sound ...
Hardware Guide
Page 19
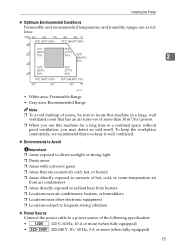
Installing the Printer ❖ Optimum Environmental Conditions Permissible and recommended temperature and humidity ranges are excessively cold, hot, or humid ❒ Areas directly exposed to currents of more (...
Installing the Printer ❖ Optimum Environmental Conditions Permissible and recommended temperature and humidity ranges are excessively cold, hot, or humid ❒ Areas directly exposed to currents of more (...
Hardware Guide
Page 20
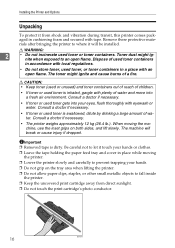
...used toner containers in accordance with local regulations. • Do not store toner, used toner is dirty. Consult a doctor if necessary. • The printer weighs approximately 12 kg (26.4 lb.). R WARNING: 2 • Do not incinerate used toner gets into a fresh air environment. Important ❒ ... holding the paper feed tray and cover in cushioning foam and secured with eyewash or water. Remove these protective materials after bringing the printer to where it from direct sunlight. ❒ Do not touch the print cartridge's photo conductor. 16 BSP024S Consult a doctor if ...
...used toner containers in accordance with local regulations. • Do not store toner, used toner is dirty. Consult a doctor if necessary. • The printer weighs approximately 12 kg (26.4 lb.). R WARNING: 2 • Do not incinerate used toner gets into a fresh air environment. Important ❒ ... holding the paper feed tray and cover in cushioning foam and secured with eyewash or water. Remove these protective materials after bringing the printer to where it from direct sunlight. ❒ Do not touch the print cartridge's photo conductor. 16 BSP024S Consult a doctor if ...
Hardware Guide
Page 21
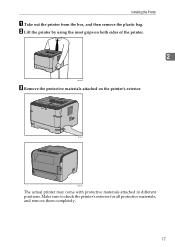
BXG011 BXG012 The actual printer may come with protective materials attached in different positions. Make sure to check the printer's exterior for all protective materials, and remove them completely. 17 B Lift the printer by using the inset grips on both sides of the printer. 2 BXG010 C Remove the protective materials attached on the printer's exterior. Installing the Printer A Take out the printer from the box, and then remove the plastic bag.
BXG011 BXG012 The actual printer may come with protective materials attached in different positions. Make sure to check the printer's exterior for all protective materials, and remove them completely. 17 B Lift the printer by using the inset grips on both sides of the printer. 2 BXG010 C Remove the protective materials attached on the printer's exterior. Installing the Printer A Take out the printer from the box, and then remove the plastic bag.
Hardware Guide
Page 22
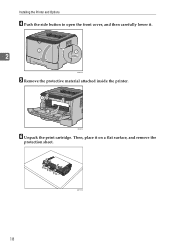
Installing the Printer and Options D Push the side button to open the front cover, and then carefully lower it on a flat surface, and remove the protection sheet. Then, place it . 2 BXG013 E Remove the protective material attached inside the printer. BSP037S 18 BXG014 F Unpack the print cartridge.
Installing the Printer and Options D Push the side button to open the front cover, and then carefully lower it on a flat surface, and remove the protection sheet. Then, place it . 2 BXG013 E Remove the protective material attached inside the printer. BSP037S 18 BXG014 F Unpack the print cartridge.
Hardware Guide
Page 23
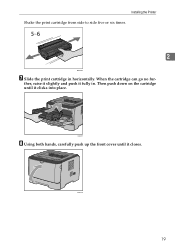
BXG018 19 BXG017 H Using both hands, carefully push up the front cover until it clicks into place. Then push down on the cartridge until it fully in horizontally. Installing the Printer Shake the print cartridge from side to side five or six times. 2 BSP038S G Slide the print cartridge in . When the cartridge can go no fur- ther, raise it slightly and push it closes.
BXG018 19 BXG017 H Using both hands, carefully push up the front cover until it clicks into place. Then push down on the cartridge until it fully in horizontally. Installing the Printer Shake the print cartridge from side to side five or six times. 2 BSP038S G Slide the print cartridge in . When the cartridge can go no fur- ther, raise it slightly and push it closes.
Hardware Guide
Page 24
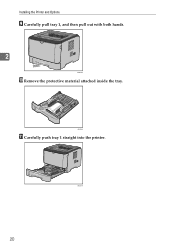
Installing the Printer and Options I Carefully pull tray 1, and then pull out with both hands. 2 BXG204 J Remove the protective material attached inside the tray. BXG210 20 BXG205 K Carefully push tray 1 straight into the printer.
Installing the Printer and Options I Carefully pull tray 1, and then pull out with both hands. 2 BXG204 J Remove the protective material attached inside the tray. BXG210 20 BXG205 K Carefully push tray 1 straight into the printer.
Hardware Guide
Page 25
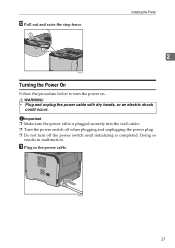
BXG020 21 R WARNING: • Plug and unplug the power cable with dry hands, or an electric shock could occur. Doing so results in the power cable. L Pull out and raise the stop fence. Important ❒ Make sure the power cable is completed. A Plug in malfunction. Installing the Printer 2 BXG019 Turning the Power On Follow the procedure below to turn off the power switch until initializing is plugged securely into the wall outlet. ❒ Turn the power switch off when plugging and unplugging the power plug. ❒ Do not turn the power on.
BXG020 21 R WARNING: • Plug and unplug the power cable with dry hands, or an electric shock could occur. Doing so results in the power cable. L Pull out and raise the stop fence. Important ❒ Make sure the power cable is completed. A Plug in malfunction. Installing the Printer 2 BXG019 Turning the Power On Follow the procedure below to turn off the power switch until initializing is plugged securely into the wall outlet. ❒ Turn the power switch off when plugging and unplugging the power plug. ❒ Do not turn the power on.
Hardware Guide
Page 26
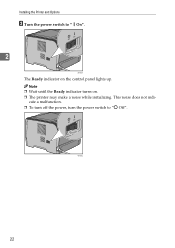
This noise does not indi- Installing the Printer and Options B Turn the power switch to "b Off". BXG022 22 cate a malfunction. ❒ To turn off the power, turn the power switch to "aOn". 2 BXG020 The Ready indicator on . ❒ The printer may make a noise while initializing. Note ❒ Wait until the Ready indicator turns on the control panel lights up.
This noise does not indi- Installing the Printer and Options B Turn the power switch to "b Off". BXG022 22 cate a malfunction. ❒ To turn off the power, turn the power switch to "aOn". 2 BXG020 The Ready indicator on . ❒ The printer may make a noise while initializing. Note ❒ Wait until the Ready indicator turns on the control panel lights up.


