Hardware Guide
Page 29
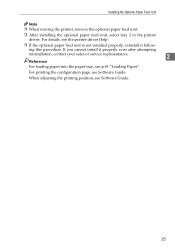
For details, see the printer driver Help. ❒ If the optional paper feed unit is not installed properly, reinstall it properly even after attempting reinstallation, contact your sales or service representative. 2 ..., see Software Guide. 25 When adjusting the printing position, see Software Guide. Installing the Optional Paper Feed Unit Note ❒ When moving the printer, remove the optional paper feed unit. ❒ After installing the optional paper feed unit, select tray 2 in the printer driver. If you cannot install it follow- ing this procedure.
For details, see the printer driver Help. ❒ If the optional paper feed unit is not installed properly, reinstall it properly even after attempting reinstallation, contact your sales or service representative. 2 ..., see Software Guide. 25 When adjusting the printing position, see Software Guide. Installing the Optional Paper Feed Unit Note ❒ When moving the printer, remove the optional paper feed unit. ❒ After installing the optional paper feed unit, select tray 2 in the printer driver. If you cannot install it follow- ing this procedure.
Hardware Guide
Page 31
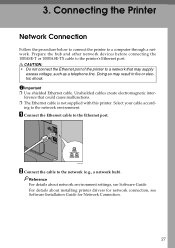
...27 Unshielded cables create electromagnetic interference that may result in fire or electric shock. BXG026 B Connect the cable to the printer's Ethernet port. Select your cable according to the Ethernet port. Doing so may supply excess voltage, such as a ...printer to a network that could cause malfunctions. ❒ The Ethernet cable is not supplied with this printer. 3. Important ❒ Use shielded Ethernet cable. R CAUTION: • Do not connect the Ethernet port of the printer to a computer through a network. Reference For details about installing printer drivers...
...27 Unshielded cables create electromagnetic interference that may result in fire or electric shock. BXG026 B Connect the cable to the printer's Ethernet port. Select your cable according to the Ethernet port. Doing so may supply excess voltage, such as a ...printer to a network that could cause malfunctions. ❒ The Ethernet cable is not supplied with this printer. 3. Important ❒ Use shielded Ethernet cable. R CAUTION: • Do not connect the Ethernet port of the printer to a computer through a network. Reference For details about installing printer drivers...
Hardware Guide
Page 33
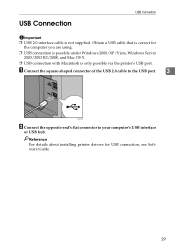
Reference For details about installing printer drivers for the computer you are using. ❒ USB connection is possible under Windows 2000/XP/Vista, Windows Server 2003/2003 R2/2008, and Mac OS X. ❒ USB connection with Macintosh is only possible via the printer's USB port. A Connect the square-shaped connector of the USB 2.0 cable...
Reference For details about installing printer drivers for the computer you are using. ❒ USB connection is possible under Windows 2000/XP/Vista, Windows Server 2003/2003 R2/2008, and Mac OS X. ❒ USB connection with Macintosh is only possible via the printer's USB port. A Connect the square-shaped connector of the USB 2.0 cable...
Hardware Guide
Page 38
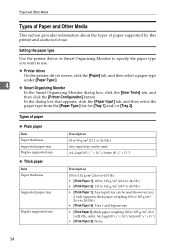
... 26.6 to 26.5 lb.) Any input tray can be used. Types of paper supported by this printer and cautions for [Tray 1] and/or [Tray 2]. Setting the paper type Use the printer driver or Smart Organizing Monitor to specify the paper type you want to use . In the dialog box that... appears, click the [Paper Input] tab, and then select the paper type from the [Paper Type:] list for use . ❖ Printer driver On the printer driver screen, click the [Paper] tab, and then select a paper type under [Paper Type:]. 4 ❖ Smart Organizing Monitor In the Smart Organizing ...
... 26.6 to 26.5 lb.) Any input tray can be used. Types of paper supported by this printer and cautions for [Tray 1] and/or [Tray 2]. Setting the paper type Use the printer driver or Smart Organizing Monitor to specify the paper type you want to use . In the dialog box that... appears, click the [Paper Input] tab, and then select the paper type from the [Paper Type:] list for use . ❖ Printer driver On the printer driver screen, click the [Paper] tab, and then select a paper type under [Paper Type:]. 4 ❖ Smart Organizing Monitor In the Smart Organizing ...
Hardware Guide
Page 42
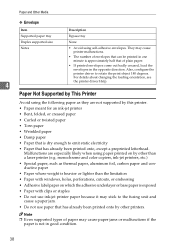
...lighter than the limitation • Paper with clips or staples • Do not use ink-jet printer paper because it may stick to rotate the print object 180 degrees. Also, configure the printer driver to the fusing unit and cause a paper jam. • Do not use paper that of envelopes... that can be printed in one minute is exposed • Paper with windows, holes, perforations, cutouts, or embossing • Adhesive label paper on by this printer. • Paper ...
...lighter than the limitation • Paper with clips or staples • Do not use ink-jet printer paper because it may stick to rotate the print object 180 degrees. Also, configure the printer driver to the fusing unit and cause a paper jam. • Do not use paper that of envelopes... that can be printed in one minute is exposed • Paper with windows, holes, perforations, cutouts, or embossing • Adhesive label paper on by this printer. • Paper ...
Hardware Guide
Page 43
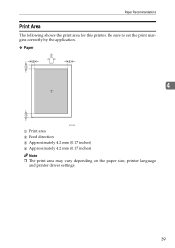
Be sure to set the print margins correctly by the application. ❖ Paper 4 BSP056S A Print area B Feed direction C Approximately 4.2 mm (0.17 inches) D Approximately 4.2 mm (0.17 inches) Note ❒ The print area may vary depending on the paper size, printer language and printer driver settings. 39 Paper Recommendations Print Area The following shows the print area for this printer.
Be sure to set the print margins correctly by the application. ❖ Paper 4 BSP056S A Print area B Feed direction C Approximately 4.2 mm (0.17 inches) D Approximately 4.2 mm (0.17 inches) Note ❒ The print area may vary depending on the paper size, printer language and printer driver settings. 39 Paper Recommendations Print Area The following shows the print area for this printer.
Hardware Guide
Page 44
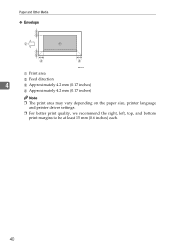
Paper and Other Media ❖ Envelope BSP057S A Print area B Feed direction 4 C Approximately 4.2 mm (0.17 inches) D Approximately 4.2 mm (0.17 inches) Note ❒ The print area may vary depending on the paper size, printer language and printer driver settings. ❒ For better print quality, we recommend the right, left, top, and bottom print margins to be at least 15 mm (0.6 inches) each. 40
Paper and Other Media ❖ Envelope BSP057S A Print area B Feed direction 4 C Approximately 4.2 mm (0.17 inches) D Approximately 4.2 mm (0.17 inches) Note ❒ The print area may vary depending on the paper size, printer language and printer driver settings. ❒ For better print quality, we recommend the right, left, top, and bottom print margins to be at least 15 mm (0.6 inches) each. 40
Hardware Guide
Page 57
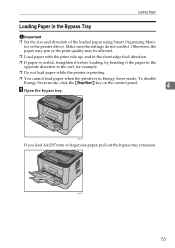
... in the Bypass Tray Important ❒ Set the size and direction of the loaded paper using Smart Organizing Monitor or the printer driver. Loading Paper Loading Paper in Energy Saver mode. A Open the bypass tray. 4 BXG050 If you load A4 (297 mm) or larger size paper, pull out ...
... in the Bypass Tray Important ❒ Set the size and direction of the loaded paper using Smart Organizing Monitor or the printer driver. Loading Paper Loading Paper in Energy Saver mode. A Open the bypass tray. 4 BXG050 If you load A4 (297 mm) or larger size paper, pull out ...

Hardware Guide
Page 58
For details about supported types of paper, see Software Guide. 54 BXG052 4 C Adjust the side guides to the paper width. Reference For details about specifying the paper type and size, see p.31 "Supported Paper for Each Tray". BXG053 Note ❒ After loading paper in until it stops against the printer. Paper and Other Media B Slide the side guides outward, then load paper with the print side up, and push in the tray, specify the paper type and size using Smart Organizing Monitor or the printer driver.
For details about supported types of paper, see Software Guide. 54 BXG052 4 C Adjust the side guides to the paper width. Reference For details about specifying the paper type and size, see p.31 "Supported Paper for Each Tray". BXG053 Note ❒ After loading paper in until it stops against the printer. Paper and Other Media B Slide the side guides outward, then load paper with the print side up, and push in the tray, specify the paper type and size using Smart Organizing Monitor or the printer driver.

Hardware Guide
Page 61
... badly creased, load the envelopes in the tray, specify the paper type and size using the printer driver before printing. posite direction, and then rotate the print object by 180 degrees using Smart Organizing Monitor or the printer driver. ❒ Be sure to their flaps are on both sides. E Lower the green levers on...
... badly creased, load the envelopes in the tray, specify the paper type and size using the printer driver before printing. posite direction, and then rotate the print object by 180 degrees using Smart Organizing Monitor or the printer driver. ❒ Be sure to their flaps are on both sides. E Lower the green levers on...
Hardware Guide
Page 75
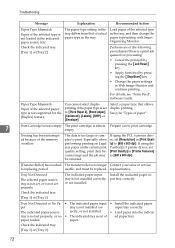
...out the indicated unit, and then remove any misfed paper. There is not loaded in the tray, and then change the paper size setting with printer driver. 71 See Software Guide. See p.85 "Removing Jammed Paper from that of the selected type in the indicated paper source tray. Check the ... that of the selected size in the tray. Load paper of actual paper size in the tray, and then change the paper type setting with printer driver. For details, see "Form Feed", Software Guide. Load paper of the selected type is a misfeed in Web Image Monitor and continue printing. Paper...
...out the indicated unit, and then remove any misfed paper. There is not loaded in the tray, and then change the paper size setting with printer driver. 71 See Software Guide. See p.85 "Removing Jammed Paper from that of the selected type in the indicated paper source tray. Check the ... that of the selected size in the tray. Load paper of actual paper size in the tray, and then change the paper type setting with printer driver. For details, see "Form Feed", Software Guide. Load paper of the selected type is a misfeed in Web Image Monitor and continue printing. Paper...
Hardware Guide
Page 76
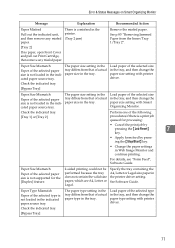
...installed. paper. Perform one of the selected type is not loaded in the indicated paper source tray. If using the PostScript 3 printer driver, set to print. Check the indicated tray. [Tray 1] or [Tray 2] 72 Troubleshooting Message Explanation Recommended Action Paper Type Mismatch ... or [Envelope]. The data is set [Print Quality] in the tray differs from that allows duplex printing. If using the PCL 6 printer driver, set properly. The indicated paper source rectly, or not installed. • Load paper into the indicat- Especially when performing printing on ...
...installed. paper. Perform one of the selected type is not loaded in the indicated paper source tray. If using the PostScript 3 printer driver, set to print. Check the indicated tray. [Tray 1] or [Tray 2] 72 Troubleshooting Message Explanation Recommended Action Paper Type Mismatch ... or [Envelope]. The data is set [Print Quality] in the tray differs from that allows duplex printing. If using the PCL 6 printer driver, set properly. The indicated paper source rectly, or not installed. • Load paper into the indicat- Especially when performing printing on ...
Hardware Guide
Page 80
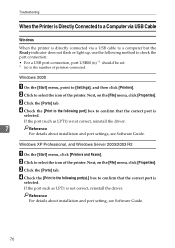
... *1 should be set. *1 (n) is the number of the printer. C Click the [Ports] tab. If the port (such as LPT1 is not correct, reinstall the driver. If the port such as LPT1) is not correct, reinstall the driver. 7 Reference For details about installation and port setting, see Software... Guide. Troubleshooting When the Printer is Directly Connected to a Computer via USB Cable Windows ...
... *1 should be set. *1 (n) is the number of the printer. C Click the [Ports] tab. If the port (such as LPT1 is not correct, reinstall the driver. If the port such as LPT1) is not correct, reinstall the driver. 7 Reference For details about installation and port setting, see Software... Guide. Troubleshooting When the Printer is Directly Connected to a Computer via USB Cable Windows ...

Hardware Guide
Page 81
...port such as LPT1 is not correct, reinstall the driver. If the port such as LPT1 is not correct, reinstall the driver. Windows Vista, and Windows Server 2008 A On the [Start] menu, click [Control Panel], and then click [Printer] in the "Hard- ware and Sound". Next, ...on the [File] menu, click [Properties]. 7 C Click the [Ports] tab. E Click the [Ports] tab. B Click [Printers and Other Hardware...
...port such as LPT1 is not correct, reinstall the driver. If the port such as LPT1 is not correct, reinstall the driver. Windows Vista, and Windows Server 2008 A On the [Start] menu, click [Control Panel], and then click [Printer] in the "Hard- ware and Sound". Next, ...on the [File] menu, click [Properties]. 7 C Click the [Ports] tab. E Click the [Ports] tab. B Click [Printers and Other Hardware...

Hardware Guide
Page 82
... the following procedures to check the port connection. • Use [About This Mac] to check the USB information. • Use the printer browser to check if the printer is not, reinstall the driver. 78 Using [About This Mac] A Click Apple Menu, and then select [About This Mac]. C Under [Contents], for [Hardware], select [USB...
... the following procedures to check the port connection. • Use [About This Mac] to check the USB information. • Use the printer browser to check if the printer is not, reinstall the driver. 78 Using [About This Mac] A Click Apple Menu, and then select [About This Mac]. C Under [Contents], for [Hardware], select [USB...
Hardware Guide
Page 83
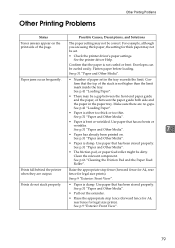
...tray. See p.31 "Paper and Other Media". 7 • Paper has already been printed on the print side of paper set . • Check the printer driver's paper settings. See p.31 "Paper and Other Media". • The friction pad, or paper feed roller might be a gap between the front end paper... setting may be dirty. Prints do not stack properly. • Paper is bent or wrinkled. See p.9 "Exterior: Front View". 79 See the printer driver Help. Raise the appropriate stop fence (forward fence for A4, rear fence for legal size prints). See p.66 "Cleaning the Friction Pad and the Paper...
...tray. See p.31 "Paper and Other Media". 7 • Paper has already been printed on the print side of paper set . • Check the printer driver's paper settings. See p.31 "Paper and Other Media". • The friction pad, or paper feed roller might be a gap between the front end paper... setting may be dirty. Prints do not stack properly. • Paper is bent or wrinkled. See p.9 "Exterior: Front View". 79 See the printer driver Help. Raise the appropriate stop fence (forward fence for A4, rear fence for legal size prints). See p.66 "Cleaning the Friction Pad and the Paper...
Hardware Guide
Page 85
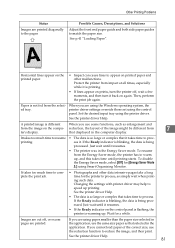
...p.41 "Loading Paper". If the Ready indicator is blinking, the data is being processed. Wait for [Energy Saver Mode 2:] using the printer driver. See the printer driver Help. 7 81 It takes too much time to complete the print job. • Photographs and other malfunctions. Just wait until it ...up, and this takes time until printing starts. printing. To disable the Energy Saver mode, select [Off] for a while. See the printer driver Help. • The data is so large or complex that it is warming up printing. A printed image is so large or complex that...
...p.41 "Loading Paper". If the Ready indicator is blinking, the data is being processed. Wait for [Energy Saver Mode 2:] using the printer driver. See the printer driver Help. 7 81 It takes too much time to complete the print job. • Photographs and other malfunctions. Just wait until it ...up, and this takes time until printing starts. printing. To disable the Energy Saver mode, select [Off] for a while. See the printer driver Help. • The data is so large or complex that it is warming up printing. A printed image is so large or complex that...
Hardware Guide
Page 86
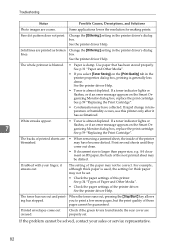
...lower the resolution for thick paper may have become dirtied. See the printer driver Help. White streaks appear. 7 • Toner is damp. See p.59 "Replacing the Print Cartridge". See the printer driver Help. See the printer driver Help. Solid lines are blemished. • When removing a jammed sheet.... The backs of printed sheets are printed as broken Change the [Dithering:] setting in the printer driver's dialog box. The toner has run out and print- See the printer driver Help. • Toner is larger than paper size, e.g. For example, although thick paper ...
...lower the resolution for thick paper may have become dirtied. See the printer driver Help. White streaks appear. 7 • Toner is damp. See p.59 "Replacing the Print Cartridge". See the printer driver Help. See the printer driver Help. Solid lines are blemished. • When removing a jammed sheet.... The backs of printed sheets are printed as broken Change the [Dithering:] setting in the printer driver's dialog box. The toner has run out and print- See the printer driver Help. • Toner is larger than paper size, e.g. For example, although thick paper ...


