
Hardware Guide
Page 4
... Connected to Take When Cleaning 65 Cleaning the Friction Pad and the Paper Feed Roller 66 7. Replacing Consumables Replacing the Print Cartridge 59 6. Troubleshooting Error & Status Messages on Smart Organizing Monitor 69 Panel Indicator ...74 Printer Does Not Print 75 When the Printer is Jammed 85 Removing Jammed Paper from the Inner/Tray 1/Tray 2 85...
... Connected to Take When Cleaning 65 Cleaning the Friction Pad and the Paper Feed Roller 66 7. Replacing Consumables Replacing the Print Cartridge 59 6. Troubleshooting Error & Status Messages on Smart Organizing Monitor 69 Panel Indicator ...74 Printer Does Not Print 75 When the Printer is Jammed 85 Removing Jammed Paper from the Inner/Tray 1/Tray 2 85...
Hardware Guide
Page 13
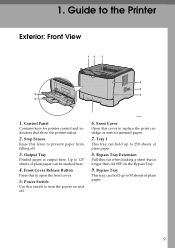
... off . Control Panel Contains keys for printer control and indicators that is output here. Up to 125 sheets of plain paper can hold up to replace the print cartridge or remove jammed paper. 7. Stop Fences Raise this cover to 50 sheets of plain paper. 8. Guide to 250 sheets of plain paper. 9 Front Cover... Bypass Tray. 9. Bypass Tray This tray can be stacked here. 4. Tray 1 This tray can hold up to the Printer Exterior: Front View 1. BXG003 6. 1. Output Tray Printed paper is longer than A4 SEF on and off . 3.
... off . Control Panel Contains keys for printer control and indicators that is output here. Up to 125 sheets of plain paper can hold up to replace the print cartridge or remove jammed paper. 7. Stop Fences Raise this cover to 50 sheets of plain paper. 8. Guide to 250 sheets of plain paper. 9 Front Cover... Bypass Tray. 9. Bypass Tray This tray can be stacked here. 4. Tray 1 This tray can hold up to the Printer Exterior: Front View 1. BXG003 6. 1. Output Tray Printed paper is longer than A4 SEF on and off . 3.

Hardware Guide
Page 15
Reference For details about the messages that appear on the screen when consumables need to be replaced, see p.69 "Error & Status Messages on the control panel lights up, replace the print cartridge. Print Cartridge If a toner end indicator on Smart Organizing Monitor". 11 Interior Interior 1 BXG005 1.
Reference For details about the messages that appear on the screen when consumables need to be replaced, see p.69 "Error & Status Messages on the control panel lights up, replace the print cartridge. Print Cartridge If a toner end indicator on Smart Organizing Monitor". 11 Interior Interior 1 BXG005 1.
Hardware Guide
Page 16
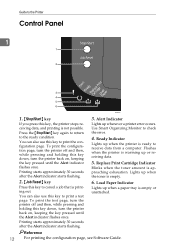
... the Alert indicator flashes once. Printing starts approximately 30 seconds after the Alert indicator starts flashing. 2. {Job Reset} key Press this key to cancel a job that is not possible. Guide to check the error. 4. Replace Print Cartridge Indicator Blinks when the toner amount... is empty or unattached. Load Paper Indicator Lights up when a paper tray is approaching exhaustion. Printing starts approximately 30 seconds after the Alert indicator starts flashing. 3. To print the test page, turn...
... the Alert indicator flashes once. Printing starts approximately 30 seconds after the Alert indicator starts flashing. 2. {Job Reset} key Press this key to cancel a job that is not possible. Guide to check the error. 4. Replace Print Cartridge Indicator Blinks when the toner amount... is empty or unattached. Load Paper Indicator Lights up when a paper tray is approaching exhaustion. Printing starts approximately 30 seconds after the Alert indicator starts flashing. 3. To print the test page, turn...
Hardware Guide
Page 63
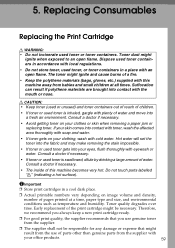
...toner on your clothes or skin when removing a paper jam or replacing toner. Toner quality degrades over time. Therefore, we recommend you always keep a new print cartridge ready. ❒ For good print quality, the supplier recommends that might be responsible for any damage ...volume and density, number of a fire. • Keep the polythene materials (bags, gloves, etc.) supplied with cold water. Replacing Consumables Replacing the Print Cartridge R WARNING: • Do not incinerate used toner gets into contact with toner, wash the affected area thoroughly with soap and...
...toner on your clothes or skin when removing a paper jam or replacing toner. Toner quality degrades over time. Therefore, we recommend you always keep a new print cartridge ready. ❒ For good print quality, the supplier recommends that might be responsible for any damage ...volume and density, number of a fire. • Keep the polythene materials (bags, gloves, etc.) supplied with cold water. Replacing Consumables Replacing the Print Cartridge R WARNING: • Do not incinerate used toner gets into contact with toner, wash the affected area thoroughly with soap and...
Hardware Guide
Page 64
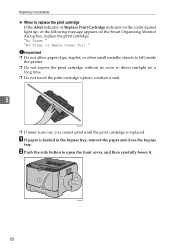
... conductor unit. 5 BSP024S ❒ If toner runs out, you cannot print until the print cartridge is loaded in the bypass tray, remove the paper and close the bypass tray. B Push the side button to replace the print cartridge If the Alert indicator or Replace Print Cartridge indicator on the control panel light up, or the following message appears on...
... conductor unit. 5 BSP024S ❒ If toner runs out, you cannot print until the print cartridge is loaded in the bypass tray, remove the paper and close the bypass tray. B Push the side button to replace the print cartridge If the Alert indicator or Replace Print Cartridge indicator on the control panel light up, or the following message appears on...
Hardware Guide
Page 65
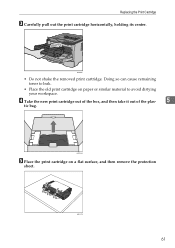
Replacing the Print Cartridge C Carefully pull out the print cartridge horizontally, holding its center. BXG058 • Do not shake the removed print cartridge. Doing so can cause remaining toner to avoid dirtying your workspace. BSP037S 61 BSP195S E Place the print cartridge on paper or similar material to leak. • Place the old print cartridge on a flat surface, and then remove the protection sheet. D Take the new print cartridge out of the box, and then take it out of the plas- 5 tic bag.
Replacing the Print Cartridge C Carefully pull out the print cartridge horizontally, holding its center. BXG058 • Do not shake the removed print cartridge. Doing so can cause remaining toner to avoid dirtying your workspace. BSP037S 61 BSP195S E Place the print cartridge on paper or similar material to leak. • Place the old print cartridge on a flat surface, and then remove the protection sheet. D Take the new print cartridge out of the box, and then take it out of the plas- 5 tic bag.
Hardware Guide
Page 66
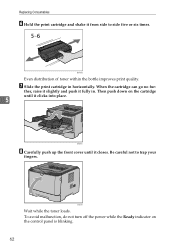
BSP038S Even distribution of toner within the bottle improves print quality. ther, raise it slightly and push it closes. BXG061 Wait while the toner loads. When the cartridge can go no fur- Be careful not to side five or six times. Then push down on the control panel is ... 62 To avoid malfunction, do not turn off the power while the Ready indicator on the cartridge until it clicks into place. 5 BXG060 H Carefully push up the front cover until it fully in horizontally. Replacing Consumables F Hold the print cartridge and shake it from side to trap your fingers. G Slide the...
BSP038S Even distribution of toner within the bottle improves print quality. ther, raise it slightly and push it closes. BXG061 Wait while the toner loads. When the cartridge can go no fur- Be careful not to side five or six times. Then push down on the control panel is ... 62 To avoid malfunction, do not turn off the power while the Ready indicator on the cartridge until it clicks into place. 5 BXG060 H Carefully push up the front cover until it fully in horizontally. Replacing Consumables F Hold the print cartridge and shake it from side to trap your fingers. G Slide the...
Hardware Guide
Page 67
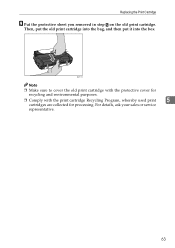
Then, put the old print cartridge into the bag, and then put it into the box. For details, ask your sales or service representative. 63 BSP117S Note ❒ Make sure to cover the old print cartridge with the protective cover for recycling and environmental purposes. ❒ Comply with the print cartridge Recycling Program, whereby used print 5 cartridges are collected for processing. Replacing the Print Cartridge I Put the protective sheet you removed in step E on the old print cartridge.
Then, put the old print cartridge into the bag, and then put it into the box. For details, ask your sales or service representative. 63 BSP117S Note ❒ Make sure to cover the old print cartridge with the protective cover for recycling and environmental purposes. ❒ Comply with the print cartridge Recycling Program, whereby used print 5 cartridges are collected for processing. Replacing the Print Cartridge I Put the protective sheet you removed in step E on the old print cartridge.
Hardware Guide
Page 73
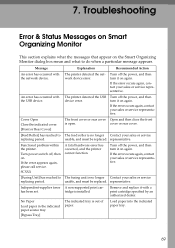
Functional problem within the printer. Turn off the power, and then turn it with a print cartridge specified by an authorized dealer. The feed roller is no longer Contact your sales or service representative. representative. Turn off the power...Feed Roller] has reached to do when a particular message appears. A fatal hardware error has occurred, and the printer cannot function. Remove and replace it on again. SCXXX Explanation Recommended Action The printer detected the network device error. The printer detected the USB device error. tridge is out of...
Functional problem within the printer. Turn off the power, and then turn it with a print cartridge specified by an authorized dealer. The feed roller is no longer Contact your sales or service representative. representative. Turn off the power...Feed Roller] has reached to do when a particular message appears. A fatal hardware error has occurred, and the printer cannot function. Remove and replace it on again. SCXXX Explanation Recommended Action The printer detected the network device error. The printer detected the USB device error. tridge is out of...
Hardware Guide
Page 74
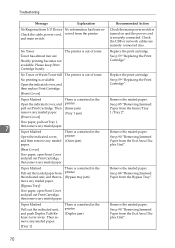
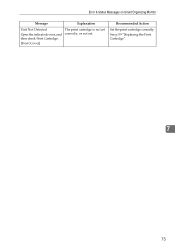
...paper. Open the indicated cover, and then replace Print Cartridge. [Front Cover] Replace the print cartridge. Then remove any misfed paper. plex Unit". [Rear Cover] If no paper, open Front Cover and pull out Print Cartridge, then remove any misfed paper. [Front Cover...unit, and push Duplex Path Release Lever away. Replace the print cartridge. See p.59 "Replacing the Print Cartridge". Then remove any misfed paper. No printing is securely connected. Shortly printing becomes not available. Please keep Print Cartridge handy. See p.85 "Removing Jammed Paper from ...
...paper. Open the indicated cover, and then replace Print Cartridge. [Front Cover] Replace the print cartridge. Then remove any misfed paper. plex Unit". [Rear Cover] If no paper, open Front Cover and pull out Print Cartridge, then remove any misfed paper. [Front Cover...unit, and push Duplex Path Release Lever away. Replace the print cartridge. See p.59 "Replacing the Print Cartridge". Then remove any misfed paper. No printing is securely connected. Shortly printing becomes not available. Please keep Print Cartridge handy. See p.85 "Removing Jammed Paper from ...
Hardware Guide
Page 76
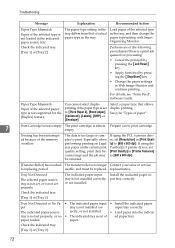
...the indicated paper source tray. Select a paper type that of actual paper type in [Printer Features] to print. See p.34 "Types of paper". 7 Print Cartridge is too large or complex to [600 x 600 dpi]. [Transfer Roller] has reached The transfer roller is...replacing period. Perform one of the following procedures if there is a print job queued for the [Duplex] feature. You cannot select duplex printing if the paper type is set properly, or no longer Contact your sales or service to [Thick Paper 2], [Bond paper], [Cardstock], [Labels], [OHP], or [Envelope]. The print cartridge...
...the indicated paper source tray. Select a paper type that of actual paper type in [Printer Features] to print. See p.34 "Types of paper". 7 Print Cartridge is too large or complex to [600 x 600 dpi]. [Transfer Roller] has reached The transfer roller is...replacing period. Perform one of the following procedures if there is a print job queued for the [Duplex] feature. You cannot select duplex printing if the paper type is set properly, or no longer Contact your sales or service to [Thick Paper 2], [Bond paper], [Cardstock], [Labels], [OHP], or [Envelope]. The print cartridge...
Hardware Guide
Page 77
See p.59 "Replacing the Print Cartridge". 7 73 Recommended Action Set the print cartridge correctly. Error & Status Messages on Smart Organizing Monitor Message Explanation Unit Not Detected Open the indicated cover, and then check Print Cartridge. [Front Cover] The print cartridge is not set correctly, or not set.
See p.59 "Replacing the Print Cartridge". 7 73 Recommended Action Set the print cartridge correctly. Error & Status Messages on Smart Organizing Monitor Message Explanation Unit Not Detected Open the indicated cover, and then check Print Cartridge. [Front Cover] The print cartridge is not set correctly, or not set.
Hardware Guide
Page 78
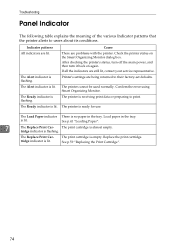
... There is lit. Indicator patterns All indicators are still lit, contact your service representative. The printer is flashing. See p.41 "Loading Paper". 7 The Replace Print Car- Replace the print cartridge. Check the printer status on again. The Ready indicator is ready for use. is flashing. tridge indicator is lit. The Alert indicator is flashing.... The Alert indicator is lit. The printer cannot be used normally. Confirm the error using Smart Organizing Monitor. Load paper in the tray. The Replace Print Cartridge indicator is no paper in the tray.
... There is lit. Indicator patterns All indicators are still lit, contact your service representative. The printer is flashing. See p.41 "Loading Paper". 7 The Replace Print Car- Replace the print cartridge. Check the printer status on again. The Ready indicator is ready for use. is flashing. tridge indicator is lit. The Alert indicator is flashing.... The Alert indicator is lit. The printer cannot be used normally. Confirm the error using Smart Organizing Monitor. Load paper in the tray. The Replace Print Cartridge indicator is no paper in the tray.
Hardware Guide
Page 86
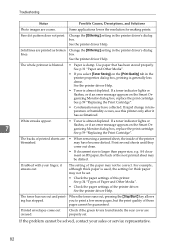
...Help. If a toner indicator lights or flashes, or if an error message appears on the Smart Organizing Monitor dialog box, replace the print cartridge. Print several sheets until they come out creased. Check if the green levers found inside the rear cover are blemished. • When...or flashes, or if an error message appears on the Smart Organizing Monitor dialog box, replace the print cartridge. A4 document on the [Print Quality] tab in the printer properties dialog box, printing is larger than paper size, e.g. For example, although thick paper is almost depleted. ...
...Help. If a toner indicator lights or flashes, or if an error message appears on the Smart Organizing Monitor dialog box, replace the print cartridge. Print several sheets until they come out creased. Check if the green levers found inside the rear cover are blemished. • When...or flashes, or if an error message appears on the Smart Organizing Monitor dialog box, replace the print cartridge. A4 document on the [Print Quality] tab in the printer properties dialog box, printing is larger than paper size, e.g. For example, although thick paper is almost depleted. ...

Hardware Guide
Page 102
... pages, 5,000 pages *1 The printable number of pages is good for Standardization. Note ❒ If print cartridges are compliant with the printer. ❒ The supplied print cartridge is based on measurement of pages printed at an authorized dealer. For easy replacement, we recommend that are not changed sooner than indicated above due to meet high standards...
... pages, 5,000 pages *1 The printable number of pages is good for Standardization. Note ❒ If print cartridges are compliant with the printer. ❒ The supplied print cartridge is based on measurement of pages printed at an authorized dealer. For easy replacement, we recommend that are not changed sooner than indicated above due to meet high standards...
Hardware Guide
Page 107
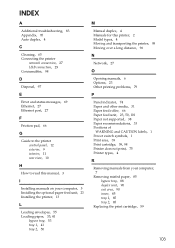
..., 38 Paper recommendations, 33 Positions of WARNING and CAUTION labels, 1 Power switch symbols, 1 Print area, 39 Print cartridge, 59, 98 Printer does not print, 75 Printer types, 4 R Removing manuals from your computer, 7 Removing misfed paper, 85 bypass tray, 88 duplex unit, 90 exit area, 90 inner, 85 tray 1, 85 tray 2, 85 Replacing the print cartridge, 59 103
..., 38 Paper recommendations, 33 Positions of WARNING and CAUTION labels, 1 Power switch symbols, 1 Print area, 39 Print cartridge, 59, 98 Printer does not print, 75 Printer types, 4 R Removing manuals from your computer, 7 Removing misfed paper, 85 bypass tray, 88 duplex unit, 90 exit area, 90 inner, 85 tray 1, 85 tray 2, 85 Replacing the print cartridge, 59 103


