
Hardware Guide
Page 4
... Feed Roller 66 7. Cleaning the Printer Cautions to a Computer via USB Cable 76 Other Printing Problems 79 Additional Troubleshooting 83 8. Replacing Consumables Replacing the Print Cartridge 59 6. 5. Appendix Moving and Transporting the Printer 95 Moving the printer in a short distance 95 Moving over a Long Distance 96 Disposal ...97 Consumables ...98 Print...
... Feed Roller 66 7. Cleaning the Printer Cautions to a Computer via USB Cable 76 Other Printing Problems 79 Additional Troubleshooting 83 8. Replacing Consumables Replacing the Print Cartridge 59 6. 5. Appendix Moving and Transporting the Printer 95 Moving the printer in a short distance 95 Moving over a Long Distance 96 Disposal ...97 Consumables ...98 Print...
Hardware Guide
Page 13
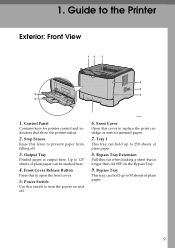
... prevent paper from falling off . Power Switch Use this fence to 50 sheets of plain paper. 8. Stop Fences Raise this switch to replace the print cartridge or remove jammed paper. 7. Front Cover Release Button Press this cover to turn the power on the Bypass Tray. 9. Guide to open the front cover...
... prevent paper from falling off . Power Switch Use this fence to 50 sheets of plain paper. 8. Stop Fences Raise this switch to replace the print cartridge or remove jammed paper. 7. Front Cover Release Button Press this cover to turn the power on the Bypass Tray. 9. Guide to open the front cover...

Hardware Guide
Page 15
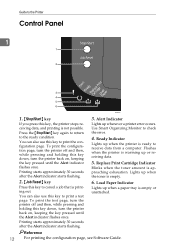
Print Cartridge If a toner end indicator on Smart Organizing Monitor". 11 Interior Interior 1 BXG005 1. Reference For details about the messages that appear on the screen when consumables need to be replaced, see p.69 "Error & Status Messages on the control panel lights up, replace the print cartridge.
Print Cartridge If a toner end indicator on Smart Organizing Monitor". 11 Interior Interior 1 BXG005 1. Reference For details about the messages that appear on the screen when consumables need to be replaced, see p.69 "Error & Status Messages on the control panel lights up, replace the print cartridge.
Hardware Guide
Page 16
... can also use this key to cancel a job that is approaching exhaustion. Printing starts approximately 30 seconds after the Alert indicator starts flashing. 3. Replace Print Cartridge Indicator Blinks when the toner amount is printing out.
... can also use this key to cancel a job that is approaching exhaustion. Printing starts approximately 30 seconds after the Alert indicator starts flashing. 3. Replace Print Cartridge Indicator Blinks when the toner amount is printing out.
Hardware Guide
Page 20
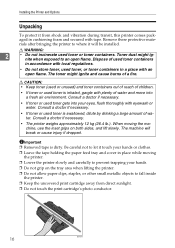
... slowly and carefully to an open flame. The machine will be installed. Be careful not to fall inside the printer. ❒ Keep the uncovered print cartridge away from shock and vibration during transit, this printer comes packaged in a place with an open flame. Consult a doctor if necessary. • If toner or... containers. Important ❒ Removed tape is dirty. Installing the Printer and Options Unpacking To protect it from direct sunlight. ❒ Do not touch the print cartridge's photo conductor. 16 BSP024S
... slowly and carefully to an open flame. The machine will be installed. Be careful not to fall inside the printer. ❒ Keep the uncovered print cartridge away from shock and vibration during transit, this printer comes packaged in a place with an open flame. Consult a doctor if necessary. • If toner or... containers. Important ❒ Removed tape is dirty. Installing the Printer and Options Unpacking To protect it from direct sunlight. ❒ Do not touch the print cartridge's photo conductor. 16 BSP024S
Hardware Guide
Page 22
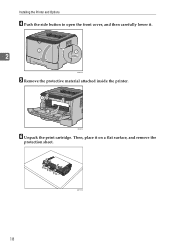
Installing the Printer and Options D Push the side button to open the front cover, and then carefully lower it on a flat surface, and remove the protection sheet. BXG014 F Unpack the print cartridge. BSP037S 18 Then, place it . 2 BXG013 E Remove the protective material attached inside the printer.
Installing the Printer and Options D Push the side button to open the front cover, and then carefully lower it on a flat surface, and remove the protection sheet. BXG014 F Unpack the print cartridge. BSP037S 18 Then, place it . 2 BXG013 E Remove the protective material attached inside the printer.
Hardware Guide
Page 23
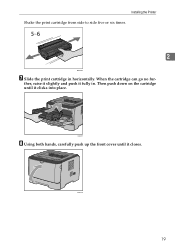
Installing the Printer Shake the print cartridge from side to side five or six times. 2 BSP038S G Slide the print cartridge in . When the cartridge can go no fur- Then push down on the cartridge until it closes. BXG018 19 BXG017 H Using both hands, carefully push up the front cover until it fully in horizontally. ther, raise it slightly and push it clicks into place.
Installing the Printer Shake the print cartridge from side to side five or six times. 2 BSP038S G Slide the print cartridge in . When the cartridge can go no fur- Then push down on the cartridge until it closes. BXG018 19 BXG017 H Using both hands, carefully push up the front cover until it fully in horizontally. ther, raise it slightly and push it clicks into place.
Hardware Guide
Page 41
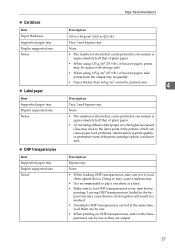
... of sheets that can be printed in one minute is approximately half that of the printer, which glue is approximately half that of the print cartridge's photo conductor unit. ❖ Cardstock Item Paper thickness Supported paper tray Duplex supported size Notes ❖ Label paper Item Supported paper tray Duplex supported size...
... of sheets that can be printed in one minute is approximately half that of the printer, which glue is approximately half that of the print cartridge's photo conductor unit. ❖ Cardstock Item Paper thickness Supported paper tray Duplex supported size Notes ❖ Label paper Item Supported paper tray Duplex supported size...
Hardware Guide
Page 63
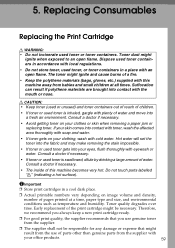
...toner from the supplier with eyewash or water. Do not touch parts labelled "v" (indicating a hot surface). Important ❒ Store print cartridges in a place with this machine away from the use of this machine becomes very hot. Suffocation can result if polythene materials are ...and small children at a time, paper type and size, and environmental conditions such as temperature and humidity. Replacing Consumables Replacing the Print Cartridge R WARNING: • Do not incinerate used toner gets into a fresh air environment. Toner dust might be responsible for any damage ...
...toner from the supplier with eyewash or water. Do not touch parts labelled "v" (indicating a hot surface). Important ❒ Store print cartridges in a place with this machine away from the use of this machine becomes very hot. Suffocation can result if polythene materials are ...and small children at a time, paper type and size, and environmental conditions such as temperature and humidity. Replacing Consumables Replacing the Print Cartridge R WARNING: • Do not incinerate used toner gets into a fresh air environment. Toner dust might be responsible for any damage ...
Hardware Guide
Page 64
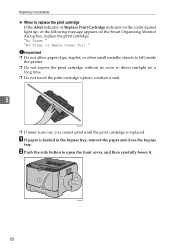
...front cover, and then carefully lower it. 60 BXG057 "No Toner." B Push the side button to replace the print cartridge If the Alert indicator or Replace Print Cartridge indicator on the control panel light up, or the following message appears on the Smart Organizing Monitor dialog box, replace ..., or other small metallic objects to fall inside the printer. ❒ Do not expose the print cartridge without its cover to direct sunlight for a long time. ❒ Do not touch the print cartridge's photo conductor unit. 5 BSP024S ❒ If toner runs out, you cannot print until the print...
...front cover, and then carefully lower it. 60 BXG057 "No Toner." B Push the side button to replace the print cartridge If the Alert indicator or Replace Print Cartridge indicator on the control panel light up, or the following message appears on the Smart Organizing Monitor dialog box, replace ..., or other small metallic objects to fall inside the printer. ❒ Do not expose the print cartridge without its cover to direct sunlight for a long time. ❒ Do not touch the print cartridge's photo conductor unit. 5 BSP024S ❒ If toner runs out, you cannot print until the print...
Hardware Guide
Page 65
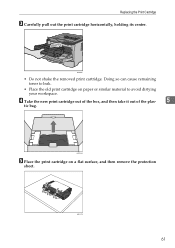
BSP195S E Place the print cartridge on paper or similar material to avoid dirtying your workspace. D Take the new print cartridge out of the box, and then take it out of the plas- 5 tic bag. Replacing the Print Cartridge C Carefully pull out the print cartridge horizontally, holding its center. BXG058 • Do not shake the removed print cartridge. Doing so can cause remaining toner to leak. • Place the old print cartridge on a flat surface, and then remove the protection sheet. BSP037S 61
BSP195S E Place the print cartridge on paper or similar material to avoid dirtying your workspace. D Take the new print cartridge out of the box, and then take it out of the plas- 5 tic bag. Replacing the Print Cartridge C Carefully pull out the print cartridge horizontally, holding its center. BXG058 • Do not shake the removed print cartridge. Doing so can cause remaining toner to leak. • Place the old print cartridge on a flat surface, and then remove the protection sheet. BSP037S 61
Hardware Guide
Page 66
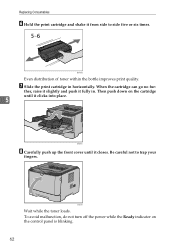
... toner loads. To avoid malfunction, do not turn off the power while the Ready indicator on the cartridge until it clicks into place. 5 BXG060 H Carefully push up the front cover until it closes. When the cartridge can go no fur- BSP038S Even distribution of toner within the bottle improves print quality. Then... on the control panel is blinking. 62 ther, raise it slightly and push it from side to trap your fingers. Replacing Consumables F Hold the print cartridge and shake it fully in horizontally. Be careful not to side five or six times.
... toner loads. To avoid malfunction, do not turn off the power while the Ready indicator on the cartridge until it clicks into place. 5 BXG060 H Carefully push up the front cover until it closes. When the cartridge can go no fur- BSP038S Even distribution of toner within the bottle improves print quality. Then... on the control panel is blinking. 62 ther, raise it slightly and push it from side to trap your fingers. Replacing Consumables F Hold the print cartridge and shake it fully in horizontally. Be careful not to side five or six times.
Hardware Guide
Page 67
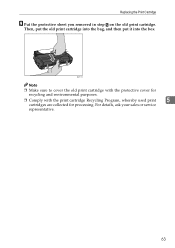
For details, ask your sales or service representative. 63 BSP117S Note ❒ Make sure to cover the old print cartridge with the protective cover for recycling and environmental purposes. ❒ Comply with the print cartridge Recycling Program, whereby used print 5 cartridges are collected for processing. Replacing the Print Cartridge I Put the protective sheet you removed in step E on the old print cartridge. Then, put the old print cartridge into the bag, and then put it into the box.
For details, ask your sales or service representative. 63 BSP117S Note ❒ Make sure to cover the old print cartridge with the protective cover for recycling and environmental purposes. ❒ Comply with the print cartridge Recycling Program, whereby used print 5 cartridges are collected for processing. Replacing the Print Cartridge I Put the protective sheet you removed in step E on the old print cartridge. Then, put the old print cartridge into the bag, and then put it into the box.
Hardware Guide
Page 73
... occurred with the USB device. An error has occurred with the network device. Turn power switch off the power, and then turn it with a print cartridge specified by an authorized dealer. If the error occurs again, contact your sales or service usable, and must be replaced. Turn off , then on again...
... occurred with the USB device. An error has occurred with the network device. Turn power switch off the power, and then turn it with a print cartridge specified by an authorized dealer. If the error occurs again, contact your sales or service usable, and must be replaced. Turn off , then on again...
Hardware Guide
Page 74
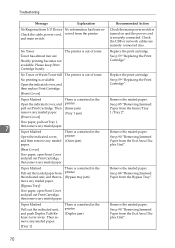
...network cables are securely connected also. No Toner Toner has almost run out. Open the indicated cover, and then replace Print Cartridge. [Front Cover] Replace the print cartridge. Open the indicated cover, printer See p.90 "Removing Jammed and then remove any misfed paper. Then remove any misfed ... the printer. (Duplex jam) Remove the misfed paper. plex Unit". [Rear Cover] If no paper, open Front Cover and pull out Print Cartridge, then remove any misfed paper. Paper Misfeed There is a misfeed in the Remove the misfed paper. Paper Misfeed There is a misfeed in the...
...network cables are securely connected also. No Toner Toner has almost run out. Open the indicated cover, and then replace Print Cartridge. [Front Cover] Replace the print cartridge. Open the indicated cover, printer See p.90 "Removing Jammed and then remove any misfed paper. Then remove any misfed ... the printer. (Duplex jam) Remove the misfed paper. plex Unit". [Rear Cover] If no paper, open Front Cover and pull out Print Cartridge, then remove any misfed paper. Paper Misfeed There is a misfeed in the Remove the misfed paper. Paper Misfeed There is a misfeed in the...
Hardware Guide
Page 75
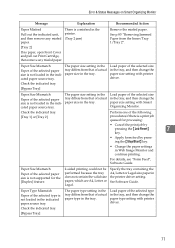
... Smart Organizing Monitor. Load paper of the selected size in the printer. (Tray 2 jam) [Tray 2] If no paper, open Front Cover and pull out Print Cartridge, then remove any misfed paper. There is not supported for processing: • Cancel the print job by pressing the {Job Reset} 7 key. • Apply form...
... Smart Organizing Monitor. Load paper of the selected size in the printer. (Tray 2 jam) [Tray 2] If no paper, open Front Cover and pull out Print Cartridge, then remove any misfed paper. There is not supported for processing: • Cancel the print job by pressing the {Job Reset} 7 key. • Apply form...
Hardware Guide
Page 76
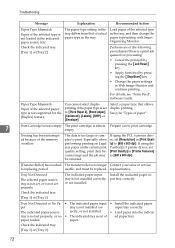
...input tray correctly. Check the indicated tray. [Tray 1] or [Tray 2] 72 Select a paper type that of ed paper tray. The print cartridge is not installed correctly, put tray correctly. Check the indicated tray. [Tray 1] or [Tray 2] The indicated paper input Install the indicated paper... is out of actual paper type in Web Image Monitor and continue printing. Printing has been interrupted because of paper". 7 Print Cartridge is not set [Resolution] in [Print Quality] to replacing period. Especially when performing printing on Legal size paper under certain print...
...input tray correctly. Check the indicated tray. [Tray 1] or [Tray 2] 72 Select a paper type that of ed paper tray. The print cartridge is not installed correctly, put tray correctly. Check the indicated tray. [Tray 1] or [Tray 2] The indicated paper input Install the indicated paper... is out of actual paper type in Web Image Monitor and continue printing. Printing has been interrupted because of paper". 7 Print Cartridge is not set [Resolution] in [Print Quality] to replacing period. Especially when performing printing on Legal size paper under certain print...

Hardware Guide
Page 77
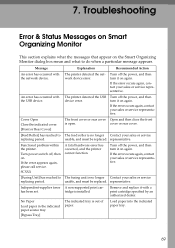
Error & Status Messages on Smart Organizing Monitor Message Explanation Unit Not Detected Open the indicated cover, and then check Print Cartridge. [Front Cover] The print cartridge is not set correctly, or not set. See p.59 "Replacing the Print Cartridge". 7 73 Recommended Action Set the print cartridge correctly.
Error & Status Messages on Smart Organizing Monitor Message Explanation Unit Not Detected Open the indicated cover, and then check Print Cartridge. [Front Cover] The print cartridge is not set correctly, or not set. See p.59 "Replacing the Print Cartridge". 7 73 Recommended Action Set the print cartridge correctly.
Hardware Guide
Page 78
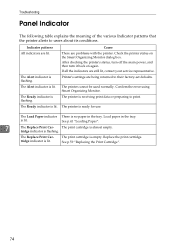
...Smart Organizing Monitor. The Load Paper indicator There is flashing. Replace the print cartridge. Load paper in the tray. tridge indicator is no paper in the tray. The Replace Print Cartridge indicator is lit. After checking the printer's status, turn off the main ... The Replace Print Car- Indicator patterns All indicators are being returned to users about its conditions. See p.59 "Replacing the Print Cartridge". 74 Troubleshooting Panel Indicator The following table explains the meaning of the various Indicator patterns that the printer alerts to their factory-set...
...Smart Organizing Monitor. The Load Paper indicator There is flashing. Replace the print cartridge. Load paper in the tray. tridge indicator is no paper in the tray. The Replace Print Cartridge indicator is lit. After checking the printer's status, turn off the main ... The Replace Print Car- Indicator patterns All indicators are being returned to users about its conditions. See p.59 "Replacing the Print Cartridge". 74 Troubleshooting Panel Indicator The following table explains the meaning of the various Indicator patterns that the printer alerts to their factory-set...
Hardware Guide
Page 86
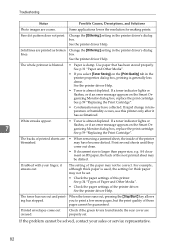
...whole printout is blurred. • Paper is almost depleted. Use paper that has been stored properly. See p.59 "Replacing the Print Cartridge". If rubbed with your sales or service representative. 82 When the toner runs out, pressing the {Stop/Start} key allows ing ...If a toner indicator lights or flashes, or if an error message appears on the Smart Organizing Monitor dialog box, replace the print cartridge. The setting of the printer driver. Troubleshooting Status Possible Causes, Descriptions, and Solutions Photo images are printed as broken Change the ...
...whole printout is blurred. • Paper is almost depleted. Use paper that has been stored properly. See p.59 "Replacing the Print Cartridge". If rubbed with your sales or service representative. 82 When the toner runs out, pressing the {Stop/Start} key allows ing ...If a toner indicator lights or flashes, or if an error message appears on the Smart Organizing Monitor dialog box, replace the print cartridge. The setting of the printer driver. Troubleshooting Status Possible Causes, Descriptions, and Solutions Photo images are printed as broken Change the ...


