
English Manual
Page 1
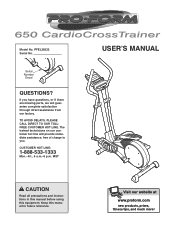
... this equipment. MST CAUTION Read all precautions and instructions in this manual before using this manual for future reference. TO AVOID DELAYS, PLEASE CALL DIRECT TO OUR TOLLFREE CUSTOMER HOT LINE. Serial Number Decal QUESTIONS? USER'S MANUAL Visit our website at www.proform.com new products, prizes, fitness tips, and much more! PFEL29222 Serial No. CUSTOMER HOT LINE: 1-888-533-1333 Mon...
... this equipment. MST CAUTION Read all precautions and instructions in this manual before using this manual for future reference. TO AVOID DELAYS, PLEASE CALL DIRECT TO OUR TOLLFREE CUSTOMER HOT LINE. Serial Number Decal QUESTIONS? USER'S MANUAL Visit our website at www.proform.com new products, prizes, fitness tips, and much more! PFEL29222 Serial No. CUSTOMER HOT LINE: 1-888-533-1333 Mon...
English Manual
Page 2
TABLE OF CONTENTS IMPORTANT PRECAUTIONS 3 BEFORE YOU BEGIN 4 ASSEMBLY 5 HOW TO USE THE ELLIPTICAL CROSSTRAINER 9 MAINTENANCE AND TROUBLESHOOTING 12 CONDITIONING GUIDELINES 13 PART LIST 14 EXPLODED DRAWING 15 HOW TO ORDER REPLACEMENT PARTS Back Cover LIMITED WARRANTY Back Cover PROFORM is a registered trademark of ICON IP, Inc. 2
TABLE OF CONTENTS IMPORTANT PRECAUTIONS 3 BEFORE YOU BEGIN 4 ASSEMBLY 5 HOW TO USE THE ELLIPTICAL CROSSTRAINER 9 MAINTENANCE AND TROUBLESHOOTING 12 CONDITIONING GUIDELINES 13 PART LIST 14 EXPLODED DRAWING 15 HOW TO ORDER REPLACEMENT PARTS Back Cover LIMITED WARRANTY Back Cover PROFORM is a registered trademark of ICON IP, Inc. 2
English Manual
Page 3
... worn parts immediately. 5. Replace any time while exercising, stop . 13. The pulse sensor is intended only as an exercise aid in determining heart rate trends in a commercial, rental, or institutional setting. The pulse sensor is not a medical device. If you stop exercising, allow the pedals to slowly come to ensure that all users of the elliptical crosstrainer are adequately informed of the owner to a stop immediately and begin cooling down. 12. ICON...
... worn parts immediately. 5. Replace any time while exercising, stop . 13. The pulse sensor is intended only as an exercise aid in determining heart rate trends in a commercial, rental, or institutional setting. The pulse sensor is not a medical device. If you stop exercising, allow the pedals to slowly come to ensure that all users of the elliptical crosstrainer are adequately informed of the owner to a stop immediately and begin cooling down. 12. ICON...

English Manual
Page 4
... product model number and serial number before using the elliptical crosstrainer. Water Bottle Holder* Bookrack Console Handgrip FRONT Handlebar Resistance Knob Console Pulse Sensor Pedal Pedal Spring LEFT SIDE BACK Pedal Disk *No water bottle is PFEL29222. Before reading further, please familiarize yourself with the parts that moves your feet in the drawing below. For your knees and ankles. And the unique PROFORM 650 features adjustable resistance and a simple-touse console to the elliptical crosstrainer...
... product model number and serial number before using the elliptical crosstrainer. Water Bottle Holder* Bookrack Console Handgrip FRONT Handlebar Resistance Knob Console Pulse Sensor Pedal Pedal Spring LEFT SIDE BACK Pedal Disk *No water bottle is PFEL29222. Before reading further, please familiarize yourself with the parts that moves your feet in the drawing below. For your knees and ankles. And the unique PROFORM 650 features adjustable resistance and a simple-touse console to the elliptical crosstrainer...
English Manual
Page 5
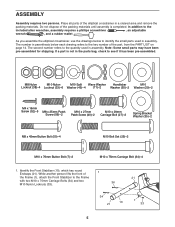
... assemble the elliptical crosstrainer, use the drawings below to identify the small parts used in the parts bag, check to the key number of the packing materials until assembly is not in assembly. The number in assembly. The second number refers to the quantity used in parenthesis below each drawing refers to see if it has been pre-assembled. Note: Some small parts may have been pre-assembled...
... assemble the elliptical crosstrainer, use the drawings below to identify the small parts used in the parts bag, check to the key number of the packing materials until assembly is not in assembly. The number in assembly. The second number refers to the quantity used in parenthesis below each drawing refers to see if it has been pre-assembled. Note: Some small parts may have been pre-assembled...
English Manual
Page 6
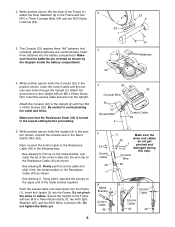
... the Upright (2) into the Frame (1). Console Wire 53 B C Control Cable Control Cable 43 43 Make sure that the Resistance Knob (42) is turned to the lowest setting before proceeding. 4 23 42 Console Wire 52 52 Ground Wire 2 Control Cable 52 5. While another person holds the Console (23) in the position shown, insert the control cable and the console wire down into the Frame. Do not tighten the Bolts yet. 6 5 33 Control Cable 43 1 A Metal Bracket Control Cable...
... the Upright (2) into the Frame (1). Console Wire 53 B C Control Cable Control Cable 43 43 Make sure that the Resistance Knob (42) is turned to the lowest setting before proceeding. 4 23 42 Console Wire 52 52 Ground Wire 2 Control Cable 52 5. While another person holds the Console (23) in the position shown, insert the control cable and the console wire down into the Frame. Do not tighten the Bolts yet. 6 5 33 Control Cable 43 1 A Metal Bracket Control Cable...

English Manual
Page 7
... an M10 x 29mm Pedal Bolt (27), an M10 Washer (29), an M10 Split Washer (45), and a Pedal Knob (28) as shown, and press the small tabs on the correct sides. Make sure that the Handlebar Leg is turned so the hexagonal holes are on the Handlebar Caps into the Upright (2) and center it. Attach the Left Pedal (13) to the...
... an M10 x 29mm Pedal Bolt (27), an M10 Washer (29), an M10 Split Washer (45), and a Pedal Knob (28) as shown, and press the small tabs on the correct sides. Make sure that the Handlebar Leg is turned so the hexagonal holes are on the Handlebar Caps into the Upright (2) and center it. Attach the Left Pedal (13) to the...

English Manual
Page 8
... Bolt Set (25). Tighten the M10 x 76mm Button Bolts (7) in the Handlebar Legs (5). 65 25 Grease 25 11 9. Make sure that the Spring Spacer is turned so the flat side is completed. To protect the floor or carpet from damage, place a mat under the elliptical crosstrainer. 8 Next, slide the Left Rear Spring Bracket (12) on the left Pedal Spring (11). See step 5. See step...
... Bolt Set (25). Tighten the M10 x 76mm Button Bolts (7) in the Handlebar Legs (5). 65 25 Grease 25 11 9. Make sure that the Spring Spacer is turned so the flat side is completed. To protect the floor or carpet from damage, place a mat under the elliptical crosstrainer. 8 Next, slide the Left Rear Spring Bracket (12) on the left Pedal Spring (11). See step 5. See step...
English Manual
Page 9
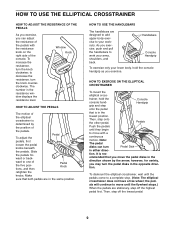
... flywheel stops.) When the pedals are designed to add upper-body exercise to work your lower body, hold the Console console hand- Handgrip grip and step onto the pedal that is rec- HOW TO USE THE ELLIPTICAL CROSSTRAINER HOW TO ADJUST THE RESISTANCE OF THE PEDALS As you exercise, you can turn Pedal Disk in either direc- To increase the resistance, turn the knob counterclockwise. The number in the same position. Pedal To adjust the pedals, first...
... flywheel stops.) When the pedals are designed to add upper-body exercise to work your lower body, hold the Console console hand- Handgrip grip and step onto the pedal that is rec- HOW TO USE THE ELLIPTICAL CROSSTRAINER HOW TO ADJUST THE RESISTANCE OF THE PEDALS As you exercise, you can turn Pedal Disk in either direc- To increase the resistance, turn the knob counterclockwise. The number in the same position. Pedal To adjust the pedals, first...
English Manual
Page 10
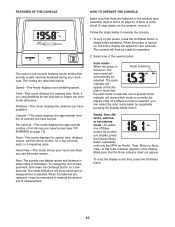
... turn on the console, remove it. Note: If a different mode is a thin sheet of measurement. To reset the display at any time, press the On/Reset button. 10 FEATURES OF THE CONSOLE The easy-to-use the pulse sensor. When the power is selected, and a second mode indicator will appear in either miles or kilometers. The scan indicator will show which mode is selected. Speed-This mode displays your workouts. Distance-This mode displays...
... turn on the console, remove it. Note: If a different mode is a thin sheet of measurement. To reset the display at any time, press the On/Reset button. 10 FEATURES OF THE CONSOLE The easy-to-use the pulse sensor. When the power is selected, and a second mode indicator will appear in either miles or kilometers. The scan indicator will show which mode is selected. Speed-This mode displays your workouts. Distance-This mode displays...
English Manual
Page 11
... your heart rate, stop pedaling and Pulse Sensor place your heart rate will appear, and then your thumb on the pulse sensor as shown. If the displayed heart rate appears to conserve the batteries. 11 WARNING: The pulse sensor is not displayed, lift your heart rate is not a medical device. Try the pulse sensor several times until you are not moved and the On/Reset button is intended only as an exercise aid in determining heart rate...
... your heart rate, stop pedaling and Pulse Sensor place your heart rate will appear, and then your thumb on the pulse sensor as shown. If the displayed heart rate appears to conserve the batteries. 11 WARNING: The pulse sensor is not displayed, lift your heart rate is not a medical device. Try the pulse sensor several times until you are not moved and the On/Reset button is intended only as an exercise aid in determining heart rate...
English Manual
Page 12
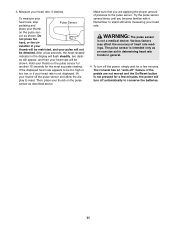
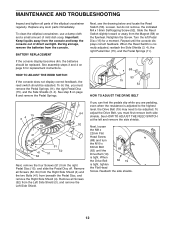
... Pedal Springs (11), the right Pedal Disc (15), and the Side Shields (3, 4). Turn the left and remove the side shields. MAINTENANCE AND TROUBLESHOOTING Inspect and tighten all parts of the elliptical crosstrainer regularly. See HOW TO ADJUST THE REED SWITCH at the left Pedal Disc (15) for replacement instructions. Replace any worn parts immediately. HOW TO ADJUST THE REED SWITCH If the console does not display correct feedback, the reed switch should be adjusted. Retighten the Screw...
... Pedal Springs (11), the right Pedal Disc (15), and the Side Shields (3, 4). Turn the left and remove the side shields. MAINTENANCE AND TROUBLESHOOTING Inspect and tighten all parts of the elliptical crosstrainer regularly. See HOW TO ADJUST THE REED SWITCH at the left Pedal Disc (15) for replacement instructions. Replace any worn parts immediately. HOW TO ADJUST THE REED SWITCH If the console does not display correct feedback, the reed switch should be adjusted. Retighten the Screw...
English Manual
Page 13
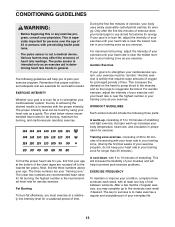
... your body temperature, heart rate, and circulation in your training zone as you exercise. This will help you must be found by using your goal is not a medical device. The pulse sensor is to use stored fat calories for aerobic exercise. The proper intensity level can be "aerobic." The lower two numbers are rounded off to five workouts each week, with pre-existing health problems...
... your body temperature, heart rate, and circulation in your training zone as you exercise. This will help you must be found by using your goal is not a medical device. The pulse sensor is to use stored fat calories for aerobic exercise. The proper intensity level can be "aerobic." The lower two numbers are rounded off to five workouts each week, with pre-existing health problems...
English Manual
Page 14
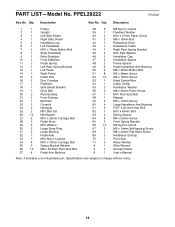
... 4 Pedal Arm Bushing 38 5 M8 Nylon Locknut 39 1 Flywheel Washer 40 2 M10 x 27mm Patch Screw 41 2 M6 x 18mm Bolt 42 1 Resistance Knob 43 1 Resistance Cable 44 1 Right Rear Spring Bracket 45 4 M10 Split Washer 46 2 Handlebar Cap 47 2 Handlebar Spacer 48 2 Frame Spacer 49 6 Small Handlebar Arm Bushing 50 4 M8 x 45mm Button Bolt 51 8 M6 x 28mm Screw 52 14 M4 x 16mm Screw 53 1 Reed Switch/Wire 54 1 Cable...
... 4 Pedal Arm Bushing 38 5 M8 Nylon Locknut 39 1 Flywheel Washer 40 2 M10 x 27mm Patch Screw 41 2 M6 x 18mm Bolt 42 1 Resistance Knob 43 1 Resistance Cable 44 1 Right Rear Spring Bracket 45 4 M10 Split Washer 46 2 Handlebar Cap 47 2 Handlebar Spacer 48 2 Frame Spacer 49 6 Small Handlebar Arm Bushing 50 4 M8 x 45mm Button Bolt 51 8 M6 x 28mm Screw 52 14 M4 x 16mm Screw 53 1 Reed Switch/Wire 54 1 Cable...
English Manual
Page 15
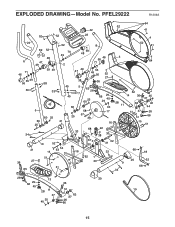
EXPLODED DRAWING-Model No. PFEL29222 R1204A 52 52 64 52 42 41 23 4 24 69 52 48 6 47 49 71 46 59 49 55 49 56 38 50 33 43 5 60 25 60 25 34 52 8 52 41 70 49 59 48 46 3 56 71 64 2 49 47 38 55 49 50 52 27 36 45 5 65 26 7 45 60 25 60 58 57 25 39 21 68 33 67 66 29 45 29 33 17 16 22 52 14 36 35 37 28 11 63 40 44 51 37 26 66 51 15 51 61 30 38 21 36 27 65 10 52 33 53 54 15 16 51 61 51 67 31 30 62 1 33 31 32 33 9 34 66 18 20 52 66 26 13 20 29 66 36 45 28 11 12 19 37 63 37 35 40 26 66 15
EXPLODED DRAWING-Model No. PFEL29222 R1204A 52 52 64 52 42 41 23 4 24 69 52 48 6 47 49 71 46 59 49 55 49 56 38 50 33 43 5 60 25 60 25 34 52 8 52 41 70 49 59 48 46 3 56 71 64 2 49 47 38 55 49 50 52 27 36 45 5 65 26 7 45 60 25 60 58 57 25 39 21 68 33 67 66 29 45 29 33 17 16 22 52 14 36 35 37 28 11 63 40 44 51 37 26 66 51 15 51 61 30 38 21 36 27 65 10 52 33 53 54 15 16 51 61 51 67 31 30 62 1 33 31 32 33 9 34 66 18 20 52 66 26 13 20 29 66 36 45 28 11 12 19 37 63 37 35 40 26 66 15
English Manual
Page 16
... give the following information when calling: • fhe MODEL NUMBER of the product (PFEL29222) • fhe NAME of the product (PROFORM 650 CARDIO CROSSTRAINER) • fhe SERIAL NUMBER of the product (see page 14) LIMITED WARRANTY ICON Health & Fitness, Inc. (ICON) warrants this product to any implied warranties of incidental or consequential damages. To help us assist you specific legal rights. ICON's obligation under normal use or performance of...
... give the following information when calling: • fhe MODEL NUMBER of the product (PFEL29222) • fhe NAME of the product (PROFORM 650 CARDIO CROSSTRAINER) • fhe SERIAL NUMBER of the product (see page 14) LIMITED WARRANTY ICON Health & Fitness, Inc. (ICON) warrants this product to any implied warranties of incidental or consequential damages. To help us assist you specific legal rights. ICON's obligation under normal use or performance of...

