
English Manual
Page 2
TABLE OF CONTENTS IMPORTANT PRECAUTIONS 3 BEFORE YOU BEGIN 4 ASSEMBLY 5 HOW TO USE THE ELLIPTICAL CROSSTRAINER 9 MAINTENANCE AND TROUBLESHOOTING 12 CONDITIONING GUIDELINES 13 PART LIST 14 EXPLODED DRAWING 15 HOW TO ORDER REPLACEMENT PARTS Back Cover LIMITED WARRANTY Back Cover PROFORM is a registered trademark of ICON IP, Inc. 2
TABLE OF CONTENTS IMPORTANT PRECAUTIONS 3 BEFORE YOU BEGIN 4 ASSEMBLY 5 HOW TO USE THE ELLIPTICAL CROSSTRAINER 9 MAINTENANCE AND TROUBLESHOOTING 12 CONDITIONING GUIDELINES 13 PART LIST 14 EXPLODED DRAWING 15 HOW TO ORDER REPLACEMENT PARTS Back Cover LIMITED WARRANTY Back Cover PROFORM is a registered trademark of ICON IP, Inc. 2
English Manual
Page 3
...only as an exercise aid in determining heart rate trends in a commercial, rental, or institutional setting. Keep your back straight when using the elliptical crosstrainer. 1. WARNING: Before beginning this or any worn parts immediately. 5. When you feel pain or dizziness at all times. 6. ICON ...athletic shoes for personal injury or property damage sustained by persons weighing more than 250 pounds. 7. do not arch your physician. The elliptical crosstrainer is especially important for home use only. Do not use of 35 or persons with a mat beneath it to ensure that ...
...only as an exercise aid in determining heart rate trends in a commercial, rental, or institutional setting. Keep your back straight when using the elliptical crosstrainer. 1. WARNING: Before beginning this or any worn parts immediately. 5. When you feel pain or dizziness at all times. 6. ICON ...athletic shoes for personal injury or property damage sustained by persons weighing more than 250 pounds. 7. do not arch your physician. The elliptical crosstrainer is especially important for home use only. Do not use of 35 or persons with a mat beneath it to ensure that ...

English Manual
Page 4
... adjustable resistance and a simple-touse console to the elliptical crosstrainer (see the front cover of this manual for selecting the new PROFORM® 650 CARDIO CROSSTRAINER. tions after reading this manual carefully before calling. Before reading further, please familiarize yourself with the parts that moves your exercise. For your knees ...
... adjustable resistance and a simple-touse console to the elliptical crosstrainer (see the front cover of this manual for selecting the new PROFORM® 650 CARDIO CROSSTRAINER. tions after reading this manual carefully before calling. Before reading further, please familiarize yourself with the parts that moves your exercise. For your knees ...
English Manual
Page 5
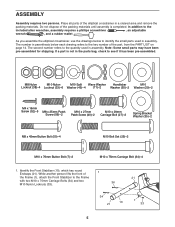
...mallet . Place all parts of the part, from the PART LIST on page 14. The number in parenthesis below to the key number of the elliptical crosstrainer in assembly. M8 Nylon M10 Nylon M10 Split Wave Washer Handlebar M10 Locknut (38)-4 Locknut (33)-6 Washer (45)-4 (71)-2 Washer (55...M8 x 45mm Button Bolt (50)-4 M10 Bolt Set (25)-2 M10 x 76mm Button Bolt (7)-2 M10 x 75mm Carriage Bolt (34)-4 1. As you assemble the elliptical crosstrainer, use the drawings below each drawing refers to identify the small parts used in the parts bag, check to the Frame 21 with two...
...mallet . Place all parts of the part, from the PART LIST on page 14. The number in parenthesis below to the key number of the elliptical crosstrainer in assembly. M8 Nylon M10 Nylon M10 Split Wave Washer Handlebar M10 Locknut (38)-4 Locknut (33)-6 Washer (45)-4 (71)-2 Washer (55...M8 x 45mm Button Bolt (50)-4 M10 Bolt Set (25)-2 M10 x 76mm Button Bolt (7)-2 M10 x 75mm Carriage Bolt (34)-4 1. As you assemble the elliptical crosstrainer, use the drawings below each drawing refers to identify the small parts used in the parts bag, check to the Frame 21 with two...

English Manual
Page 8
... Spacer (63) onto the axle; make sure that all parts of the Front Spring Bracket (65) on the left over after assembly is facing the elliptical crosstrainer. Attach the Handlebar Leg to an M10 Bolt Set (25). To protect the floor or carpet from damage, place a mat under the... tighten the Patch Screw into the axle. 11 Grease 16 63 12 Next, hold the lower end of the left Handlebar Leg (5) inside of the elliptical crosstrainer are properly tightened. Apply grease to the Front Spring Bracket with the Bolt Set. Make sure that the Spring Spacer is turned so the...
... Spacer (63) onto the axle; make sure that all parts of the Front Spring Bracket (65) on the left over after assembly is facing the elliptical crosstrainer. Attach the Handlebar Leg to an M10 Bolt Set (25). To protect the floor or carpet from damage, place a mat under the... tighten the Patch Screw into the axle. 11 Grease 16 63 12 Next, hold the lower end of the left Handlebar Leg (5) inside of the elliptical crosstrainer are properly tightened. Apply grease to the Front Spring Bracket with the Bolt Set. Make sure that the Spring Spacer is turned so the...
English Manual
Page 9
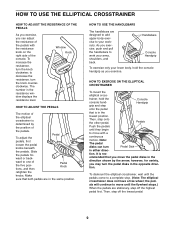
... of the five positions, and then Pedal Knob retighten the knobs. It is determined by the arrow; tion. HOW TO EXERCISE ON THE ELLIPTICAL CROSSTRAINER To mount the elliptical cross- trainer, hold the console handgrip as you exercise. Then, step onto the other pedal. ward to decrease the resistance, turn Pedal Disk in the...
... of the five positions, and then Pedal Knob retighten the knobs. It is determined by the arrow; tion. HOW TO EXERCISE ON THE ELLIPTICAL CROSSTRAINER To mount the elliptical cross- trainer, hold the console handgrip as you exercise. Then, step onto the other pedal. ward to decrease the resistance, turn Pedal Disk in the...
English Manual
Page 12
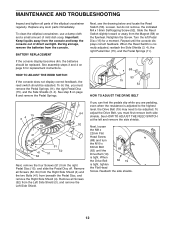
... Pedal Springs (11), the right Pedal Disc (15), and the Side Shields (3, 4). Replace any worn parts immediately. To clean the elliptical crosstrainer, use a damp cloth and a small amount of the elliptical crosstrainer regularly. During storage, remove the batteries from the Left Side Shield (3), and remove the Left Side Shield. To do not...
... Pedal Springs (11), the right Pedal Disc (15), and the Side Shields (3, 4). Replace any worn parts immediately. To clean the elliptical crosstrainer, use a damp cloth and a small amount of the elliptical crosstrainer regularly. During storage, remove the batteries from the Left Side Shield (3), and remove the Left Side Shield. To do not...


