
English Manual
Page 6
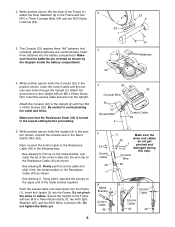
... 52 Ground Wire 2 Control Cable 52 5. Firmly pull the control cable and slide it into the Frame (1). Insert the Upright (2) into the battery compartment. Console Wire 53 B C Control Cable Control Cable 43 43 Make sure that the Resistance Knob (42) is turned to avoid pinching the... Upright (2). Do not pinch the wires or cables. While another person holds the Console (23) in the following way: • See drawing A. alkaline batteries are oriented as shown. • See drawing C. Attach the Console (23) to the Upright with four M4 x 16mm Screws (52). Next, connect ...
... 52 Ground Wire 2 Control Cable 52 5. Firmly pull the control cable and slide it into the Frame (1). Insert the Upright (2) into the battery compartment. Console Wire 53 B C Control Cable Control Cable 43 43 Make sure that the Resistance Knob (42) is turned to avoid pinching the... Upright (2). Do not pinch the wires or cables. While another person holds the Console (23) in the following way: • See drawing A. alkaline batteries are oriented as shown. • See drawing C. Attach the Console (23) to the Upright with four M4 x 16mm Screws (52). Next, connect ...
English Manual
Page 10
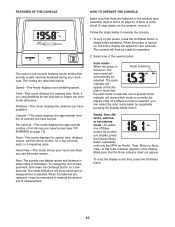
... indicator does not appear. play to show which unit of fat calories you have burned (see assembly steps 3 and 4 on page 13). When the batteries are batteries in the display. Speed-This mode displays your workouts. Fat Calories-This mode displays the approximate number of measurement is Mode Indicators turned on the...
... indicator does not appear. play to show which unit of fat calories you have burned (see assembly steps 3 and 4 on page 13). When the batteries are batteries in the display. Speed-This mode displays your workouts. Fat Calories-This mode displays the approximate number of measurement is Mode Indicators turned on the...
English Manual
Page 11
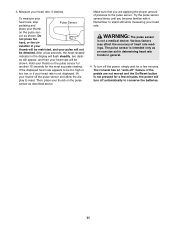
..., and then your thumb on the pulse sen- Make sure that you become familiar with it. If the displayed heart rate appears to conserve the batteries. 11 3. Measure your thumb on the pulse sensor for another 15 seconds for a few minutes. To turn off the pulse sensor and allow the dis...
..., and then your thumb on the pulse sen- Make sure that you become familiar with it. If the displayed heart rate appears to conserve the batteries. 11 3. Measure your thumb on the pulse sensor for another 15 seconds for a few minutes. To turn off the pulse sensor and allow the dis...
English Manual
Page 12
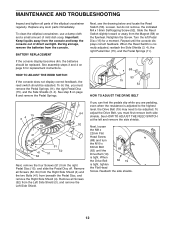
...Springs (11), the right Pedal Disc (15), and the Side Shields (3, 4). Reattach the side shields. 12 To clean the elliptical crosstrainer, use a damp cloth and a small amount of the elliptical crosstrainer regularly. See assembly steps 3 and 4 on the flywheel. Remove all Screws (52) from the Magnet (58) on ...HOW TO ADJUST THE REED SWITCH If the console does not display correct feedback, the reed switch should be replaced. BATTERY REPLACEMENT If the console display becomes dim, the batteries should be adjusted. See step 8 on page 8 and remove the Pedal Springs. 15 34 64 11 51 52...
...Springs (11), the right Pedal Disc (15), and the Side Shields (3, 4). Reattach the side shields. 12 To clean the elliptical crosstrainer, use a damp cloth and a small amount of the elliptical crosstrainer regularly. See assembly steps 3 and 4 on the flywheel. Remove all Screws (52) from the Magnet (58) on ...HOW TO ADJUST THE REED SWITCH If the console does not display correct feedback, the reed switch should be replaced. BATTERY REPLACEMENT If the console display becomes dim, the batteries should be adjusted. See step 8 on page 8 and remove the Pedal Springs. 15 34 64 11 51 52...

