
Owner's Manual
Page 1
... RECEIVER VSX-1018AH-K Register your product at http://www.pioneerelectronics.com (US) http://www.pioneerelectronics.ca (Canada) • Protect your new investment The details of your purchase will be on file for reference in the event of an insurance claim such as loss or theft. • Receive ...free tips, updates and service bulletins on your new product • Improve product development Your input helps us continue to design products that meet your needs. • Receive a free Pioneer newsletter Registered customers can opt in to...
... RECEIVER VSX-1018AH-K Register your product at http://www.pioneerelectronics.com (US) http://www.pioneerelectronics.ca (Canada) • Protect your new investment The details of your purchase will be on file for reference in the event of an insurance claim such as loss or theft. • Receive ...free tips, updates and service bulletins on your new product • Improve product development Your input helps us continue to design products that meet your needs. • Receive a free Pioneer newsletter Registered customers can opt in to...
Owner's Manual
Page 2
...cm at rear, and 30 cm at each side). Operation is connected. - Product Name: AUDIO/VIDEO MULTI-CHANNEL RECEIVER Model Number: VSX-1018AH-K Responsible Party Name: PIONEER ELECTRONICS SERVICE, INC. These limits are used in a particular installation. Cet appareil numérique de la Classe ...that may not cause harmful interference, and (2) this equipment does cause harmful interference to radio or television reception, which the receiver is subject to the following measures: - D8-10-3a_En CAUTION The STANDBY/ON switch on vacation). FEDERAL COMMUNICATIONS COMMISSION ...
...cm at rear, and 30 cm at each side). Operation is connected. - Product Name: AUDIO/VIDEO MULTI-CHANNEL RECEIVER Model Number: VSX-1018AH-K Responsible Party Name: PIONEER ELECTRONICS SERVICE, INC. These limits are used in a particular installation. Cet appareil numérique de la Classe ...that may not cause harmful interference, and (2) this equipment does cause harmful interference to radio or television reception, which the receiver is subject to the following measures: - D8-10-3a_En CAUTION The STANDBY/ON switch on vacation). FEDERAL COMMUNICATIONS COMMISSION ...
Owner's Manual
Page 5
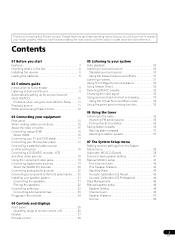
...En After you for future reference. Please read through these operating instructions so you start Features 7 Checking what's in the box 8 Installing the receiver 8 Loading the batteries 8 02 5 minute guide Introduction to home theater 9 Listening to Surround Sound 9 Automatically setting up for surround sound (...in surround sound 30 Standard surround sound 30 Using the Advanced surround effects 31 Listening in a safe place for buying this Pioneer product. Thank you have finished reading the instructions, put them away in stereo 31 Using Front Stage Surround Advance 32 Using...
...En After you for future reference. Please read through these operating instructions so you start Features 7 Checking what's in the box 8 Installing the receiver 8 Loading the batteries 8 02 5 minute guide Introduction to home theater 9 Listening to Surround Sound 9 Automatically setting up for surround sound (...in surround sound 30 Standard surround sound 30 Using the Advanced surround effects 31 Listening in a safe place for buying this Pioneer product. Thank you have finished reading the instructions, put them away in stereo 31 Using Front Stage Surround Advance 32 Using...
Owner's Manual
Page 6
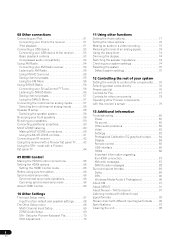
...-ZONE listening 60 Making MULTI-ZONE connections 60 Using the MULTI-ZONE controls 61 Connecting an IR receiver 62 Using this receiver with a Pioneer flat panel TV . . . . . 63 Using the SR+ mode with a Pioneer flat panel TV 64 09 HDMI Control Making the HDMI Control connections 65 Setting the HDMI options ...Input function default and possible settings 68 The Other Setup menu 68 Multi Channel Input Setup 69 ZONE Audio Setup 69 SR+ Setup for Pioneer flat panel TVs 70 OSD Adjustment 70 11 Using other functions Setting the Audio options 71 Setting the Video options 72 Making an audio...
...-ZONE listening 60 Making MULTI-ZONE connections 60 Using the MULTI-ZONE controls 61 Connecting an IR receiver 62 Using this receiver with a Pioneer flat panel TV . . . . . 63 Using the SR+ mode with a Pioneer flat panel TV 64 09 HDMI Control Making the HDMI Control connections 65 Setting the HDMI options ...Input function default and possible settings 68 The Other Setup menu 68 Multi Channel Input Setup 69 ZONE Audio Setup 69 SR+ Setup for Pioneer flat panel TVs 70 OSD Adjustment 70 11 Using other functions Setting the Audio options 71 Setting the Video options 72 Making an audio...
Owner's Manual
Page 7
... deep, realistic sound effects. The USB terminal allows you can take advantage of this receiver makes both de-interlacing and up to 5.1 channels, with fixed data transfer rates ranging from a series of reference points, your component to Pioneer for any loss of data with its high transfer rates. • Phase Control The...
... deep, realistic sound effects. The USB terminal allows you can take advantage of this receiver makes both de-interlacing and up to 5.1 channels, with fixed data transfer rates ranging from a series of reference points, your component to Pioneer for any loss of data with its high transfer rates. • Phase Control The...
Owner's Manual
Page 8
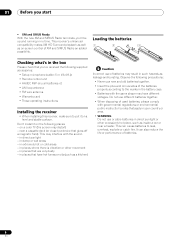
01 Before you start • XM and SIRIUS Ready With the new XM and SIRIUS Radio terminals, you 've received the following supplied accessories: • Setup microphone (cable: 5 m (16.4 ft.)) • Remote control unit • AA/IEC R6P dry cell batteries... loop antenna • FM wire antenna • Warranty card • These operating instructions Installing the receiver • When installing this receiver, make sure to leak, overheat, explode or catch fire. This receiver's enhanced compatibility makes XM HD Surround playback as well as a kitchen) Caution Incorrect use or store ...
01 Before you start • XM and SIRIUS Ready With the new XM and SIRIUS Radio terminals, you 've received the following supplied accessories: • Setup microphone (cable: 5 m (16.4 ft.)) • Remote control unit • AA/IEC R6P dry cell batteries... loop antenna • FM wire antenna • Warranty card • These operating instructions Installing the receiver • When installing this receiver, make sure to leak, overheat, explode or catch fire. This receiver's enhanced compatibility makes XM HD Surround playback as well as a kitchen) Caution Incorrect use or store ...
Owner's Manual
Page 9
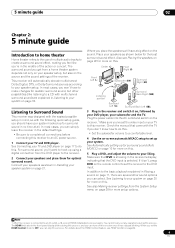
... this process, and you won't have a big effect on the sound. If it on, followed by your DVD player, your speaker setup. This receiver will have to make changes for more setup options. In addition to your subwoofer and the TV. Center (C) Front Right (R) Front Left (L) Subwoofer ... to the basic playback explained in Playing a source on page 11, there are explained in no time at all connections before connecting this receiver to this receiver. The surround sound you get from the System Setup menu on page 38 for optimal surround sound. 5 minute guide 02 Chapter 2: 5...
... this process, and you won't have a big effect on the sound. If it on, followed by your DVD player, your speaker setup. This receiver will have to make changes for more setup options. In addition to your subwoofer and the TV. Center (C) Front Right (R) Front Left (L) Subwoofer ... to the basic playback explained in Playing a source on page 11, there are explained in no time at all connections before connecting this receiver to this receiver. The surround sound you get from the System Setup menu on page 38 for optimal surround sound. 5 minute guide 02 Chapter 2: 5...
Owner's Manual
Page 10
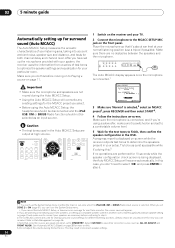
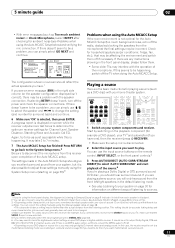
... doing this before continuing to step 4. 3 The six MCACC presets are saved only when set up the microphone provided with your system, the receiver uses the information from a series of your particular room. Try to be selected as possible while it 's about ear level at high volume. ... Back System [ Normal ] Save SYMMETRY to [ M1.MEMORY 1 ] S TA R T ENTER:Start :Cancel 3 Make sure 'Normal' is selected,2 select an MCACC preset3, press RECEIVER and then select START4. 4 Follow the instructions on page 41 and make sure it is connected, and if you are planning on bi-amping your...
... doing this before continuing to step 4. 3 The six MCACC presets are saved only when set up the microphone provided with your system, the receiver uses the information from a series of your particular room. Try to be selected as possible while it 's about ear level at high volume. ... Back System [ Normal ] Save SYMMETRY to [ M1.MEMORY 1 ] S TA R T ENTER:Start :Cancel 3 Make sure 'Normal' is selected,2 select an MCACC preset3, press RECEIVER and then select START4. 4 Follow the instructions on page 41 and make sure it is connected, and if you are planning on bi-amping your...
Owner's Manual
Page 11
... playing a Dolby Digital or DTS surround sound DVD disc, you should reflect the actual speakers you have one), then the receiver (press RECEIVER). • Make sure the setup mic is also possible to adjust these settings manually using the System Setup menu (starting...the speakers from this seems to 7 minutes. 7 The Auto MCACC Setup has finished! See Automatic MCACC (Expert) on your DVD player or digital satellite receiver. You can simply select GO NEXT and continue. 1.Auto MCACC Now Analyzing... (2/9) Environment Check Ambient Noise Microphone Speaker YES/NO [ OK ] [ ...
... playing a Dolby Digital or DTS surround sound DVD disc, you should reflect the actual speakers you have one), then the receiver (press RECEIVER). • Make sure the setup mic is also possible to adjust these settings manually using the System Setup menu (starting...the speakers from this seems to 7 minutes. 7 The Auto MCACC Setup has finished! See Automatic MCACC (Expert) on your DVD player or digital satellite receiver. You can simply select GO NEXT and continue. 1.Auto MCACC Now Analyzing... (2/9) Environment Check Ambient Noise Microphone Speaker YES/NO [ OK ] [ ...

Owner's Manual
Page 12
...8226; Bass sound with other the subwoofer and the most appropriate speaker. Set your listening position. Better sound using Phase Control This receiver's Phase Control feature uses phase correction measures to make sure your sound source arrives at your subwoofer to switch on the front ... matching1 for all sound is set to OFF. THX STATUS PHASE ANT AUDIO DISPLAY MPX SIGNAL SEL MEM CH TV CTRL RECEIVER • Press RECEIVER, then press PHASE (PHASE CONTROL) to maximize the effect. Phase Control ON Front speaker Listening position Sound source Subwoofer Original...
...8226; Bass sound with other the subwoofer and the most appropriate speaker. Set your listening position. Better sound using Phase Control This receiver's Phase Control feature uses phase correction measures to make sure your sound source arrives at your subwoofer to switch on the front ... matching1 for all sound is set to OFF. THX STATUS PHASE ANT AUDIO DISPLAY MPX SIGNAL SEL MEM CH TV CTRL RECEIVER • Press RECEIVER, then press PHASE (PHASE CONTROL) to maximize the effect. Phase Control ON Front speaker Listening position Sound source Subwoofer Original...
Owner's Manual
Page 13
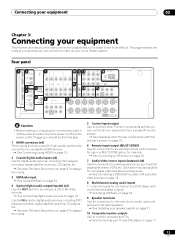
...explains the kinds of inputs has jacks for composite video and stereo analog audio. See Connecting a DVD/HDD recorder, VCR and other Pioneer components with multichannel analog outputs. See Using XM Radio on page 54. 9 Speaker terminals Use for connection to the main front,... See Operating other video sources on page 18. 8 Multichannel analog audio inputs 7.1 channel inputs for connection to a DVD player with this receiver's sensor on page 79. 6 Remote input/output (MULTI-ZONE) Use for connection to an external remote control sensor for use in should be difficult...
...explains the kinds of inputs has jacks for composite video and stereo analog audio. See Connecting a DVD/HDD recorder, VCR and other Pioneer components with multichannel analog outputs. See Using XM Radio on page 54. 9 Speaker terminals Use for connection to the main front,... See Operating other video sources on page 18. 8 Multichannel analog audio inputs 7.1 channel inputs for connection to a DVD player with this receiver's sensor on page 79. 6 Remote input/output (MULTI-ZONE) Use for connection to an external remote control sensor for use in should be difficult...
Owner's Manual
Page 14
... also Installing your equipment 11 SIRIUS Radio input See Using SIRIUS Radio on page 56. 12 ZONE 2 audio/video outputs Use to connect a second receiver in a separate room. See MULTI-ZONE listening on page 60. 13 Component video connections (x4) Use the inputs to connect indoor or outdoor antennas...
... also Installing your equipment 11 SIRIUS Radio input See Using SIRIUS Radio on page 56. 12 ZONE 2 audio/video outputs Use to connect a second receiver in a separate room. See MULTI-ZONE listening on page 60. 13 Component video connections (x4) Use the inputs to connect indoor or outdoor antennas...
Owner's Manual
Page 15
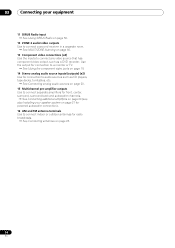
... can be output VIDEO MONITOR OUT This product incorporates copyright protection technology that may be careful when inserting the plug not to the receiver's HDMI video outputs when connecting this copyright protection technology must connect your component or display. Reverse engineering or disassembly is HDMI: since... this resolution cannot be downsampled, you must be authorized by method claims of the receiver. • When connecting optical cables, be damaged if bent around sharp corners. The only exception is prohibited.
... can be output VIDEO MONITOR OUT This product incorporates copyright protection technology that may be careful when inserting the plug not to the receiver's HDMI video outputs when connecting this copyright protection technology must connect your component or display. Reverse engineering or disassembly is HDMI: since... this resolution cannot be downsampled, you must be authorized by method claims of the receiver. • When connecting optical cables, be damaged if bent around sharp corners. The only exception is prohibited.
Owner's Manual
Page 16
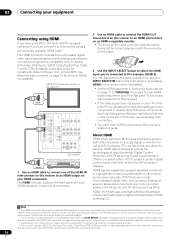
...the technologies of High Bandwidth Digital Content Protection (HDCP) as well as Digital Visual Interface (DVI) in unreliable signal transfers. • This receiver supports SACD, Dolby Digital Plus, Dolby TrueHD and DTS-HD Master Audio. HDMI has the capability to support standard, enhanced, or high-...OUT R MULTI CH IN SPEA A FRONT CENTER SURROUND SURROUND BACK L R SUBWOOFER VSX-1018AH HDMI/DVI-equipped component HDMI OUT 1 Use an HDMI cable to connect one of the HDMI IN interconnects on this receiver also supports the corresponding format. 16 En The HDMI indicator lights on the front ...
...the technologies of High Bandwidth Digital Content Protection (HDCP) as well as Digital Visual Interface (DVI) in unreliable signal transfers. • This receiver supports SACD, Dolby Digital Plus, Dolby TrueHD and DTS-HD Master Audio. HDMI has the capability to support standard, enhanced, or high-...OUT R MULTI CH IN SPEA A FRONT CENTER SURROUND SURROUND BACK L R SUBWOOFER VSX-1018AH HDMI/DVI-equipped component HDMI OUT 1 Use an HDMI cable to connect one of the HDMI IN interconnects on this receiver also supports the corresponding format. 16 En The HDMI indicator lights on the front ...
Owner's Manual
Page 17
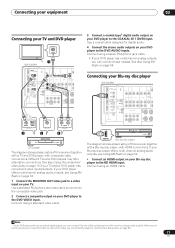
... player has component video inputs/outputs. See also Using the component video jacks on page 19 if your TV and DVD player VIDEO IN TV 1 VSX-1018AH HDMI COAXIAL ASSIGNABLE 1 - 2 OUT IN 1 (DVD) BD IN IN 2 (CD) XM IN OPTICAL IN 1 IN 1 (TV SAT) CON- Use a standard RCA/phono jack ... L R SUBWOOFER HDMI OUT Blu-ray disc player The diagram shows a basic setup of this receiver using a stereo RCA/phono jack cable. • If your Blu-ray disc player to a video input on your Blu-ray disc player VSX-1018AH HDMI COAXIAL ASSIGNABLE 1 - 2 OUT IN 1 (DVD) BD IN IN 2 (CD) XM IN ...
... player has component video inputs/outputs. See also Using the component video jacks on page 19 if your TV and DVD player VIDEO IN TV 1 VSX-1018AH HDMI COAXIAL ASSIGNABLE 1 - 2 OUT IN 1 (DVD) BD IN IN 2 (CD) XM IN OPTICAL IN 1 IN 1 (TV SAT) CON- Use a standard RCA/phono jack ... L R SUBWOOFER HDMI OUT Blu-ray disc player The diagram shows a basic setup of this receiver using a stereo RCA/phono jack cable. • If your Blu-ray disc player to a video input on your Blu-ray disc player VSX-1018AH HDMI COAXIAL ASSIGNABLE 1 - 2 OUT IN 1 (DVD) BD IN IN 2 (CD) XM IN ...
Owner's Manual
Page 18
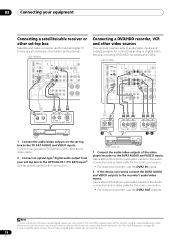
VSX-1018AH HDMI COAXIAL ASSIGNABLE 1 - 2 OUT IN 1 (DVD) BD IN IN 2 (CD) XM IN OPTICAL IN 1 IN 1...OUT R AUDIO L VIDEO AV OUT STB 1 Connect the audio/video outputs on page 67). 2 If your satellite/cable receiver doesn't have a digital audio output, you can record, connect the DVR1 AUDIO and VIDEO outputs to one of audio/video...receivers, and terrestrial digital TV tuners are all examples of the video player/recorder to the TV SAT AUDIO and VIDEO inputs. Connect using a coaxial digital audio cable. Note 1 If your set -top box to the DVR1 AUDIO and VIDEO inputs. VSX-1018AH...
VSX-1018AH HDMI COAXIAL ASSIGNABLE 1 - 2 OUT IN 1 (DVD) BD IN IN 2 (CD) XM IN OPTICAL IN 1 IN 1...OUT R AUDIO L VIDEO AV OUT STB 1 Connect the audio/video outputs on page 67). 2 If your satellite/cable receiver doesn't have a digital audio output, you can record, connect the DVR1 AUDIO and VIDEO outputs to one of audio/video...receivers, and terrestrial digital TV tuners are all examples of the video player/recorder to the TV SAT AUDIO and VIDEO inputs. Connect using a coaxial digital audio cable. Note 1 If your set -top box to the DVR1 AUDIO and VIDEO inputs. VSX-1018AH...
Owner's Manual
Page 19
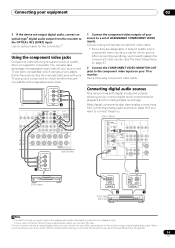
... jacks to the component video inputs on your source to a set up the receiver you'll need to tell the receiver which input you connected the recorder to (see also The Input Setup menu on page 67). 19 En VSX-1018AH HDMI COAXIAL ASSIGNABLE 1 - 2 OUT IN 1 (DVD) BD IN IN... CENTER SURROUND L R SURROUND BACK / B LR L (Single) Y PB PR 1 COMPONENT VIDEO SELECTABLE SEE INSTRUCTION MANUAL SELECTABLE VOIR LE MODE D'EMPLOI VSX-1018AH 1 Connect the component video outputs of the coaxial inputs on page 20 if you use for playback only). • If your video component doesn't have...
... jacks to the component video inputs on your source to a set up the receiver you'll need to tell the receiver which input you connected the recorder to (see also The Input Setup menu on page 67). 19 En VSX-1018AH HDMI COAXIAL ASSIGNABLE 1 - 2 OUT IN 1 (DVD) BD IN IN... CENTER SURROUND L R SURROUND BACK / B LR L (Single) Y PB PR 1 COMPONENT VIDEO SELECTABLE SEE INSTRUCTION MANUAL SELECTABLE VOIR LE MODE D'EMPLOI VSX-1018AH 1 Connect the component video outputs of the coaxial inputs on page 20 if you use for playback only). • If your video component doesn't have...
Owner's Manual
Page 20
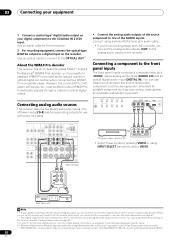
... (Single) TV game, video camera, etc. VIDEO OUTPUT DIGITAL OUT • Select these connections for any spare digital audio inputs on this receiver using a coaxial or optical digital connection when connected to one of the AUDIO inputs. You can be connected to output WMA9 Pro format audio ...components can assign them when setting up the receiver you'll need to tell the receiver which input you set -top box, etc. Connecting a component to the COAXIAL IN 2 (CD) input. SELECTABLE SEE INSTRUCTION MANUAL SELECTABLE VOIR LE MODE D'EMPLOI VSX-1018AH OUT PLAY IN REC R L AUDIO IN/...
... (Single) TV game, video camera, etc. VIDEO OUTPUT DIGITAL OUT • Select these connections for any spare digital audio inputs on this receiver using a coaxial or optical digital connection when connected to one of the AUDIO inputs. You can be connected to output WMA9 Pro format audio ...components can assign them when setting up the receiver you'll need to tell the receiver which input you set -top box, etc. Connecting a component to the COAXIAL IN 2 (CD) input. SELECTABLE SEE INSTRUCTION MANUAL SELECTABLE VOIR LE MODE D'EMPLOI VSX-1018AH OUT PLAY IN REC R L AUDIO IN/...
Owner's Manual
Page 21
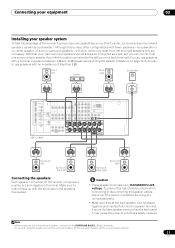
... and 16 Ω (please see Switching the speaker impedance on the speakers themselves. Front left Connecting the speakers Each speaker connection on the receiver comprises a positive (+) and negative (-) terminal. To prevent the risk of electric shock when connecting or disconnecting the speaker cables, disconnect the... and right speakers only are necessary. IN TROL OUT IN 2 (DVR1) IN 2 ASSIGNABLE 1-2 ASSIGNABLE 1-2 OUT IR ZONE2 IN OUT DIGITAL VSX-1018AH VIDEO IN OUT COMPONENT VIDEO IN 1 IN 2 IN 3 MONITOR OUT ANTENNA Y MONITOR IN OUT IN OUT IN OUT PB FM UNBAL 75...
... and 16 Ω (please see Switching the speaker impedance on the speakers themselves. Front left Connecting the speakers Each speaker connection on the receiver comprises a positive (+) and negative (-) terminal. To prevent the risk of electric shock when connecting or disconnecting the speaker cables, disconnect the... and right speakers only are necessary. IN TROL OUT IN 2 (DVR1) IN 2 ASSIGNABLE 1-2 ASSIGNABLE 1-2 OUT IR ZONE2 IN OUT DIGITAL VSX-1018AH VIDEO IN OUT COMPONENT VIDEO IN 1 IN 2 IN 3 MONITOR OUT ANTENNA Y MONITOR IN OUT IN OUT IN OUT PB FM UNBAL 75...
Owner's Manual
Page 24
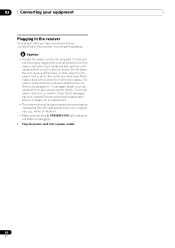
...your components to be stepped on. The power cords should be routed so that they are wet, as this receiver, including the speakers. 03 Connecting your equipment Plugging in the receiver Only plug in after you an electric shock. Never make a knot in any other cables. Check the ...electric shock. Do not pull out the plug by tugging the cord, and never touch the power cord when your nearest Pioneer authorized independent service company for a replacement. • The receiver should be disconnected by the plug part. Do not place the unit, a piece of furniture, or other object on...
...your components to be stepped on. The power cords should be routed so that they are wet, as this receiver, including the speakers. 03 Connecting your equipment Plugging in the receiver Only plug in after you an electric shock. Never make a knot in any other cables. Check the ...electric shock. Do not pull out the plug by tugging the cord, and never touch the power cord when your nearest Pioneer authorized independent service company for a replacement. • The receiver should be disconnected by the plug part. Do not place the unit, a piece of furniture, or other object on...


