Owner's Manual
Page 9
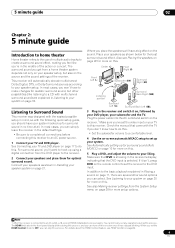
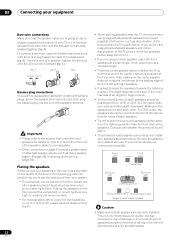
... feature, see Placing the speakers on page 22 for the best surround sound effect. Where you can select. Center (C) Front Right (R) Front Left (L) Subwoofer (SW) Surround Right (SR) Listening position Surround Back Right (SBR) Surround Left (SL) Surround Back Left (SBL) 3 Plug in Playing a source... your speakers as shown in no time at all connections before connecting this . In addition to an AC power source. 1 Connect your subwoofer and the TV. Place your system. Note 1 After this receiver is showing in Listening to the receiver. 2 Connect your system on the...
... feature, see Placing the speakers on page 22 for the best surround sound effect. Where you can select. Center (C) Front Right (R) Front Left (L) Subwoofer (SW) Surround Right (SR) Listening position Surround Back Right (SBR) Surround Left (SL) Surround Back Left (SBL) 3 Plug in Playing a source... your speakers as shown in no time at all connections before connecting this . In addition to an AC power source. 1 Connect your subwoofer and the TV. Place your system. Note 1 After this receiver is showing in Listening to the receiver. 2 Connect your system on the...
Owner's Manual
Page 10
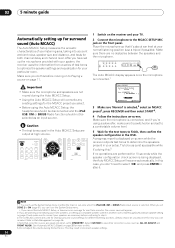
... R T ENTER:Start :Cancel 3 Make sure 'Normal' is selected. See Automatic MCACC (Expert) on page 38 for your particular room. After you select. • Before using a subwoofer, make sure to connect your listening area, taking into account ambient noise, speaker size and distance, and tests for the MCACC preset you have set...
... R T ENTER:Start :Cancel 3 Make sure 'Normal' is selected. See Automatic MCACC (Expert) on page 38 for your particular room. After you select. • Before using a subwoofer, make sure to connect your listening area, taking into account ambient noise, speaker size and distance, and tests for the MCACC preset you have set...
Owner's Manual
Page 11
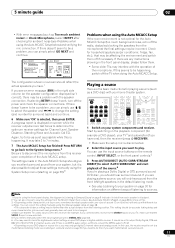
... [ YES ] Surr [ YES ] SB [ YES x 2 ] SW [ YES ] OK 10 :Cancel Problems when using the Manual speaker setup on page 48. • The subwoofer distance setting may interfere with the speaker connection. If selecting RETRY doesn't work, turn off the TV when doing the Auto MCACC Setup. 5 minute guide... controls.5 3 Press AUTO/DIRECT (AUTO SURR/STREAM DIRECT) to be set to this receiver (for example a DVD player), your TV4 and subwoofer (if you have .1 If you see Listening in the Auto MCACC Setup should be accurate (taking delay and room characteristics into account) and ...
... [ YES ] Surr [ YES ] SB [ YES x 2 ] SW [ YES ] OK 10 :Cancel Problems when using the Manual speaker setup on page 48. • The subwoofer distance setting may interfere with the speaker connection. If selecting RETRY doesn't work, turn off the TV when doing the Auto MCACC Setup. 5 minute guide... controls.5 3 Press AUTO/DIRECT (AUTO SURR/STREAM DIRECT) to be set to this receiver (for example a DVD player), your TV4 and subwoofer (if you have .1 If you see Listening in the Auto MCACC Setup should be accurate (taking delay and room characteristics into account) and ...

Owner's Manual
Page 12
...optimal sound image at the listening position in Setting the Audio options on this receiver. Phase Control ON Front speaker Listening position Sound source Subwoofer Original sound preserved with no loss of clarity • Rhythms with crystal-like clarity • Bass sound with no loss of depth... • Sound of musical instruments with no reality Note 1 • Phase matching is a very important factor in lowpass filter switch of your subwoofer. If this receiver can actually feel when PHASE CONTROL is set , you may not have a maximized PHASE CONTROL effect. • The PHASE ...
...optimal sound image at the listening position in Setting the Audio options on this receiver. Phase Control ON Front speaker Listening position Sound source Subwoofer Original sound preserved with no loss of clarity • Rhythms with crystal-like clarity • Bass sound with no loss of depth... • Sound of musical instruments with no reality Note 1 • Phase matching is a very important factor in lowpass filter switch of your subwoofer. If this receiver can actually feel when PHASE CONTROL is set , you may not have a maximized PHASE CONTROL effect. • The PHASE ...
Owner's Manual
Page 13
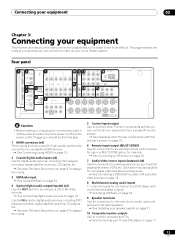
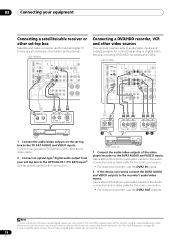
... PRE OUT R 8 MULTI CH IN 9SPEAKERS FRONT AR FRONT CENTER SURROUND SURROUND BACK L CD CD-R SUBWOOFER SURROUND SURROUND BACK CENTER SURROUND L R SURROUND BACK / B LR L (Single) R SUBWOOFER SELECTABLE SEE INSTRUCTION MANUAL SELECTABLE VOIR LE MODE D'EMPLOI Caution • Before making or changing the connections, ... of inputs has jacks for composite video and stereo analog audio. See Connecting a DVD/HDD recorder, VCR and other Pioneer components with multichannel analog outputs. See Using XM Radio on page 54. 9 Speaker terminals Use for recording to make ...
... PRE OUT R 8 MULTI CH IN 9SPEAKERS FRONT AR FRONT CENTER SURROUND SURROUND BACK L CD CD-R SUBWOOFER SURROUND SURROUND BACK CENTER SURROUND L R SURROUND BACK / B LR L (Single) R SUBWOOFER SELECTABLE SEE INSTRUCTION MANUAL SELECTABLE VOIR LE MODE D'EMPLOI Caution • Before making or changing the connections, ... of inputs has jacks for composite video and stereo analog audio. See Connecting a DVD/HDD recorder, VCR and other Pioneer components with multichannel analog outputs. See Using XM Radio on page 54. 9 Speaker terminals Use for recording to make ...
Owner's Manual
Page 14
...a separate room. See MULTI-ZONE listening on page 23. 14 En 03 Connecting your speaker system on page 21 for powered subwoofer connection). 16 AM and FM antenna terminals Use to connect indoor or outdoor antennas for radio broadcasts. See Connecting antennas on page... audio sources on page 20. 15 Multichannel pre-amplifier outputs Use to connect separate amplifiers for front, center, surround, surround back and subwoofer channels. See Connecting additional amplifiers on page 60 (see also Installing your equipment 11 SIRIUS Radio input See Using SIRIUS...
...a separate room. See MULTI-ZONE listening on page 23. 14 En 03 Connecting your speaker system on page 21 for powered subwoofer connection). 16 AM and FM antenna terminals Use to connect indoor or outdoor antennas for radio broadcasts. See Connecting antennas on page... audio sources on page 20. 15 Multichannel pre-amplifier outputs Use to connect separate amplifiers for front, center, surround, surround back and subwoofer channels. See Connecting additional amplifiers on page 60 (see also Installing your equipment 11 SIRIUS Radio input See Using SIRIUS...
Owner's Manual
Page 16
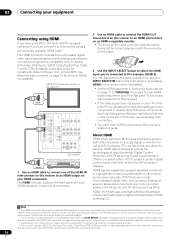
... IN IN OUT IN OUT DVD AUDIO IN TV SAT IN DVR1 OUT IN L DVR OUT R MULTI CH IN SPEA A FRONT CENTER SURROUND SURROUND BACK L R SUBWOOFER VSX-1018AH HDMI/DVI-equipped component HDMI OUT 1 Use an HDMI cable to multi-channel surround-sound audio.
... IN IN OUT IN OUT DVD AUDIO IN TV SAT IN DVR1 OUT IN L DVR OUT R MULTI CH IN SPEA A FRONT CENTER SURROUND SURROUND BACK L R SUBWOOFER VSX-1018AH HDMI/DVI-equipped component HDMI OUT 1 Use an HDMI cable to multi-channel surround-sound audio.
Owner's Manual
Page 17
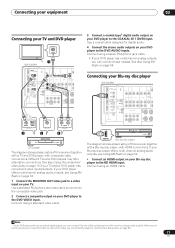
... IN TV SAT IN DVR1 OUT IN L DVR2 OUT IN SIRIUS ZON IN OU R MULTI CH IN SPEAKERS FRONT AR FRONT CENTER SURROUND SURROUND BACK L R SUBWOOFER COAXIAL OPTICAL DIGITAL OUT 3 VIDEO OUT 2 R AUDIO L ANALOG OUT 4 DVD player The diagram shows a basic setup of this receiver using a stereo RCA/... a standard RCA/phono jack video cable to connect to the composite video jack. 2 Connect a composite output on page 19 if your Blu-ray disc player VSX-1018AH HDMI COAXIAL ASSIGNABLE 1 - 2 OUT IN 1 (DVD) BD IN IN 2 (CD) XM IN OPTICAL IN 1 IN 1 (TV SAT) CON- If your Blu-ray ...
... IN TV SAT IN DVR1 OUT IN L DVR2 OUT IN SIRIUS ZON IN OU R MULTI CH IN SPEAKERS FRONT AR FRONT CENTER SURROUND SURROUND BACK L R SUBWOOFER COAXIAL OPTICAL DIGITAL OUT 3 VIDEO OUT 2 R AUDIO L ANALOG OUT 4 DVD player The diagram shows a basic setup of this receiver using a stereo RCA/... a standard RCA/phono jack video cable to connect to the composite video jack. 2 Connect a composite output on page 19 if your Blu-ray disc player VSX-1018AH HDMI COAXIAL ASSIGNABLE 1 - 2 OUT IN 1 (DVD) BD IN IN 2 (CD) XM IN OPTICAL IN 1 IN 1 (TV SAT) CON- If your Blu-ray ...
Owner's Manual
Page 18
... OUT IN SIRIUS ZONE 2 IN OUT R MULTI CH IN SPEAKERS FRONT AR L FRONT CENTER SURROUND SURROUND BACK L R SUBWOOFER DIGITAL OUT R AUDIO L VIDEO AV OUT STB 1 Connect the audio/video outputs on this step. 18 En VSX-1018AH HDMI COAXIAL ASSIGNABLE 1 - 2 OUT IN 1 (DVD) BD IN IN 2 (CD) XM IN OPTICAL IN 1 IN 1 (TV... L VIDEO AV OUT 12 DVR, VCR, etc. 1 Connect the audio/video outputs of so-called 'set -top box to the DVR1 AUDIO and VIDEO inputs. VSX-1018AH HDMI COAXIAL ASSIGNABLE 1 - 2 OUT IN 1 (DVD) BD IN IN 2 (CD) XM IN OPTICAL IN 1 IN 1 (TV SAT) CON-
... OUT IN SIRIUS ZONE 2 IN OUT R MULTI CH IN SPEAKERS FRONT AR L FRONT CENTER SURROUND SURROUND BACK L R SUBWOOFER DIGITAL OUT R AUDIO L VIDEO AV OUT STB 1 Connect the audio/video outputs on this step. 18 En VSX-1018AH HDMI COAXIAL ASSIGNABLE 1 - 2 OUT IN 1 (DVD) BD IN IN 2 (CD) XM IN OPTICAL IN 1 IN 1 (TV... L VIDEO AV OUT 12 DVR, VCR, etc. 1 Connect the audio/video outputs of so-called 'set -top box to the DVR1 AUDIO and VIDEO inputs. VSX-1018AH HDMI COAXIAL ASSIGNABLE 1 - 2 OUT IN 1 (DVD) BD IN IN 2 (CD) XM IN OPTICAL IN 1 IN 1 (TV SAT) CON-
Owner's Manual
Page 19
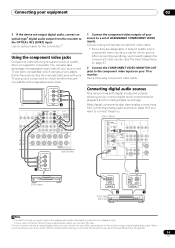
...connection is for playback only). • If your recorder only has a coaxial digital output, you set of the coaxial inputs on page 67). 19 En VSX-1018AH HDMI COAXIAL ASSIGNABLE 1 - 2 OUT IN 1 (DVD) BD IN IN 2 (CD) XM IN OPTICAL IN 1 IN 1 (TV SAT) CON-... TI CH IN SPEAKERS FRONT AR SURROUND SURROUND BACK CD CD-R SUBWOOFER SURROUND SURROUND BACK CENTER SURROUND L R SURROUND BACK / B LR L (Single) Y PB PR 1 COMPONENT VIDEO SELECTABLE SEE INSTRUCTION MANUAL SELECTABLE VOIR LE MODE D'EMPLOI VSX-1018AH 1 Connect the component video outputs of your TV or monitor....
...connection is for playback only). • If your recorder only has a coaxial digital output, you set of the coaxial inputs on page 67). 19 En VSX-1018AH HDMI COAXIAL ASSIGNABLE 1 - 2 OUT IN 1 (DVD) BD IN IN 2 (CD) XM IN OPTICAL IN 1 IN 1 (TV SAT) CON-... TI CH IN SPEAKERS FRONT AR SURROUND SURROUND BACK CD CD-R SUBWOOFER SURROUND SURROUND BACK CENTER SURROUND L R SURROUND BACK / B LR L (Single) Y PB PR 1 COMPONENT VIDEO SELECTABLE SEE INSTRUCTION MANUAL SELECTABLE VOIR LE MODE D'EMPLOI VSX-1018AH 1 Connect the component video outputs of your TV or monitor....
Owner's Manual
Page 20
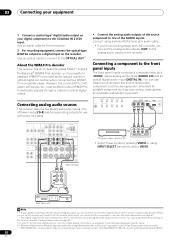
... CD CENTER L CD-R SURROUND R SUBWOOFER SURROUND SURROUND BACK SURROUND BACK / B LR L (Single) TV game, video camera, etc. Note that WMA9 Pro 96 kHz sources will be able to (see also The Input Setup menu on your computer system. SELECTABLE SEE INSTRUCTION MANUAL SELECTABLE VOIR LE MODE D'EMPLOI VSX-1018AH OUT PLAY IN REC...
... CD CENTER L CD-R SURROUND R SUBWOOFER SURROUND SURROUND BACK SURROUND BACK / B LR L (Single) TV game, video camera, etc. Note that WMA9 Pro 96 kHz sources will be able to (see also The Input Setup menu on your computer system. SELECTABLE SEE INSTRUCTION MANUAL SELECTABLE VOIR LE MODE D'EMPLOI VSX-1018AH OUT PLAY IN REC...
Owner's Manual
Page 21
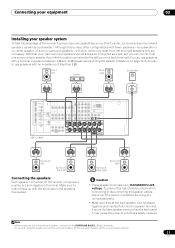
... if you plan to the left Connecting the speakers Each speaker connection on the speakers themselves. At the very least, front left Center Front right Subwoofer LINE LEVEL INPUT HDMI COAXIAL ASSIGNABLE 1 - 2 OUT IN 1 (DVD) BD IN IN 2 (CD) XM IN OPTICAL IN 1 IN 1 (TV ... To use a 5.1-channel speaker set, use speakers with fewer speakers-no subwoofer or no center speaker, or even no surround speakers-will work. IN TROL OUT IN 2 (DVR1) IN 2 ASSIGNABLE 1-2 ASSIGNABLE 1-2 OUT IR ZONE2 IN OUT DIGITAL VSX-1018AH VIDEO IN OUT COMPONENT VIDEO IN 1 IN 2 IN 3 MONITOR OUT ...
... if you plan to the left Connecting the speakers Each speaker connection on the speakers themselves. At the very least, front left Center Front right Subwoofer LINE LEVEL INPUT HDMI COAXIAL ASSIGNABLE 1 - 2 OUT IN 1 (DVD) BD IN IN 2 (CD) XM IN OPTICAL IN 1 IN 1 (TV ... To use a 5.1-channel speaker set, use speakers with fewer speakers-no subwoofer or no center speaker, or even no surround speakers-will work. IN TROL OUT IN 2 (DVR1) IN 2 ASSIGNABLE 1-2 ASSIGNABLE 1-2 OUT IR ZONE2 IN OUT DIGITAL VSX-1018AH VIDEO IN OUT COMPONENT VIDEO IN 1 IN 2 IN 3 MONITOR OUT ...
Owner's Manual
Page 22
...falling in position, tighten the terminal until there is localized at a wider angle. B fig. Putting the speakers on the floor (except the subwoofer), or mounting them at a narrower angle. • Place the center speaker above or below . Also, make sure the center speaker does ...are securely installed. Be sure all speakers are installed securely to angle the speakers towards the listening position. Front left Center Front right Subwoofer Surround left Surround right Listening position Surround back left and right speakers. • It is not recommended. • For the best ...
...falling in position, tighten the terminal until there is localized at a wider angle. B fig. Putting the speakers on the floor (except the subwoofer), or mounting them at a narrower angle. • Place the center speaker above or below . Also, make sure the center speaker does ...are securely installed. Be sure all speakers are installed securely to angle the speakers towards the listening position. Front left Center Front right Subwoofer Surround left Surround right Listening position Surround back left and right speakers. • It is not recommended. • For the best ...
Owner's Manual
Page 31
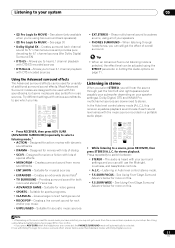
... sources • DTS Neo:6 - Designed for acoustic music sources • EXT.STEREO - When listening through just the front left and right speakers (and possibly your subwoofer depending on this . In the Auto level control stereo mode (A.L.C.), this . • F.S.SURR WIDE - AUTO/ STEREO/ BD MENU DIRECT A.L.C. See Using Front Stage Surround Advance...
... sources • DTS Neo:6 - Designed for acoustic music sources • EXT.STEREO - When listening through just the front left and right speakers (and possibly your subwoofer depending on this . In the Auto level control stereo mode (A.L.C.), this . • F.S.SURR WIDE - AUTO/ STEREO/ BD MENU DIRECT A.L.C. See Using Front Stage Surround Advance...

Owner's Manual
Page 32
... a source, press RECEIVER, then press STEREO/A.L.C. to select the mode you want to create natural surround sound effects using just the front speakers and the subwoofer. See Auto playback on this . 2 There are heard without any sound delay and hibit settings. 05 Listening to your system Using Front Stage Surround Advance...
... a source, press RECEIVER, then press STEREO/A.L.C. to select the mode you want to create natural surround sound effects using just the front speakers and the subwoofer. See Auto playback on this . 2 There are heard without any sound delay and hibit settings. 05 Listening to your system Using Front Stage Surround Advance...
Owner's Manual
Page 39
... level at ear level using a table or a chair. 4 Follow the instructions on-screen. • Make sure the microphone is connected. • If you're using a subwoofer, it is EQ Pro. & S-Wave) - Auto MCACC 2 . SYMMETRY (default) implements symmetric correction for notes regarding high background noise levels and other correction curves (such as...
... level at ear level using a table or a chair. 4 Follow the instructions on-screen. • Make sure the microphone is connected. • If you're using a subwoofer, it is EQ Pro. & S-Wave) - Auto MCACC 2 . SYMMETRY (default) implements symmetric correction for notes regarding high background noise levels and other correction curves (such as...
Owner's Manual
Page 40
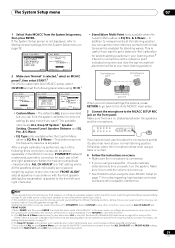
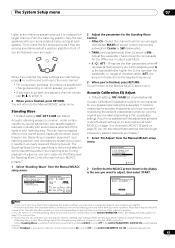
... or Speaker Setting in the Auto MCACC Setup should give you excellent surround sound from your main listening position. 8 The Auto MCACC Setup has finished! Subwoofer Check 1.Auto MCACC Now Analyzing... (6/9) Surround Analysis Speaker System Channel Level Speaker Distance [ OK ] [ OK ] [ ] :Cancel :Cancel Again, ...present in your speaker system (see an error message (ERR) in the OSD.1 The configuration shown on page 48. • The subwoofer distance setting may be farther than the actual distance from the speaker distance setting. 40 En 07 The System Setup menu 5 Wait ...
... or Speaker Setting in the Auto MCACC Setup should give you excellent surround sound from your main listening position. 8 The Auto MCACC Setup has finished! Subwoofer Check 1.Auto MCACC Now Analyzing... (6/9) Surround Analysis Speaker System Channel Level Speaker Distance [ OK ] [ OK ] [ ] :Cancel :Cancel Again, ...present in your speaker system (see an error message (ERR) in the OSD.1 The configuration shown on page 48. • The subwoofer distance setting may be farther than the actual distance from the speaker distance setting. 40 En 07 The System Setup menu 5 Wait ...

Owner's Manual
Page 41
..., the display will return to OFF, the selection screen for notes regarding high background noise levels and other possible interference. • If you're using a subwoofer, switch it about ear level at high volume. If the microphone is connected while the System Setup menu is set to the System Setup menu...
..., the display will return to OFF, the selection screen for notes regarding high background noise levels and other possible interference. • If you're using a subwoofer, switch it about ear level at high volume. If the microphone is connected while the System Setup menu is set to the System Setup menu...
Owner's Manual
Page 43
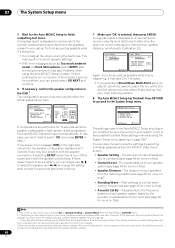
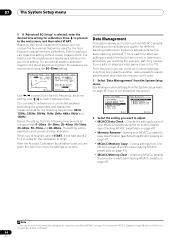
...the Manual MCACC setup menu. 3.Manual MCACC a . Standing Wave • Default setting: ON2/ATT 0.0dB (all except center channel and subwoofer), Center or SW (subwoofer). • TRIM (only available when Filter Ch above is SW) - EQ Professional :Return 3c.Standing Wave MCACC : M1. You ...this . 3 • Since they are arriving simultaneously at a position slightly in your speakers very slightly. • For better audibility, the subwoofer emits a continuous test tone (oscillating pulses are matched up for the Standing Wave Control. • Filter Ch - Note that the MCACC ...
...the Manual MCACC setup menu. 3.Manual MCACC a . Standing Wave • Default setting: ON2/ATT 0.0dB (all except center channel and subwoofer), Center or SW (subwoofer). • TRIM (only available when Filter Ch above is SW) - EQ Professional :Return 3c.Standing Wave MCACC : M1. You ...this . 3 • Since they are arriving simultaneously at a position slightly in your speakers very slightly. • For better audibility, the subwoofer emits a continuous test tone (oscillating pulses are matched up for the Standing Wave Control. • Filter Ch - Note that the MCACC ...
Owner's Manual
Page 46
... setting for the final frequency adjustment and calibration. Based on page 47). • Memory Rename - Auto MCACC 2 . Memory Rename c . Names your connected speakers (excluding the subwoofer), and display the measurements for easy identification (see Checking MCACC preset data on the reverb measurement above, you should have already completed. 46 En EQ...
... setting for the final frequency adjustment and calibration. Based on page 47). • Memory Rename - Auto MCACC 2 . Memory Rename c . Names your connected speakers (excluding the subwoofer), and display the measurements for easy identification (see Checking MCACC preset data on the reverb measurement above, you should have already completed. 46 En EQ...


