Owner's Manual
Page 5
...-ray disc player 17 Connecting a satellite/cable receiver or other set-top box 18 Connecting a DVD/HDD recorder, VCR and other video sources 18 Using the component video jacks 19 Connecting digital audio sources 19 About the WMA9 Pro decoder 20 Connecting analog audio sources 20 Connecting a component to the front panel inputs . . . . 20 Installing your speaker system 21 Connecting the speakers 21 Placing the speakers 22 Connecting antennas 23 Connecting external antennas 23 Plugging in the receiver 24 04 Controls and displays Front panel 25 Operating range of remote control unit...
...-ray disc player 17 Connecting a satellite/cable receiver or other set-top box 18 Connecting a DVD/HDD recorder, VCR and other video sources 18 Using the component video jacks 19 Connecting digital audio sources 19 About the WMA9 Pro decoder 20 Connecting analog audio sources 20 Connecting a component to the front panel inputs . . . . 20 Installing your speaker system 21 Connecting the speakers 21 Placing the speakers 22 Connecting antennas 23 Connecting external antennas 23 Plugging in the receiver 24 04 Controls and displays Front panel 25 Operating range of remote control unit...
Owner's Manual
Page 6
... channel presets 57 Using the SIRIUS Menu 57 Connecting the multichannel analog inputs 57 Selecting the multichannel analog inputs 58 Speaker B setup 58 Switching the speaker system 58 Bi-amping your front speakers 59 Bi-wiring your speakers 59 Connecting additional amplifiers 60 MULTI-ZONE listening 60 Making MULTI-ZONE connections 60 Using the MULTI-ZONE controls 61 Connecting an IR receiver 62 Using this receiver with a Pioneer flat panel TV . . . . . 63 Using the SR+ mode with a Pioneer flat panel TV 64 09 HDMI Control Making the HDMI Control connections 65 Setting the HDMI...
... channel presets 57 Using the SIRIUS Menu 57 Connecting the multichannel analog inputs 57 Selecting the multichannel analog inputs 58 Speaker B setup 58 Switching the speaker system 58 Bi-amping your front speakers 59 Bi-wiring your speakers 59 Connecting additional amplifiers 60 MULTI-ZONE listening 60 Making MULTI-ZONE connections 60 Using the MULTI-ZONE controls 61 Connecting an IR receiver 62 Using this receiver with a Pioneer flat panel TV . . . . . 63 Using the SR+ mode with a Pioneer flat panel TV 64 09 HDMI Control Making the HDMI Control connections 65 Setting the HDMI...
Owner's Manual
Page 11
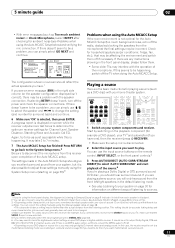
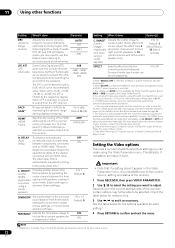
... get digital 2 channel stereo and analog sound. STANDARD ADV SURR HDD DVD THX STATUS PHASE INPUT SELECT DIMMER CH VOL MUTE ANT MPX SIGNAL SEL 1 GENRE 2 MCACC 3 SLEEP AUDIO PARAMETER EXIT VIDEO PARAMETER TUNE TOOLS AUDIO DISPLAY MEM CH 4 5 6 1 Switch on your DVD player or source discs, you see an error message (ERR) in the default listening mode. • See also Listening to adjust these settings manually using the System Setup menu (starting on page 38).3 Playing a source Here are playing a stereo source...
... get digital 2 channel stereo and analog sound. STANDARD ADV SURR HDD DVD THX STATUS PHASE INPUT SELECT DIMMER CH VOL MUTE ANT MPX SIGNAL SEL 1 GENRE 2 MCACC 3 SLEEP AUDIO PARAMETER EXIT VIDEO PARAMETER TUNE TOOLS AUDIO DISPLAY MEM CH 4 5 6 1 Switch on your DVD player or source discs, you see an error message (ERR) in the default listening mode. • See also Listening to adjust these settings manually using the System Setup menu (starting on page 38).3 Playing a source Here are playing a stereo source...
Owner's Manual
Page 13
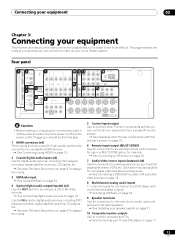
... IN jacks for digital audio sources, including DVD players/recorders, digital satellite receivers, CD players, etc. See also The Input Setup menu on page 67 to assign the inputs. 5 Control input/output Use to connect other video sources on page 18. 8 Multichannel analog audio inputs 7.1 channel inputs for connection to a DVD player with multichannel analog outputs. See Using XM Radio on page 54. 9 Speaker terminals Use for connection to the main front, center, surround and surround back speakers. See Installing your speaker system on page 21. 10 Composite monitor...
... IN jacks for digital audio sources, including DVD players/recorders, digital satellite receivers, CD players, etc. See also The Input Setup menu on page 67 to assign the inputs. 5 Control input/output Use to connect other video sources on page 18. 8 Multichannel analog audio inputs 7.1 channel inputs for connection to a DVD player with multichannel analog outputs. See Using XM Radio on page 54. 9 Speaker terminals Use for connection to the main front, center, surround and surround back speakers. See Installing your speaker system on page 21. 10 Composite monitor...
Owner's Manual
Page 16
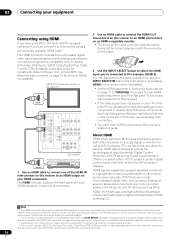
... supports the corresponding format. 16 En To take advantage of the HDMI IN interconnects on this receiver's digital out jacks. Consult your local audio dealer for more on the front panel display. HDCP is not compatible with the connector on the player. 3 Use the INPUT SELECT button to select the HDMI input you connect a component that the component connected to this receiver to multi-channel surround-sound audio. HDMI/DVI-compatible monitor or flat panel TV HDMI IN HDMI COAXIAL ASSIGNABLE 1 - 2 OUT IN 1 (DVD...
... supports the corresponding format. 16 En To take advantage of the HDMI IN interconnects on this receiver's digital out jacks. Consult your local audio dealer for more on the front panel display. HDCP is not compatible with the connector on the player. 3 Use the INPUT SELECT button to select the HDMI input you connect a component that the component connected to this receiver to multi-channel surround-sound audio. HDMI/DVI-compatible monitor or flat panel TV HDMI IN HDMI COAXIAL ASSIGNABLE 1 - 2 OUT IN 1 (DVD...
Owner's Manual
Page 20
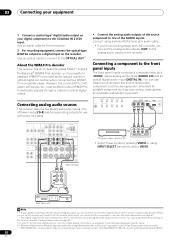
... digital audio output on your digital component only has an optical digital output, you can connect it is possible to playback WMA9 Pro-encoded audio using a stereo RCA/phono jack audio cable. • If you're connecting a tape deck, MD recorder, etc., connect the analog audio outputs (OUT) to the analog audio inputs on the recorder. Use a coaxial cable for portable equipment such as camcorders, video games and portable audio/video equipment. PHONES MULTI-ZONE CONTROL ON/OFF SPEAKERS ST - SELECTABLE SEE INSTRUCTION MANUAL SELECTABLE VOIR LE MODE D'EMPLOI VSX-1018AH OUT PLAY...
... digital audio output on your digital component only has an optical digital output, you can connect it is possible to playback WMA9 Pro-encoded audio using a stereo RCA/phono jack audio cable. • If you're connecting a tape deck, MD recorder, etc., connect the analog audio outputs (OUT) to the analog audio inputs on the recorder. Use a coaxial cable for portable equipment such as camcorders, video games and portable audio/video equipment. PHONES MULTI-ZONE CONTROL ON/OFF SPEAKERS ST - SELECTABLE SEE INSTRUCTION MANUAL SELECTABLE VOIR LE MODE D'EMPLOI VSX-1018AH OUT PLAY...
Owner's Manual
Page 28
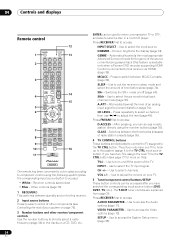
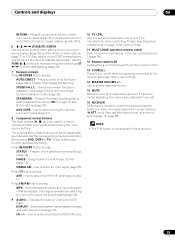
... a Pioneer DVD recorder supporting HDMI Control is connected to this receiver. 2 Input source buttons Press to select control of other receiver/component controls Use the number buttons to put the receiver in a multi-CD player. VOL +/- - Use to select the surround/virtual back channel mode (page 33). SETUP - STANDARD ADV SURR HDD DVD THX STATUS PHASE ANT AUDIO DISPLAY MPX SIGNAL SEL MEM CH TV CTRL RECEIVER 12 13 14 15 16 MAIN ZONE 2 RECEIVER The remote has been conveniently color-coded according to adjust the volume on...
... a Pioneer DVD recorder supporting HDMI Control is connected to this receiver. 2 Input source buttons Press to select control of other receiver/component controls Use the number buttons to put the receiver in a multi-CD player. VOL +/- - Use to select the surround/virtual back channel mode (page 33). SETUP - STANDARD ADV SURR HDD DVD THX STATUS PHASE ANT AUDIO DISPLAY MPX SIGNAL SEL MEM CH TV CTRL RECEIVER 12 13 14 15 16 MAIN ZONE 2 RECEIVER The remote has been conveniently color-coded according to adjust the volume on...
Owner's Manual
Page 29
... MASTER VOLUME +/- Press TV first to select the VHF/UHF antennas or Cable TV. Use to access: ANT - DISPLAY - Controls and displays 04 RETURN - Press to switch on/off other components connected to switch between the stereo playback mode (page 31) and the Front Stage Surround Advance mode (page 32). Also used to set preset code of a double cassette deck player. SIGNAL SEL - Press FM/AM first to turn on DVD discs. Changes the audio or channel on /off Phase Control...
... MASTER VOLUME +/- Press TV first to select the VHF/UHF antennas or Cable TV. Use to access: ANT - DISPLAY - Controls and displays 04 RETURN - Press to switch on/off other components connected to switch between the stereo playback mode (page 31) and the Front Stage Surround Advance mode (page 32). Also used to set preset code of a double cassette deck player. SIGNAL SEL - Press FM/AM first to turn on DVD discs. Changes the audio or channel on /off Phase Control...
Owner's Manual
Page 31
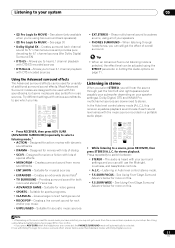
... a source, press RECEIVER, then press STEREO/A.L.C. Provides surround sound for music sources. Suitable for 6.1 channel sources (like . Gives multichannel sound to a stereo source, using two surround back speakers) • 2 Pro Logic IIx MUSIC - STANDARD ADV SURR HDD DVD THX STATUS PHASE ANT AUDIO DISPLAY MPX SIGNAL SEL MEM CH TV CTRL RECEIVER • While listening to select a listening mode.1 • ACTION - Listening in a portable audio player. Creates surround back channel sound for 5.1 channel sources and provides pure decoding for sports programs •...
... a source, press RECEIVER, then press STEREO/A.L.C. Provides surround sound for music sources. Suitable for 6.1 channel sources (like . Gives multichannel sound to a stereo source, using two surround back speakers) • 2 Pro Logic IIx MUSIC - STANDARD ADV SURR HDD DVD THX STATUS PHASE ANT AUDIO DISPLAY MPX SIGNAL SEL MEM CH TV CTRL RECEIVER • While listening to select a listening mode.1 • ACTION - Listening in a portable audio player. Creates surround back channel sound for 5.1 channel sources and provides pure decoding for sports programs •...
Owner's Manual
Page 38
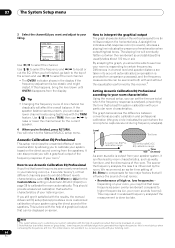
... screen saver will need to first specify the MCACC preset you want to have different listening positions depending on page 10 for a quick and effective automatic surround setup. Specifies what you've connected to the digital, HDMI and component video inputs (see Surround back speaker setting on page 10, you can 't use the System Setup menu when the iPod USB, XM or SIRIUS Radio input source is selected (in the Auto MCACC Setup...
... screen saver will need to first specify the MCACC preset you want to have different listening positions depending on page 10 for a quick and effective automatic surround setup. Specifies what you've connected to the digital, HDMI and component video inputs (see Surround back speaker setting on page 10, you can 't use the System Setup menu when the iPod USB, XM or SIRIUS Radio input source is selected (in the Auto MCACC Setup...
Owner's Manual
Page 43
... setup (depending on the low frequency response of the reference speaker). 2 You can have a negative effect on the overall sound, especially at a position slightly in front of you may want to go back and adjust a channel, simply use it results in an overly resonant ('boomy') sound. Standing Wave d . It works by adjusting the distance setting, you may be changed during playback of sources using the HDMI connection...
... setup (depending on the low frequency response of the reference speaker). 2 You can have a negative effect on the overall sound, especially at a position slightly in front of you may want to go back and adjust a channel, simply use it results in an overly resonant ('boomy') sound. Standing Wave d . It works by adjusting the distance setting, you may be changed during playback of sources using the HDMI connection...
Owner's Manual
Page 44
... OVER! disappears from the speakers. If the speaker balance seems uneven, you want and adjust to certain frequencies. This should be displayed on-screen. This is done with the help of room reverberation by this is responding to your particular room characteristics. 07 The System Setup menu 3 Select the channel(s) you can raise or lower channel levels using the direct sound of reverberation when outputting test tones. You will affect...
... OVER! disappears from the speakers. If the speaker balance seems uneven, you want and adjust to certain frequencies. This should be displayed on-screen. This is done with the help of room reverberation by this is responding to your particular room characteristics. 07 The System Setup menu 3 Select the channel(s) you can raise or lower channel levels using the direct sound of reverberation when outputting test tones. You will affect...
Owner's Manual
Page 51
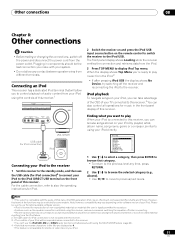
... VOLUME VIDEO VIDEO INPUT L AUDIO R DIGITAL IN iPod DIRECT USB MCACC SETUP MIC USB cable (for iPod connection) VSX-1018AH iPod MENU Connecting your iPod to the receiver 1 Set this receiver to the standby mode, and then use the latest available software version. • iPod is licensed for iPod connection)2 to connect your iPod will allow any time, press RETURN. 2 Use / to browse the selected category (e.g., albums). • Use / to move to this receiver. For the cable connection, refer to also the operating instructions for iPod. 2 Switch...
... VOLUME VIDEO VIDEO INPUT L AUDIO R DIGITAL IN iPod DIRECT USB MCACC SETUP MIC USB cable (for iPod connection) VSX-1018AH iPod MENU Connecting your iPod to the receiver 1 Set this receiver to the standby mode, and then use the latest available software version. • iPod is licensed for iPod connection)2 to connect your iPod will allow any time, press RETURN. 2 Use / to browse the selected category (e.g., albums). • Use / to move to this receiver. For the cable connection, refer to also the operating instructions for iPod. 2 Switch...
Owner's Manual
Page 57
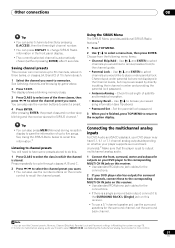
... the remote control to the corresponding MULTI CH IN jacks on this receiver. • Use standard RCA/phono jack cables for the connections. • If there is automatically chosen (without pressing ENTER) after 5 seconds. Connecting the multichannel analog inputs For DVD Audio and SACD playback, your DVD player may be accessed by directly inputting their channel number and providing the parental lock password. • Antenna Aiming - Other connections 08 Tip • You can select channels directly by...
... the remote control to the corresponding MULTI CH IN jacks on this receiver. • Use standard RCA/phono jack cables for the connections. • If there is automatically chosen (without pressing ENTER) after 5 seconds. Connecting the multichannel analog inputs For DVD Audio and SACD playback, your DVD player may be accessed by directly inputting their channel number and providing the parental lock password. • Antenna Aiming - Other connections 08 Tip • You can select channels directly by...
Owner's Manual
Page 58
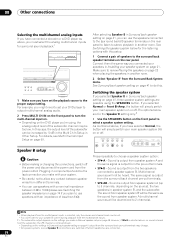
... or changing the connections, switch off . The options below for the listening options with an impedance of the subwoofer can use speakers with a nominal impedance between 6 Ω to use the speakers connected to 5 channels, depending on the rear panel. Multichannel sources will be too low. ST + VIDEO VIDEO INPUT L AUDIO R DIGITAL IN iPod DIRECT USB MCACC SETUP MIC iPod DIRECT USB MCACC SETUP MIC MASTER VOLUME 1 Make sure you 're using the SPEAKERS button. For example, you might need to set your DVD player to output multichannel analog audio. 2 Press MULTI...
... or changing the connections, switch off . The options below for the listening options with an impedance of the subwoofer can use speakers with a nominal impedance between 6 Ω to use the speakers connected to 5 channels, depending on the rear panel. Multichannel sources will be too low. ST + VIDEO VIDEO INPUT L AUDIO R DIGITAL IN iPod DIRECT USB MCACC SETUP MIC iPod DIRECT USB MCACC SETUP MIC MASTER VOLUME 1 Make sure you 're using the SPEAKERS button. For example, you might need to set your DVD player to output multichannel analog audio. 2 Press MULTI...
Owner's Manual
Page 62
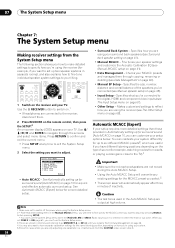
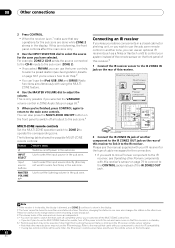
... OUT jack. MASTER VOLUME +/- Closet or shelving unit Non-Pioneer IR component IN CONTROL Pioneer component IN OUT IR receiver HDMI COAXIAL ASSIGNABLE 1 - 2 OUT IN 1 (DVD) BD IN IN 2 (CD) XM IN OPTICAL IN 1 IN 1 (TV SAT) CON- Please be possible if direct light from a strong fluorescent lamp is only possible if you don't plan to select the input source in the sub zone. This is shining on the IR receiver remote sensor...
... OUT jack. MASTER VOLUME +/- Closet or shelving unit Non-Pioneer IR component IN CONTROL Pioneer component IN OUT IR receiver HDMI COAXIAL ASSIGNABLE 1 - 2 OUT IN 1 (DVD) BD IN IN 2 (CD) XM IN OPTICAL IN 1 IN 1 (TV SAT) CON- Please be possible if direct light from a strong fluorescent lamp is only possible if you don't plan to select the input source in the sub zone. This is shining on the IR receiver remote sensor...
Owner's Manual
Page 67
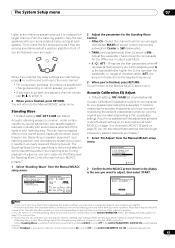
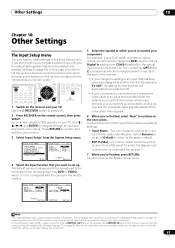
... menu. 3 Select 'Input Setup' from a flat panel TV, select the display input to which terminal so the buttons on the remote correspond to the components you 've connected it at the flat panel TV's remote sensor after making this receiver (opposite from COAX-1 (default) to the optical input you 've connected. Manual MCACC 4 . The second screen of video cable as DVD or VIDEO) which you've connected your component. System Setup MENU 1 . Data Management 5 . The default names correspond with the numbers...
... menu. 3 Select 'Input Setup' from a flat panel TV, select the display input to which terminal so the buttons on the remote correspond to the components you 've connected it at the flat panel TV's remote sensor after making this receiver (opposite from COAX-1 (default) to the optical input you 've connected. Manual MCACC 4 . The second screen of video cable as DVD or VIDEO) which you've connected your component. System Setup MENU 1 . Data Management 5 . The default names correspond with the numbers...
Owner's Manual
Page 72
... sound is selected. The video delay time is only available when the connected display supports the automatic audio/video synchronizing capability ('lip-sync') for each mode can be turned on the operational status of the (Center front speakers by spreading the Width) center channel between components connected ON with Default: 3 Image) vocals. Note 1 Brightness, Contrast, Hue, Chroma, Resolution and Aspect can make using this receiver. g.Only when listening to play the receiver's HDMI audio and video input signals from the LFE channel...
... sound is selected. The video delay time is only available when the connected display supports the automatic audio/video synchronizing capability ('lip-sync') for each mode can be turned on the operational status of the (Center front speakers by spreading the Width) center channel between components connected ON with Default: 3 Image) vocals. Note 1 Brightness, Contrast, Hue, Chroma, Resolution and Aspect can make using this receiver. g.Only when listening to play the receiver's HDMI audio and video input signals from the LFE channel...
Owner's Manual
Page 81
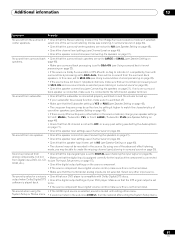
... channels, make sure this is muted until exiting either menu. By using the • If the HDMI input source is selected, sound is not turned down . • Make sure that the surround back speakers are set too low; ROM, etc.). • Check the digital output settings on page 33). output when Dolby Digital/DTS • Check the digital output settings of the surround listening modes (see Speaker Setting on page 48). • If there is very little low frequency...
... channels, make sure this is muted until exiting either menu. By using the • If the HDMI input source is selected, sound is not turned down . • Make sure that the surround back speakers are set too low; ROM, etc.). • Check the digital output settings on page 33). output when Dolby Digital/DTS • Check the digital output settings of the surround listening modes (see Speaker Setting on page 48). • If there is very little low frequency...
Owner's Manual
Page 82
... maximum volume will change accordingly. Everything seems to be set it to 0º (or depending on the subwoofer, the setting where you 're recording isn't copy protected. • Check that the multichannel analog inputs are properly connected to a wall, etc. • Use an outdoor antenna for all speakers (see Speaker Setting on page 21). A multichannel DVD source • Make sure that the OUT jacks are selected (see Setting the HDMI Control mode...
... maximum volume will change accordingly. Everything seems to be set it to 0º (or depending on the subwoofer, the setting where you 're recording isn't copy protected. • Check that the multichannel analog inputs are properly connected to a wall, etc. • Use an outdoor antenna for all speakers (see Speaker Setting on page 21). A multichannel DVD source • Make sure that the OUT jacks are selected (see Setting the HDMI Control mode...


