
Owner's Manual
Page 1
... RECEIVER VSX-1018AH-K Register your product at http://www.pioneerelectronics.com (US) http://www.pioneerelectronics.ca (Canada) • Protect your new investment The details of your purchase will be on file for reference in the event of an insurance claim such as loss or theft. • Receive ...free tips, updates and service bulletins on your new product • Improve product development Your input helps us continue to design products that meet your needs. • Receive a free Pioneer newsletter Registered customers can opt in to...
... RECEIVER VSX-1018AH-K Register your product at http://www.pioneerelectronics.com (US) http://www.pioneerelectronics.ca (Canada) • Protect your new investment The details of your purchase will be on file for reference in the event of an insurance claim such as loss or theft. • Receive ...free tips, updates and service bulletins on your new product • Improve product development Your input helps us continue to design products that meet your needs. • Receive a free Pioneer newsletter Registered customers can opt in to...
Owner's Manual
Page 2
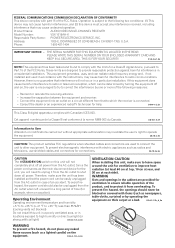
...for the unit, you will need to unplug it from the AC outlet. Product Name: AUDIO/VIDEO MULTI-CHANNEL RECEIVER Model Number: VSX-1018AH-K Responsible Party Name: PIONEER ELECTRONICS SERVICE, INC. LONG BEACH, CA 90801-1760, U.S.A. PLEASE WRITE THIS SERIAL NUMBER ON YOUR ENCLOSED WARRANTY... items (such as the main disconnect device for example, when on thick carpet or a bed. Increase the separation between the equipment and receiver. - Operating Environment Operating environment temperature and humidity: +5 ºC to +35 ºC (+41 ºF to the following measures: ...
...for the unit, you will need to unplug it from the AC outlet. Product Name: AUDIO/VIDEO MULTI-CHANNEL RECEIVER Model Number: VSX-1018AH-K Responsible Party Name: PIONEER ELECTRONICS SERVICE, INC. LONG BEACH, CA 90801-1760, U.S.A. PLEASE WRITE THIS SERIAL NUMBER ON YOUR ENCLOSED WARRANTY... items (such as the main disconnect device for example, when on thick carpet or a bed. Increase the separation between the equipment and receiver. - Operating Environment Operating environment temperature and humidity: +5 ºC to +35 ºC (+41 ºF to the following measures: ...
Owner's Manual
Page 5
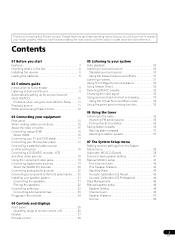
... surround sound 30 Using the Advanced surround effects 31 Listening in a safe place for buying this Pioneer product. After you start Features 7 Checking what's in the box 8 Installing the receiver 8 Loading the batteries 8 02 5 minute guide Introduction to home theater 9 Listening to Surround ... your speaker system 21 Connecting the speakers 21 Placing the speakers 22 Connecting antennas 23 Connecting external antennas 23 Plugging in the receiver 24 04 Controls and displays Front panel 25 Operating range of remote control unit 26 Display 27 Remote control 28 05 Listening ...
... surround sound 30 Using the Advanced surround effects 31 Listening in a safe place for buying this Pioneer product. After you start Features 7 Checking what's in the box 8 Installing the receiver 8 Loading the batteries 8 02 5 minute guide Introduction to home theater 9 Listening to Surround ... your speaker system 21 Connecting the speakers 21 Placing the speakers 22 Connecting antennas 23 Connecting external antennas 23 Plugging in the receiver 24 04 Controls and displays Front panel 25 Operating range of remote control unit 26 Display 27 Remote control 28 05 Listening ...
Owner's Manual
Page 6
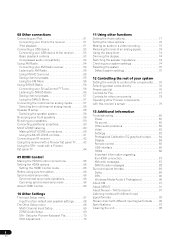
...60 Making MULTI-ZONE connections 60 Using the MULTI-ZONE controls 61 Connecting an IR receiver 62 Using this receiver with a Pioneer flat panel TV . . . . . 63 Using the SR+ mode with a Pioneer flat panel TV 64 09 HDMI Control Making the HDMI Control connections 65 Setting the...96 Specifications 97 Cleaning the unit 98 6 En THX Surround 91 Listening modes with different input signal formats 92 Stream direct with this receiver's sensor 79 13 Additional information Troubleshooting 80 Power 80 No sound 80 Other audio problems 82 Video 83 Settings 83 Professional Calibration EQ ...
...60 Making MULTI-ZONE connections 60 Using the MULTI-ZONE controls 61 Connecting an IR receiver 62 Using this receiver with a Pioneer flat panel TV . . . . . 63 Using the SR+ mode with a Pioneer flat panel TV 64 09 HDMI Control Making the HDMI Control connections 65 Setting the...96 Specifications 97 Cleaning the unit 98 6 En THX Surround 91 Listening modes with different input signal formats 92 Stream direct with this receiver's sensor 79 13 Additional information Troubleshooting 80 Power 80 No sound 80 Other audio problems 82 Video 83 Settings 83 Professional Calibration EQ ...
Owner's Manual
Page 7
... high transfer rates. • Phase Control The Phase Control technology incorporated into your component to this receiver automatically equalizes the playback sound level according to Pioneer for handling digital audio, and this receiver in synchronization with your Pioneer component that helps bring CD quality sound back to WMA, MP3 and MPEG-4 AAC audio files...
... high transfer rates. • Phase Control The Phase Control technology incorporated into your component to this receiver automatically equalizes the playback sound level according to Pioneer for handling digital audio, and this receiver in synchronization with your Pioneer component that helps bring CD quality sound back to WMA, MP3 and MPEG-4 AAC audio files...
Owner's Manual
Page 8
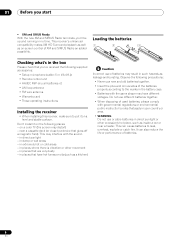
... dry cell batteries x2 • AM loop antenna • FM wire antenna • Warranty card • These operating instructions Installing the receiver • When installing this receiver, make sure to put it on -screen control of batteries may distort) - on a color TV (the screen may result in places ...(such as leakage and bursting. in extremely hot or cold areas - This can also reduce the life or performance of batteries. 8 En This receiver's enhanced compatibility makes XM HD Surround playback as well as inside a car or near a cassette deck (or close to the marks in direct ...
... dry cell batteries x2 • AM loop antenna • FM wire antenna • Warranty card • These operating instructions Installing the receiver • When installing this receiver, make sure to put it on -screen control of batteries may distort) - on a color TV (the screen may result in places ...(such as leakage and bursting. in extremely hot or cold areas - This can also reduce the life or performance of batteries. 8 En This receiver's enhanced compatibility makes XM HD Surround playback as well as inside a car or near a cassette deck (or close to the marks in direct ...
Owner's Manual
Page 9
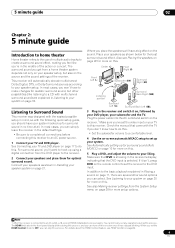
... make changes for more on , followed by your DVD player, your speakers as shown in the receiver's display, indicating that the DVD input is connected to an AC outlet, a 15-second HDMI initialization... Plug the power cable into the AC outlet and switch on page 65. 9 En See also Making receiver settings from the System Setup menu on page 38 for realistic surround sound, but also on page 22...and place them for more setup options. The surround sound you get from the DVD player to the receiver. 2 Connect your system on the sound. See Automatically setting up your TV and DVD player on...
... make changes for more on , followed by your DVD player, your speakers as shown in the receiver's display, indicating that the DVD input is connected to an AC outlet, a 15-second HDMI initialization... Plug the power cable into the AC outlet and switch on page 65. 9 En See also Making receiver settings from the System Setup menu on page 38 for realistic surround sound, but also on page 22...and place them for more setup options. The surround sound you get from the DVD player to the receiver. 2 Connect your system on the sound. See Automatically setting up your TV and DVD player on...
Owner's Manual
Page 10
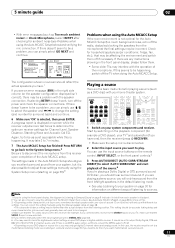
...5 Wait for the test tones to finish, then confirm the speaker configuration in another room, read through Surround back speaker setting on the receiver and your TV. 2 Connect the microphone to save other correction curves (such as an input source. 02 5 minute guide Automatically setting ...up the microphone provided with your system, the receiver uses the information from a series of your listening area, taking into account ambient noise, speaker size and distance, and tests for ...
...5 Wait for the test tones to finish, then confirm the speaker configuration in another room, read through Surround back speaker setting on the receiver and your TV. 2 Connect the microphone to save other correction curves (such as an input source. 02 5 minute guide Automatically setting ...up the microphone provided with your system, the receiver uses the information from a series of your listening area, taking into account ambient noise, speaker size and distance, and tests for ...
Owner's Manual
Page 11
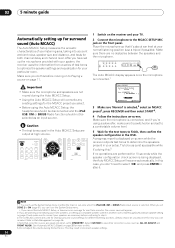
...Data Check screen. You can simply use the input source buttons on -screen should reflect the actual speakers you have one), then the receiver (press RECEIVER). • Make sure the setup mic is now selected). 5 If you need to manually switch the input signal type press SIGNAL ... Press AUTO/DIRECT (AUTO SURR/STREAM DIRECT) to 7 minutes. 7 The Auto MCACC Setup has finished! Again, try to your system components and receiver. Note 1 If you're using the Auto MCACC Setup below) and verifying the mic connection. STANDARD ADV SURR HDD DVD THX STATUS PHASE INPUT ...
...Data Check screen. You can simply use the input source buttons on -screen should reflect the actual speakers you have one), then the receiver (press RECEIVER). • Make sure the setup mic is now selected). 5 If you need to manually switch the input signal type press SIGNAL ... Press AUTO/DIRECT (AUTO SURR/STREAM DIRECT) to 7 minutes. 7 The Auto MCACC Setup has finished! Again, try to your system components and receiver. Note 1 If you're using the Auto MCACC Setup below) and verifying the mic connection. STANDARD ADV SURR HDD DVD THX STATUS PHASE INPUT ...

Owner's Manual
Page 12
...Note 1 • Phase matching is being performed properly. THX STATUS PHASE ANT AUDIO DISPLAY MPX SIGNAL SEL MEM CH TV CTRL RECEIVER • Press RECEIVER, then press PHASE (PHASE CONTROL) to OFF. With the Phase Control mode switched on the type of your subwoofer has a ... phase', they crest and trough together, resulting in phase, preventing unwanted distortion and/or coloring of the sound signal. If this receiver can actually feel when PHASE CONTROL is set , you can reproduce powerful bass sound without deteriorating the quality of processing involves a group...
...Note 1 • Phase matching is being performed properly. THX STATUS PHASE ANT AUDIO DISPLAY MPX SIGNAL SEL MEM CH TV CTRL RECEIVER • Press RECEIVER, then press PHASE (PHASE CONTROL) to OFF. With the Phase Control mode switched on the type of your subwoofer has a ... phase', they crest and trough together, resulting in phase, preventing unwanted distortion and/or coloring of the sound signal. If this receiver can actually feel when PHASE CONTROL is set , you can reproduce powerful bass sound without deteriorating the quality of processing involves a group...
Owner's Manual
Page 13
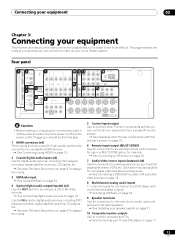
... assign the inputs. 5 Control input/output Use to connect other Pioneer components so that you can control all your equipment from the power outlet. Plugging in a MULTI-ZONE setup, for example. See Connecting an IR receiver on page 17. 13 En This page explains the kinds of... inputs has jacks for composite video and stereo analog audio. See Connecting a DVD/HDD recorder, VCR and other Pioneer components with this receiver's sensor on page 79. 6 Remote input/output (MULTI-ZONE) Use for connection to an external remote control sensor for connection to ...
... assign the inputs. 5 Control input/output Use to connect other Pioneer components so that you can control all your equipment from the power outlet. Plugging in a MULTI-ZONE setup, for example. See Connecting an IR receiver on page 17. 13 En This page explains the kinds of... inputs has jacks for composite video and stereo analog audio. See Connecting a DVD/HDD recorder, VCR and other Pioneer components with this receiver's sensor on page 79. 6 Remote input/output (MULTI-ZONE) Use for connection to an external remote control sensor for connection to ...
Owner's Manual
Page 14
... to connect separate amplifiers for radio broadcasts. See Connecting antennas on page 60. 13 Component video connections (x4) Use the inputs to connect a second receiver in a separate room. See MULTI-ZONE listening on page 23. 14 En
... to connect separate amplifiers for radio broadcasts. See Connecting antennas on page 60. 13 Component video connections (x4) Use the inputs to connect a second receiver in a separate room. See MULTI-ZONE listening on page 23. 14 En
Owner's Manual
Page 15
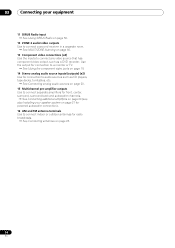
... connect your monitor/TV to HDMI, component, then composite (in Setting the Video options on page 67), the converter gives priority to the receiver's HDMI video outputs when connecting this case, try adjusting the resolution settings on page 72. 15 En Note 1 • If the video...display. Connecting your equipment 03 When making cable connections • To avoid hum, do not lay connected cables over the top of the receiver. • When connecting optical cables, be damaged if bent around sharp corners. patents and other intellectual property rights owned by Macrovision Corporation ...
... connect your monitor/TV to HDMI, component, then composite (in Setting the Video options on page 67), the converter gives priority to the receiver's HDMI video outputs when connecting this case, try adjusting the resolution settings on page 72. 15 En Note 1 • If the video...display. Connecting your equipment 03 When making cable connections • To avoid hum, do not lay connected cables over the top of the receiver. • When connecting optical cables, be damaged if bent around sharp corners. patents and other intellectual property rights owned by Macrovision Corporation ...
Owner's Manual
Page 16
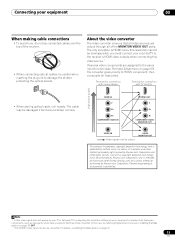
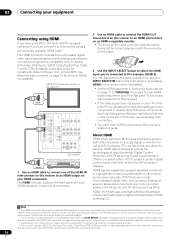
... single digital connection for use an analog video connection. • You can't hear HDMI audio through this receiver's digital out jacks. About HDMI HDMI (High Definition Multimedia Interface) supports both DVI and High Bandwidth Digital ...you have an HDMI or DVI (with HDCP) equipped component, you can connect it to this receiver using a commercially available HDMI cable.1 The HDMI connection transfers uncompressed digital video, as well as ... IN SPEA A FRONT CENTER SURROUND SURROUND BACK L R SUBWOOFER VSX-1018AH HDMI/DVI-equipped component HDMI OUT 1 Use an HDMI cable to do so.
... single digital connection for use an analog video connection. • You can't hear HDMI audio through this receiver's digital out jacks. About HDMI HDMI (High Definition Multimedia Interface) supports both DVI and High Bandwidth Digital ...you have an HDMI or DVI (with HDCP) equipped component, you can connect it to this receiver using a commercially available HDMI cable.1 The HDMI connection transfers uncompressed digital video, as well as ... IN SPEA A FRONT CENTER SURROUND SURROUND BACK L R SUBWOOFER VSX-1018AH HDMI/DVI-equipped component HDMI OUT 1 Use an HDMI cable to do so.
Owner's Manual
Page 17
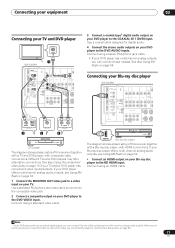
... can connect these instead. Note 1 If your DVD player to the COAXIAL IN 1 (DVD) input. Connecting your equipment 03 Connecting your Blu-ray disc player VSX-1018AH HDMI COAXIAL ASSIGNABLE 1 - 2 OUT IN 1 (DVD) BD IN IN 2 (CD) XM IN OPTICAL IN 1 IN 1 (TV SAT) CON- IN TROL OUT IN 2... output on your DVD player only has an optical digital output, you can connect it to one of this receiver using an optical cable. Connecting your TV and DVD player VIDEO IN TV 1 VSX-1018AH HDMI COAXIAL ASSIGNABLE 1 - 2 OUT IN 1 (DVD) BD IN IN 2 (CD) XM IN OPTICAL IN 1 IN ...
... can connect these instead. Note 1 If your DVD player to the COAXIAL IN 1 (DVD) input. Connecting your equipment 03 Connecting your Blu-ray disc player VSX-1018AH HDMI COAXIAL ASSIGNABLE 1 - 2 OUT IN 1 (DVD) BD IN IN 2 (CD) XM IN OPTICAL IN 1 IN 1 (TV SAT) CON- IN TROL OUT IN 2... output on your DVD player only has an optical digital output, you can connect it to one of this receiver using an optical cable. Connecting your TV and DVD player VIDEO IN TV 1 VSX-1018AH HDMI COAXIAL ASSIGNABLE 1 - 2 OUT IN 1 (DVD) BD IN IN 2 (CD) XM IN OPTICAL IN 1 IN ...
Owner's Manual
Page 18
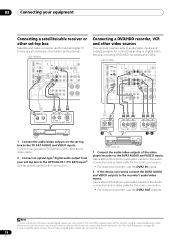
...top box to (see The Input Setup menu on the set up the receiver you'll need to tell the receiver which input you can record, connect the DVR1 AUDIO and VIDEO outputs to the recorder's audio/video inputs. VSX-1018AH HDMI COAXIAL ASSIGNABLE 1 - 2 OUT IN 1 (DVD) BD IN IN... 2 (CD) XM IN OPTICAL IN 1 IN 1 (TV SAT) CON- VSX-1018AH HDMI COAXIAL ASSIGNABLE 1 - 2 OUT ...
...top box to (see The Input Setup menu on the set up the receiver you'll need to tell the receiver which input you can record, connect the DVR1 AUDIO and VIDEO outputs to the recorder's audio/video inputs. VSX-1018AH HDMI COAXIAL ASSIGNABLE 1 - 2 OUT IN 1 (DVD) BD IN IN... 2 (CD) XM IN OPTICAL IN 1 IN 1 (TV SAT) CON- VSX-1018AH HDMI COAXIAL ASSIGNABLE 1 - 2 OUT ...
Owner's Manual
Page 19
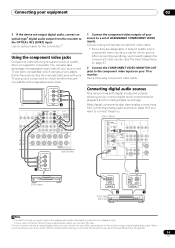
... L R SURROUND BACK / B LR L (Single) Y PB PR 1 COMPONENT VIDEO SELECTABLE SEE INSTRUCTION MANUAL SELECTABLE VOIR LE MODE D'EMPLOI VSX-1018AH 1 Connect the component video outputs of your source to the component video inputs on page 67). 19 En After connecting everything, you want to... page 20 if you 'll need to tell the receiver which input you can skip this receiver using a three-way component video cable. • Since they are both digital inputs and outputs, allowing you use for making digital recordings. VSX-1018AH HDMI COAXIAL ASSIGNABLE 1 - 2 OUT IN 1 (DVD...
... L R SURROUND BACK / B LR L (Single) Y PB PR 1 COMPONENT VIDEO SELECTABLE SEE INSTRUCTION MANUAL SELECTABLE VOIR LE MODE D'EMPLOI VSX-1018AH 1 Connect the component video outputs of your source to the component video inputs on page 67). 19 En After connecting everything, you want to... page 20 if you 'll need to tell the receiver which input you can skip this receiver using a three-way component video cable. • Since they are both digital inputs and outputs, allowing you use for making digital recordings. VSX-1018AH HDMI COAXIAL ASSIGNABLE 1 - 2 OUT IN 1 (DVD...
Owner's Manual
Page 20
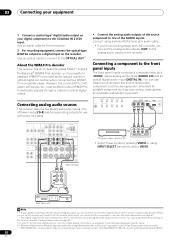
... player. Connect using INPUT SELECT (remote) to record some digital sources, you must be able to one of the optical inputs on this receiver. Use a coaxial cable for use these inputs by pressing VIDEO or using a stereo RCA/phono jack audio cable. • If you ...Connect a coaxial-type1 digital audio output on your digital component to 48 kHz. 20 En SELECTABLE SEE INSTRUCTION MANUAL SELECTABLE VOIR LE MODE D'EMPLOI VSX-1018AH OUT PLAY IN REC R L AUDIO IN/OUT Tape deck, etc. must make analog connections as camcorders, video games and portable audio/video ...
... player. Connect using INPUT SELECT (remote) to record some digital sources, you must be able to one of the optical inputs on this receiver. Use a coaxial cable for use these inputs by pressing VIDEO or using a stereo RCA/phono jack audio cable. • If you ...Connect a coaxial-type1 digital audio output on your digital component to 48 kHz. 20 En SELECTABLE SEE INSTRUCTION MANUAL SELECTABLE VOIR LE MODE D'EMPLOI VSX-1018AH OUT PLAY IN REC R L AUDIO IN/OUT Tape deck, etc. must make analog connections as camcorders, video games and portable audio/video ...
Owner's Manual
Page 21
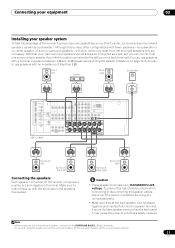
IN TROL OUT IN 2 (DVR1) IN 2 ASSIGNABLE 1-2 ASSIGNABLE 1-2 OUT IR ZONE2 IN OUT DIGITAL VSX-1018AH VIDEO IN OUT COMPONENT VIDEO IN 1 IN 2 IN 3 MONITOR OUT ANTENNA Y MONITOR IN OUT IN OUT IN OUT PB FM UNBAL 75 AM LOOP DVD... a safety measure. To prevent the risk of electric shock when connecting or disconnecting the speaker cables, disconnect the power cord before touching any of the receiver's surround sound capabilities connect front, center, surround and surround back speakers, as well as a subwoofer.1 Although this is twisted together and inserted fully into...
IN TROL OUT IN 2 (DVR1) IN 2 ASSIGNABLE 1-2 ASSIGNABLE 1-2 OUT IR ZONE2 IN OUT DIGITAL VSX-1018AH VIDEO IN OUT COMPONENT VIDEO IN 1 IN 2 IN 3 MONITOR OUT ANTENNA Y MONITOR IN OUT IN OUT IN OUT PB FM UNBAL 75 AM LOOP DVD... a safety measure. To prevent the risk of electric shock when connecting or disconnecting the speaker cables, disconnect the power cord before touching any of the receiver's surround sound capabilities connect front, center, surround and surround back speakers, as well as a subwoofer.1 Although this is twisted together and inserted fully into...
Owner's Manual
Page 24
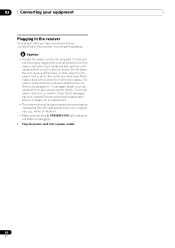
... En Check the power cord once in the cord or tie it damaged, ask your nearest Pioneer authorized independent service company for a replacement. • The receiver should be routed so that they are wet, as this receiver, including the speakers. Never make a knot in a while. If you find it with other ... power cord or pinch the cord in any other cables. The power cords should be stepped on. 03 Connecting your equipment Plugging in the receiver Only plug in after you an electric shock. Caution • Handle the power cord by tugging the cord, and never touch the power...
... En Check the power cord once in the cord or tie it damaged, ask your nearest Pioneer authorized independent service company for a replacement. • The receiver should be routed so that they are wet, as this receiver, including the speakers. Never make a knot in a while. If you find it with other ... power cord or pinch the cord in any other cables. The power cords should be stepped on. 03 Connecting your equipment Plugging in the receiver Only plug in after you an electric shock. Caution • Handle the power cord by tugging the cord, and never touch the power...


