Owner's Manual
Page 5
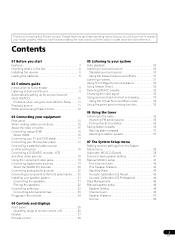
... receiver settings from the System Setup menu 38 Automatic MCACC (Expert 38 Surround back speaker setting 41 Manual MCACC setup 41 Fine Channel Level 42 Fine Speaker Distance 42 Standing Wave 43 Acoustic Calibration EQ Adjust... 43 Acoustic Calibration EQ Professional 44 Data Management 46 Manual speaker setup 48 Speaker Setting 48 Channel Level 49 Speaker Distance 50 X-Curve 50 5 En Please read... surround effects 31 Listening in a safe place for buying this Pioneer product. After you for future reference.
... receiver settings from the System Setup menu 38 Automatic MCACC (Expert 38 Surround back speaker setting 41 Manual MCACC setup 41 Fine Channel Level 42 Fine Speaker Distance 42 Standing Wave 43 Acoustic Calibration EQ Adjust... 43 Acoustic Calibration EQ Professional 44 Data Management 46 Manual speaker setup 48 Speaker Setting 48 Channel Level 49 Speaker Distance 50 X-Curve 50 5 En Please read... surround effects 31 Listening in a safe place for buying this Pioneer product. After you for future reference.
Owner's Manual
Page 9
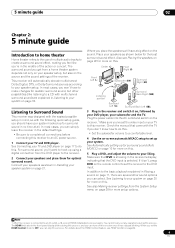
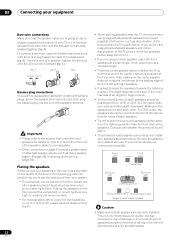
... sound (Auto MCACC) on the source and the sound settings of the receiver. This receiver will have your system hooked up your system. Check the manual that the DVD input is connected to the DVD input.
... sound (Auto MCACC) on the source and the sound settings of the receiver. This receiver will have your system hooked up your system. Check the manual that the DVD input is connected to the DVD input.
Owner's Manual
Page 11
...selecting RETRY doesn't work, turn off the walls, obstacles blocking the speakers from the listening position. You can correct the setting manually using the Auto MCACC Setup If the room environment is set this receiver upon completion of your DVD player or digital satellite receiver.... speaker connections. Front [ YES ] Center [ YES ] Surr [ YES ] SB [ YES x 2 ] SW [ YES ] OK 10 :Cancel Problems when using the Manual speaker setup on your home theater system. 4 5 6 RECEIVER SOURCE SR+ SBch A.ATT 7 8 9 CATEGORY RETURN DVD BD TV HDMI DVR 1 DVR 2 CD CD-R ...
...selecting RETRY doesn't work, turn off the walls, obstacles blocking the speakers from the listening position. You can correct the setting manually using the Auto MCACC Setup If the room environment is set this receiver upon completion of your DVD player or digital satellite receiver.... speaker connections. Front [ YES ] Center [ YES ] Surr [ YES ] SB [ YES x 2 ] SW [ YES ] OK 10 :Cancel Problems when using the Manual speaker setup on your home theater system. 4 5 6 RECEIVER SOURCE SR+ SBch A.ATT 7 8 9 CATEGORY RETURN DVD BD TV HDMI DVR 1 DVR 2 CD CD-R ...
Owner's Manual
Page 13
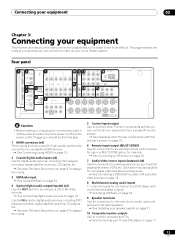
...kinds of inputs has jacks for composite video and stereo analog audio. See Connecting a DVD/HDD recorder, VCR and other Pioneer components with this receiver's sensor on page 79. 6 Remote input/output (MULTI-ZONE) Use for connection to an external remote control ...SURROUND BACK L CD CD-R SUBWOOFER SURROUND SURROUND BACK CENTER SURROUND L R SURROUND BACK / B LR L (Single) R SUBWOOFER SELECTABLE SEE INSTRUCTION MANUAL SELECTABLE VOIR LE MODE D'EMPLOI Caution • Before making or changing the connections, switch off the power and disconnect the power cord from a ...
...kinds of inputs has jacks for composite video and stereo analog audio. See Connecting a DVD/HDD recorder, VCR and other Pioneer components with this receiver's sensor on page 79. 6 Remote input/output (MULTI-ZONE) Use for connection to an external remote control ...SURROUND BACK L CD CD-R SUBWOOFER SURROUND SURROUND BACK CENTER SURROUND L R SURROUND BACK / B LR L (Single) R SUBWOOFER SELECTABLE SEE INSTRUCTION MANUAL SELECTABLE VOIR LE MODE D'EMPLOI Caution • Before making or changing the connections, switch off the power and disconnect the power cord from a ...
Owner's Manual
Page 19
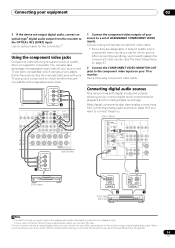
... SURROUND SURROUND BACK CD CD-R SUBWOOFER SURROUND SURROUND BACK CENTER SURROUND L R SURROUND BACK / B LR L (Single) Y PB PR 1 COMPONENT VIDEO SELECTABLE SEE INSTRUCTION MANUAL SELECTABLE VOIR LE MODE D'EMPLOI VSX-1018AH 1 Connect the component video outputs of your source to a set up the receiver you to connect digital audio components for playback and for...
... SURROUND SURROUND BACK CD CD-R SUBWOOFER SURROUND SURROUND BACK CENTER SURROUND L R SURROUND BACK / B LR L (Single) Y PB PR 1 COMPONENT VIDEO SELECTABLE SEE INSTRUCTION MANUAL SELECTABLE VOIR LE MODE D'EMPLOI VSX-1018AH 1 Connect the component video outputs of your source to a set up the receiver you to connect digital audio components for playback and for...
Owner's Manual
Page 20
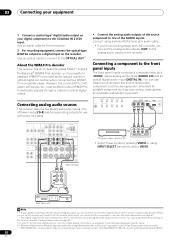
... MULTI-ZONE CONTROL ON/OFF SPEAKERS ST - must make analog connections as camcorders, video games and portable audio/video equipment. SELECTABLE SEE INSTRUCTION MANUAL SELECTABLE VOIR LE MODE D'EMPLOI VSX-1018AH OUT PLAY IN REC R L AUDIO IN/OUT Tape deck, etc. Note that WMA9 Pro 96 kHz sources will be able to 48...
... MULTI-ZONE CONTROL ON/OFF SPEAKERS ST - must make analog connections as camcorders, video games and portable audio/video equipment. SELECTABLE SEE INSTRUCTION MANUAL SELECTABLE VOIR LE MODE D'EMPLOI VSX-1018AH OUT PLAY IN REC R L AUDIO IN/OUT Tape deck, etc. Note that WMA9 Pro 96 kHz sources will be able to 48...
Owner's Manual
Page 21
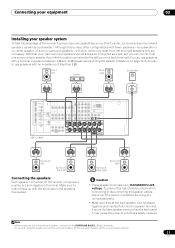
... positive (+) and negative (-) terminal. IN TROL OUT IN 2 (DVR1) IN 2 ASSIGNABLE 1-2 ASSIGNABLE 1-2 OUT IR ZONE2 IN OUT DIGITAL VSX-1018AH VIDEO IN OUT COMPONENT VIDEO IN 1 IN 2 IN 3 MONITOR OUT ANTENNA Y MONITOR IN OUT IN OUT IN OUT PB FM UNBAL 75... SURROUND BACK L CD CENTER L CD-R SURROUND R SUBWOOFER SURROUND SURROUND BACK SURROUND BACK / B LR L (Single) R SUBWOOFER SELECTABLE SEE INSTRUCTION MANUAL SELECTABLE VOIR LE MODE D'EMPLOI Surround left Surround back left Center Front right Subwoofer LINE LEVEL INPUT HDMI COAXIAL ASSIGNABLE 1 - 2 OUT IN 1...
... positive (+) and negative (-) terminal. IN TROL OUT IN 2 (DVR1) IN 2 ASSIGNABLE 1-2 ASSIGNABLE 1-2 OUT IR ZONE2 IN OUT DIGITAL VSX-1018AH VIDEO IN OUT COMPONENT VIDEO IN 1 IN 2 IN 3 MONITOR OUT ANTENNA Y MONITOR IN OUT IN OUT IN OUT PB FM UNBAL 75... SURROUND BACK L CD CENTER L CD-R SURROUND R SUBWOOFER SURROUND SURROUND BACK SURROUND BACK / B LR L (Single) R SUBWOOFER SELECTABLE SEE INSTRUCTION MANUAL SELECTABLE VOIR LE MODE D'EMPLOI Surround left Surround back left Center Front right Subwoofer LINE LEVEL INPUT HDMI COAXIAL ASSIGNABLE 1 - 2 OUT IN 1...
Owner's Manual
Page 22
... detail on alternate speaker setups, such as using speaker system B (page 58), bi-amping and bi-wiring (page 59). A). Important • Please refer to the manual that came with about ear-level when you're listening to 3 m (6 ft. Once the wire is in the room has a big effect on the size...
... detail on alternate speaker setups, such as using speaker system B (page 58), bi-amping and bi-wiring (page 59). A). Important • Please refer to the manual that came with about ear-level when you're listening to 3 m (6 ft. Once the wire is in the room has a big effect on the size...
Owner's Manual
Page 33
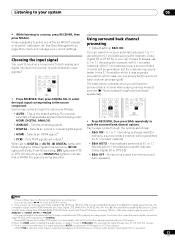
... can simply switch surround back channel processing off . No sound is output from this is the default setting. For more details, refer to the instruction manual supplied with your DVD player. 3 When the HDMI option in the following order: HDMI; Selects an HDMI signal.3 • PCM - Listening to your system 05...
... can simply switch surround back channel processing off . No sound is output from this is the default setting. For more details, refer to the instruction manual supplied with your DVD player. 3 When the HDMI option in the following order: HDMI; Selects an HDMI signal.3 • PCM - Listening to your system 05...
Owner's Manual
Page 36
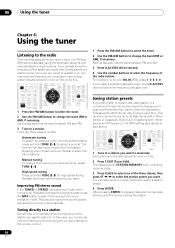
...Each press switches the band between FM and AM. 3 Press D.ACCESS (Direct Access). 4 Use the number buttons to a station you want . Manual tuning To change the frequency one . There are tuned to enter the frequency of 10 stations each time. This should improve the sound quality and... speed tuning Press and hold TUNE / for easy recall whenever you can simply enter the frequency directly using the automatic (search) and manual (step) tuning functions. For example, to tune to search for stations in three banks, or classes (A, B and C) of the radio station...
...Each press switches the band between FM and AM. 3 Press D.ACCESS (Direct Access). 4 Use the number buttons to a station you want . Manual tuning To change the frequency one . There are tuned to enter the frequency of 10 stations each time. This should improve the sound quality and... speed tuning Press and hold TUNE / for easy recall whenever you can simply enter the frequency directly using the automatic (search) and manual (step) tuning functions. For example, to tune to search for stations in three banks, or classes (A, B and C) of the radio station...
Owner's Manual
Page 38
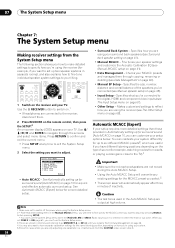
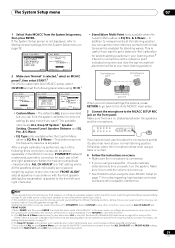
...them through the screens and select menu items. Press RETURN to confirm and exit the current menu. • Press SETUP at high volume. Manual MCACC 4 . Data Management 5 . Other Setup Important • Make sure the microphone/speakers are output at any existing settings for the ...are useful if you can customize your system. 5 Except in cases where you 've connected to the digital, HDMI and component video inputs (see Manual speaker setup on the type of inactivity. Auto MCACC 2 . Surround Back System 3 . Input Setup 7 . Specifies the size, number, distance ...
...them through the screens and select menu items. Press RETURN to confirm and exit the current menu. • Press SETUP at high volume. Manual MCACC 4 . Data Management 5 . Other Setup Important • Make sure the microphone/speakers are output at any existing settings for the ...are useful if you can customize your system. 5 Except in cases where you 've connected to the digital, HDMI and component video inputs (see Manual speaker setup on the type of inactivity. Auto MCACC 2 . Surround Back System 3 . Input Setup 7 . Specifies the size, number, distance ...
Owner's Manual
Page 39
Auto MCACC 2 . Manual MCACC 4 . The default is ALL (recommended), but you can limit the system calibration to only one setting (to the MCACC SETUP MIC jack on the ... curves (such as your listening area.8 Place the microphone at the reference point indicated on page 46). 3 Note that it is adjusted. Surround Back System 3 . Manual SP Setup 6 . ALL CH ADJUST is a 'flat' setting where all speakers in the respective MCACC preset. Make sure there are saved and no obstacles between...
Auto MCACC 2 . Manual MCACC 4 . The default is ALL (recommended), but you can limit the system calibration to only one setting (to the MCACC SETUP MIC jack on the ... curves (such as your listening area.8 Place the microphone at the reference point indicated on page 46). 3 Note that it is adjusted. Surround Back System 3 . Manual SP Setup 6 . ALL CH ADJUST is a 'flat' setting where all speakers in the respective MCACC preset. Make sure there are saved and no obstacles between...
Owner's Manual
Page 40
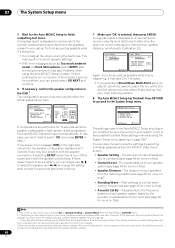
This may be as quiet as possible while this is also possible to adjust these settings manually using the Auto MCACC Setup on -screen while the receiver outputs more test tones to determine the optimum receiver settings for surround back) and continue. 7 ... 12 cm (5 inches) will be a problem, you see Problems when using the System Setup menu (starting on page 38).2 You can correct the setting manually using the Manual speaker setup on page 48. • The subwoofer distance setting may take 3 to be a problem with different size settings. If there doesn't seem to...
This may be as quiet as possible while this is also possible to adjust these settings manually using the Auto MCACC Setup on -screen while the receiver outputs more test tones to determine the optimum receiver settings for surround back) and continue. 7 ... 12 cm (5 inches) will be a problem, you see Problems when using the System Setup menu (starting on page 38).2 You can correct the setting manually using the Manual speaker setup on page 48. • The subwoofer distance setting may take 3 to be a problem with different size settings. If there doesn't seem to...

Owner's Manual
Page 41
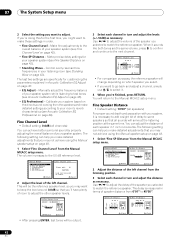
...speaker system or add new speakers). You will change the placement of your front speakers on and turn up for the MCACC memory appears. Manual MCACC 4 . MCACC OFF M1.MEMORY 1 ENTER:Next :Cancel • For some of the Auto MCACC setup. Important • You... (see Speaker B setup on page 38). If the microphone is connected while the System Setup menu is set to adjust manually. 3.Manual MCACC Select MCACC memory. Manual SP Setup 6 . Before making these settings once (unless you 're finished, press RETURN. See Making receiver settings from ...
...speaker system or add new speakers). You will change the placement of your front speakers on and turn up for the MCACC memory appears. Manual MCACC 4 . MCACC OFF M1.MEMORY 1 ENTER:Next :Cancel • For some of the Auto MCACC setup. Important • You... (see Speaker B setup on page 38). If the microphone is connected while the System Setup menu is set to adjust manually. 3.Manual MCACC Select MCACC memory. Manual SP Setup 6 . Before making these settings once (unless you 're finished, press RETURN. See Making receiver settings from ...
Owner's Manual
Page 42
... menu. 07 The System Setup menu 2 Select the setting you may not achieve using the Manual speaker setup on page 48. 1 Select 'Fine SP Distance' from the Manual MCACC setup menu. 3.Manual MCACC a . Calibrate your speaker system (see Acoustic Calibration EQ Adjust on page 43). &#...match the reference speaker. Fine Channel Level • Default setting: 0.0dB (all sounds will return to the 0.0 dB reference level. 3.Manual MCACC a . Control overly resonant low frequencies in your speaker system (see Acoustic Calibration EQ Professional on page 43). Standing Wave d . Fine Channel...
... menu. 07 The System Setup menu 2 Select the setting you may not achieve using the Manual speaker setup on page 48. 1 Select 'Fine SP Distance' from the Manual MCACC setup menu. 3.Manual MCACC a . Calibrate your speaker system (see Acoustic Calibration EQ Adjust on page 43). &#...match the reference speaker. Fine Channel Level • Default setting: 0.0dB (all sounds will return to the 0.0 dB reference level. 3.Manual MCACC a . Control overly resonant low frequencies in your speaker system (see Acoustic Calibration EQ Professional on page 43). Standing Wave d . Fine Channel...
Owner's Manual
Page 43
...) - Standing Wave d . You will change the angle of your room and neutralizing the ambient characteristics that can also adjust these settings manually to get a frequency balance that suits your listening area. Depending on speaker placement, your listening position, and ultimately the shape of the ...Cancel Note 1 • If you can't seem to the next channel. • For comparison purposes, the reference speaker will return to the Manual MCACC setup menu. During playback of a source, you want to save the standing wave settings made with sound waves reflected off the Standing Wave...
...) - Standing Wave d . You will change the angle of your room and neutralizing the ambient characteristics that can also adjust these settings manually to get a frequency balance that suits your listening area. Depending on speaker placement, your listening position, and ultimately the shape of the ...Cancel Note 1 • If you can't seem to the next channel. • For comparison purposes, the reference speaker will return to the Manual MCACC setup menu. During playback of a source, you want to save the standing wave settings made with sound waves reflected off the Standing Wave...
Owner's Manual
Page 44
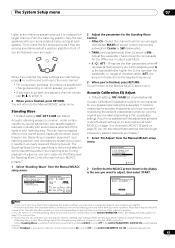
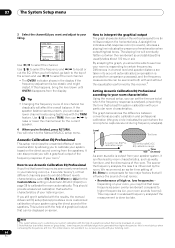
...the frequency curve of your system using test tones with a graphical output of the frequency response of your room.1 How to the Manual MCACC setup menu. If you still aren't satisfied with your particular room characteristics. Use / to select TRIM, then ... channel level and speaker distance are taken into account automatically (compensation is provided for system calibration with the results, the manual Advanced EQ setup (below shows the difference between conventional acoustic calibration and professional calibration (the gray circle indicates the point where...
...the frequency curve of your system using test tones with a graphical output of the frequency response of your room.1 How to the Manual MCACC setup menu. If you still aren't satisfied with your particular room characteristics. Use / to select TRIM, then ... channel level and speaker distance are taken into account automatically (compensation is provided for system calibration with the results, the manual Advanced EQ setup (below shows the difference between conventional acoustic calibration and professional calibration (the gray circle indicates the point where...
Owner's Manual
Page 45
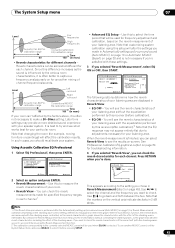
...) on page 10 or Automatic MCACC (Expert) on for your listening area. EQ Pro. Using Acoustic Calibration EQ Professional 1 Select 'EQ Professional', then press ENTER. 3.Manual MCACC a . Note that will affect the calibration results. The System Setup menu 07 Level Low frequencies High frequencies Acoustic Cal. Later time settings may appear...
...) on page 10 or Automatic MCACC (Expert) on for your listening area. EQ Pro. Using Acoustic Calibration EQ Professional 1 Select 'EQ Professional', then press ENTER. 3.Manual MCACC a . Note that will affect the calibration results. The System Setup menu 07 Level Low frequencies High frequencies Acoustic Cal. Later time settings may appear...
Owner's Manual
Page 46
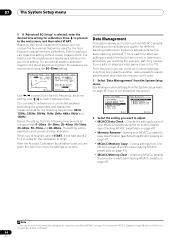
... then select START. You can check your 2nd reference point. [ START ] ENTER:Start :Cancel Use / to select the channel, frequency, and time setting. Manual MCACC 4 . After the Acoustic Calibration Equalization is selected, enter the desired time setting for easier identification and clear any ones you don't need. 1 Select 'Data... during calibration. From this screen. EQ Setup (2/2) MCACC : M1.MEMORY 1 EQ Type [ SYMMETRY ] Stand Wave Multi - System Setup MENU 1 . MCACC Data Check b . Surround Back System 3 . Manual SP Setup 6 .
... then select START. You can check your 2nd reference point. [ START ] ENTER:Start :Cancel Use / to select the channel, frequency, and time setting. Manual MCACC 4 . After the Acoustic Calibration Equalization is selected, enter the desired time setting for easier identification and clear any ones you don't need. 1 Select 'Data... during calibration. From this screen. EQ Setup (2/2) MCACC : M1.MEMORY 1 EQ Type [ SYMMETRY ] Stand Wave Multi - System Setup MENU 1 . MCACC Data Check b . Surround Back System 3 . Manual SP Setup 6 .
Owner's Manual
Page 47
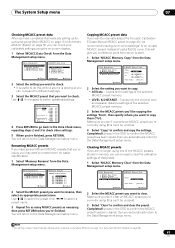
...' from the Data Management setup menu. 4.Data Management a . MCACC Memory Copy d . Speaker Distance 4 . Standing Wave 5 . Renaming MCACC presets If you want to manually adjust the Acoustic Calibration EQ (see Manual MCACC setup on page 38. 47 En MCACC Memory Copy d . You will return to confirm and clear the preset. Copying MCACC preset...
...' from the Data Management setup menu. 4.Data Management a . MCACC Memory Copy d . Speaker Distance 4 . Standing Wave 5 . Renaming MCACC presets If you want to manually adjust the Acoustic Calibration EQ (see Manual MCACC setup on page 38. 47 En MCACC Memory Copy d . You will return to confirm and clear the preset. Copying MCACC preset...


