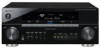
Owner's Manual
Page 3
... table specified by the manufacturer, or sold with the apparatus. Install in a car or ship) and which requires repair will be charged for connection with speaker, and should be routed away from tip-over. 13) Unplug this apparatus near this unit will be of sufficient magnitude to constitute a risk of the...
... table specified by the manufacturer, or sold with the apparatus. Install in a car or ship) and which requires repair will be charged for connection with speaker, and should be routed away from tip-over. 13) Unplug this apparatus near this unit will be of sufficient magnitude to constitute a risk of the...
Owner's Manual
Page 5
... Connecting analog audio sources 20 Connecting a component to the front panel inputs . . . . 20 Installing your speaker system 21 Connecting the speakers 21 Placing the speakers 22 Connecting antennas 23 Connecting external antennas 23 Plugging in the receiver 24 04 Controls and displays Front panel 25 ... a station 36 Saving station presets 36 Naming station presets 37 Listening to Surround Sound 9 Automatically setting up for buying this Pioneer product. After you will know how to operate your system Auto playback 30 Listening in surround sound 30 Standard surround sound 30...
... Connecting analog audio sources 20 Connecting a component to the front panel inputs . . . . 20 Installing your speaker system 21 Connecting the speakers 21 Placing the speakers 22 Connecting antennas 23 Connecting external antennas 23 Plugging in the receiver 24 04 Controls and displays Front panel 25 ... a station 36 Saving station presets 36 Naming station presets 37 Listening to Surround Sound 9 Automatically setting up for buying this Pioneer product. After you will know how to operate your system Auto playback 30 Listening in surround sound 30 Standard surround sound 30...
Owner's Manual
Page 6
...57 Using the SIRIUS Menu 57 Connecting the multichannel analog inputs 57 Selecting the multichannel analog inputs 58 Speaker B setup 58 Switching the speaker system 58 Bi-amping your front speakers 59 Bi-wiring your system Setting the remote to control other components . . . . 76 ...Selecting preset codes directly 76 Preset code list 76 Controls for TVs 77 Controls for other components 78 Operating other Pioneer components with different input signal formats . ...
...57 Using the SIRIUS Menu 57 Connecting the multichannel analog inputs 57 Selecting the multichannel analog inputs 58 Speaker B setup 58 Switching the speaker system 58 Bi-amping your front speakers 59 Bi-wiring your system Setting the remote to control other components . . . . 76 ...Selecting preset codes directly 76 Preset code list 76 Controls for TVs 77 Controls for other components 78 Operating other Pioneer components with different input signal formats . ...
Owner's Manual
Page 7
...compression. • Front Stage Surround Advance With the Front Stage Surround Advance feature, you can operate this receiver generates equal amplifier power to Pioneer for high-power drivability, low distortion and stable imaging. The USB terminal allows you to listen to 256 kbps (this receiver's enhanced ...EX and DTS-ES decoders for six-channel surround sound. Also, with the addition of a surround back speaker, you can take advantage of the built-in synchronization with your Pioneer component that helps bring CD quality sound back to WMA, MP3 and MPEG-4 AAC audio files by ...
...compression. • Front Stage Surround Advance With the Front Stage Surround Advance feature, you can operate this receiver generates equal amplifier power to Pioneer for high-power drivability, low distortion and stable imaging. The USB terminal allows you to listen to 256 kbps (this receiver's enhanced ...EX and DTS-ES decoders for six-channel surround sound. Also, with the addition of a surround back speaker, you can take advantage of the built-in synchronization with your Pioneer component that helps bring CD quality sound back to WMA, MP3 and MPEG-4 AAC audio files by ...
Owner's Manual
Page 9
... on page 22 for surround sound in the default settings. • Be sure to complete all . In most cases, you should have to your speakers as shown below for more on this receiver is connected to the DVD input. Also see HDMI Control on page 21. Check the manual that... this. 5 Play a DVD, and adjust the volume to this process. See also Making receiver settings from the DVD player to the receiver. 2 Connect your speakers and place them for more setup options. The HDMI indicator in the receiver and switch it has stopped blinking. When you can skip this receiver...
... on page 22 for surround sound in the default settings. • Be sure to complete all . In most cases, you should have to your speakers as shown below for more on this receiver is connected to the DVD input. Also see HDMI Control on page 21. Check the manual that... this. 5 Play a DVD, and adjust the volume to this process. See also Making receiver settings from the DVD player to the receiver. 2 Connect your speakers and place them for more setup options. The HDMI indicator in the receiver and switch it has stopped blinking. When you can skip this receiver...
Owner's Manual
Page 10
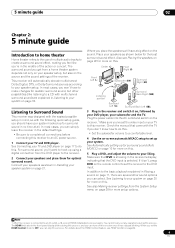
... preset for now (you select. • Before using a subwoofer, make sure to connect your listening area, taking into account ambient noise, speaker size and distance, and tests for both channel delay and channel level. Caution • The test tones used for storing surround sound settings for...MPX SIGNAL SEL MEM CH TV CTRL RECEIVER MAIN ZONE 2 1 Switch on the receiver and your setup. PHONES MULTI-ZONE CONTROL ON/OFF SPEAKERS ST - 02 5 minute guide Automatically setting up for surround sound (Auto MCACC) The Auto MCACC Setup measures the acoustic characteristics of test...
... preset for now (you select. • Before using a subwoofer, make sure to connect your listening area, taking into account ambient noise, speaker size and distance, and tests for both channel delay and channel level. Caution • The test tones used for storing surround sound settings for...MPX SIGNAL SEL MEM CH TV CTRL RECEIVER MAIN ZONE 2 1 Switch on the receiver and your setup. PHONES MULTI-ZONE CONTROL ON/OFF SPEAKERS ST - 02 5 minute guide Automatically setting up for surround sound (Auto MCACC) The Auto MCACC Setup measures the acoustic characteristics of test...
Owner's Manual
Page 11
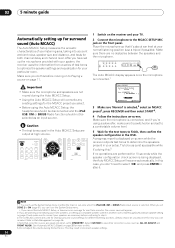
...Start by switching on -screen while the receiver outputs more on this. 3 • Depending on the characteristics of your room, sometimes identical speakers with different size settings. See Automatic MCACC (Expert) on page 38 for more test tones to be changed. 4 Make sure that the VIDEO...on page 9 indicates (in the front panel display, please follow them off if necessary. You can use / to select the speaker and / to disconnect the microphone from your DVD player or digital satellite receiver. This setting should hear surround sound. If there ...
...Start by switching on -screen while the receiver outputs more on this. 3 • Depending on the characteristics of your room, sometimes identical speakers with different size settings. See Automatic MCACC (Expert) on page 38 for more test tones to be changed. 4 Make sure that the VIDEO...on page 9 indicates (in the front panel display, please follow them off if necessary. You can use / to select the speaker and / to disconnect the microphone from your DVD player or digital satellite receiver. This setting should hear surround sound. If there ...

Owner's Manual
Page 12
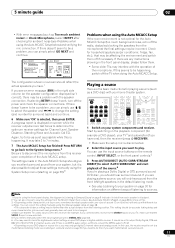
...in phase distortion where the low-frequency sound is delayed or muffled by the conflict with other the subwoofer and the most appropriate speaker. If two waveforms are 'in phase', they crest and trough together, resulting in achieving proper sound reproduction. 02 5 minute guide... It is possible to check on . - Phase Control OFF Front speaker Listening position Sound source Subwoofer Sound muffled due to a delay in lowpass filter switch of your TV so that varies with frequency, resulting...
...in phase distortion where the low-frequency sound is delayed or muffled by the conflict with other the subwoofer and the most appropriate speaker. If two waveforms are 'in phase', they crest and trough together, resulting in achieving proper sound reproduction. 02 5 minute guide... It is possible to check on . - Phase Control OFF Front speaker Listening position Sound source Subwoofer Sound muffled due to a delay in lowpass filter switch of your TV so that varies with frequency, resulting...
Owner's Manual
Page 13
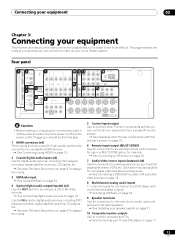
...analog audio inputs 7.1 channel inputs for connection to a DVD player with multichannel analog outputs. See Using XM Radio on page 54. 9 Speaker terminals Use for digital audio sources, including DVD players/recorders, digital satellite receivers, CD players, etc. See also The Input Setup menu... on page 67 to assign the inputs. 5 Control input/output Use to connect other Pioneer components with many connection possibilities, but it doesn't have to audio/visual sources, such as DVD players/recorders, VCRs, etc. Rear panel 1...
...analog audio inputs 7.1 channel inputs for connection to a DVD player with multichannel analog outputs. See Using XM Radio on page 54. 9 Speaker terminals Use for digital audio sources, including DVD players/recorders, digital satellite receivers, CD players, etc. See also The Input Setup menu... on page 67 to assign the inputs. 5 Control input/output Use to connect other Pioneer components with many connection possibilities, but it doesn't have to audio/visual sources, such as DVD players/recorders, VCRs, etc. Rear panel 1...
Owner's Manual
Page 14
03 Connecting your speaker system on page 21 for powered subwoofer connection). 16 AM and FM antenna terminals Use to connect indoor or outdoor antennas for radio broadcasts. ...
03 Connecting your speaker system on page 21 for powered subwoofer connection). 16 AM and FM antenna terminals Use to connect indoor or outdoor antennas for radio broadcasts. ...
Owner's Manual
Page 17
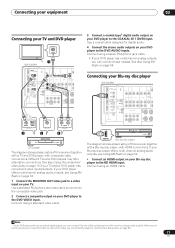
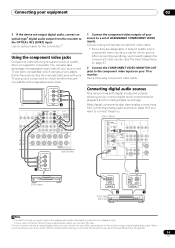
... IN OUT IN OUT IN OUT DVD AUDIO IN TV SAT IN DVR1 OUT IN L DVR2 OUT IN SIRIUS ZON IN OU R MULTI CH IN SPEAKERS FRONT AR FRONT CENTER SURROUND SURROUND BACK L R SUBWOOFER COAXIAL OPTICAL DIGITAL OUT 3 VIDEO OUT 2 R AUDIO L ANALOG OUT 4 DVD player The diagram shows a ... digital audio. 4 Connect the stereo audio outputs on your DVD player to the DVD VIDEO input. Connecting your TV and DVD player VIDEO IN TV 1 VSX-1018AH HDMI COAXIAL ASSIGNABLE 1 - 2 OUT IN 1 (DVD) BD IN IN 2 (CD) XM IN OPTICAL IN 1 IN 1 (TV SAT) CON- Connect using an optical cable....
... IN OUT IN OUT IN OUT DVD AUDIO IN TV SAT IN DVR1 OUT IN L DVR2 OUT IN SIRIUS ZON IN OU R MULTI CH IN SPEAKERS FRONT AR FRONT CENTER SURROUND SURROUND BACK L R SUBWOOFER COAXIAL OPTICAL DIGITAL OUT 3 VIDEO OUT 2 R AUDIO L ANALOG OUT 4 DVD player The diagram shows a ... digital audio. 4 Connect the stereo audio outputs on your DVD player to the DVD VIDEO input. Connecting your TV and DVD player VIDEO IN TV 1 VSX-1018AH HDMI COAXIAL ASSIGNABLE 1 - 2 OUT IN 1 (DVD) BD IN IN 2 (CD) XM IN OPTICAL IN 1 IN 1 (TV SAT) CON- Connect using an optical cable....
Owner's Manual
Page 18
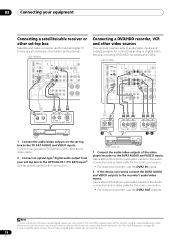
... IN OUT IN OUT IN OUT DVD AUDIO IN TV SAT IN DVR1 OUT IN L DVR2 OUT IN SIRIUS ZON IN OU R MULTI CH IN SPEAKERS FRONT AR FRONT CENTER SURROUND SURROUND BACK L R SUBWOOFER Connecting a DVD/HDD recorder, VCR and other set-top box Satellite and cable receivers, and ... DVR, VCR, etc. 1 Connect the audio/video outputs of so-called 'set -top box to (see The Input Setup menu on the set -top boxes'. VSX-1018AH HDMI COAXIAL ASSIGNABLE 1 - 2 OUT IN 1 (DVD) BD IN IN 2 (CD) XM IN OPTICAL IN 1 IN 1 (TV SAT) CON- 03 Connecting your satellite/cable ...
... IN OUT IN OUT IN OUT DVD AUDIO IN TV SAT IN DVR1 OUT IN L DVR2 OUT IN SIRIUS ZON IN OU R MULTI CH IN SPEAKERS FRONT AR FRONT CENTER SURROUND SURROUND BACK L R SUBWOOFER Connecting a DVD/HDD recorder, VCR and other set-top box Satellite and cable receivers, and ... DVR, VCR, etc. 1 Connect the audio/video outputs of so-called 'set -top box to (see The Input Setup menu on the set -top boxes'. VSX-1018AH HDMI COAXIAL ASSIGNABLE 1 - 2 OUT IN 1 (DVD) BD IN IN 2 (CD) XM IN OPTICAL IN 1 IN 1 (TV SAT) CON- 03 Connecting your satellite/cable ...
Owner's Manual
Page 19
...(Single) PRE OUT TI CH IN SPEAKERS FRONT AR SURROUND SURROUND BACK CD CD-R SUBWOOFER SURROUND SURROUND BACK CENTER SURROUND L R SURROUND BACK / B LR L (Single) Y PB PR 1 COMPONENT VIDEO SELECTABLE SEE INSTRUCTION MANUAL SELECTABLE VOIR LE MODE D'EMPLOI VSX-1018AH 1 Connect the component video outputs of... to tell the receiver which source. You can output digital audio, connect an optical-type1 digital audio output from the recorder to connect these too. VSX-1018AH HDMI COAXIAL ASSIGNABLE 1 - 2 OUT IN 1 (DVD) BD IN IN 2 (CD) XM IN OPTICAL IN 1 IN 1 (TV SAT) ...
...(Single) PRE OUT TI CH IN SPEAKERS FRONT AR SURROUND SURROUND BACK CD CD-R SUBWOOFER SURROUND SURROUND BACK CENTER SURROUND L R SURROUND BACK / B LR L (Single) Y PB PR 1 COMPONENT VIDEO SELECTABLE SEE INSTRUCTION MANUAL SELECTABLE VOIR LE MODE D'EMPLOI VSX-1018AH 1 Connect the component video outputs of... to tell the receiver which source. You can output digital audio, connect an optical-type1 digital audio output from the recorder to connect these too. VSX-1018AH HDMI COAXIAL ASSIGNABLE 1 - 2 OUT IN 1 (DVD) BD IN IN 2 (CD) XM IN OPTICAL IN 1 IN 1 (TV SAT) ...
Owner's Manual
Page 20
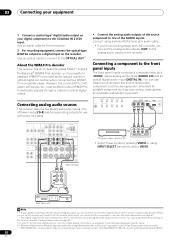
AUTO SURR/ SOUND STANDARD ADVANCED STREAM DIRECT RETRIEVER SURROUND SURROUND STEREO/ A.L.C. SELECTABLE SEE INSTRUCTION MANUAL SELECTABLE VOIR LE MODE D'EMPLOI VSX-1018AH OUT PLAY IN REC R L AUDIO IN/OUT Tape deck, etc. When you set -top box, etc. Connect using a ...for use these inputs by pressing VIDEO or using an optical cable. Connecting a component to select VIDEO. PHONES MULTI-ZONE CONTROL ON/OFF SPEAKERS ST - VIDEO OUTPUT DIGITAL OUT • Select these connections for portable equipment such as explained in Connecting analog audio sources below. 3 ...
AUTO SURR/ SOUND STANDARD ADVANCED STREAM DIRECT RETRIEVER SURROUND SURROUND STEREO/ A.L.C. SELECTABLE SEE INSTRUCTION MANUAL SELECTABLE VOIR LE MODE D'EMPLOI VSX-1018AH OUT PLAY IN REC R L AUDIO IN/OUT Tape deck, etc. When you set -top box, etc. Connect using a ...for use these inputs by pressing VIDEO or using an optical cable. Connecting a component to select VIDEO. PHONES MULTI-ZONE CONTROL ON/OFF SPEAKERS ST - VIDEO OUTPUT DIGITAL OUT • Select these connections for portable equipment such as explained in Connecting analog audio sources below. 3 ...
Owner's Manual
Page 21
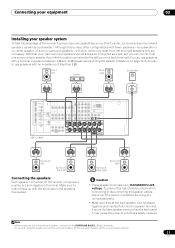
IN TROL OUT IN 2 (DVR1) IN 2 ASSIGNABLE 1-2 ASSIGNABLE 1-2 OUT IR ZONE2 IN OUT DIGITAL VSX-1018AH VIDEO IN OUT COMPONENT VIDEO IN 1 IN 2 IN 3 MONITOR OUT ANTENNA Y MONITOR IN OUT IN OUT IN OUT PB FM UNBAL 75 AM LOOP DVD... DVR2 SIRIUS ZONE 2 PR ASSIGNABLE 1-3 AUDIO IN IN OUT IN OUT IN IN OUT IN OUT IN FRONT CENTER (Single) PRE OUT L R MULTI CH IN SPEAKERS FRONT AR FRONT CENTER SURROUND SURROUND BACK L CD CENTER L CD-R SURROUND R SUBWOOFER SURROUND SURROUND BACK SURROUND BACK / B LR L (Single) R SUBWOOFER SELECTABLE SEE INSTRUCTION MANUAL ...
IN TROL OUT IN 2 (DVR1) IN 2 ASSIGNABLE 1-2 ASSIGNABLE 1-2 OUT IR ZONE2 IN OUT DIGITAL VSX-1018AH VIDEO IN OUT COMPONENT VIDEO IN 1 IN 2 IN 3 MONITOR OUT ANTENNA Y MONITOR IN OUT IN OUT IN OUT PB FM UNBAL 75 AM LOOP DVD... DVR2 SIRIUS ZONE 2 PR ASSIGNABLE 1-3 AUDIO IN IN OUT IN OUT IN IN OUT IN OUT IN FRONT CENTER (Single) PRE OUT L R MULTI CH IN SPEAKERS FRONT AR FRONT CENTER SURROUND SURROUND BACK L CD CENTER L CD-R SURROUND R SUBWOOFER SURROUND SURROUND BACK SURROUND BACK / B LR L (Single) R SUBWOOFER SELECTABLE SEE INSTRUCTION MANUAL ...
Owner's Manual
Page 22
... the subwoofer), or mounting them very high on the size of the picture when the TV is switched on alternate speaker setups, such as using a center speaker, place the front speakers at the TV screen. Use less of an angle for details on how to connect the other . to 9 ft... and the exposed wire strands twisted together (fig. Front left Center Front right Subwoofer Surround left Surround right Listening position Surround back left and right speakers. • It is enough space to insert the exposed wire (fig. C 10 mm (3/8 in.) Banana plug connections If you to get ...
... the subwoofer), or mounting them very high on the size of the picture when the TV is switched on alternate speaker setups, such as using a center speaker, place the front speakers at the TV screen. Use less of an angle for details on how to connect the other . to 9 ft... and the exposed wire strands twisted together (fig. Front left Center Front right Subwoofer Surround left Surround right Listening position Surround back left and right speakers. • It is enough space to insert the exposed wire (fig. C 10 mm (3/8 in.) Banana plug connections If you to get ...

Owner's Manual
Page 23
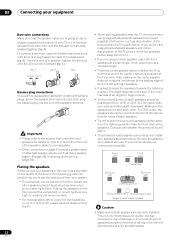
...the stand. c) before clipping the loop to the antenna, bend in the same way as shown below show suggested surround and surround back speaker orientation. For the best possible reception, suspend horizontally outdoors. to 20 ft.) length of both AM antenna wires. 2 Push open the tabs..., then insert one surround back speaker (or none) connected. A) shows orientation with two surround back speakers connected. 90° to 6 m (16 ft. b fig. b). • If you plan to mount the AM ...
...the stand. c) before clipping the loop to the antenna, bend in the same way as shown below show suggested surround and surround back speaker orientation. For the best possible reception, suspend horizontally outdoors. to 20 ft.) length of both AM antenna wires. 2 Push open the tabs..., then insert one surround back speaker (or none) connected. A) shows orientation with two surround back speakers connected. 90° to 6 m (16 ft. b fig. b). • If you plan to mount the AM ...
Owner's Manual
Page 24
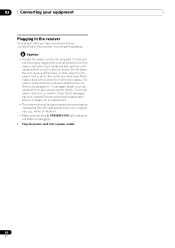
Never make a knot in the cord or tie it damaged, ask your nearest Pioneer authorized independent service company for a replacement. • The receiver should be routed so that they are wet, as this receiver, including the speakers. Do not place the unit, a piece of furniture, or other object on the power cord or...
Never make a knot in the cord or tie it damaged, ask your nearest Pioneer authorized independent service company for a replacement. • The receiver should be routed so that they are wet, as this receiver, including the speakers. Do not place the unit, a piece of furniture, or other object on the power cord or...
Owner's Manual
Page 25
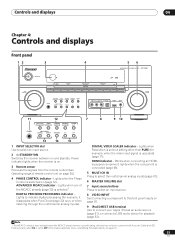
PHONES MULTI-ZONE CONTROL ON/OFF SPEAKERS ST - ST + VIDEO VIDEO INPUT L AUDIO R DIGITAL IN iPod DIRECT USB MCACC SETUP MIC MASTER VOLUME 11 12 7 8 9 10 AUTO SURR/ SOUND STANDARD ADVANCED STREAM ... on (page 12). PHONES MULTI-ZONE CONTROL ON/OFF SPEAKERS ST - Lights when Resolution is on page 71). 25 En DIGITAL VIDEO SCALER indicator - Controls and displays 04 Chapter 4: Controls and displays Front panel 12 3 4 56 AUDIO/VIDEO MULTI-CHANNEL RECEIVER VSX-1018AH INPUT SELECTOR STANDBY/ON PHASE CONTROL ADVANCED MCACC DIGITAL PRECISION...
PHONES MULTI-ZONE CONTROL ON/OFF SPEAKERS ST - ST + VIDEO VIDEO INPUT L AUDIO R DIGITAL IN iPod DIRECT USB MCACC SETUP MIC MASTER VOLUME 11 12 7 8 9 10 AUTO SURR/ SOUND STANDARD ADVANCED STREAM ... on (page 12). PHONES MULTI-ZONE CONTROL ON/OFF SPEAKERS ST - Lights when Resolution is on page 71). 25 En DIGITAL VIDEO SCALER indicator - Controls and displays 04 Chapter 4: Controls and displays Front panel 12 3 4 56 AUDIO/VIDEO MULTI-CHANNEL RECEIVER VSX-1018AH INPUT SELECTOR STANDBY/ON PHASE CONTROL ADVANCED MCACC DIGITAL PRECISION...
Owner's Manual
Page 26
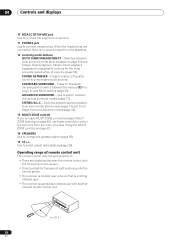
Switches between Auto surround mode (Auto playback on page 61). 14 SPEAKERS Use to change the speaker system (page 58). 15 ST +/- Press for the most accurate reproduction of remote control unit The remote control may not work properly if: • There ... Controls and displays 10 MCACC SETUP MIC jack Use to connect the supplied microphone. 11 PHONES jack Use to control the sub zone from the speakers. 12 Listening mode buttons AUTO SURR/STREAM DIRECT - STEREO/A.L.C. - STANDARD SURROUND -
Switches between Auto surround mode (Auto playback on page 61). 14 SPEAKERS Use to change the speaker system (page 58). 15 ST +/- Press for the most accurate reproduction of remote control unit The remote control may not work properly if: • There ... Controls and displays 10 MCACC SETUP MIC jack Use to connect the supplied microphone. 11 PHONES jack Use to control the sub zone from the speakers. 12 Listening mode buttons AUTO SURR/STREAM DIRECT - STEREO/A.L.C. - STANDARD SURROUND -


