
Owner's Manual
Page 1
... RECEIVER VSX-1018AH-K Register your product at http://www.pioneerelectronics.com (US) http://www.pioneerelectronics.ca (Canada) • Protect your new investment The details of your purchase will be on file for reference in the event of an insurance claim such as loss or theft. • Receive ...free tips, updates and service bulletins on your new product • Improve product development Your input helps us continue to design products that meet your needs. • Receive a free Pioneer newsletter Registered customers can opt in to...
... RECEIVER VSX-1018AH-K Register your product at http://www.pioneerelectronics.com (US) http://www.pioneerelectronics.ca (Canada) • Protect your new investment The details of your purchase will be on file for reference in the event of an insurance claim such as loss or theft. • Receive ...free tips, updates and service bulletins on your new product • Improve product development Your input helps us continue to design products that meet your needs. • Receive a free Pioneer newsletter Registered customers can opt in to...
Owner's Manual
Page 2
...VIDEO MULTI-CHANNEL RECEIVER Model Number: VSX-1018AH-K Responsible Party Name: PIONEER ELECTRONICS SERVICE, INC. Phone: 1-800-421-1404 IMPORTANT NOTICE - THIS IS FOR YOUR SECURITY. These limits are used in case of the FCC Rules. Reorient or relocate the receiving antenna. - D8... of the product, and to provide reasonable protection against harmful interference in a particular installation. Increase the separation between the equipment and receiver. - Operating Environment Operating environment temperature and humidity: +5 ºC to +35 ºC (+41 ºF to Part 15 ...
...VIDEO MULTI-CHANNEL RECEIVER Model Number: VSX-1018AH-K Responsible Party Name: PIONEER ELECTRONICS SERVICE, INC. Phone: 1-800-421-1404 IMPORTANT NOTICE - THIS IS FOR YOUR SECURITY. These limits are used in case of the FCC Rules. Reorient or relocate the receiving antenna. - D8... of the product, and to provide reasonable protection against harmful interference in a particular installation. Increase the separation between the equipment and receiver. - Operating Environment Operating environment temperature and humidity: +5 ºC to +35 ºC (+41 ºF to Part 15 ...
Owner's Manual
Page 5
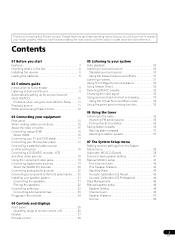
... surround sound 30 Standard surround sound 30 Using the Advanced surround effects 31 Listening in a safe place for buying this Pioneer product. Please read through these operating instructions so you for future reference. Contents 01 Before you have finished reading the ... 36 Naming station presets 37 Listening to your model properly. After you start Features 7 Checking what's in the box 8 Installing the receiver 8 Loading the batteries 8 02 5 minute guide Introduction to home theater 9 Listening to Surround Sound 9 Automatically setting up for surround sound...
... surround sound 30 Standard surround sound 30 Using the Advanced surround effects 31 Listening in a safe place for buying this Pioneer product. Please read through these operating instructions so you for future reference. Contents 01 Before you have finished reading the ... 36 Naming station presets 37 Listening to your model properly. After you start Features 7 Checking what's in the box 8 Installing the receiver 8 Loading the batteries 8 02 5 minute guide Introduction to home theater 9 Listening to Surround Sound 9 Automatically setting up for surround sound...
Owner's Manual
Page 6
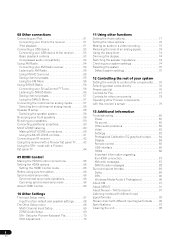
...-ZONE listening 60 Making MULTI-ZONE connections 60 Using the MULTI-ZONE controls 61 Connecting an IR receiver 62 Using this receiver with a Pioneer flat panel TV . . . . . 63 Using the SR+ mode with a Pioneer flat panel TV 64 09 HDMI Control Making the HDMI Control connections 65 Setting the HDMI options ...Input function default and possible settings 68 The Other Setup menu 68 Multi Channel Input Setup 69 ZONE Audio Setup 69 SR+ Setup for Pioneer flat panel TVs 70 OSD Adjustment 70 11 Using other functions Setting the Audio options 71 Setting the Video options 72 Making an audio...
...-ZONE listening 60 Making MULTI-ZONE connections 60 Using the MULTI-ZONE controls 61 Connecting an IR receiver 62 Using this receiver with a Pioneer flat panel TV . . . . . 63 Using the SR+ mode with a Pioneer flat panel TV 64 09 HDMI Control Making the HDMI Control connections 65 Setting the HDMI options ...Input function default and possible settings 68 The Other Setup menu 68 Multi Channel Input Setup 69 ZONE Audio Setup 69 SR+ Setup for Pioneer flat panel TVs 70 OSD Adjustment 70 11 Using other functions Setting the Audio options 71 Setting the Video options 72 Making an audio...
Owner's Manual
Page 7
...the original sound. • Auto Level Control When the source is played in Auto level control stereo mode (A.L.C.), this receiver automatically equalizes the playback sound level according to the variation in recording levels between music sources recorded in synchronization with your listening...) channel for connecting an iPod unit and a USB mass storage device. This innovative technology measures the reverb characteristics of your Pioneer component that supports the HDMI Control function by restoring sound pressure and smoothing jagged artifacts left over after compression. • Front...
...the original sound. • Auto Level Control When the source is played in Auto level control stereo mode (A.L.C.), this receiver automatically equalizes the playback sound level according to the variation in recording levels between music sources recorded in synchronization with your listening...) channel for connecting an iPod unit and a USB mass storage device. This innovative technology measures the reverb characteristics of your Pioneer component that supports the HDMI Control function by restoring sound pressure and smoothing jagged artifacts left over after compression. • Front...
Owner's Manual
Page 8
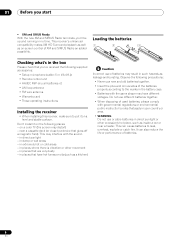
...and minus sides of batteries. 8 En 01 Before you start • XM and SIRIUS Ready With the new XM and SIRIUS Radio terminals, you 've received the following supplied accessories: • Setup microphone (cable: 5 m (16.4 ft.)) • Remote control unit • AA/IEC R6P dry cell ...batteries x2 • AM loop antenna • FM wire antenna • Warranty card • These operating instructions Installing the receiver • When installing this receiver, make sure to put it on a level and stable surface. in places that apply in direct sunlight or other movement - in...
...and minus sides of batteries. 8 En 01 Before you start • XM and SIRIUS Ready With the new XM and SIRIUS Radio terminals, you 've received the following supplied accessories: • Setup microphone (cable: 5 m (16.4 ft.)) • Remote control unit • AA/IEC R6P dry cell ...batteries x2 • AM loop antenna • FM wire antenna • Warranty card • These operating instructions Installing the receiver • When installing this receiver, make sure to put it on a level and stable surface. in places that apply in direct sunlight or other movement - in...
Owner's Manual
Page 9
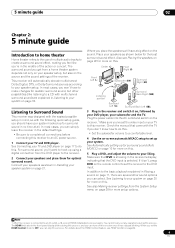
... on page 11, there are explained in Listening to your system on this . Plug the power cable into the AC outlet and switch on the receiver.1 Make sure you've set the HDMI Control mode to complete all . Check the manual that DVD is connected to an AC outlet, a 15-second... HDMI initialization process begins. If it has stopped blinking. In addition to the DVD input. Note 1 After this receiver is showing in the front panel display blinks during this receiver once it isn't, press DVD on the remote control to set up for the best surround sound effect. You cannot...
... on page 11, there are explained in Listening to your system on this . Plug the power cable into the AC outlet and switch on the receiver.1 Make sure you've set the HDMI Control mode to complete all . Check the manual that DVD is connected to an AC outlet, a 15-second... HDMI initialization process begins. If it has stopped blinking. In addition to the DVD input. Note 1 After this receiver is showing in the front panel display blinks during this receiver once it isn't, press DVD on the remote control to set up for the best surround sound effect. You cannot...
Owner's Manual
Page 10
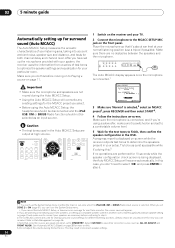
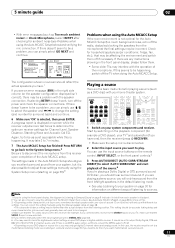
... over three minutes, the screen saver will resume automatically. Try to be selected as possible while it is displayed on-screen while the receiver outputs test tones to determine the speakers present in your TV. 2 Connect the microphone to connect your listening area, taking into account ambient...doing this before continuing to finish, then confirm the speaker configuration in the Auto MCACC Setup are no operations are used in the OSD. RECEIVER SOURCE DVD BD TV HDMI DVR 1 DVR 2 CD CD-R FM/AM XM SIRIUS iPod USB INPUT AUDIO PARAMETER EXIT VIDEO PARAMETER TUNE ...
... over three minutes, the screen saver will resume automatically. Try to be selected as possible while it is displayed on-screen while the receiver outputs test tones to determine the speakers present in your TV. 2 Connect the microphone to connect your listening area, taking into account ambient...doing this before continuing to finish, then confirm the speaker configuration in the Auto MCACC Setup are no operations are used in the OSD. RECEIVER SOURCE DVD BD TV HDMI DVR 1 DVR 2 CD CD-R FM/AM XM SIRIUS iPod USB INPUT AUDIO PARAMETER EXIT VIDEO PARAMETER TUNE ...
Owner's Manual
Page 11
...TUNE iPod CTRL AUTO/ STEREO/ BD MENU DIRECT A.L.C. Check for example, if you connected this to convert the MPEG audio to this receiver (for household appliances (air conditioner, fridge, fan, etc.), that may interfere with your room, sometimes identical speakers with cone sizes of... 1.Auto MCACC CHECK! If there are playing a stereo source, you need to do this . 3 • Depending on your DVD player or digital satellite receiver. If there doesn't seem to sources. 5 minute guide 02 • With error messages (such as Too much background noise, echo off the TV when ...
...TUNE iPod CTRL AUTO/ STEREO/ BD MENU DIRECT A.L.C. Check for example, if you connected this to convert the MPEG audio to this receiver (for household appliances (air conditioner, fridge, fan, etc.), that may interfere with your room, sometimes identical speakers with cone sizes of... 1.Auto MCACC CHECK! If there are playing a stereo source, you need to do this . 3 • Depending on your DVD player or digital satellite receiver. If there doesn't seem to sources. 5 minute guide 02 • With error messages (such as Too much background noise, echo off the TV when ...

Owner's Manual
Page 12
...the conflict with other the subwoofer and the most appropriate speaker. The PHASE CONTROL indicator on phase correction. It is set to ON on this receiver. When the HDMI audio output parameter is also recommended you may not have a maximized PHASE CONTROL effect. • The PHASE CONTROL mode ...your TV so that varies with frequency, resulting in phase distortion where the low-frequency sound is coming from the speakers connected to this receiver depends on the type of your subwoofer to maximize the effect. Turn down the volume of your subwoofer, set , you try changing the...
...the conflict with other the subwoofer and the most appropriate speaker. The PHASE CONTROL indicator on phase correction. It is set to ON on this receiver. When the HDMI audio output parameter is also recommended you may not have a maximized PHASE CONTROL effect. • The PHASE CONTROL mode ...your TV so that varies with frequency, resulting in phase distortion where the low-frequency sound is coming from the speakers connected to this receiver depends on the type of your subwoofer to maximize the effect. Turn down the volume of your subwoofer, set , you try changing the...
Owner's Manual
Page 13
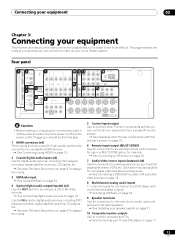
...jacks for digital audio sources, including DVD players/recorders, digital satellite receivers, CD players, etc. See also The Input Setup menu on page 67 to assign the inputs. 5 Control input/output Use to connect other Pioneer components so that you can connect to connect monitors and TVs..... See Operating other video sources on page 18. 8 Multichannel analog audio inputs 7.1 channel inputs for connection to a DVD player with this receiver's sensor on page 54. 4 Optical digital audio output/input(s) (x3) Use the OUT jack for use in should be difficult. Rear panel 1 ...
...jacks for digital audio sources, including DVD players/recorders, digital satellite receivers, CD players, etc. See also The Input Setup menu on page 67 to assign the inputs. 5 Control input/output Use to connect other Pioneer components so that you can connect to connect monitors and TVs..... See Operating other video sources on page 18. 8 Multichannel analog audio inputs 7.1 channel inputs for connection to a DVD player with this receiver's sensor on page 54. 4 Optical digital audio output/input(s) (x3) Use the OUT jack for use in should be difficult. Rear panel 1 ...
Owner's Manual
Page 14
... also Installing your equipment 11 SIRIUS Radio input See Using SIRIUS Radio on page 56. 12 ZONE 2 audio/video outputs Use to connect a second receiver in a separate room. See MULTI-ZONE listening on page 60. 13 Component video connections (x4) Use the inputs to connect indoor or outdoor antennas...
... also Installing your equipment 11 SIRIUS Radio input See Using SIRIUS Radio on page 56. 12 ZONE 2 audio/video outputs Use to connect a second receiver in a separate room. See MULTI-ZONE listening on page 60. 13 Component video connections (x4) Use the inputs to connect indoor or outdoor antennas...
Owner's Manual
Page 15
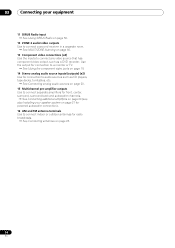
...Video options on your component or display. For details, see The Input Setup menu on page 67), the converter gives priority to the receiver's HDMI video outputs when connecting this video source.1 If several video components are output through all of this case, try adjusting the ...; When storing optical cable, coil loosely. The cable may not be authorized by Macrovision Corporation, and is protected by method claims of the receiver. • When connecting optical cables, be careful when inserting the plug not to the same input function (see Setting the Video options on...
...Video options on your component or display. For details, see The Input Setup menu on page 67), the converter gives priority to the receiver's HDMI video outputs when connecting this video source.1 If several video components are output through all of this case, try adjusting the ...; When storing optical cable, coil loosely. The cable may not be authorized by Macrovision Corporation, and is protected by method claims of the receiver. • When connecting optical cables, be careful when inserting the plug not to the same input function (see Setting the Video options on...
Owner's Manual
Page 16
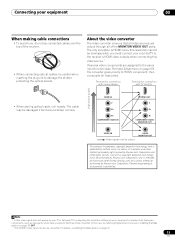
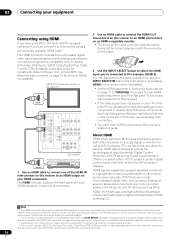
... OUT DVD AUDIO IN TV SAT IN DVR1 OUT IN L DVR OUT R MULTI CH IN SPEA A FRONT CENTER SURROUND SURROUND BACK L R SUBWOOFER VSX-1018AH HDMI/DVI-equipped component HDMI OUT 1 Use an HDMI cable to an HDMI output on your TV or flat panel TV, try adjusting the resolution...operation by using a DVI connection may not be displayed, but so long as Digital Visual Interface (DVI) in unreliable signal transfers. • This receiver supports SACD, Dolby Digital Plus, Dolby TrueHD and DTS-HD Master Audio. About HDMI HDMI (High Definition Multimedia Interface) supports both DVI and High...
... OUT DVD AUDIO IN TV SAT IN DVR1 OUT IN L DVR OUT R MULTI CH IN SPEA A FRONT CENTER SURROUND SURROUND BACK L R SUBWOOFER VSX-1018AH HDMI/DVI-equipped component HDMI OUT 1 Use an HDMI cable to an HDMI output on your TV or flat panel TV, try adjusting the resolution...operation by using a DVI connection may not be displayed, but so long as Digital Visual Interface (DVI) in unreliable signal transfers. • This receiver supports SACD, Dolby Digital Plus, Dolby TrueHD and DTS-HD Master Audio. About HDMI HDMI (High Definition Multimedia Interface) supports both DVI and High...
Owner's Manual
Page 17
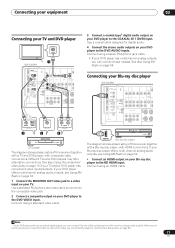
... XM Radio on page 54. 1 Connect the MONITOR OUT video jack to the BD HDMI input. Connecting your TV and DVD player VIDEO IN TV 1 VSX-1018AH HDMI COAXIAL ASSIGNABLE 1 - 2 OUT IN 1 (DVD) BD IN IN 2 (CD) XM IN OPTICAL IN 1 IN 1 (TV SAT) CON- Connect using... BACK L R SUBWOOFER HDMI OUT Blu-ray disc player The diagram shows a basic setup of this receiver together with a TV and DVD player, with HDMI connections. Connecting your equipment 03 Connecting your Blu-ray disc player VSX-1018AH HDMI COAXIAL ASSIGNABLE 1 - 2 OUT IN 1 (DVD) BD IN IN 2 (CD) XM ...
... XM Radio on page 54. 1 Connect the MONITOR OUT video jack to the BD HDMI input. Connecting your TV and DVD player VIDEO IN TV 1 VSX-1018AH HDMI COAXIAL ASSIGNABLE 1 - 2 OUT IN 1 (DVD) BD IN IN 2 (CD) XM IN OPTICAL IN 1 IN 1 (TV SAT) CON- Connect using... BACK L R SUBWOOFER HDMI OUT Blu-ray disc player The diagram shows a basic setup of this receiver together with a TV and DVD player, with HDMI connections. Connecting your equipment 03 Connecting your Blu-ray disc player VSX-1018AH HDMI COAXIAL ASSIGNABLE 1 - 2 OUT IN 1 (DVD) BD IN IN 2 (CD) XM ...
Owner's Manual
Page 18
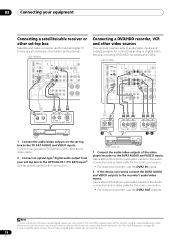
... SURROUND SURROUND BACK L R SUBWOOFER DIGITAL OUT R AUDIO L VIDEO AV OUT STB 1 Connect the audio/video outputs on page 67). 2 If your set -top boxes'. VSX-1018AH HDMI COAXIAL ASSIGNABLE 1 - 2 OUT IN 1 (DVD) BD IN IN 2 (CD) XM IN OPTICAL IN 1 IN 1 (TV SAT) CON- Use a stereo ...audio connection and a video cable for the connection. VSX-1018AH HDMI COAXIAL ASSIGNABLE 1 - 2 OUT IN 1 (DVD) BD IN IN 2 (CD) XM IN OPTICAL IN 1 IN 1 (TV SAT) CON- When you set up the receiver you'll need to tell the receiver which input you can record, connect the DVR1 ...
... SURROUND SURROUND BACK L R SUBWOOFER DIGITAL OUT R AUDIO L VIDEO AV OUT STB 1 Connect the audio/video outputs on page 67). 2 If your set -top boxes'. VSX-1018AH HDMI COAXIAL ASSIGNABLE 1 - 2 OUT IN 1 (DVD) BD IN IN 2 (CD) XM IN OPTICAL IN 1 IN 1 (TV SAT) CON- Use a stereo ...audio connection and a video cable for the connection. VSX-1018AH HDMI COAXIAL ASSIGNABLE 1 - 2 OUT IN 1 (DVD) BD IN IN 2 (CD) XM IN OPTICAL IN 1 IN 1 (TV SAT) CON- When you set up the receiver you'll need to tell the receiver which input you can record, connect the DVR1 ...
Owner's Manual
Page 19
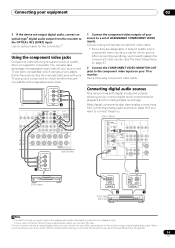
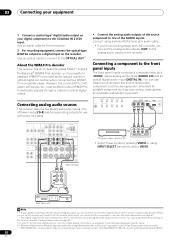
... (Single) Y PB PR 1 COMPONENT VIDEO SELECTABLE SEE INSTRUCTION MANUAL SELECTABLE VOIR LE MODE D'EMPLOI VSX-1018AH 1 Connect the component video outputs of your source to tell the receiver which delivers a very stable, flicker-free picture. Connect using a coaxial digital audio cable. Connecting your...8226; If your TV or monitor. Connecting digital audio sources This receiver has both compatible), which input you must connect the analog audio cables (the digital connection is for making digital recordings. VSX-1018AH HDMI COAXIAL ASSIGNABLE 1 - 2 OUT IN 1 (DVD) BD...
... (Single) Y PB PR 1 COMPONENT VIDEO SELECTABLE SEE INSTRUCTION MANUAL SELECTABLE VOIR LE MODE D'EMPLOI VSX-1018AH 1 Connect the component video outputs of your source to tell the receiver which delivers a very stable, flicker-free picture. Connect using a coaxial digital audio cable. Connecting your...8226; If your TV or monitor. Connecting digital audio sources This receiver has both compatible), which input you must connect the analog audio cables (the digital connection is for making digital recordings. VSX-1018AH HDMI COAXIAL ASSIGNABLE 1 - 2 OUT IN 1 (DVD) BD...
Owner's Manual
Page 20
..., video games and portable audio/video equipment. SELECTABLE SEE INSTRUCTION MANUAL SELECTABLE VOIR LE MODE D'EMPLOI VSX-1018AH OUT PLAY IN REC R L AUDIO IN/OUT Tape deck, etc. However, the connected PC, DVD player, set up the receiver (see also The Input Setup menu on page 67). • The digital outputs from other...
..., video games and portable audio/video equipment. SELECTABLE SEE INSTRUCTION MANUAL SELECTABLE VOIR LE MODE D'EMPLOI VSX-1018AH OUT PLAY IN REC R L AUDIO IN/OUT Tape deck, etc. However, the connected PC, DVD player, set up the receiver (see also The Input Setup menu on page 67). • The digital outputs from other...
Owner's Manual
Page 21
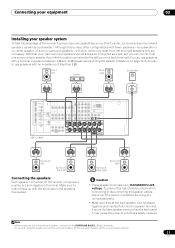
...and inserted fully into the speaker terminal. IN TROL OUT IN 2 (DVR1) IN 2 ASSIGNABLE 1-2 ASSIGNABLE 1-2 OUT IR ZONE2 IN OUT DIGITAL VSX-1018AH VIDEO IN OUT COMPONENT VIDEO IN 1 IN 2 IN 3 MONITOR OUT ANTENNA Y MONITOR IN OUT IN OUT IN OUT PB FM UNBAL 75 ... front, center, surround and surround back speakers, as well as a safety measure. Front left Connecting the speakers Each speaker connection on the receiver comprises a positive (+) and negative (-) terminal. Note that all the bare speaker wire is ideal, other configurations with the terminals on page...
...and inserted fully into the speaker terminal. IN TROL OUT IN 2 (DVR1) IN 2 ASSIGNABLE 1-2 ASSIGNABLE 1-2 OUT IR ZONE2 IN OUT DIGITAL VSX-1018AH VIDEO IN OUT COMPONENT VIDEO IN 1 IN 2 IN 3 MONITOR OUT ANTENNA Y MONITOR IN OUT IN OUT IN OUT PB FM UNBAL 75 ... front, center, surround and surround back speakers, as well as a safety measure. Front left Connecting the speakers Each speaker connection on the receiver comprises a positive (+) and negative (-) terminal. Note that all the bare speaker wire is ideal, other configurations with the terminals on page...
Owner's Manual
Page 24
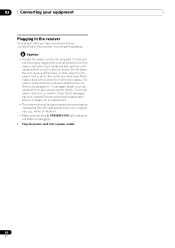
... the plug part. Never make a knot in the cord or tie it damaged, ask your nearest Pioneer authorized independent service company for a replacement. • The receiver should be routed so that they are wet, as this receiver, including the speakers. If you find it with other way. 03 Connecting your equipment Plugging in... the receiver Only plug in after you have connected all your hands are not likely to this could cause a short circuit or electric shock. Caution • Handle ...
... the plug part. Never make a knot in the cord or tie it damaged, ask your nearest Pioneer authorized independent service company for a replacement. • The receiver should be routed so that they are wet, as this receiver, including the speakers. If you find it with other way. 03 Connecting your equipment Plugging in... the receiver Only plug in after you have connected all your hands are not likely to this could cause a short circuit or electric shock. Caution • Handle ...


