

Owner's Manual
Page 2
... is cut and the unit is no longer fully operational. CAUTION The POWER switch on the equipment. A polarized plug has two blades with the cart, stand, tripod, bracket, or table specified by operating the equipment on vacation). If you will not completely shut off all power. The wide blade or the...
... is cut and the unit is no longer fully operational. CAUTION The POWER switch on the equipment. A polarized plug has two blades with the cart, stand, tripod, bracket, or table specified by operating the equipment on vacation). If you will not completely shut off all power. The wide blade or the...

Owner's Manual
Page 3
... receiving antenna. - D8-10-1-2_En CAUTION: This product satisfies FCC regulations when shielded cables and connectors are designed to other stand is connected. - English WARNING: THE APPARATUS IS NOT WATERPROOF, TO PREVENT FIRE OR SHOCK HAZARD, DO NOT EXPOSE THIS ... to the State of California and other reproductive harm. Product Name: Plasma Display Model Number: PRO-FHD1 Product Category: Class B Personal Computers & Peripherals Responsible Party Name: PIONEER ELECTRONICS SERVICE, INC. These limits are used in accordance with the instructions, may invalidate the user...
... receiving antenna. - D8-10-1-2_En CAUTION: This product satisfies FCC regulations when shielded cables and connectors are designed to other stand is connected. - English WARNING: THE APPARATUS IS NOT WATERPROOF, TO PREVENT FIRE OR SHOCK HAZARD, DO NOT EXPOSE THIS ... to the State of California and other reproductive harm. Product Name: Plasma Display Model Number: PRO-FHD1 Product Category: Class B Personal Computers & Peripherals Responsible Party Name: PIONEER ELECTRONICS SERVICE, INC. These limits are used in accordance with the instructions, may invalidate the user...
Owner's Manual
Page 6
...any still image, it is poor. • Do not cover with long-life and high reliability. Use of the Pioneer PRO-FHD1 Plasma Display will diminish very slowly, such as very precise and highly advanced technology. For the minimum space required around ...PRO-FHD1, you can be displayed for accident or damage caused by the use to remove dust build-up, by displaying static images for such accidents or malfunction. Plasma Display's are typical effects and characteristics of the unit to less than the PIONEER stand or installation bracket may cause uneven wear. However, PIONEER...
...any still image, it is poor. • Do not cover with long-life and high reliability. Use of the Pioneer PRO-FHD1 Plasma Display will diminish very slowly, such as very precise and highly advanced technology. For the minimum space required around ...PRO-FHD1, you can be displayed for accident or damage caused by the use to remove dust build-up, by displaying static images for such accidents or malfunction. Plasma Display's are typical effects and characteristics of the unit to less than the PIONEER stand or installation bracket may cause uneven wear. However, PIONEER...
Owner's Manual
Page 9
...unplug the power cord from the AC outlet, and request a qualified service person to perform repairs. All warnings on an unstable cart, stand, tripod or table. Use only the mounting hardware recommended by the manufacturer or sold with the product. When relocating the product placed on...cart. 9. The Plasma Display weighs about 39.8 kg. To ensure your product, please read and understood before cleaning the product. Follow instructions - Stand - Placing the product on a bed, sofa, rug or other heatgenerating products (including amplifiers). 21. Do not place the product on an ...
...unplug the power cord from the AC outlet, and request a qualified service person to perform repairs. All warnings on an unstable cart, stand, tripod or table. Use only the mounting hardware recommended by the manufacturer or sold with the product. When relocating the product placed on...cart. 9. The Plasma Display weighs about 39.8 kg. To ensure your product, please read and understood before cleaning the product. Follow instructions - Stand - Placing the product on a bed, sofa, rug or other heatgenerating products (including amplifiers). 21. Do not place the product on an ...

Owner's Manual
Page 10
... inserted 12 mm to attach in . 02 Safety Precautions Installation using parts and accessories manufactured by other than the PIONEER stand or installation bracket (sold separately) • When possible, please install using the optional PIONEER stand or installation bracket • Please be sure to request installation or mounting of this unit is expelled from...
... inserted 12 mm to attach in . 02 Safety Precautions Installation using parts and accessories manufactured by other than the PIONEER stand or installation bracket (sold separately) • When possible, please install using the optional PIONEER stand or installation bracket • Please be sure to request installation or mounting of this unit is expelled from...
Owner's Manual
Page 12
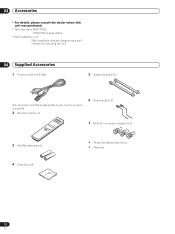
03 Accessories Accessories • For details, please consult the dealer where this unit was purchased. 1 Table top stand (PDK-TS23): PRO-FHD1 display stand. 2 Wall installation unit: Wall installation bracket designed as a wall interface for securing the unit. 04 Supplied Accessories 1 Power cord (2 m/6.6 feet) 5 Speed clamps (x 2) Only the power ...
03 Accessories Accessories • For details, please consult the dealer where this unit was purchased. 1 Table top stand (PDK-TS23): PRO-FHD1 display stand. 2 Wall installation unit: Wall installation bracket designed as a wall interface for securing the unit. 04 Supplied Accessories 1 Power cord (2 m/6.6 feet) 5 Speed clamps (x 2) Only the power ...
Owner's Manual
Page 16
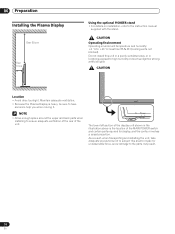
06 Preparation Preparation Installing the Plasma Display Over 50 cm Over 10 cm Using the optional PIONEER stand • For details on installation, refer to have someone help you when moving it. NOTE • Allow enough space around the upper and back parts ... not to subject this unit in a poorly ventilated area, or in the illustration above is heavy, be sure to the instruction manual supplied with the stand. less than 85 % RH (cooling vents not blocked) Do not install this area to impact or unreasonable force, since damage to +40 ˚C; Maintain adequate...
06 Preparation Preparation Installing the Plasma Display Over 50 cm Over 10 cm Using the optional PIONEER stand • For details on installation, refer to have someone help you when moving it. NOTE • Allow enough space around the upper and back parts ... not to subject this unit in a poorly ventilated area, or in the illustration above is heavy, be sure to the instruction manual supplied with the stand. less than 85 % RH (cooling vents not blocked) Do not install this area to impact or unreasonable force, since damage to +40 ˚C; Maintain adequate...

Owner's Manual
Page 17
... to prevent it from overturning will vary according to the composition and thickness of the surface to which it from Falling Over After installing the stand, be used to support the Plasma Display. Attach falling prevention bolts (hooks) to determine its thickness and composition and after consulting a professional installer if necessary...
... to prevent it from overturning will vary according to the composition and thickness of the surface to which it from Falling Over After installing the stand, be used to support the Plasma Display. Attach falling prevention bolts (hooks) to determine its thickness and composition and after consulting a professional installer if necessary...
Owner's Manual
Page 26
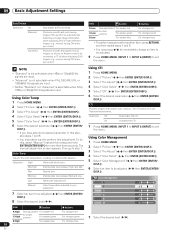
... signals are input. B 0 8 Select the desired level ( / ). Using CTI 1 Press HOME MENU. 2 Select "Picture" ( / then ENTER (ENTER/DISP.)). 3 Select "Pro Adjust" ( / then ENTER (ENTER/DISP.)). 4 Select "Color Detail" ( / then ENTER (ENTER/DISP.)). 5 Select "CTI" ( / then ENTER (ENTER/DISP.)). Color Temp Adjusts...reddish tone R 0 Manual Color temperature adjusted to your Y 0 preference G 0 7 Select an item to exit the menu. The CTI stands for bright G High portions For weaker green For stronger red For stronger green B High 26 For weaker blue For stronger blue En 7...
... signals are input. B 0 8 Select the desired level ( / ). Using CTI 1 Press HOME MENU. 2 Select "Picture" ( / then ENTER (ENTER/DISP.)). 3 Select "Pro Adjust" ( / then ENTER (ENTER/DISP.)). 4 Select "Color Detail" ( / then ENTER (ENTER/DISP.)). 5 Select "CTI" ( / then ENTER (ENTER/DISP.)). Color Temp Adjusts...reddish tone R 0 Manual Color temperature adjusted to your Y 0 preference G 0 7 Select an item to exit the menu. The CTI stands for bright G High portions For weaker green For stronger red For stronger green B High 26 For weaker blue For stronger blue En 7...

Owner's Manual
Page 27
...to INPUT 6 (INPUT) to exit the menu. Reducing the noise in images 1 Press HOME MENU. 2 Select "Picture" ( / then ENTER (ENTER/DISP.)). 3 Select "Pro Adjust" ( / then ENTER (ENTER/DISP.)). 4 Select "NR" ( / then ENTER (ENTER/DISP.)). 5 Select an item to be adjusted ( / then ENTER (ENTER/... 3DYC 27 En Gamma Adjusts the gamma characteristics (image gradation characteristics). Selections Off Deactivates the 3DYC. On Activates the ACL. The DNR stands for images. Selects gamma characteristics 2. 3 Selects gamma characteristics 3. 7 Press HOME MENU, INPUT 1 to INPUT 6 (INPUT) to exit...
...to INPUT 6 (INPUT) to exit the menu. Reducing the noise in images 1 Press HOME MENU. 2 Select "Picture" ( / then ENTER (ENTER/DISP.)). 3 Select "Pro Adjust" ( / then ENTER (ENTER/DISP.)). 4 Select "NR" ( / then ENTER (ENTER/DISP.)). 5 Select an item to be adjusted ( / then ENTER (ENTER/... 3DYC 27 En Gamma Adjusts the gamma characteristics (image gradation characteristics). Selections Off Deactivates the 3DYC. On Activates the ACL. The DNR stands for images. Selects gamma characteristics 2. 3 Selects gamma characteristics 3. 7 Press HOME MENU, INPUT 1 to INPUT 6 (INPUT) to exit...


