
Owner's Manual
Page 4
... Changing the volume and sound ...........21 Use the multiscreen functions 22 Splitting the screen 22 Confirming current status 22 AV Selection 22 Selecting a screen size manually ...........23 09 Basic Adjustment Settings Language setting 25 Basic picture adjustments 25 Advanced...AV mode only 30 Adjusting image positions and clock automatically (PC mode only 30 Adjusting image positions and clock manually (PC mode only 30 Selecting an input signal type 31 Color system setting 31 Selecting a screen size automatically (AV mode only 32 Selecting a screen size for buying this Pioneer...
... Changing the volume and sound ...........21 Use the multiscreen functions 22 Splitting the screen 22 Confirming current status 22 AV Selection 22 Selecting a screen size manually ...........23 09 Basic Adjustment Settings Language setting 25 Basic picture adjustments 25 Advanced...AV mode only 30 Adjusting image positions and clock automatically (PC mode only 30 Adjusting image positions and clock manually (PC mode only 30 Selecting an input signal type 31 Color system setting 31 Selecting a screen size automatically (AV mode only 32 Selecting a screen size for buying this Pioneer...
Owner's Manual
Page 6
...the sides and rear of the unit to remove dust build-up, by using a vacuum cleaner set to its lifetime, the luminosity of the Pioneer PRO-FHD1 Plasma Display will diminish very slowly, such as compared to rise, and could cause injury. Over the course of its lowest suction setting. &#...the proper measures to mount or install the Plasma Display, in front of time. • When playing a game, the "GAME" mode setting within "AV Selection" is poor. • Do not cover with long-life and high reliability. When the surrounding or internal temperature exceeds a certain degree, the display...
...the sides and rear of the unit to remove dust build-up, by using a vacuum cleaner set to its lifetime, the luminosity of the Pioneer PRO-FHD1 Plasma Display will diminish very slowly, such as compared to rise, and could cause injury. Over the course of its lowest suction setting. &#...the proper measures to mount or install the Plasma Display, in front of time. • When playing a game, the "GAME" mode setting within "AV Selection" is poor. • Do not cover with long-life and high reliability. When the surrounding or internal temperature exceeds a certain degree, the display...

Owner's Manual
Page 14
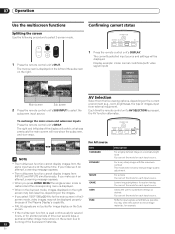
...MUTING button Press to mute the volume (page 21). 7 RETURN button Restores the previous menu screen (pages 24 to 27). 8 AV SELECTION button Use to select the AV function (page 22). 9 DISPLAY button Press to view the unit's current input and setup mode (page 22). 10 SPLIT button Press... on the unit (pages 24 to wear out, the operable distance will gradually become shorter. 05 Part Names Remote control unit STANDBY/ON 1 SCREEN AUTO AV SIZE SETUP DISPLAY SELECTION 2 PC 8 3 INPUT 9 4 1 2 3 4 5 6 SPLIT SUB INPUT 5 VOLUME MUTING SWAP 6 10 11 12 RETURN 7 HOME MENU 13 ...
...MUTING button Press to mute the volume (page 21). 7 RETURN button Restores the previous menu screen (pages 24 to 27). 8 AV SELECTION button Use to select the AV function (page 22). 9 DISPLAY button Press to view the unit's current input and setup mode (page 22). 10 SPLIT button Press... on the unit (pages 24 to wear out, the operable distance will gradually become shorter. 05 Part Names Remote control unit STANDBY/ON 1 SCREEN AUTO AV SIZE SETUP DISPLAY SELECTION 2 PC 8 3 INPUT 9 4 1 2 3 4 5 6 SPLIT SUB INPUT 5 VOLUME MUTING SWAP 6 10 11 12 RETURN 7 HOME MENU 13 ...
Owner's Manual
Page 22
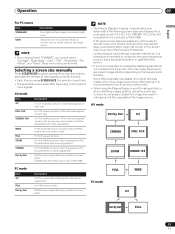
...previously the main screen will be displayed properly because of the Plasma Display's capability. STANDBY/ON SCREEN AUTO SIZE SETUP PC AV DISPLAY SELECTION For AV source Item STANDARD NOTE • The multiscreen function cannot display images from external equipment. To exchange the main screen and.... The currently selected input source and settings will now show the subscreen, and vice versa. Each time the remote control unit's AV SELECTION is used continuously for several hours, or for shorter periods of time over several days, a permanent after-image may select this...
...previously the main screen will be displayed properly because of the Plasma Display's capability. STANDBY/ON SCREEN AUTO SIZE SETUP PC AV DISPLAY SELECTION For AV source Item STANDARD NOTE • The multiscreen function cannot display images from external equipment. To exchange the main screen and.... The currently selected input source and settings will now show the subscreen, and vice versa. Each time the remote control unit's AV SELECTION is used continuously for several hours, or for shorter periods of time over several days, a permanent after-image may select this...
Owner's Manual
Page 23
... Plasma Display's imaging characteristics may also see bars on each side, and you cannot select "Contrast", "Brightness", "Color", "Tint", "Sharpness", "Pro Adjust", and "Reset"; Full 16:9 screen display Matches input signal with some programmes. For 16:9 letterbox pictures. For 14:9 letterbox pictures. Unless... uneven wear. A thin side mask appears on each side. After viewing, it is strongly recommended to customize settings as desired. AV mode Item 4:3 FULL 14:9 CINEMA 14:9 WIDE FULL ZOOM CINEMA Dot by Dot (except when the input size is progressively stretched...
... Plasma Display's imaging characteristics may also see bars on each side, and you cannot select "Contrast", "Brightness", "Color", "Tint", "Sharpness", "Pro Adjust", and "Reset"; Full 16:9 screen display Matches input signal with some programmes. For 16:9 letterbox pictures. For 14:9 letterbox pictures. Unless... uneven wear. A thin side mask appears on each side. After viewing, it is strongly recommended to customize settings as desired. AV mode Item 4:3 FULL 14:9 CINEMA 14:9 WIDE FULL ZOOM CINEMA Dot by Dot (except when the input size is progressively stretched...
Owner's Manual
Page 24
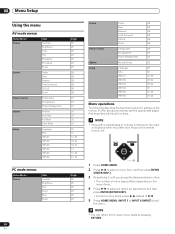
... within parentheses ( ) indicate notations for setting up the menus. 08 Menu Setup Menu Setup Using the menu AV mode menus Home Menu Picture Sound Power Control Option Setup Item Contrast Brightness Color Tint Sharpness Pro Adjust Reset Treble Bass Balance Front Surround FOCUS Reset Energy Save No Signal off Power Management Position...
... within parentheses ( ) indicate notations for setting up the menus. 08 Menu Setup Menu Setup Using the menu AV mode menus Home Menu Picture Sound Power Control Option Setup Item Contrast Brightness Color Tint Sharpness Pro Adjust Reset Treble Bass Balance Front Surround FOCUS Reset Energy Save No Signal off Power Management Position...
Owner's Manual
Page 25
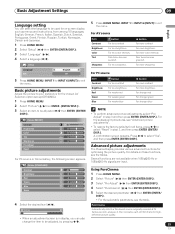
... is in step 3 and then press ENTER (ENTER/DISP.). Red Green Blue Reset 0 2 Select "Picture" ( / then ENTER (ENTER/DISP.)). 0 3 Select "Pro Adjust" ( / then ENTER (ENTER/DISP.)). 0 4 Select "PureCinema" ( / then ENTER (ENTER/DISP.)). 5 Select the desired parameter ( / then ENTER (ENTER.... 1 Press HOME MENU. 2 Select "Setup" ( / then ENTER (ENTER/DISP.)). 3 Select "Language" ( / ). 4 Select a language ( / ). For AV source Item Contrast Brightness Color Tint Sharpness button For less contrast For less brightness For less color intensity Skin tones become purplish For less sharpness...
... is in step 3 and then press ENTER (ENTER/DISP.). Red Green Blue Reset 0 2 Select "Picture" ( / then ENTER (ENTER/DISP.)). 0 3 Select "Pro Adjust" ( / then ENTER (ENTER/DISP.)). 0 4 Select "PureCinema" ( / then ENTER (ENTER/DISP.)). 5 Select the desired parameter ( / then ENTER (ENTER.... 1 Press HOME MENU. 2 Select "Setup" ( / then ENTER (ENTER/DISP.)). 3 Select "Language" ( / ). 4 Select a language ( / ). For AV source Item Contrast Brightness Color Tint Sharpness button For less contrast For less brightness For less color intensity Skin tones become purplish For less sharpness...

Owner's Manual
Page 28
..." is not settable: 480p, 720p, 576p, 1080p. Selections 1 Optimum for video images 2 Standard setting 3 Optimum for all items, press / to your preference for the chosen AV Selection option. Sound adjustments You can adjust the sound quality to select "Reset" in step 3, and then press ENTER (ENTER/ DISP.). Adjust the sound to...
..." is not settable: 480p, 720p, 576p, 1080p. Selections 1 Optimum for video images 2 Standard setting 3 Optimum for all items, press / to your preference for the chosen AV Selection option. Sound adjustments You can adjust the sound quality to select "Reset" in step 3, and then press ENTER (ENTER/ DISP.). Adjust the sound to...

Owner's Manual
Page 29
... mode when no input signal is disabled during display of the HOME MENU. INPUT1 and 4 are disabled, however, when they have "Signal Type" set to "AV", they are disabled. • Operation is subsequently detected, the unit automatically turns ON. 5 Press HOME MENU, INPUT 1 to INPUT 6 (INPUT) to exit the menu. If...
... mode when no input signal is disabled during display of the HOME MENU. INPUT1 and 4 are disabled, however, when they have "Signal Type" set to "AV", they are disabled. • Operation is subsequently detected, the unit automatically turns ON. 5 Press HOME MENU, INPUT 1 to INPUT 6 (INPUT) to exit the menu. If...
Owner's Manual
Page 30
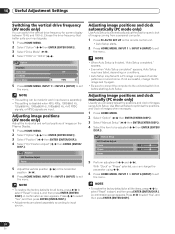
...PC mode only) Usually you can switch the vertical drive frequency for all the items, press / to exit the menu. Adjusting image positions (AV mode only) Adjust the horizontal and vertical positions of similar patterns or monochrome. Press / to select "Yes", and then press ENTER (ENTER/... Position Adjust Clock 0 Phase 0 Reset 5 Perform adjustment ( / and / ). 10 Useful Adjustment Settings Useful Adjustment Settings Switching the vertical drive frequency (AV mode only) You can change the PC image and try again. • Be sure to connect the computer to the unit and switch it on...
...PC mode only) Usually you can switch the vertical drive frequency for all the items, press / to exit the menu. Adjusting image positions (AV mode only) Adjust the horizontal and vertical positions of similar patterns or monochrome. Press / to select "Yes", and then press ENTER (ENTER/... Position Adjust Clock 0 Phase 0 Reset 5 Perform adjustment ( / and / ). 10 Useful Adjustment Settings Useful Adjustment Settings Switching the vertical drive frequency (AV mode only) You can change the PC image and try again. • Be sure to connect the computer to the unit and switch it on...
Owner's Manual
Page 31
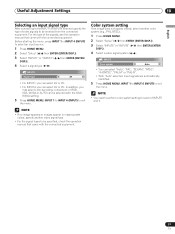
... PC. • For INPUT4, you may select color decoding, component, or RGB. XGA, WXGA or AUTO can select AV or PC. Color system setting If an image does not appear clearly, select another video signal type. • For the signal types to be received ...
... PC. • For INPUT4, you may select color decoding, component, or RGB. XGA, WXGA or AUTO can select AV or PC. Color system setting If an image does not appear clearly, select another video signal type. • For the signal types to be received ...

Owner's Manual
Page 32
10 Useful Adjustment Settings Selecting a screen size automatically (AV mode only) The Plasma Display automatically selects an appropriate screen size when video signals are received with "On" selected. Item WIDE 4:3 ... 4 Select "WIDE" or "4:3" ( / ). Option Position Auto Size On Item Off On Description Deactivates the Auto Size function. Selecting a screen size for received 4:3 aspect ratio signals (AV mode only) Specify whether the Plasma Display should choose the 4:3 mode or WIDE mode when 4:3 aspect ratio signals are received from a connected HDMI equipment (see...
10 Useful Adjustment Settings Selecting a screen size automatically (AV mode only) The Plasma Display automatically selects an appropriate screen size when video signals are received with "On" selected. Item WIDE 4:3 ... 4 Select "WIDE" or "4:3" ( / ). Option Position Auto Size On Item Off On Description Deactivates the Auto Size function. Selecting a screen size for received 4:3 aspect ratio signals (AV mode only) Specify whether the Plasma Display should choose the 4:3 mode or WIDE mode when 4:3 aspect ratio signals are received from a connected HDMI equipment (see...
Owner's Manual
Page 35
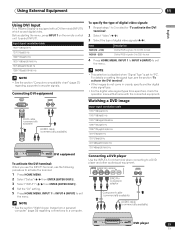
..., use the following procedure to activate the terminal. 1 Press HOME MENU. 2 Select "Setup" ( / then ENTER (ENTER/DISP.)). 3 Select "INPUT1" ( / then ENTER (ENTER/DISP.)). 4 Set the "AV" setting. 5 Press HOME MENU, INPUT 1 to INPUT 6 (INPUT) to "PC". To specify the type of digital video signals: 1 Repeat steps 1 to exit the menu. Item...
..., use the following procedure to activate the terminal. 1 Press HOME MENU. 2 Select "Setup" ( / then ENTER (ENTER/DISP.)). 3 Select "INPUT1" ( / then ENTER (ENTER/DISP.)). 4 Set the "AV" setting. 5 Press HOME MENU, INPUT 1 to INPUT 6 (INPUT) to "PC". To specify the type of digital video signals: 1 Repeat steps 1 to exit the menu. Item...

Owner's Manual
Page 37
...all component connections before making control cord connections. Connecting control cords Connect control cords between the Plasma Display and other PIONEER equipment having the logo. You can be performed with the PIONEER AV receiver supporting SR+. 1 Press HOME MENU. 2 Select "Setup" ( / then ENTER (ENTER/DISP.)). 3 ...CONTROL IN OUT CONTROL IN OUT CONTROL IN OUT The control cables (commercially available) are monaural cables with a PIONEER AV receiver. For more information, see the instruction manual that allows linked operations with mini plugs (no resistance). Linked ...
...all component connections before making control cord connections. Connecting control cords Connect control cords between the Plasma Display and other PIONEER equipment having the logo. You can be performed with the PIONEER AV receiver supporting SR+. 1 Press HOME MENU. 2 Select "Setup" ( / then ENTER (ENTER/DISP.)). 3 ...CONTROL IN OUT CONTROL IN OUT CONTROL IN OUT The control cables (commercially available) are monaural cables with a PIONEER AV receiver. For more information, see the instruction manual that allows linked operations with mini plugs (no resistance). Linked ...