
Owner's Manual
Page 3
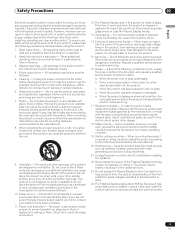
... listed on proposition 65 known to which can radiate radio frequency energy and, if not installed and used to connect the unit to radio or television reception, which the receiver is no guarantee that interference will not occur in accordance with other equipment. Product Name: Plasma Display Model Number: PRO-FHD1 Product Category: Class B Personal Computers & Peripherals Responsible Party Name: PIONEER ELECTRONICS SERVICE, INC. Connect...
... listed on proposition 65 known to which can radiate radio frequency energy and, if not installed and used to connect the unit to radio or television reception, which the receiver is no guarantee that interference will not occur in accordance with other equipment. Product Name: Plasma Display Model Number: PRO-FHD1 Product Category: Class B Personal Computers & Peripherals Responsible Party Name: PIONEER ELECTRONICS SERVICE, INC. Connect...
Owner's Manual
Page 4
... Sound adjustments 28 FOCUS 28 Front Surround 28 Power Control 29 10 Useful Adjustment Settings Switching the vertical drive frequency (AV mode only 30 Adjusting image positions (AV mode only 30 Adjusting image positions and clock automatically (PC mode only 30 Adjusting image positions and clock manually (PC mode only 30 Selecting an input signal type 31 Color system setting 31 Selecting a screen size automatically (AV mode only 32 Selecting a screen size for received 4:3 aspect ratio signals (AV mode only) ...32 08 Menu Setup Using...
... Sound adjustments 28 FOCUS 28 Front Surround 28 Power Control 29 10 Useful Adjustment Settings Switching the vertical drive frequency (AV mode only 30 Adjusting image positions (AV mode only 30 Adjusting image positions and clock automatically (PC mode only 30 Adjusting image positions and clock manually (PC mode only 30 Selecting an input signal type 31 Color system setting 31 Selecting a screen size automatically (AV mode only 32 Selecting a screen size for received 4:3 aspect ratio signals (AV mode only) ...32 08 Menu Setup Using...
Owner's Manual
Page 6
... the sides and rear of the unit to remove dust build-up, by using only parts and accessories designed by using a vacuum cleaner set to ensure proper heat emission: • Distance the unit slightly from a decoder, DVD player, VCR and all phosphor-based screens (for a prolonged period of time, when using the Plasma Display, always switch the display to less than the PIONEER stand or installation bracket may cause uneven...
... the sides and rear of the unit to remove dust build-up, by using only parts and accessories designed by using a vacuum cleaner set to ensure proper heat emission: • Distance the unit slightly from a decoder, DVD player, VCR and all phosphor-based screens (for a prolonged period of time, when using the Plasma Display, always switch the display to less than the PIONEER stand or installation bracket may cause uneven...
Owner's Manual
Page 7
... on the surface may be permanently switched off, or on, resulting in either a black or colored cell permanently fixed on the surface may result in the discolouration or scratch of the Plasma Display automatically adjusts the brightness to clean the cabinet. Do not make you use the handles attached to received video signals. Pioneer Plasma Display panels contain a very large number of plastic. If this is...
... on the surface may be permanently switched off, or on, resulting in either a black or colored cell permanently fixed on the surface may result in the discolouration or scratch of the Plasma Display automatically adjusts the brightness to clean the cabinet. Do not make you use the handles attached to received video signals. Pioneer Plasma Display panels contain a very large number of plastic. If this is...
Owner's Manual
Page 9
... at the plugs and product. 02 12. Power source - Power cord protection - The power cords must be sure to install the product according to prevent people from stepping on them . Overloading can cause overheating and/or shorten the life of the product. Servicing - a. When a liquid was spilled on an unstable cart, stand, tripod or table. Replacement parts - When mounting the product on a wall, be injured...
... at the plugs and product. 02 12. Power source - Power cord protection - The power cords must be sure to install the product according to prevent people from stepping on them . Overloading can cause overheating and/or shorten the life of the product. Servicing - a. When a liquid was spilled on an unstable cart, stand, tripod or table. Replacement parts - When mounting the product on a wall, be injured...

Owner's Manual
Page 14
... 14 15 PLASMA DISPLAY When handling the remote control unit • Do not drop the remote control unit or expose it to moisture. • Do not use the remote control unit in a location subject to direct sunlight, heat radiation from a heater, or in operation or standby mode (page 21). 2 SCREEN SIZE button Press to select the screen size (page 23). 3 PC AUTO SET UP button When using computer signal input, automatically sets the "Position...
... 14 15 PLASMA DISPLAY When handling the remote control unit • Do not drop the remote control unit or expose it to moisture. • Do not use the remote control unit in a location subject to direct sunlight, heat radiation from a heater, or in operation or standby mode (page 21). 2 SCREEN SIZE button Press to select the screen size (page 23). 3 PC AUTO SET UP button When using computer signal input, automatically sets the "Position...

Owner's Manual
Page 15
... used for Plasma Display setup adjustments. 3 CONTROL IN/OUT terminals 4 INPUT1 terminal (DVI-D) 5 INPUT2 terminal (HDMI) 6 INPUT3 terminal (HDMI) 7 INPUT4 terminals (COMPONENT VIDEO: Y, Pb/Cb, Pr/Cr, ANALOG RGB : G, B, R ,HD, VD) 11 12 8 INPUT5 terminal (S-VIDEO) 9 INPUT6 terminal (VIDEO) 10 AUDIO INPUT terminals Audio input connectors corresponding to INPUT1 to INPUT6 video input connectors. 11 AC IN Use to connect the supplied power cord to these connectors without first consulting your Pioneer installation technician. Part Names Connection panel R SPEAKER...
... used for Plasma Display setup adjustments. 3 CONTROL IN/OUT terminals 4 INPUT1 terminal (DVI-D) 5 INPUT2 terminal (HDMI) 6 INPUT3 terminal (HDMI) 7 INPUT4 terminals (COMPONENT VIDEO: Y, Pb/Cb, Pr/Cr, ANALOG RGB : G, B, R ,HD, VD) 11 12 8 INPUT5 terminal (S-VIDEO) 9 INPUT6 terminal (VIDEO) 10 AUDIO INPUT terminals Audio input connectors corresponding to INPUT1 to INPUT6 video input connectors. 11 AC IN Use to connect the supplied power cord to these connectors without first consulting your Pioneer installation technician. Part Names Connection panel R SPEAKER...
Owner's Manual
Page 18
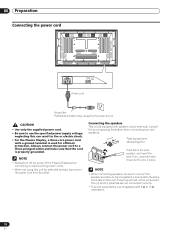
... the power source. CAUTION • Use only the supplied power cord. • Be sure to use of the Plasma Display when connecting or disconnecting power cords. • When not using this unit for efficient protection. NOTE • When connecting speakers, be produced if the (+) and (-) polarities are not connected correctly. • This unit supports the use the specified power supply voltage; 06 Preparation Connecting the power cord AC IN SPEAKER 8Ω ~16Ω + - Then, close...
... the power source. CAUTION • Use only the supplied power cord. • Be sure to use of the Plasma Display when connecting or disconnecting power cords. • When not using this unit for efficient protection. NOTE • When connecting speakers, be produced if the (+) and (-) polarities are not connected correctly. • This unit supports the use the specified power supply voltage; 06 Preparation Connecting the power cord AC IN SPEAKER 8Ω ~16Ω + - Then, close...
Owner's Manual
Page 21
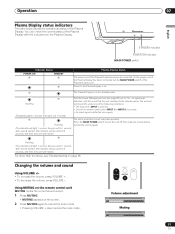
... repeat.) Flashing (The indicator will light 1 second, then go out for 1 second; Changing the volume and sound Using VOLUME +/- • To increase the volume, press VOLUME +. • To decrease the volume, press VOLUME -. Using MUTING on the remote control unit MUTING mutes the current sound output. 1 Press MUTING. • MUTING appears on the screen. 2 Press MUTING again to the Plasma Display is pressed; • One of the Plasma Display with the...
... repeat.) Flashing (The indicator will light 1 second, then go out for 1 second; Changing the volume and sound Using VOLUME +/- • To increase the volume, press VOLUME +. • To decrease the volume, press VOLUME -. Using MUTING on the remote control unit MUTING mutes the current sound output. 1 Press MUTING. • MUTING appears on the screen. 2 Press MUTING again to the Plasma Display is pressed; • One of the Plasma Display with the...
Owner's Manual
Page 22
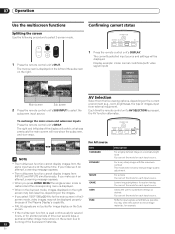
.... STANDBY/ON SCREEN AUTO SIZE SETUP PC AV DISPLAY SELECTION 1 Press the remote control unit's DISPLAY. DYNAMIC • The multiscreen function cannot display images from the same input source at the same time. AV Selection Select from external equipment. If you press HOME MENU the single-screen mode is restored and the corresponding menu is pressed, the AV function alternates. MOVIE GAME • When in a normally bright room You can set...
.... STANDBY/ON SCREEN AUTO SIZE SETUP PC AV DISPLAY SELECTION 1 Press the remote control unit's DISPLAY. DYNAMIC • The multiscreen function cannot display images from the same input source at the same time. AV Selection Select from external equipment. If you press HOME MENU the single-screen mode is restored and the corresponding menu is pressed, the AV function alternates. MOVIE GAME • When in a normally bright room You can set...
Owner's Manual
Page 25
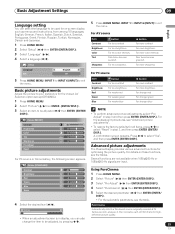
... contrast button For more brightness For stronger red For stronger green 1 Press HOME MENU. Press / to be adjusted, by pressing / . 25 En For details on -screen display such as menus and instructions, from among 15 languages; Using PureCinema 1 Press HOME MENU. Picture STANDARD Contrast 40 Brightness 0 Advanced picture adjustments The Plasma Display provides various advanced functions for high- PureCinema Contrast 40 Automatically detects a film-based source...
... contrast button For more brightness For stronger red For stronger green 1 Press HOME MENU. Press / to be adjusted, by pressing / . 25 En For details on -screen display such as menus and instructions, from among 15 languages; Using PureCinema 1 Press HOME MENU. Picture STANDARD Contrast 40 Brightness 0 Advanced picture adjustments The Plasma Display provides various advanced functions for high- PureCinema Contrast 40 Automatically detects a film-based source...

Owner's Manual
Page 28
... Balance button button For weaker treble For stronger treble For weaker bass For stronger bass Decreases audio from the Decreases audio from SRS Labs, Inc. • The effect of SRS Labs, Inc. • WOW technology is not supported if either of the following settings. A confirmation screen appears. NOTE • To restore the factory defaults for still images 7 Press HOME MENU, INPUT 1 to INPUT 6 (INPUT...
... Balance button button For weaker treble For stronger treble For weaker bass For stronger bass Decreases audio from the Decreases audio from SRS Labs, Inc. • The effect of SRS Labs, Inc. • WOW technology is not supported if either of the following settings. A confirmation screen appears. NOTE • To restore the factory defaults for still images 7 Press HOME MENU, INPUT 1 to INPUT 6 (INPUT...
Owner's Manual
Page 30
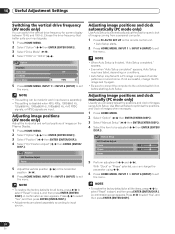
... HOME MENU, INPUT 1 to INPUT 6 (INPUT) to select "Reset" in step 4, and then press ENTER (ENTER/ DISP.). NOTE • To restore the factory defaults for screen display between 75 Hz and 100 Hz. A confirmation screen appears. 10 Useful Adjustment Settings Useful Adjustment Settings Switching the vertical drive frequency (AV mode only) You can switch the vertical drive frequency for all items, press / to exit the menu. Adjusting image positions and clock automatically (PC mode only) Use Auto Setup...
... HOME MENU, INPUT 1 to INPUT 6 (INPUT) to select "Reset" in step 4, and then press ENTER (ENTER/ DISP.). NOTE • To restore the factory defaults for screen display between 75 Hz and 100 Hz. A confirmation screen appears. 10 Useful Adjustment Settings Useful Adjustment Settings Switching the vertical drive frequency (AV mode only) You can switch the vertical drive frequency for all items, press / to exit the menu. Adjusting image positions and clock automatically (PC mode only) Use Auto Setup...
Owner's Manual
Page 31
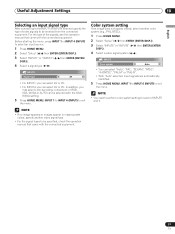
... "Auto" selected, input signals are automatically identified. 5 Press HOME MENU, INPUT 1 to INPUT 6 (INPUT) to exit the menu. For the type of INPUT5 and 6. 31 En Before starting the menu, press INPUT 1 or INPUT 4 (INPUT) to be specified, check the operation manual that came with the XGA/ WXGA setting. 5 Press HOME MENU, INPUT 1 to INPUT 6 (INPUT) to exit the menu. NOTE • You need to be received from the connected equipment. Useful Adjustment Settings 10...
... "Auto" selected, input signals are automatically identified. 5 Press HOME MENU, INPUT 1 to INPUT 6 (INPUT) to exit the menu. For the type of INPUT5 and 6. 31 En Before starting the menu, press INPUT 1 or INPUT 4 (INPUT) to be specified, check the operation manual that came with the XGA/ WXGA setting. 5 Press HOME MENU, INPUT 1 to INPUT 6 (INPUT) to exit the menu. NOTE • You need to be received from the connected equipment. Useful Adjustment Settings 10...

Owner's Manual
Page 33
... the menu, press INPUT 2 or INPUT 3 (INPUT) to S-Video/ Composite video conversion connector where necessary. Connections for Composite Connectors INPUT6 VIDEO INPUT6 R L Audio cable (commercially available) S-Video cable (commercially available) Use a SCART to your Plasma Display, like a decoder, VCR, DVD player, personalcomputer, game console, and camcorder. NOTE • Be sure to use the HDMI terminal, activate the terminal and specify the types of video and audio signals to your decoder or VCR operation manual...
... the menu, press INPUT 2 or INPUT 3 (INPUT) to S-Video/ Composite video conversion connector where necessary. Connections for Composite Connectors INPUT6 VIDEO INPUT6 R L Audio cable (commercially available) S-Video cable (commercially available) Use a SCART to your Plasma Display, like a decoder, VCR, DVD player, personalcomputer, game console, and camcorder. NOTE • Be sure to use the HDMI terminal, activate the terminal and specify the types of video and audio signals to your decoder or VCR operation manual...

Owner's Manual
Page 34
... images do not come in clearly, specify another digital video signal type. • For the digital video signal types to be specified, check the operation manual that came with the connected equipment. • Depending on top right corner of the Plasma Display (blue box) everytime the external devices changing the output format, this might causing the blank screen while detecting the signal format. Item Auto Color-1 Color-2 Color-3 Color-4 Description Automatically identifies input digital video signals. HDMI cable having the HDMI...
... images do not come in clearly, specify another digital video signal type. • For the digital video signal types to be specified, check the operation manual that came with the connected equipment. • Depending on top right corner of the Plasma Display (blue box) everytime the external devices changing the output format, this might causing the blank screen while detecting the signal format. Item Auto Color-1 Color-2 Color-3 Color-4 Description Automatically identifies input digital video signals. HDMI cable having the HDMI...
Owner's Manual
Page 35
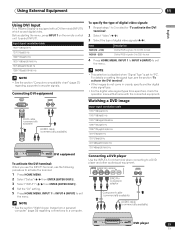
Using External Equipment 11 English Using DVI Input This Plasma Display is set to "PC". For details on the remote control unit to select INPUT1. Connecting DVI equipment INPUT1 DVI-D INPUT1 R L DVI-D cable (commercially available) AUDIO cable (commercially available) DVI equipment To activate the DVI terminal: When you use the INPUT1 terminal, use the following procedure to activate the terminal. 1 Press HOME MENU. 2 Select "Setup" ( / then ENTER (ENTER/DISP.)). 3 Select "INPUT1" ( / then ENTER (ENTER...
Using External Equipment 11 English Using DVI Input This Plasma Display is set to "PC". For details on the remote control unit to select INPUT1. Connecting DVI equipment INPUT1 DVI-D INPUT1 R L DVI-D cable (commercially available) AUDIO cable (commercially available) DVI equipment To activate the DVI terminal: When you use the INPUT1 terminal, use the following procedure to activate the terminal. 1 Press HOME MENU. 2 Select "Setup" ( / then ENTER (ENTER/DISP.)). 3 Select "INPUT1" ( / then ENTER (ENTER...

Owner's Manual
Page 36
... L INPUT6 VIDEO INPUT6 R L DVI-D cable (commercially available) Audio cable (commercially available) Composite video cables (commercially available) S-Video cable (commercially available) Personal computer When using the INPUT1 terminal: INPUT1 DVI-D INPUT1 R L Enjoying a game console or watching camcorder images Connecting a game console or camcorder Use the INPUT5 or INPUT6 terminals to connect a personal computer. Watching an image from the game console or camcorder To watch a DVD image, press INPUT 4, 5 or 6 (INPUT) to use the remote control unit's Auto setup function...
... L INPUT6 VIDEO INPUT6 R L DVI-D cable (commercially available) Audio cable (commercially available) Composite video cables (commercially available) S-Video cable (commercially available) Personal computer When using the INPUT1 terminal: INPUT1 DVI-D INPUT1 R L Enjoying a game console or watching camcorder images Connecting a game console or camcorder Use the INPUT5 or INPUT6 terminals to connect a personal computer. Watching an image from the game console or camcorder To watch a DVD image, press INPUT 4, 5 or 6 (INPUT) to use the remote control unit's Auto setup function...

Owner's Manual
Page 37
... as the input switch linkage operation function and the DSP surround mode display function. Linked operation can then operate the connected equipment by sending commands from the remote control units. Item Off On Description SR+ is temporarily minimised. 37 En For more information, see the instruction manual that allows linked operations with the PIONEER AV receiver supporting SR+. 1 Press HOME MENU. 2 Select "Setup" ( / then...
... as the input switch linkage operation function and the DSP surround mode display function. Linked operation can then operate the connected equipment by sending commands from the remote control units. Item Off On Description SR+ is temporarily minimised. 37 En For more information, see the instruction manual that allows linked operations with the PIONEER AV receiver supporting SR+. 1 Press HOME MENU. 2 Select "Setup" ( / then...
Owner's Manual
Page 38
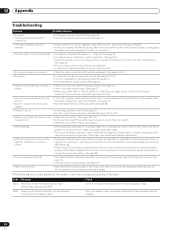
... color, light color, dark or color • Adjust the picture tone. (See pages 25 to 37.) • Is a non-compatible PC signal being input? (See page 37.) • Is the Input Select setting correct? (See page 31.) • Images are normal operation of the Plasma Display is output from only a single speaker. • Check if the speaker cable connections have also been connected. (See page 33 to select a screen size that the audio...
... color, light color, dark or color • Adjust the picture tone. (See pages 25 to 37.) • Is a non-compatible PC signal being input? (See page 37.) • Is the Input Select setting correct? (See page 31.) • Images are normal operation of the Plasma Display is output from only a single speaker. • Check if the speaker cable connections have also been connected. (See page 33 to select a screen size that the audio...


