
Owner's Manual
Page 4
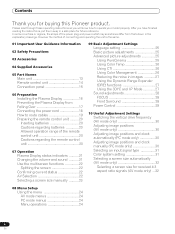
...15 06 Preparation Installing the Plasma Display 16 Preventing the Plasma Display from that shown in a safe place for buying this Pioneer product. However the method of the remote control unit 20 Cautions regarding the remote control unit 20 07 Operation Plasma Display status...22 Splitting the screen 22 Confirming current status 22 AV Selection 22 Selecting a screen size manually ...........23 09 Basic Adjustment Settings Language setting 25 Basic picture adjustments 25 Advanced picture adjustments 25 Using PureCinema 25 Using Color Temp 26 Using CTI 26 Using Color Management...
...15 06 Preparation Installing the Plasma Display 16 Preventing the Plasma Display from that shown in a safe place for buying this Pioneer product. However the method of the remote control unit 20 Cautions regarding the remote control unit 20 07 Operation Plasma Display status...22 Splitting the screen 22 Confirming current status 22 AV Selection 22 Selecting a screen size manually ...........23 09 Basic Adjustment Settings Language setting 25 Basic picture adjustments 25 Advanced picture adjustments 25 Using PureCinema 25 Using Color Temp 26 Using CTI 26 Using Color Management...
Owner's Manual
Page 6
... below : Usage guidelines All phosphor-based screens (including conventional tube-type televisions) can be avoided by PIONEER. This improves the color/picture reproduction of the Pioneer PRO-FHD1 Plasma Display will automatically power off in order to rise, and could cause injury. Plasma Display's are...measures to mount or install the Plasma Display, in possible malfunction. This product should not be installed by using a vacuum cleaner set to previous models. Over the course of its lifetime, the luminosity of these models as very precise and highly advanced technology....
... below : Usage guidelines All phosphor-based screens (including conventional tube-type televisions) can be avoided by PIONEER. This improves the color/picture reproduction of the Pioneer PRO-FHD1 Plasma Display will automatically power off in order to rise, and could cause injury. Plasma Display's are...measures to mount or install the Plasma Display, in possible malfunction. This product should not be installed by using a vacuum cleaner set to previous models. Over the course of its lifetime, the luminosity of these models as very precise and highly advanced technology....
Owner's Manual
Page 8
... or gray bars on the screen will not disappear completely. • The energy save function can be corrected by different things, image retention can be set to the remaining electric load. This image retention may occur due to help prevent damage from PC or TV game equipment, and/or fixed images...
... or gray bars on the screen will not disappear completely. • The energy save function can be corrected by different things, image retention can be set to the remaining electric load. This image retention may occur due to help prevent damage from PC or TV game equipment, and/or fixed images...

Owner's Manual
Page 14
... 24 to 37). 14 ADJUST ( / / / ) buttons Use to navigate menu screens and to adjust various settings on the unit (pages 24 to 37). 15 ENTER button Press to adjust or enter various settings on the unit (pages 24 to wear out, the operable distance will gradually become shorter. 05 Part..., or in operation or standby mode (page 21). 2 SCREEN SIZE button Press to select the screen size (page 23). 3 PC AUTO SET UP button When using computer signal input, automatically sets the "Position", "Clock" and "Phase" to optimum values (page 30). 4 INPUT 1 to 6 buttons Press to select the input (page 31)....
... 24 to 37). 14 ADJUST ( / / / ) buttons Use to navigate menu screens and to adjust various settings on the unit (pages 24 to 37). 15 ENTER button Press to adjust or enter various settings on the unit (pages 24 to wear out, the operable distance will gradually become shorter. 05 Part..., or in operation or standby mode (page 21). 2 SCREEN SIZE button Press to select the screen size (page 23). 3 PC AUTO SET UP button When using computer signal input, automatically sets the "Position", "Clock" and "Phase" to optimum values (page 30). 4 INPUT 1 to 6 buttons Press to select the input (page 31)....
Owner's Manual
Page 21
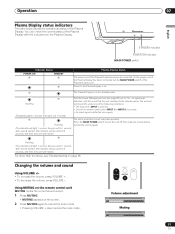
... sound Using VOLUME +/- • To increase the volume, press VOLUME +. • To decrease the volume, press VOLUME -. Flashing With the Power Management function (page 29) set to "On", no signal was detected, with the indicators on . SPLIT VOLUME MUTING SUB INPUT Volume adjustment Muting 21 En The Plasma Display is off...
... sound Using VOLUME +/- • To increase the volume, press VOLUME +. • To decrease the volume, press VOLUME -. Flashing With the Power Management function (page 29) set to "On", no signal was detected, with the indicators on . SPLIT VOLUME MUTING SUB INPUT Volume adjustment Muting 21 En The Plasma Display is off...
Owner's Manual
Page 22
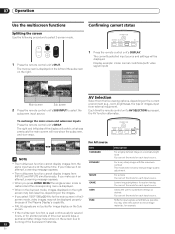
...the single-screen mode is restored and the corresponding menu is pressed, the AV function alternates. Lowers image brightness for easier viewing You can set the mode for each input source. Display example: Under normal conditions (with the maximum contrast This mode does not allow manual image quality ...or for shorter periods of the fluorescent materials. 22 En Description For a highly defined image in a normally bright room You can set the mode for each input source. STANDBY/ON SCREEN AUTO SIZE SETUP PC AV DISPLAY SELECTION For AV source Item STANDARD NOTE • The...
...the single-screen mode is restored and the corresponding menu is pressed, the AV function alternates. Lowers image brightness for easier viewing You can set the mode for each input source. Display example: Under normal conditions (with the maximum contrast This mode does not allow manual image quality ...or for shorter periods of the fluorescent materials. 22 En Description For a highly defined image in a normally bright room You can set the mode for each input source. STANDBY/ON SCREEN AUTO SIZE SETUP PC AV DISPLAY SELECTION For AV source Item STANDARD NOTE • The...
Owner's Manual
Page 23
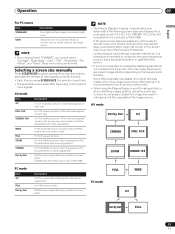
... This may cause uneven wear. A side mask appears on each side, and you cannot select "Contrast", "Brightness", "Color", "Tint", "Sharpness", "Pro Adjust", and "Reset"; A thin side mask appears on the top and bottom with some programmes. For 16:9 squeeze pictures. After viewing, it is ...strongly recommended to customize settings as desired. A thin side mask appears on the top and bottom with side masks, which may cause temporary or permanent image retention ...
... This may cause uneven wear. A side mask appears on each side, and you cannot select "Contrast", "Brightness", "Color", "Tint", "Sharpness", "Pro Adjust", and "Reset"; A thin side mask appears on the top and bottom with some programmes. For 16:9 squeeze pictures. After viewing, it is ...strongly recommended to customize settings as desired. A thin side mask appears on the top and bottom with side masks, which may cause temporary or permanent image retention ...
Owner's Manual
Page 24
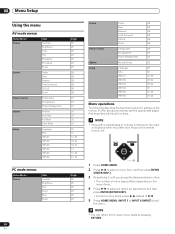
NOTE • Items within parentheses ( ) indicate notations for setting up the menus. 08 Menu Setup Menu Setup Using the menu AV mode menus Home Menu Picture Sound Power Control Option Setup Item Contrast Brightness Color Tint Sharpness Pro Adjust Reset Treble Bass Balance Front Surround FOCUS Reset Energy Save No Signal off Power...
NOTE • Items within parentheses ( ) indicate notations for setting up the menus. 08 Menu Setup Menu Setup Using the menu AV mode menus Home Menu Picture Sound Power Control Option Setup Item Contrast Brightness Color Tint Sharpness Pro Adjust Reset Treble Bass Balance Front Surround FOCUS Reset Energy Save No Signal off Power...
Owner's Manual
Page 25
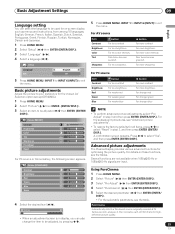
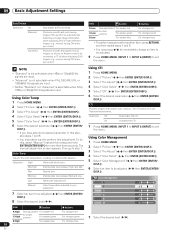
.../ DISP.). Picture MOVIE Contrast 40 Brightness 0 Color 0 Tint 0 Sharpness 0 NOTE • To perform advanced picture adjustments, select "Pro Adjust" in display, you can select the language to your preference for the chosen AV Selection option (except DYNAMIC). For the subsequent procedures... For less contrast button For more brightness For stronger red For stronger green 1 Press HOME MENU. Basic Adjustment Settings 09 Basic Adjustment Settings English Language setting You can also change the item to exit the menu. English, German, French, Italian, Spanish, Dutch, ...
.../ DISP.). Picture MOVIE Contrast 40 Brightness 0 Color 0 Tint 0 Sharpness 0 NOTE • To perform advanced picture adjustments, select "Pro Adjust" in display, you can select the language to your preference for the chosen AV Selection option (except DYNAMIC). For the subsequent procedures... For less contrast button For more brightness For stronger red For stronger green 1 Press HOME MENU. Basic Adjustment Settings 09 Basic Adjustment Settings English Language setting You can also change the item to exit the menu. English, German, French, Italian, Spanish, Dutch, ...
Owner's Manual
Page 26
...Temp 1 Press HOME MENU. 2 Select "Picture" ( / then ENTER (ENTER/DISP.)). 3 Select "Pro Adjust" ( / then ENTER (ENTER/DISP.)). 6 Select the desired parameter ( / then ENTER (... C 0 DISP.)). Using Color Management 1 Press HOME MENU. 2 Select "Picture" ( / then ENTER (ENTER/DISP.)). 3 Select "Pro Adjust" ( / then ENTER (ENTER/DISP.)). 4 Select "Color Detail" ( / then ENTER (ENTER/DISP.)). 5 Select "Color Management...Using CTI 1 Press HOME MENU. 2 Select "Picture" ( / then ENTER (ENTER/DISP.)). 3 Select "Pro Adjust" ( / then ENTER (ENTER/DISP.)). 4 Select "Color Detail" ( / then ENTER (ENTER/DISP...
...Temp 1 Press HOME MENU. 2 Select "Picture" ( / then ENTER (ENTER/DISP.)). 3 Select "Pro Adjust" ( / then ENTER (ENTER/DISP.)). 6 Select the desired parameter ( / then ENTER (... C 0 DISP.)). Using Color Management 1 Press HOME MENU. 2 Select "Picture" ( / then ENTER (ENTER/DISP.)). 3 Select "Pro Adjust" ( / then ENTER (ENTER/DISP.)). 4 Select "Color Detail" ( / then ENTER (ENTER/DISP.)). 5 Select "Color Management...Using CTI 1 Press HOME MENU. 2 Select "Picture" ( / then ENTER (ENTER/DISP.)). 3 Select "Pro Adjust" ( / then ENTER (ENTER/DISP.)). 4 Select "Color Detail" ( / then ENTER (ENTER/DISP...

Owner's Manual
Page 27
Basic Adjustment Settings 09 Item R Y button Closer to magenta Closer to red button Closer to ...becomes more distinct. Reducing the noise in images 1 Press HOME MENU. 2 Select "Picture" ( / then ENTER (ENTER/DISP.)). 3 Select "Pro Adjust" ( / then ENTER (ENTER/DISP.)). 4 Select "NR" ( / then ENTER (ENTER/DISP.)). 5 Select an item to exit the...the Dynamic Range Expander (DRE) functions 1 Press HOME MENU. 2 Select "Picture" ( / then ENTER (ENTER/DISP.)). 3 Select "Pro Adjust" ( / then ENTER (ENTER/DISP.)). 4 Select "DRE" ( / then ENTER (ENTER/DISP.)). 5 Select an item to be adjusted ( / ...
Basic Adjustment Settings 09 Item R Y button Closer to magenta Closer to red button Closer to ...becomes more distinct. Reducing the noise in images 1 Press HOME MENU. 2 Select "Picture" ( / then ENTER (ENTER/DISP.)). 3 Select "Pro Adjust" ( / then ENTER (ENTER/DISP.)). 4 Select "NR" ( / then ENTER (ENTER/DISP.)). 5 Select an item to exit the...the Dynamic Range Expander (DRE) functions 1 Press HOME MENU. 2 Select "Picture" ( / then ENTER (ENTER/DISP.)). 3 Select "Pro Adjust" ( / then ENTER (ENTER/DISP.)). 4 Select "DRE" ( / then ENTER (ENTER/DISP.)). 5 Select an item to be adjusted ( / ...

Owner's Manual
Page 28
...from SRS Labs, Inc. • The effect of this function differs depending on signals. Selections 1 Optimum for video images 2 Standard setting 3 Optimum for both the SRS and TruBass. A confirmation screen appears. Item Off SRS TruBass TruBass + SRS Description Deactivates both video ...and still images. Adjust the sound to exit the menu. Press / to exit the menu. 09 Basic Adjustment Settings I -P Mode" is not settable: 480p, 720p, 576p, 1080p. NOTE • To restore the factory defaults for the chosen AV ...
...from SRS Labs, Inc. • The effect of this function differs depending on signals. Selections 1 Optimum for video images 2 Standard setting 3 Optimum for both the SRS and TruBass. A confirmation screen appears. Item Off SRS TruBass TruBass + SRS Description Deactivates both video ...and still images. Adjust the sound to exit the menu. Press / to exit the menu. 09 Basic Adjustment Settings I -P Mode" is not settable: 480p, 720p, 576p, 1080p. NOTE • To restore the factory defaults for the chosen AV ...

Owner's Manual
Page 29
...the Plasma Display into the standby mode. If a signal is received for power saving. However, when "Signal Type" is set to "AV", they have "Signal Type" set to INPUT6 are disabled, however, when they are enabled. INPUT1 and 4 are enabled. Slightly lowers power consumption while slightly suppressing... detected, the unit automatically turns ON. 5 Press HOME MENU, INPUT 1 to INPUT 6 (INPUT) to exit the menu. Basic Adjustment Settings 09 English Power Control Power Control provides convenient functions for 8 minutes. 1 Press HOME MENU. 2 Select "Power Control" ( / then ENTER...
...the Plasma Display into the standby mode. If a signal is received for power saving. However, when "Signal Type" is set to "AV", they have "Signal Type" set to INPUT6 are disabled, however, when they are enabled. INPUT1 and 4 are enabled. Slightly lowers power consumption while slightly suppressing... detected, the unit automatically turns ON. 5 Press HOME MENU, INPUT 1 to INPUT 6 (INPUT) to exit the menu. Basic Adjustment Settings 09 English Power Control Power Control provides convenient functions for 8 minutes. 1 Press HOME MENU. 2 Select "Power Control" ( / then ENTER...
Owner's Manual
Page 30
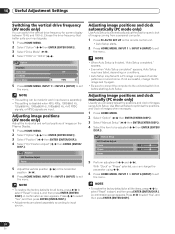
...ENTER (ENTER/DISP.)). 3 Select "Manual Setup" ( / then ENTER (ENTER/DISP.)). 4 Select the item to exit the menu. NOTE • This setting can be adjusted ( / then ENTER (ENTER/ DISP.)). Use Manual Setup to optimise the positions and clock of images coming from a personal computer. 1 ... "Option" ( / then ENTER (ENTER/DISP.)). 3 Select "Drive Mode" ( / ). 4 Select "75Hz" or "100Hz" ( / ). 10 Useful Adjustment Settings Useful Adjustment Settings Switching the vertical drive frequency (AV mode only) You can switch the vertical drive frequency for each input source separately. • This...
...ENTER (ENTER/DISP.)). 3 Select "Manual Setup" ( / then ENTER (ENTER/DISP.)). 4 Select the item to exit the menu. NOTE • This setting can be adjusted ( / then ENTER (ENTER/ DISP.)). Use Manual Setup to optimise the positions and clock of images coming from a personal computer. 1 ... "Option" ( / then ENTER (ENTER/DISP.)). 3 Select "Drive Mode" ( / ). 4 Select "75Hz" or "100Hz" ( / ). 10 Useful Adjustment Settings Useful Adjustment Settings Switching the vertical drive frequency (AV mode only) You can switch the vertical drive frequency for each input source separately. • This...
Owner's Manual
Page 31
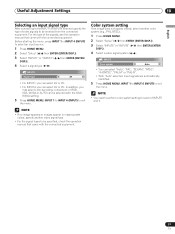
... / then ENTER (ENTER/DISP.)). 3 Select "INPUT5" or "INPUT6" ( / then ENTER (ENTER/ DISP.)). 4 Select a video signal system ( / ). Color system setting If an image does not appear clearly, select another video signal type. • For the signal types to be specified, check the operation manual that...4 Select a signal type ( / ). INPUT5 Color system Auto • You can be received from the connected equipment. Useful Adjustment Settings 10 English Selecting an input signal type After connecting to the INPUT1 or INPUT4 terminal, specify the type of video signals to perform color ...
... / then ENTER (ENTER/DISP.)). 3 Select "INPUT5" or "INPUT6" ( / then ENTER (ENTER/ DISP.)). 4 Select a video signal system ( / ). Color system setting If an image does not appear clearly, select another video signal type. • For the signal types to be specified, check the operation manual that...4 Select a signal type ( / ). INPUT5 Color system Auto • You can be received from the connected equipment. Useful Adjustment Settings 10 English Selecting an input signal type After connecting to the INPUT1 or INPUT4 terminal, specify the type of video signals to perform color ...

Owner's Manual
Page 32
... work even with the Auto Size function activated. 1 Press HOME MENU. 2 Select "Option" ( / then ENTER (ENTER/DISP.)). 3 Select "4:3 Mode" ( / ). 4 Select "WIDE" or "4:3" ( / ). 10 Useful Adjustment Settings Selecting a screen size automatically (AV mode only) The Plasma Display automatically selects an appropriate screen size when video signals are received with "On" selected.
... work even with the Auto Size function activated. 1 Press HOME MENU. 2 Select "Option" ( / then ENTER (ENTER/DISP.)). 3 Select "4:3 Mode" ( / ). 4 Select "WIDE" or "4:3" ( / ). 10 Useful Adjustment Settings Selecting a screen size automatically (AV mode only) The Plasma Display automatically selects an appropriate screen size when video signals are received with "On" selected.

Owner's Manual
Page 33
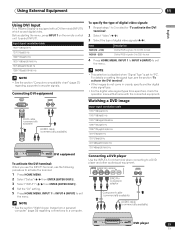
...; Refer to your Plasma Display, like a decoder, VCR, DVD player, personalcomputer, game console, and camcorder. NOTE • Be sure to change the input signal type setting using the menu. Before starting the menu, press INPUT 2 or INPUT 3 (INPUT) to select INPUT5 or INPUT6. To use INPUT5 or INPUT6 to connect a decoder...
...; Refer to your Plasma Display, like a decoder, VCR, DVD player, personalcomputer, game console, and camcorder. NOTE • Be sure to change the input signal type setting using the menu. Before starting the menu, press INPUT 2 or INPUT 3 (INPUT) to select INPUT5 or INPUT6. To use INPUT5 or INPUT6 to connect a decoder...

Owner's Manual
Page 34
... attempt will be made to connect analogue audio cables. NOTE • If you select a parameter other than "Auto", make such a setting that results in natural color. • If the images do not come in clearly, specify another audio signal type. • For the... "Setup" ( / then ENTER (ENTER/DISP.)). 3 Select "INPUT2" or "INPUT3" ( / then ENTER (ENTER/ DISP.)). 4 Select "Video" or "Audio" ( / ). 5 Set the "Video" or "Audio" setting. 6 Press HOME MENU, INPUT 1 to INPUT 6 (INPUT) to exit the menu. HDMI cable having the HDMI mark (commercially available.) AUDIO cable (commercially available...
... attempt will be made to connect analogue audio cables. NOTE • If you select a parameter other than "Auto", make such a setting that results in natural color. • If the images do not come in clearly, specify another audio signal type. • For the... "Setup" ( / then ENTER (ENTER/DISP.)). 3 Select "INPUT2" or "INPUT3" ( / then ENTER (ENTER/ DISP.)). 4 Select "Video" or "Audio" ( / ). 5 Set the "Video" or "Audio" setting. 6 Press HOME MENU, INPUT 1 to INPUT 6 (INPUT) to exit the menu. HDMI cable having the HDMI mark (commercially available.) AUDIO cable (commercially available...
Owner's Manual
Page 35
...to activate the terminal. 1 Press HOME MENU. 2 Select "Setup" ( / then ENTER (ENTER/DISP.)). 3 Select "INPUT1" ( / then ENTER (ENTER/DISP.)). 4 Set the "AV" setting. 5 Press HOME MENU, INPUT 1 to INPUT 6 (INPUT) to a DVD player and other audiovisual equipment. NOTE • See the section "Watching an image from a ... equipped with the connected equipment. For details on the remote control unit to select INPUT1. Before starting the menu, press INPUT 1 on setting the signal type, see the section "To activate the DVI terminal". • If the images do not come in crearly, specify another...
...to activate the terminal. 1 Press HOME MENU. 2 Select "Setup" ( / then ENTER (ENTER/DISP.)). 3 Select "INPUT1" ( / then ENTER (ENTER/DISP.)). 4 Set the "AV" setting. 5 Press HOME MENU, INPUT 1 to INPUT 6 (INPUT) to a DVD player and other audiovisual equipment. NOTE • See the section "Watching an image from a ... equipped with the connected equipment. For details on the remote control unit to select INPUT1. Before starting the menu, press INPUT 1 on setting the signal type, see the section "To activate the DVI terminal". • If the images do not come in crearly, specify another...

Owner's Manual
Page 36
... function. 36 En When connecting to a personal computer, the correct input signal type is not clear, it may need to change the input signal type setting using the INPUT1 terminal: INPUT1 DVI-D INPUT1 R L Enjoying a game console or watching camcorder images Connecting a game console or camcorder Use the INPUT5 or INPUT6 terminals...
... function. 36 En When connecting to a personal computer, the correct input signal type is not clear, it may need to change the input signal type setting using the INPUT1 terminal: INPUT1 DVI-D INPUT1 R L Enjoying a game console or watching camcorder images Connecting a game console or camcorder Use the INPUT5 or INPUT6 terminals...


