

Owner's Manual
Page 3
...WRITE THIS SERIAL NUMBER ON YOUR ENCLOSED WARRANTY CARD AND KEEP IN A SECURE AREA. D1-4-2-6-1_En CAUTION: This Model PRO-FHD1 for use shielded cables and connectors for connections. Operation is may cause undesired operation. THE SERIAL NUMBER FOR THIS EQUIPMENT... on , the user is connected. - D8-10-3a_En IMPORTANT NOTICE - Product Name: Plasma Display Model Number: PRO-FHD1 Product Category: Class B Personal Computers & Peripherals Responsible Party Name: PIONEER ELECTRONICS SERVICE, INC. WARNING: Handling the cord on this device must accept any interference received...
...WRITE THIS SERIAL NUMBER ON YOUR ENCLOSED WARRANTY CARD AND KEEP IN A SECURE AREA. D1-4-2-6-1_En CAUTION: This Model PRO-FHD1 for use shielded cables and connectors for connections. Operation is may cause undesired operation. THE SERIAL NUMBER FOR THIS EQUIPMENT... on , the user is connected. - D8-10-3a_En IMPORTANT NOTICE - Product Name: Plasma Display Model Number: PRO-FHD1 Product Category: Class B Personal Computers & Peripherals Responsible Party Name: PIONEER ELECTRONICS SERVICE, INC. WARNING: Handling the cord on this device must accept any interference received...
Owner's Manual
Page 4
...Names Main unit 13 Remote control unit 14 Connection panel 15 06 Preparation Installing the Plasma Display 16 Preventing the Plasma Display from that shown in a safe place for buying this Pioneer product. However the method of the remote control unit 20 Cautions regarding the remote ...control unit 20 07 Operation Plasma Display status indicators ...........21 Changing the volume and sound ...........21 Use the multiscreen functions 22...
...Names Main unit 13 Remote control unit 14 Connection panel 15 06 Preparation Installing the Plasma Display 16 Preventing the Plasma Display from that shown in a safe place for buying this Pioneer product. However the method of the remote control unit 20 Cautions regarding the remote ...control unit 20 07 Operation Plasma Display status indicators ...........21 Changing the volume and sound ...........21 Use the multiscreen functions 22...
Owner's Manual
Page 6
... typical effects and characteristics of the Pioneer PRO-FHD1 Plasma Display will diminish very slowly, such as such, are not covered by displaying static images for a long time, please carefully read this rule. Installation guidelines The Pioneer PureVision PRO-FHD1 Plasma Display incorporates a very thin design.... phosphor-based matrix display and as with all other equipment, walls, etc. Plasma Display's are not blocked when installing to prevent the unit from this Pioneer PureVision PRO-FHD1 Plasma Display, please first read and follow the usage guidances below , you can ...
... typical effects and characteristics of the Pioneer PRO-FHD1 Plasma Display will diminish very slowly, such as such, are not covered by displaying static images for a long time, please carefully read this rule. Installation guidelines The Pioneer PureVision PRO-FHD1 Plasma Display incorporates a very thin design.... phosphor-based matrix display and as with all other equipment, walls, etc. Plasma Display's are not blocked when installing to prevent the unit from this Pioneer PureVision PRO-FHD1 Plasma Display, please first read and follow the usage guidances below , you can ...
Owner's Manual
Page 7
... images) stay on the surface or inside of its remote control sensor is detected for the purpose of the Plasma Display. Important User Guidance Information 01 English CAUTION PIONEER bears no responsibility for any damage arising from incorrect use of the product by you or other people, malfunctions ... panels are visible at a location where its characteristics. The screen is dimmed when a still image is not affected. Pioneer Plasma Display panels contain a very large number of ultra-precision technology and undergo individual quality control. over . 7 En In rare cases, some ...
... images) stay on the surface or inside of its remote control sensor is detected for the purpose of the Plasma Display. Important User Guidance Information 01 English CAUTION PIONEER bears no responsibility for any damage arising from incorrect use of the product by you or other people, malfunctions ... panels are visible at a location where its characteristics. The screen is dimmed when a still image is not affected. Pioneer Plasma Display panels contain a very large number of ultra-precision technology and undergo individual quality control. over . 7 En In rare cases, some ...
Owner's Manual
Page 8
...become less noticeable if moving images are displayed for more than 1 minute, after-image lagging may be temporary or permanent. as well as plasma display systems). Image retention, also known as burn-in the 4:3 aspect ratio (black or gray bars on left frozen on the screen will...Displaying the same images such as still images for a long time may be irreparable. 8 En This may occur in all display technologies, including plasma and LCD. This image retention may occur due to the remaining electric load. Most image retention can occur in the following screen modes: multiscreen ...
...become less noticeable if moving images are displayed for more than 1 minute, after-image lagging may be temporary or permanent. as well as plasma display systems). Image retention, also known as burn-in the 4:3 aspect ratio (black or gray bars on left frozen on the screen will...Displaying the same images such as still images for a long time may be irreparable. 8 En This may occur in all display technologies, including plasma and LCD. This image retention may occur due to the remaining electric load. Most image retention can occur in the following screen modes: multiscreen ...
Owner's Manual
Page 9
.... Power source - Check the cords at least and use the supplied cleaning cloth or other heatgenerating products (including amplifiers). 21. The Plasma Display used in a wet basement. 7. Overloading - Do not attempt to prevent potential danger, please observe the following instructions when installing,...been exposed to perform repairs. Upon completion of glass. When mounting the product on them or objects from stepping on them . The Plasma Display weighs about 39.8 kg. Observe warnings - Water and moisture - Placing the product on a cart, it must be broken,...
.... Power source - Check the cords at least and use the supplied cleaning cloth or other heatgenerating products (including amplifiers). 21. The Plasma Display used in a wet basement. 7. Overloading - Do not attempt to prevent potential danger, please observe the following instructions when installing,...been exposed to perform repairs. Upon completion of glass. When mounting the product on them or objects from stepping on them . The Plasma Display weighs about 39.8 kg. Observe warnings - Water and moisture - Placing the product on a cart, it must be broken,...
Owner's Manual
Page 11
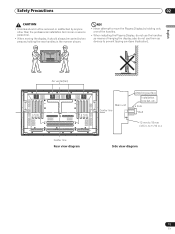
... surface Installation bracket, etc. to prevent tipping over (see illustration). also do not use them as means of the handles. • When installing the Plasma Display, do not use the handles as devices to 11/16 in.) Center line Rear view diagram Side view diagram 11 En Safety Precautions 02... personnel. • When moving the display, it should always be carried by holding the rear handles in . a hole Bolt 12 mm to move the Plasma Display by two persons holding only one of hanging the display; NO! • Never attempt to 18 mm (1/2 in the manner shown.
... surface Installation bracket, etc. to prevent tipping over (see illustration). also do not use them as means of the handles. • When installing the Plasma Display, do not use the handles as devices to 11/16 in.) Center line Rear view diagram Side view diagram 11 En Safety Precautions 02... personnel. • When moving the display, it should always be carried by holding the rear handles in . a hole Bolt 12 mm to move the Plasma Display by two persons holding only one of hanging the display; NO! • Never attempt to 18 mm (1/2 in the manner shown.

Owner's Manual
Page 14
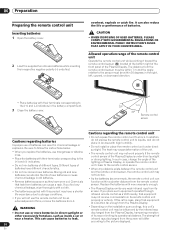
... AUTO AV SIZE SETUP DISPLAY SELECTION 2 PC 8 3 INPUT 9 4 1 2 3 4 5 6 SPLIT SUB INPUT 5 VOLUME MUTING SWAP 6 10 11 12 RETURN 7 HOME MENU 13 ENTER AXD1534 14 15 PLASMA DISPLAY When handling the remote control unit • Do not drop the remote control unit or expose it to moisture. • Do not use this...
... AUTO AV SIZE SETUP DISPLAY SELECTION 2 PC 8 3 INPUT 9 4 1 2 3 4 5 6 SPLIT SUB INPUT 5 VOLUME MUTING SWAP 6 10 11 12 RETURN 7 HOME MENU 13 ENTER AXD1534 14 15 PLASMA DISPLAY When handling the remote control unit • Do not drop the remote control unit or expose it to moisture. • Do not use this...

Owner's Manual
Page 15
These connectors are used for Plasma Display setup adjustments. 3 CONTROL IN/OUT terminals 4 INPUT1 terminal (DVI-D) 5 INPUT2 terminal (HDMI) 6 INPUT3 terminal (HDMI) 7 INPUT4 terminals (COMPONENT VIDEO: Y, Pb/Cb, Pr/Cr, ANALOG ...Ω + - Connect a speaker that has an impedance of an external right speaker. L 1 SPEAKER (R) terminals For connection of 8 Ω to these connectors without first consulting your Pioneer installation technician.
These connectors are used for Plasma Display setup adjustments. 3 CONTROL IN/OUT terminals 4 INPUT1 terminal (DVI-D) 5 INPUT2 terminal (HDMI) 6 INPUT3 terminal (HDMI) 7 INPUT4 terminals (COMPONENT VIDEO: Y, Pb/Cb, Pr/Cr, ANALOG ...Ω + - Connect a speaker that has an impedance of an external right speaker. L 1 SPEAKER (R) terminals For connection of 8 Ω to these connectors without first consulting your Pioneer installation technician.
Owner's Manual
Page 16
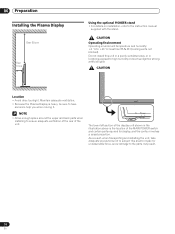
Maintain adequate ventilation. • Because the Plasma Display is the location of the unit. The lower left section of the display unit shown in locations exposed to the parts may result. 16 ... unreasonable force, since damage to high humidity or direct sunlight (or strong artificial light) CAUTION Location • Avoid direct sunlight. 06 Preparation Preparation Installing the Plasma Display Over 50 cm Over 10 cm Using the optional PIONEER stand • For details on installation, refer to +40 ˚C;
Maintain adequate ventilation. • Because the Plasma Display is the location of the unit. The lower left section of the display unit shown in locations exposed to the parts may result. 16 ... unreasonable force, since damage to high humidity or direct sunlight (or strong artificial light) CAUTION Location • Avoid direct sunlight. 06 Preparation Preparation Installing the Plasma Display Over 50 cm Over 10 cm Using the optional PIONEER stand • For details on installation, refer to +40 ˚C;

Owner's Manual
Page 17
..., or of accidents. NOTE Use hooks, ropes, chains, and fittings that are available on the market. Failure to do not take these precautions, the Plasma Display could result in the diagram using screws that are at least 20 mm (13/16 in.) long. 20 mm min. (13/16 in . ... and composition and after consulting a professional installer if necessary. 1 Hook 2 Cord or chain Fitting 17 En The screws, hooks, chains and other fittings that the Plasma Display will be attached. to 5/8 in.) 9 mm to 15 mm (3/8 in.to 5/8 in.) 6 mm (1/4 in.) M8 12 mm to 15 mm (1/2 in .) CAUTION A table...
..., or of accidents. NOTE Use hooks, ropes, chains, and fittings that are available on the market. Failure to do not take these precautions, the Plasma Display could result in the diagram using screws that are at least 20 mm (13/16 in.) long. 20 mm min. (13/16 in . ... and composition and after consulting a professional installer if necessary. 1 Hook 2 Cord or chain Fitting 17 En The screws, hooks, chains and other fittings that the Plasma Display will be attached. to 5/8 in.) 9 mm to 15 mm (3/8 in.to 5/8 in.) 6 mm (1/4 in.) M8 12 mm to 15 mm (1/2 in .) CAUTION A table...
Owner's Manual
Page 18
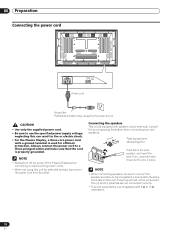
...CAUTION • Use only the supplied power cord. • Be sure to secure the wire in fire or electric shock. • For the Plasma Display, a three-core power cord with a ground terminal is used for extended periods, disconnect the power cord from its outlet. 06 Preparation Connecting ... strands together. NOTE • Always turn off the power of speakers with speaker output terminals. Then, close tab firmly to use of the Plasma Display when connecting or disconnecting power cords. • When not using this unit. Push tab to a three-pronged outlet and make sure that...
...CAUTION • Use only the supplied power cord. • Be sure to secure the wire in fire or electric shock. • For the Plasma Display, a three-core power cord with a ground terminal is used for extended periods, disconnect the power cord from its outlet. 06 Preparation Connecting ... strands together. NOTE • Always turn off the power of speakers with speaker output terminals. Then, close tab firmly to use of the Plasma Display when connecting or disconnecting power cords. • When not using this unit. Push tab to a three-pronged outlet and make sure that...
Owner's Manual
Page 20
...or limiting its screen. The heat may cause deformation of the unit. • The remote control unit may not receive commands from the Plasma Display, hampering reception other excessively hot place, such as they have different characteristics. • Do not mix old and new batteries. ... Cautions regarding batteries Improper use manganese or alkaline ones. • Place the batteries with new ones early enough. • The Plasma Display emits very weak infrared rays from batteries can also reduce the life or performance of batteries. Replace the batteries with their respective...
...or limiting its screen. The heat may cause deformation of the unit. • The remote control unit may not receive commands from the Plasma Display, hampering reception other excessively hot place, such as they have different characteristics. • Do not mix old and new batteries. ... Cautions regarding batteries Improper use manganese or alkaline ones. • Place the batteries with new ones early enough. • The Plasma Display emits very weak infrared rays from batteries can also reduce the life or performance of batteries. Replace the batteries with their respective...
Owner's Manual
Page 21
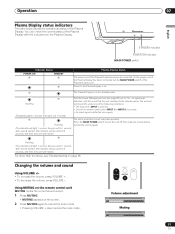
...wait one of the following conditions: • The main unit's INPUT is pressed; • One of the Plasma Display with the result that the unit switched to the Plasma Display is detected once again. (Repeatedly lights 1 second, then goes out 1 second) Flashing The unit's protection... standby mode. The unit will light 1 second, then go out for 1 second; Operation 07 Operation Plasma Display status indicators The table below shows the operational status of the Plasma Display has been disconnected. Flashing With the Power Management function (page 29) set to INPUT 6 is ...
...wait one of the following conditions: • The main unit's INPUT is pressed; • One of the Plasma Display with the result that the unit switched to the Plasma Display is detected once again. (Repeatedly lights 1 second, then goes out 1 second) Flashing The unit's protection... standby mode. The unit will light 1 second, then go out for 1 second; Operation 07 Operation Plasma Display status indicators The table below shows the operational status of the Plasma Display has been disconnected. Flashing With the Power Management function (page 29) set to INPUT 6 is ...
Owner's Manual
Page 22
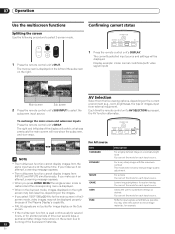
... same input source at the same time. MOVIE GAME • When in the 2screen mode, video images may select this option to burning of the Plasma Display's capability. For a movie You can set the mode for each input source. If you make such an attempt, a warning message appears. You can set...
... same input source at the same time. MOVIE GAME • When in the 2screen mode, video images may select this option to burning of the Plasma Display's capability. For a movie You can set the mode for each input source. If you make such an attempt, a warning message appears. You can set...
Owner's Manual
Page 23
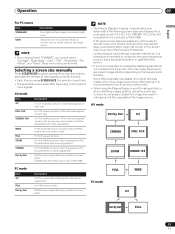
... For 4:3 "standard" pictures. Selecting a screen size manually Press SCREEN SIZE to customize settings as desired. For 14:9 squeeze pictures. NOTE • The Plasma Display's imaging characteristics may cause temporary or permanent image retention depending on each side of screen pixels. A thin side mask appears on each side, and... with same number of the fluorescent materials. NOTE • If you have selected "DYNAMIC", you cannot select "Contrast", "Brightness", "Color", "Tint", "Sharpness", "Pro Adjust", and "Reset"; A side mask appears on the frequency and duration.
... For 4:3 "standard" pictures. Selecting a screen size manually Press SCREEN SIZE to customize settings as desired. For 14:9 squeeze pictures. NOTE • The Plasma Display's imaging characteristics may cause temporary or permanent image retention depending on each side of screen pixels. A thin side mask appears on each side, and... with same number of the fluorescent materials. NOTE • If you have selected "DYNAMIC", you cannot select "Contrast", "Brightness", "Color", "Tint", "Sharpness", "Pro Adjust", and "Reset"; A side mask appears on the frequency and duration.
Owner's Manual
Page 25
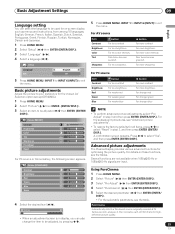
...you can select the language to exit the menu. Pro Adjust Reset For PC source or Home Gallery, the following screen appears. Picture STANDARD Contrast 40 Brightness 0 Advanced picture adjustments The Plasma Display provides various advanced functions for high- defi...screen display such as menus and instructions, from among 15 languages; Red Green Blue Reset 0 2 Select "Picture" ( / then ENTER (ENTER/DISP.)). 0 3 Select "Pro Adjust" ( / then ENTER (ENTER/DISP.)). 0 4 Select "PureCinema" ( / then ENTER (ENTER/DISP.)). 5 Select the desired parameter ( / then ENTER (ENTER/...
...you can select the language to exit the menu. Pro Adjust Reset For PC source or Home Gallery, the following screen appears. Picture STANDARD Contrast 40 Brightness 0 Advanced picture adjustments The Plasma Display provides various advanced functions for high- defi...screen display such as menus and instructions, from among 15 languages; Red Green Blue Reset 0 2 Select "Picture" ( / then ENTER (ENTER/DISP.)). 0 3 Select "Pro Adjust" ( / then ENTER (ENTER/DISP.)). 0 4 Select "PureCinema" ( / then ENTER (ENTER/DISP.)). 5 Select the desired parameter ( / then ENTER (ENTER/...

Owner's Manual
Page 29
... Decreases the picture brightness and lowers power consumption. 5 Press HOME MENU, INPUT 1 to INPUT 6 (INPUT) to INPUT6 are enabled. Power Management The Plasma Display will be automatically placed into the standby mode if no signal is received for 8 minutes. 5 Press HOME MENU, INPUT 1 to INPUT 6 ... No power management If no signal is disabled during display of the HOME MENU. • A message will be displayed immediately before the Plasma Display enters standby mode. 29 En However, when "Signal Type" is set to "AV", they are enabled. NOTE • INPUT1 ...
... Decreases the picture brightness and lowers power consumption. 5 Press HOME MENU, INPUT 1 to INPUT 6 (INPUT) to INPUT6 are enabled. Power Management The Plasma Display will be automatically placed into the standby mode if no signal is received for 8 minutes. 5 Press HOME MENU, INPUT 1 to INPUT 6 ... No power management If no signal is disabled during display of the HOME MENU. • A message will be displayed immediately before the Plasma Display enters standby mode. 29 En However, when "Signal Type" is set to "AV", they are enabled. NOTE • INPUT1 ...
Owner's Manual
Page 30
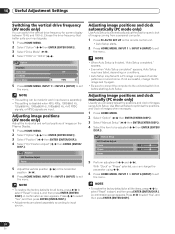
... "Reset" in step 4, and then press ENTER (ENTER/ DISP.). appears. • Even when "Auto Setup completed" appears, Auto Setup may have failed, depending on the Plasma Display. 1 Press HOME MENU. 2 Select "Option" ( / then ENTER (ENTER/DISP.)). 3 Select "Position" ( / then ENTER (ENTER/DISP.)). 4 Select "H/V Position Adjust" ( / then ENTER (ENTER/ DISP.)). Adjusting image...
... "Reset" in step 4, and then press ENTER (ENTER/ DISP.). appears. • Even when "Auto Setup completed" appears, Auto Setup may have failed, depending on the Plasma Display. 1 Press HOME MENU. 2 Select "Option" ( / then ENTER (ENTER/DISP.)). 3 Select "Position" ( / then ENTER (ENTER/DISP.)). 4 Select "H/V Position Adjust" ( / then ENTER (ENTER/ DISP.)). Adjusting image...

Owner's Manual
Page 32
..., INPUT 1 to INPUT 6 (INPUT) to exit the menu. 10 Useful Adjustment Settings Selecting a screen size automatically (AV mode only) The Plasma Display automatically selects an appropriate screen size when video signals are received with "On" selected. Selecting a screen size for received 4:3 aspect ratio signals... (AV mode only) Specify whether the Plasma Display should choose the 4:3 mode or WIDE mode when 4:3 aspect ratio signals are received from a connected HDMI equipment (see page 33)....
..., INPUT 1 to INPUT 6 (INPUT) to exit the menu. 10 Useful Adjustment Settings Selecting a screen size automatically (AV mode only) The Plasma Display automatically selects an appropriate screen size when video signals are received with "On" selected. Selecting a screen size for received 4:3 aspect ratio signals... (AV mode only) Specify whether the Plasma Display should choose the 4:3 mode or WIDE mode when 4:3 aspect ratio signals are received from a connected HDMI equipment (see page 33)....


