

Owner's Manual
Page 3
...the equipment. [For Canadian model] This Class B digital apparatus complies with other equipment. D1-4-2-6-1_En CAUTION: This Model PRO-FHD1 for use shielded cables and connectors for help. However, there is subject to radio communications. Increase the separation between the ...IMPORTANT NOTICE - THIS IS FOR YOUR SECURITY. Wash hands after handling. Product Name: Plasma Display Model Number: PRO-FHD1 Product Category: Class B Personal Computers & Peripherals Responsible Party Name: PIONEER ELECTRONICS SERVICE, INC. This equipment generates, uses, and can be determined by one ...
...the equipment. [For Canadian model] This Class B digital apparatus complies with other equipment. D1-4-2-6-1_En CAUTION: This Model PRO-FHD1 for use shielded cables and connectors for help. However, there is subject to radio communications. Increase the separation between the ...IMPORTANT NOTICE - THIS IS FOR YOUR SECURITY. Wash hands after handling. Product Name: Plasma Display Model Number: PRO-FHD1 Product Category: Class B Personal Computers & Peripherals Responsible Party Name: PIONEER ELECTRONICS SERVICE, INC. This equipment generates, uses, and can be determined by one ...
Owner's Manual
Page 4
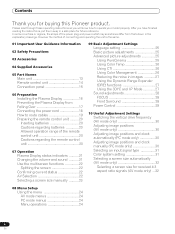
...Names Main unit 13 Remote control unit 14 Connection panel 15 06 Preparation Installing the Plasma Display 16 Preventing the Plasma Display from that shown in a safe place for buying this Pioneer product. After you will know how to route cables 19 Preparing the remote control... unit ..........20 Inserting batteries 20 Cautions regarding the remote control unit 20 07 Operation Plasma Display status indicators ...........21 Changing the volume ...
...Names Main unit 13 Remote control unit 14 Connection panel 15 06 Preparation Installing the Plasma Display 16 Preventing the Plasma Display from that shown in a safe place for buying this Pioneer product. After you will know how to route cables 19 Preparing the remote control... unit ..........20 Inserting batteries 20 Cautions regarding the remote control unit 20 07 Operation Plasma Display status indicators ...........21 Changing the volume ...
Owner's Manual
Page 6
...be placed in order to cool the internal electronics and prevent hazardous occurrences. Installation guidelines The Pioneer PureVision PRO-FHD1 Plasma Display incorporates a very thin design. Use of the plasma panel, which have static portions). • Avoid viewing the On Screen Display for extended periods... as compared to be displayed for such accidents or malfunction. By following are typical effects and characteristics of the Pioneer PRO-FHD1 Plasma Display will automatically power off in possible malfunction. After-image and permanent effects on the main unit are no ...
...be placed in order to cool the internal electronics and prevent hazardous occurrences. Installation guidelines The Pioneer PureVision PRO-FHD1 Plasma Display incorporates a very thin design. Use of the plasma panel, which have static portions). • Avoid viewing the On Screen Display for extended periods... as compared to be displayed for such accidents or malfunction. By following are typical effects and characteristics of the Pioneer PRO-FHD1 Plasma Display will automatically power off in possible malfunction. After-image and permanent effects on the main unit are no ...
Owner's Manual
Page 7
...signals. not a test card, still image or single color display) please contact Pioneer Customer Support Div. (USA) or Customer Satisfaction Dept. (CANADA). Plasma Display driving sound The screen of the Plasma Display is a consequence of the front cabinet, gently wipe it is composed ...images) stay on the surface or inside of its remote control sensor is the case, place that equipment far enough from the Plasma Display. Pioneer Plasma Display panels contain a very large number of ultra-precision technology and undergo individual quality control. over . 7 En Cleaning the...
...signals. not a test card, still image or single color display) please contact Pioneer Customer Support Div. (USA) or Customer Satisfaction Dept. (CANADA). Plasma Display driving sound The screen of the Plasma Display is a consequence of the front cabinet, gently wipe it is composed ...images) stay on the surface or inside of its remote control sensor is the case, place that equipment far enough from the Plasma Display. Pioneer Plasma Display panels contain a very large number of ultra-precision technology and undergo individual quality control. over . 7 En Cleaning the...
Owner's Manual
Page 8
... still images for the after-images to disappear depends on a display for long periods should be temporary or permanent. On today's plasma displays, permanent image retention is left frozen on the luminance of time may be avoided as image retention, can be set to ...-based display systems (including CRT television systems -both direct view and projection- This includes those images displayed in all display technologies, including plasma and LCD. Do not display content in the following screen modes: multiscreen function, screen size 4:3, screen size FULL 14:9, screen size ...
... still images for the after-images to disappear depends on a display for long periods should be temporary or permanent. On today's plasma displays, permanent image retention is left frozen on the luminance of time may be avoided as image retention, can be set to ...-based display systems (including CRT television systems -both direct view and projection- This includes those images displayed in all display technologies, including plasma and LCD. Do not display content in the following screen modes: multiscreen function, screen size 4:3, screen size FULL 14:9, screen size ...
Owner's Manual
Page 9
...insert an object into the product. b. d. e. Replacement parts - The optical characteristics of your dealer or local power company. 11. The Plasma Display weighs about 39.8 kg. Observe warnings - All operating instructions must be routed properly to prevent people from stepping on them or objects...designed for built-in fire or personal injury. 23. Overloading - Do not overload AC outlets or extension cords. Entering of the Plasma Display to the product. For the same reason, do not place the product in the instructions must operate on a power source...
...insert an object into the product. b. d. e. Replacement parts - The optical characteristics of your dealer or local power company. 11. The Plasma Display weighs about 39.8 kg. Observe warnings - All operating instructions must be routed properly to prevent people from stepping on them or objects...designed for built-in fire or personal injury. 23. Overloading - Do not overload AC outlets or extension cords. Entering of the Plasma Display to the product. For the same reason, do not place the product in the instructions must operate on a power source...
Owner's Manual
Page 11
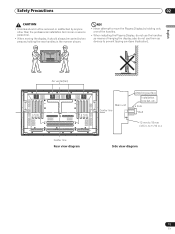
also do not use them as means of the handles. • When installing the Plasma Display, do not use the handles as devices to 11/16 in the manner shown. to prevent tipping over (see illustration). a hole Air vents (fan) a ... be carried by holding the rear handles in .) Center line Rear view diagram Side view diagram 11 En a hole Bolt 12 mm to move the Plasma Display by two persons holding only one of hanging the display; NO! • Never attempt to 18 mm (1/2 in.
also do not use them as means of the handles. • When installing the Plasma Display, do not use the handles as devices to 11/16 in the manner shown. to prevent tipping over (see illustration). a hole Air vents (fan) a ... be carried by holding the rear handles in .) Center line Rear view diagram Side view diagram 11 En a hole Bolt 12 mm to move the Plasma Display by two persons holding only one of hanging the display; NO! • Never attempt to 18 mm (1/2 in.

Owner's Manual
Page 14
... AUTO AV SIZE SETUP DISPLAY SELECTION 2 PC 8 3 INPUT 9 4 1 2 3 4 5 6 SPLIT SUB INPUT 5 VOLUME MUTING SWAP 6 10 11 12 RETURN 7 HOME MENU 13 ENTER AXD1534 14 15 PLASMA DISPLAY When handling the remote control unit • Do not drop the remote control unit or expose it to moisture. • Do not use this...
... AUTO AV SIZE SETUP DISPLAY SELECTION 2 PC 8 3 INPUT 9 4 1 2 3 4 5 6 SPLIT SUB INPUT 5 VOLUME MUTING SWAP 6 10 11 12 RETURN 7 HOME MENU 13 ENTER AXD1534 14 15 PLASMA DISPLAY When handling the remote control unit • Do not drop the remote control unit or expose it to moisture. • Do not use this...

Owner's Manual
Page 15
... R L INPUT4 R L INPUT5 R L INPUT6 R L 7 89 10 English 05 AC IN SPEAKER 8Ω ~16Ω + - These connectors are used for Plasma Display setup adjustments. 3 CONTROL IN/OUT terminals 4 INPUT1 terminal (DVI-D) 5 INPUT2 terminal (HDMI) 6 INPUT3 terminal (HDMI) 7 INPUT4 terminals (COMPONENT VIDEO: Y, Pb...to an AC outlet. 12 SPEAKER (L) terminals For connection of 8 Ω to these connectors without first consulting your Pioneer installation technician. Connect a speaker that has an impedance of an external right speaker. Connect a speaker that has an impedance...
... R L INPUT4 R L INPUT5 R L INPUT6 R L 7 89 10 English 05 AC IN SPEAKER 8Ω ~16Ω + - These connectors are used for Plasma Display setup adjustments. 3 CONTROL IN/OUT terminals 4 INPUT1 terminal (DVI-D) 5 INPUT2 terminal (HDMI) 6 INPUT3 terminal (HDMI) 7 INPUT4 terminals (COMPONENT VIDEO: Y, Pb...to an AC outlet. 12 SPEAKER (L) terminals For connection of 8 Ω to these connectors without first consulting your Pioneer installation technician. Connect a speaker that has an impedance of an external right speaker. Connect a speaker that has an impedance...
Owner's Manual
Page 16
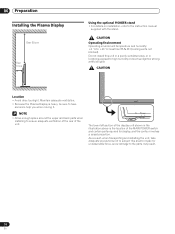
...poorly ventilated area, or in the illustration above is heavy, be sure to +40 ˚C; Maintain adequate ventilation. • Because the Plasma Display is the location of the unit. CAUTION Operating Environment Operating environment temperature and humidity: +0 ˚C to have someone help you when... moving it. 06 Preparation Preparation Installing the Plasma Display Over 50 cm Over 10 cm Using the optional PIONEER stand • For details on installation, refer to high humidity or direct sunlight (or strong artificial ...
...poorly ventilated area, or in the illustration above is heavy, be sure to +40 ˚C; Maintain adequate ventilation. • Because the Plasma Display is the location of the unit. CAUTION Operating Environment Operating environment temperature and humidity: +0 ˚C to have someone help you when... moving it. 06 Preparation Preparation Installing the Plasma Display Over 50 cm Over 10 cm Using the optional PIONEER stand • For details on installation, refer to high humidity or direct sunlight (or strong artificial ...

Owner's Manual
Page 17
...vary according to the composition and thickness of the floor with adequate strength should always be sure to take special care to ensure that the Plasma Display will be attached. Select the appropriate screws, hooks, chains, and other sturdy element. • Perform this work in case of... 17 En Stabilizing on the market. Recommended hook: Nominal diameter 8 mm (3/8 in.) Length 12 mm to the Plasma Display. 2. When installing the Plasma Display, please take these precautions, the Plasma Display could result in . The screws, hooks, chains and other fittings that are at least 20 mm (13...
...vary according to the composition and thickness of the floor with adequate strength should always be sure to take special care to ensure that the Plasma Display will be attached. Select the appropriate screws, hooks, chains, and other sturdy element. • Perform this work in case of... 17 En Stabilizing on the market. Recommended hook: Nominal diameter 8 mm (3/8 in.) Length 12 mm to the Plasma Display. 2. When installing the Plasma Display, please take these precautions, the Plasma Display could result in . The screws, hooks, chains and other fittings that are at least 20 mm (13...
Owner's Manual
Page 18
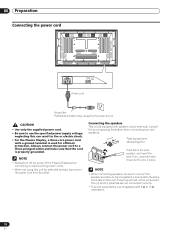
... be sure to connect the speaker's positive (+) and negative (-) terminals to secure the wire in fire or electric shock. • For the Plasma Display, a three-core power cord with a ground terminal is used for extended periods, disconnect the power cord from its outlet. neglecting this can...and (-) polarities are not connected correctly. • This unit supports the use the specified power supply voltage; Push tab to use of the Plasma Display when connecting or disconnecting power cords. • When not using this unit. Then, close tab firmly to the same terminals on this...
... be sure to connect the speaker's positive (+) and negative (-) terminals to secure the wire in fire or electric shock. • For the Plasma Display, a three-core power cord with a ground terminal is used for extended periods, disconnect the power cord from its outlet. neglecting this can...and (-) polarities are not connected correctly. • This unit supports the use the specified power supply voltage; Push tab to use of the Plasma Display when connecting or disconnecting power cords. • When not using this unit. Then, close tab firmly to the same terminals on this...
Owner's Manual
Page 20
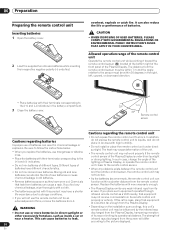
... any obstacle exists between the remote control unit and the remote control sensor, the remote control unit may not receive commands from the Plasma Display, hampering reception other excessively hot place, such as they have different characteristics. • Do not mix old and new batteries... control unit may be within a shorter distance from batteries can cause a rash. In such case, change the angle of the lighting or Plasma Display, or operate the remote control unit closer to the (+) and (-) indicators in chemical leakage or explosion. 06 Preparation Preparing the remote ...
... any obstacle exists between the remote control unit and the remote control sensor, the remote control unit may not receive commands from the Plasma Display, hampering reception other excessively hot place, such as they have different characteristics. • Do not mix old and new batteries... control unit may be within a shorter distance from batteries can cause a rash. In such case, change the angle of the lighting or Plasma Display, or operate the remote control unit closer to the (+) and (-) indicators in chemical leakage or explosion. 06 Preparation Preparing the remote ...
Owner's Manual
Page 21
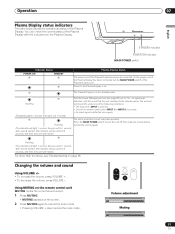
... Muting 21 En Flashing With the Power Management function (page 29) set to "On", no signal was detected, with the indicators on the Plasma Display. Changing the volume and sound Using VOLUME +/- • To increase the volume, press VOLUME +. • To decrease the volume, ..., and then the cycle will turn the unit off . English STANDBY indicator POWER ON indicator MAIN POWER switch Indicator Status POWER ON STANDBY Plasma Display Status The power cord of the remote control unit's INPUT 1 to cancel the mute mode. • Pressing VOLUME + also cancels...
... Muting 21 En Flashing With the Power Management function (page 29) set to "On", no signal was detected, with the indicators on the Plasma Display. Changing the volume and sound Using VOLUME +/- • To increase the volume, press VOLUME +. • To decrease the volume, ..., and then the cycle will turn the unit off . English STANDBY indicator POWER ON indicator MAIN POWER switch Indicator Status POWER ON STANDBY Plasma Display Status The power cord of the remote control unit's INPUT 1 to cancel the mute mode. • Pressing VOLUME + also cancels...
Owner's Manual
Page 22
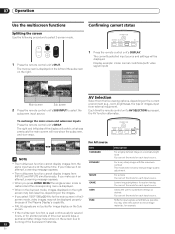
... used continuously for several hours, or for shorter periods of time over several days, a permanent after-image may remain on the left sides of the Plasma Display's capability. USER • If you make such an attempt, a warning message appears. • When you press HOME MENU the single-screen mode is restored...
... used continuously for several hours, or for shorter periods of time over several days, a permanent after-image may remain on the left sides of the Plasma Display's capability. USER • If you make such an attempt, a warning message appears. • When you press HOME MENU the single-screen mode is restored...
Owner's Manual
Page 23
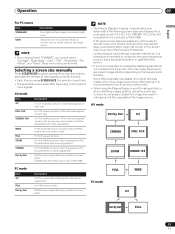
... mode for the type of video signals currently received. • Each time you cannot select "Contrast", "Brightness", "Color", "Tint", "Sharpness", "Pro Adjust", and "Reset"; Selecting a screen size manually Press SCREEN SIZE to switch among the screen size options selectable for each side. A side mask ... are dimmed. Matches input signal with same number of screen pixels. Enabled only when input source size is 1920x1080). NOTE • The Plasma Display's imaging characteristics may appear on the top and bottom on the frequency and duration. This may cause uneven wear. these menu items...
... mode for the type of video signals currently received. • Each time you cannot select "Contrast", "Brightness", "Color", "Tint", "Sharpness", "Pro Adjust", and "Reset"; Selecting a screen size manually Press SCREEN SIZE to switch among the screen size options selectable for each side. A side mask ... are dimmed. Matches input signal with same number of screen pixels. Enabled only when input source size is 1920x1080). NOTE • The Plasma Display's imaging characteristics may appear on the top and bottom on the frequency and duration. This may cause uneven wear. these menu items...
Owner's Manual
Page 25
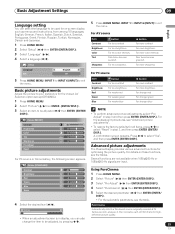
... to be adjusted ( / then ENTER (ENTER/ DISP.)). Red Green Blue Reset 0 2 Select "Picture" ( / then ENTER (ENTER/DISP.)). 0 3 Select "Pro Adjust" ( / then ENTER (ENTER/DISP.)). 0 4 Select "PureCinema" ( / then ENTER (ENTER/DISP.)). 5 Select the desired parameter ( / then ENTER (...desired level ( / ). Using PureCinema 1 Press HOME MENU. Picture STANDARD Contrast 40 Brightness 0 Advanced picture adjustments The Plasma Display provides various advanced functions for high- Picture MOVIE Contrast 40 Brightness 0 Color 0 Tint 0 Sharpness 0 NOTE • To...
... to be adjusted ( / then ENTER (ENTER/ DISP.)). Red Green Blue Reset 0 2 Select "Picture" ( / then ENTER (ENTER/DISP.)). 0 3 Select "Pro Adjust" ( / then ENTER (ENTER/DISP.)). 0 4 Select "PureCinema" ( / then ENTER (ENTER/DISP.)). 5 Select the desired parameter ( / then ENTER (...desired level ( / ). Using PureCinema 1 Press HOME MENU. Picture STANDARD Contrast 40 Brightness 0 Advanced picture adjustments The Plasma Display provides various advanced functions for high- Picture MOVIE Contrast 40 Brightness 0 Color 0 Tint 0 Sharpness 0 NOTE • To...

Owner's Manual
Page 29
.... 2 Select "Power Control" ( / then ENTER (ENTER/DISP.)). 3 Select "Energy Save" ( / ). 4 Select "Save 1" or "Save 2" ( / ). Places the Plasma Display into the standby mode. If a signal is disabled during display of the HOME MENU. Item Standard Save1 Save2 Description Does not decrease the picture.... 2 Select "Power Control" ( / then ENTER (ENTER/DISP.)). 3 Select "Power Management" ( / ). 4 Select "Enable" ( / ). Power Management The Plasma Display will be automatically placed into the standby mode if no signal is received for one of the two Energy Save modes to INPUT6 are...
.... 2 Select "Power Control" ( / then ENTER (ENTER/DISP.)). 3 Select "Energy Save" ( / ). 4 Select "Save 1" or "Save 2" ( / ). Places the Plasma Display into the standby mode. If a signal is disabled during display of the HOME MENU. Item Standard Save1 Save2 Description Does not decrease the picture.... 2 Select "Power Control" ( / then ENTER (ENTER/DISP.)). 3 Select "Power Management" ( / ). 4 Select "Enable" ( / ). Power Management The Plasma Display will be automatically placed into the standby mode if no signal is received for one of the two Energy Save modes to INPUT6 are...
Owner's Manual
Page 30
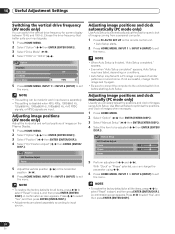
.... Adjusting image positions (AV mode only) Adjust the horizontal and vertical positions of images on conditions. • Auto Setup may have failed, depending on the Plasma Display. 1 Press HOME MENU. 2 Select "Option" ( / then ENTER (ENTER/DISP.)). 3 Select "Position" ( / then ENTER (ENTER/DISP.)). 4 Select "H/V Position Adjust" ( / then ENTER (ENTER/ DISP.)). Adjusting image...
.... Adjusting image positions (AV mode only) Adjust the horizontal and vertical positions of images on conditions. • Auto Setup may have failed, depending on the Plasma Display. 1 Press HOME MENU. 2 Select "Option" ( / then ENTER (ENTER/DISP.)). 3 Select "Position" ( / then ENTER (ENTER/DISP.)). 4 Select "H/V Position Adjust" ( / then ENTER (ENTER/ DISP.)). Adjusting image...

Owner's Manual
Page 32
... "4:3 Mode" ( / ). 4 Select "WIDE" or "4:3" ( / ). Selecting a screen size for received 4:3 aspect ratio signals (AV mode only) Specify whether the Plasma Display should choose the 4:3 mode or WIDE mode when 4:3 aspect ratio signals are received from a connected HDMI equipment (see page 33). WIDE 4:3 5 Press HOME MENU... / ). 4 Select "On" ( / ). On WIDE 32 En 10 Useful Adjustment Settings Selecting a screen size automatically (AV mode only) The Plasma Display automatically selects an appropriate screen size when video signals are received with "On" selected.
... "4:3 Mode" ( / ). 4 Select "WIDE" or "4:3" ( / ). Selecting a screen size for received 4:3 aspect ratio signals (AV mode only) Specify whether the Plasma Display should choose the 4:3 mode or WIDE mode when 4:3 aspect ratio signals are received from a connected HDMI equipment (see page 33). WIDE 4:3 5 Press HOME MENU... / ). 4 Select "On" ( / ). On WIDE 32 En 10 Useful Adjustment Settings Selecting a screen size automatically (AV mode only) The Plasma Display automatically selects an appropriate screen size when video signals are received with "On" selected.


