Pioneer PRO-800HDi Support and Manuals
Get Help and Manuals for this Pioneer item

View All Support Options Below
Free Pioneer PRO-800HDi manuals!
Problems with Pioneer PRO-800HDi?
Ask a Question
Free Pioneer PRO-800HDi manuals!
Problems with Pioneer PRO-800HDi?
Ask a Question
Popular Pioneer PRO-800HDi Manual Pages
Owner's Manual - Page 3
... type plug.
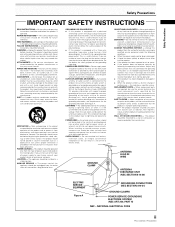
Refer all servicing to cords at plugs, convenience receptacles, and the point where they are not sure of the type of the appliance should be unplugged from touching such power lines or circuits as a bookcase or rack unless proper ventilation is a safety feature. REPLACEMENT PARTS - SAFETY CHECK -
NATIONAL ELECTRICAL CODE
iii
PRO-1000HDI / PRO-800HDI
Owner's Manual - Page 5
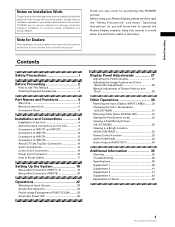
... Connection 16 Power Cord Connection 16 How to Use This Manual 2 Checking Supplied Accessories 3
Part Names and Functions 4
Main Unit 4 Remote Control Unit 5 Connection Panel 6
Installation and Connections 8
Installation of Terms 42
1
PRO-1000HDI / PRO-800HDI
Contents
Safety Precautions i
Before Proceeding 2
How to Route Cables 17
Setting Up the System 18
Setup after...
Owner's Manual - Page 6
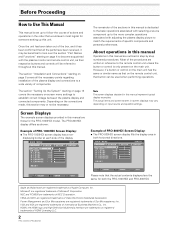
... basic operations associated with selecting a source component up this manual. Microsoft is dedicated to establish correct linkage between the plasma display and connected components. Depending on input source and specific settings.
The actual items and contents seen in this section may vary depending on the connections made, this manual are the same for the PRO-1000HDI model.
Owner's Manual - Page 7
... Proceeding
Before Proceeding
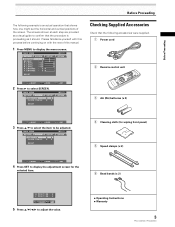
The following accessories were supplied.
1 Power cord
2 Remote control unit
3 AA (R6) batteries (x 2)
SELECT
SET ENTER
MENU EXIT
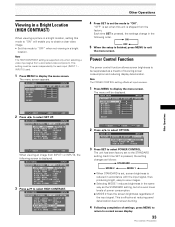
3 Press 5/∞ to select the item to adjust the value.
÷ Operating Instructions ÷ Warranty
3
PRO-1000HDI / PRO-800HDI The screens shown at each step are provided as a visual guide to display the adjustment screen for...
Owner's Manual - Page 15
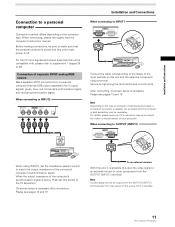
... read the computer's instruction manual. When connecting to OUTPUT (INPUT1)
INPUT1
OUTPUT
ANALOG RGB
(ANALOG RGB)
When using INPUT2, set this unit is off or in standby.
11
PRO-1000HDI / PRO-800HDI
Please see pages 18 and 19. When connecting to INPUT2
(ON SYNC)
G
B
INPUT2 (H/V SYNC)
R
HD
VD
7Ω5Ô2k.Ω2
Installation and Connections
When connecting...
Owner's Manual - Page 20

... unit. The control cables (not supplied) are made to control. When the connection is used for efficiency protection.
Notes ÷ Make sure the power is done through the remote sensor on another unit, the remote sensor of connected PIONEER components that component will no resistance).
16
PRO-1000HDI / PRO-800HDI Point the remote control unit of...
Owner's Manual - Page 22

... Hz vertical; 3 56.5 kHz horizontal / 70 Hz vertical. Setting Up the System
Setup after Connection (INPUT1, 2)
After components have been connected to change alternately as
follows:
XGA
WIDE XGA
18
PRO-1000HDI / PRO-800HDI No setup is necessary for signals with other than VIDEO.
1 Switch the main power switch on the connection
panel to the on position...
Owner's Manual - Page 23
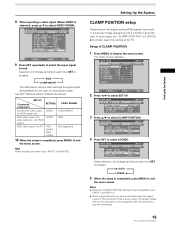
... the instruction manual supplied with the component you are appropriate and available for the type of a DVD player, etc. Notes ÷ Make this CLAMP POSITION setting for each applicable input
(INPUT1 and INPUT2). ÷ When using .
Note Make this setting at AUTO. R. E NHANCE V.
For details, please refer to LOCKED. ÷ Normally, leave this setup for each...
Owner's Manual - Page 24

...-3 manually in accordance with the actual signal input.
5 When the setup is selected, automatic switching may occur properly with someinput signals. Note VIDEO SIGNAL setting is possible only when INPUT5 is selected.
1 Press MENU to display the menu screen. MAIN MENU
PICTURE SCREEN
CONT RAST
BR I O SEL ECT : AUT O
20
PRO-1000HDI / PRO-800HDI
SELECT
SET ENTER...
Owner's Manual - Page 26

... these terminals, on-screen setup is not necessary.
3 Press... in the section "Installation and Connections" starting on page 8. • Set up the on-screen...power on and off .
• If the input computer signal is not supported by the
display, the following pages is blinking (red).
6 Switch MAIN POWER...PRO-1000HDI / PRO-800HDI
FULL
4 Use VOLUME +/- Doing so may continue to light for a long ...
Owner's Manual - Page 30
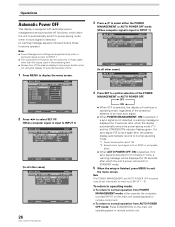
...
: VGA
SELECT
SET ENTER
MENU EXIT
26
PRO-1000HDI / PRO-800HDI
3 Press 5/∞ to select either operate the computer, or press INPUT on SYNC or composite
SYNC ÷ When AUTO POWER OFF: ON is selected, if no sync signal is detected. (A warning message appears onscreen before these functions operate.)
Notes ÷ Power Management settings are supported only when...
Owner's Manual - Page 35
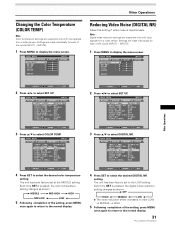
...setting, press MENU
once again to return to select the desired DIGITAL NR
setting. The unit has been factory set to select COLOR TEMP. Settings are supported... I NG
: V I DEO
V I DEO S I GNAL : RGB
SELECT
SET CHANGE
MENU EXIT
4 Press SET to the normal display.
31
PRO-1000HDI / PRO-800HDI MAIN MENU
INPUT1
PICTURE SCREEN SET UP
OPTION
I NPUT L ABEL
: I NPUT 1
AUT O P OWER OF ...
Owner's Manual - Page 37
... F : OF F
COL OR T EMP
: M I DDL E
D I G I T AL NR
: L OW
H I GH CON TRA S T : OF F
P URE C I NEMA
: OFF
3 D Y / C MOD E
: MOT I NT S H ARP
:0 :0 :0 :0 :0
SET UP
INPUT4 OPTION
RE S ET
SELECT
SET ENTER
MENU EXIT
2 Press 2/3 to "OFF" when not viewing in accordance with the input signal, thus producing bright, easy-to normal screen display.
33
PRO-1000HDI / PRO-800HDI
Owner's Manual - Page 39
.... Consult the table of supported computer input signals on page 39 and set the vacuum cleaner to see if a warning is displayed on the bottom of this ). In the case of the screen is no display check to its outlet, and consult a Pioneer service center or your dealer.
35
PRO-1000HDI / PRO-800HDI
Additional Information If there...
Owner's Manual - Page 42
...Instructions 1
÷ Due to improvements, specifications and design are subject to change without notice.
HDMI jack • Digital signal 3.3 V T.M.D.S. / 50...sync.
38
PRO-1000HDI / PRO-800HDI
INPUT 3 Input...Specifications
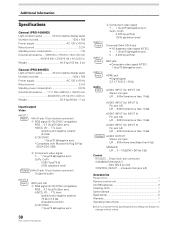
General (PRO-1000HDI)
Light emission panel 50 inch plasma display panel Number of pixels 1024 x 768 Power supply AC 120 V, 60 Hz Rated current 2.5 A Standby power...
Pioneer PRO-800HDi Reviews
We have not received any reviews for Pioneer yet.