

Owner's Manual
Page 3
... cables and connectors are designed to the following measures: - D8-10-3a_En IMPORTANT NOTICE - D1-4-2-6-1_En CAUTION: This Model PRO-FHD1 for help. English WARNING: THE APPARATUS IS NOT WATERPROOF, TO PREVENT FIRE OR SHOCK HAZARD, DO NOT EXPOSE THIS APPLIANCE ...interference by turning the equipment off and on, the user is connected. - Product Name: Plasma Display Model Number: PRO-FHD1 Product Category: Class B Personal Computers & Peripherals Responsible Party Name: PIONEER ELECTRONICS SERVICE, INC. This equipment generates, uses, and can be determined by one or more...
... cables and connectors are designed to the following measures: - D8-10-3a_En IMPORTANT NOTICE - D1-4-2-6-1_En CAUTION: This Model PRO-FHD1 for help. English WARNING: THE APPARATUS IS NOT WATERPROOF, TO PREVENT FIRE OR SHOCK HAZARD, DO NOT EXPOSE THIS APPLIANCE ...interference by turning the equipment off and on, the user is connected. - Product Name: Plasma Display Model Number: PRO-FHD1 Product Category: Class B Personal Computers & Peripherals Responsible Party Name: PIONEER ELECTRONICS SERVICE, INC. This equipment generates, uses, and can be determined by one or more...
Owner's Manual
Page 4
...Preparing the remote control unit ..........20 Inserting batteries 20 Cautions regarding the remote control unit 20 07 Operation Plasma Display status indicators ...........21 Changing the volume and sound ...........21 Use the multiscreen functions 22 Splitting the screen...05 Part Names Main unit 13 Remote control unit 14 Connection panel 15 06 Preparation Installing the Plasma Display 16 Preventing the Plasma Display from that shown in images 27 Using the Dynamic Range Expander (DRE) functions 27 ... the instructions, put them away in a safe place for buying this Pioneer product.
...Preparing the remote control unit ..........20 Inserting batteries 20 Cautions regarding the remote control unit 20 07 Operation Plasma Display status indicators ...........21 Changing the volume and sound ...........21 Use the multiscreen functions 22 Splitting the screen...05 Part Names Main unit 13 Remote control unit 14 Connection panel 15 06 Preparation Installing the Plasma Display 16 Preventing the Plasma Display from that shown in images 27 Using the Dynamic Range Expander (DRE) functions 27 ... the instructions, put them away in a safe place for buying this Pioneer product.
Owner's Manual
Page 6
...After playing a game, or displaying a PC image or any other equipment, walls, etc. Over the course of its lifetime, the luminosity of the Pioneer PRO-FHD1 Plasma Display will diminish very slowly, such as compared to the product. To enjoy beautiful and bright images on your... effects and characteristics of -the-art design and construction, as well as such, are no exception to obtain maximum enjoyment from this Pioneer PureVision PRO-FHD1 Plasma Display, please first read and follow the usage guidances below , you can ensure longer and satisfactory results from tipping over a long ...
...After playing a game, or displaying a PC image or any other equipment, walls, etc. Over the course of its lifetime, the luminosity of the Pioneer PRO-FHD1 Plasma Display will diminish very slowly, such as compared to the product. To enjoy beautiful and bright images on your... effects and characteristics of -the-art design and construction, as well as such, are no exception to obtain maximum enjoyment from this Pioneer PureVision PRO-FHD1 Plasma Display, please first read and follow the usage guidances below , you can ensure longer and satisfactory results from tipping over a long ...
Owner's Manual
Page 7
... VCR close up or during single color displays then this product, gently wipe it emits a small amount of plastic. Information of time. Pioneer Plasma Display panels contain a very large number of between 2.5 and 3.5 meters while viewing a normal broadcast (i.e. If the defective cells are manufactured... do not use the handles attached to received video signals. Handles at the rear of the Plasma Display • Do not remove the handles from tilting over 6.2 million cells.) All Pioneer display panels are visible at a location where its characteristics. over . 7 En Using the...
... VCR close up or during single color displays then this product, gently wipe it emits a small amount of plastic. Information of time. Pioneer Plasma Display panels contain a very large number of between 2.5 and 3.5 meters while viewing a normal broadcast (i.e. If the defective cells are manufactured... do not use the handles attached to received video signals. Handles at the rear of the Plasma Display • Do not remove the handles from tilting over 6.2 million cells.) All Pioneer display panels are visible at a location where its characteristics. over . 7 En Using the...
Owner's Manual
Page 8
... hours, a faint imprint of the image, known as image retention, can remain. Although caused by watching moving video. On today's plasma displays, permanent image retention is 1920x1080), and images with content. as well as burn-in may occur. Displaying dark images after displaying still...(such as still images, fixed images from screen burning (see page 29). Recommended guidelines are displayed. The after-images remaining on the Plasma Display continuously over several hours, or for more than 1 minute, after-image lagging may occur due to burning of the fluorescent materials...
... hours, a faint imprint of the image, known as image retention, can remain. Although caused by watching moving video. On today's plasma displays, permanent image retention is 1920x1080), and images with content. as well as burn-in may occur. Displaying dark images after displaying still...(such as still images, fixed images from screen burning (see page 29). Recommended guidelines are displayed. The after-images remaining on the Plasma Display continuously over several hours, or for more than 1 minute, after-image lagging may occur due to burning of the fluorescent materials...
Owner's Manual
Page 9
...depth and is unstable, unpack, carry, and install the product with utmost care. When the power cord or plug is damaged. d. The Plasma Display weighs about 39.8 kg. English 9 En However, improper use can break when the product is dropped or applied with the product. ...safety. Unplug the power cord from the AC outlet, and request a qualified service person to a strong impact, for a long period of the Plasma Display to perform repairs. Do not use liquid cleaners or aerosol cleaners. 6. When a liquid was spilled on an unstable cart, stand, tripod ...
...depth and is unstable, unpack, carry, and install the product with utmost care. When the power cord or plug is damaged. d. The Plasma Display weighs about 39.8 kg. English 9 En However, improper use can break when the product is dropped or applied with the product. ...safety. Unplug the power cord from the AC outlet, and request a qualified service person to a strong impact, for a long period of the Plasma Display to perform repairs. Do not use liquid cleaners or aerosol cleaners. 6. When a liquid was spilled on an unstable cart, stand, tripod ...
Owner's Manual
Page 11
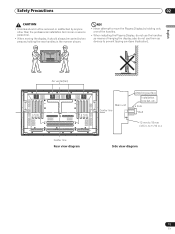
... in.) Center line Rear view diagram Side view diagram 11 En also do not use them as means of the handles. • When installing the Plasma Display, do not use the handles as devices to prevent tipping over (see illustration). a hole Air vents (fan) a hole Main unit Center line Attaching surface..., it should always be carried by holding the rear handles in the manner shown. to 18 mm (1/2 in. NO! • Never attempt to move the Plasma Display by two persons holding only one of hanging the display;
... in.) Center line Rear view diagram Side view diagram 11 En also do not use them as means of the handles. • When installing the Plasma Display, do not use the handles as devices to prevent tipping over (see illustration). a hole Air vents (fan) a hole Main unit Center line Attaching surface..., it should always be carried by holding the rear handles in the manner shown. to 18 mm (1/2 in. NO! • Never attempt to move the Plasma Display by two persons holding only one of hanging the display;

Owner's Manual
Page 14
... AUTO AV SIZE SETUP DISPLAY SELECTION 2 PC 8 3 INPUT 9 4 1 2 3 4 5 6 SPLIT SUB INPUT 5 VOLUME MUTING SWAP 6 10 11 12 RETURN 7 HOME MENU 13 ENTER AXD1534 14 15 PLASMA DISPLAY When handling the remote control unit • Do not drop the remote control unit or expose it to moisture. • Do not use this...
... AUTO AV SIZE SETUP DISPLAY SELECTION 2 PC 8 3 INPUT 9 4 1 2 3 4 5 6 SPLIT SUB INPUT 5 VOLUME MUTING SWAP 6 10 11 12 RETURN 7 HOME MENU 13 ENTER AXD1534 14 15 PLASMA DISPLAY When handling the remote control unit • Do not drop the remote control unit or expose it to moisture. • Do not use this...

Owner's Manual
Page 15
L 1 SPEAKER (R) terminals For connection of an external left speaker. These connectors are used for Plasma Display setup adjustments. 3 CONTROL IN/OUT terminals 4 INPUT1 terminal (DVI-D) 5 INPUT2 terminal (HDMI) 6 INPUT3 terminal (HDMI) 7 INPUT4 terminals ...terminals For connection of an external right speaker. Connect a speaker that has an impedance of 8 Ω to these connectors without first consulting your Pioneer installation technician. Part Names Connection panel R SPEAKER 8+Ω ~16Ω- 1 SERVICE ONLY CONTROL IN OUT 2 3 INPUT1 DVI-D INPUT2 HDMI INPUT3...
L 1 SPEAKER (R) terminals For connection of an external left speaker. These connectors are used for Plasma Display setup adjustments. 3 CONTROL IN/OUT terminals 4 INPUT1 terminal (DVI-D) 5 INPUT2 terminal (HDMI) 6 INPUT3 terminal (HDMI) 7 INPUT4 terminals ...terminals For connection of an external right speaker. Connect a speaker that has an impedance of 8 Ω to these connectors without first consulting your Pioneer installation technician. Part Names Connection panel R SPEAKER 8+Ω ~16Ω- 1 SERVICE ONLY CONTROL IN OUT 2 3 INPUT1 DVI-D INPUT2 HDMI INPUT3...
Owner's Manual
Page 16
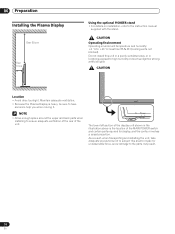
Maintain adequate ventilation. • Because the Plasma Display is the location of the MAIN POWER switch and certain parts required for display, and the contour involves a raised projection. CAUTION Operating Environment Operating ... enough space around the upper and back parts when installing to the instruction manual supplied with the stand. 06 Preparation Preparation Installing the Plasma Display Over 50 cm Over 10 cm Using the optional PIONEER stand • For details on installation, refer to ensure adequate ventilation of the rear of the unit.
Maintain adequate ventilation. • Because the Plasma Display is the location of the MAIN POWER switch and certain parts required for display, and the contour involves a raised projection. CAUTION Operating Environment Operating ... enough space around the upper and back parts when installing to the instruction manual supplied with the stand. 06 Preparation Preparation Installing the Plasma Display Over 50 cm Over 10 cm Using the optional PIONEER stand • For details on installation, refer to ensure adequate ventilation of the rear of the unit.

Owner's Manual
Page 17
...the appropriate screws, hooks, chains, and other sturdy element. • Perform this work in . The screws, hooks, chains and other fittings that the Plasma Display will vary according to the composition and thickness of 6 mm (1/4 in.) and that are at least 20 mm (13/16 in.) long. 20 ...injury and physical damage. min.) 1. NOTE Use hooks, ropes, chains, and fittings that are available on the floor, use to secure the Plasma Display to prevent it from overturning will not fall down and cause injury. Stabilizing on a table or floor Using a wall for stabilization Stabilize the...
...the appropriate screws, hooks, chains, and other sturdy element. • Perform this work in . The screws, hooks, chains and other fittings that the Plasma Display will vary according to the composition and thickness of 6 mm (1/4 in.) and that are at least 20 mm (13/16 in.) long. 20 ...injury and physical damage. min.) 1. NOTE Use hooks, ropes, chains, and fittings that are available on the floor, use to secure the Plasma Display to prevent it from overturning will not fall down and cause injury. Stabilizing on a table or floor Using a wall for stabilization Stabilize the...
Owner's Manual
Page 18
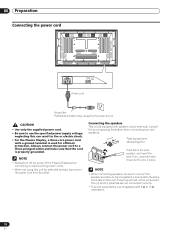
... 8 Ω to 16 Ω impedance. 18 En Proper sound will not be sure to connect the speaker's positive (+) and negative (-) terminals to use of the Plasma Display when connecting or disconnecting power cords. • When not using this unit. L Power cord Noise filter Partially eliminates noise caused by the power source...
... 8 Ω to 16 Ω impedance. 18 En Proper sound will not be sure to connect the speaker's positive (+) and negative (-) terminals to use of the Plasma Display when connecting or disconnecting power cords. • When not using this unit. L Power cord Noise filter Partially eliminates noise caused by the power source...
Owner's Manual
Page 20
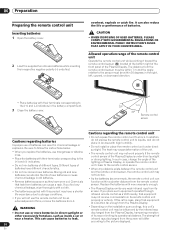
... from the screen will not use manganese or alkaline ones. • Place the batteries with new ones early enough. • The Plasma Display emits very weak infrared rays from its screen. WARNING • Depending on the installation surroundings, this product may not receive commands from...for an extendedperiod of time, remove the batteries from it toward the remote control sensor ( ) located at a location far enough from the Plasma Display. 06 Preparation Preparing the remote control unit Inserting batteries 1 Open the battery cover. 2 Load the supplied two AA size batteries while ...
... from the screen will not use manganese or alkaline ones. • Place the batteries with new ones early enough. • The Plasma Display emits very weak infrared rays from its screen. WARNING • Depending on the installation surroundings, this product may not receive commands from...for an extendedperiod of time, remove the batteries from it toward the remote control sensor ( ) located at a location far enough from the Plasma Display. 06 Preparation Preparing the remote control unit Inserting batteries 1 Open the battery cover. 2 Load the supplied two AA size batteries while ...
Owner's Manual
Page 21
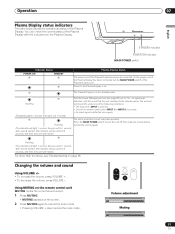
...indicator will light 1 second, then go out for 1 second; You can check the current status of the remote control unit's INPUT 1 to the Plasma Display is detected once again. (Repeatedly lights 1 second, then goes out 1 second) Flashing The unit's protection circuit may have operated. The unit ... will go out for 1 second; English STANDBY indicator POWER ON indicator MAIN POWER switch Indicator Status POWER ON STANDBY Plasma Display Status The power cord of the Plasma Display. Press the MAIN POWER switch to turn back ON, under one minute before turning the unit on page 38...
...indicator will light 1 second, then go out for 1 second; You can check the current status of the remote control unit's INPUT 1 to the Plasma Display is detected once again. (Repeatedly lights 1 second, then goes out 1 second) Flashing The unit's protection circuit may have operated. The unit ... will go out for 1 second; English STANDBY indicator POWER ON indicator MAIN POWER switch Indicator Status POWER ON STANDBY Plasma Display Status The power cord of the Plasma Display. Press the MAIN POWER switch to turn back ON, under one minute before turning the unit on page 38...
Owner's Manual
Page 22
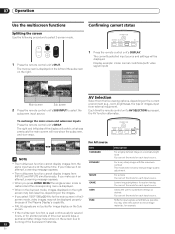
... check image materials, for each input source. If you select 1920*1080p@24 Hz for image display on the screen due to burning of the Plasma Display's capability. PURE • PAL 60 signals are not suited for the main screen in the 2-screen mode, images displayed on the right screen may...
... check image materials, for each input source. If you select 1920*1080p@24 Hz for image display on the screen due to burning of the Plasma Display's capability. PURE • PAL 60 signals are not suited for the main screen in the 2-screen mode, images displayed on the right screen may...
Owner's Manual
Page 23
...• Each time you press SCREEN SIZE, the selection is recommended to view full screen motion video. • When using the Plasma Display in a profit-making activity, or when exhibiting images publicly, using the screen size function to consistently display signals that does not... side of the screen. A side mask appears on each side, and you cannot select "Contrast", "Brightness", "Color", "Tint", "Sharpness", "Pro Adjust", and "Reset"; Unless doing so would infringe copyright restrictions, it is switched. • The selectable screen sizes differ depending on the frequency...
...• Each time you press SCREEN SIZE, the selection is recommended to view full screen motion video. • When using the Plasma Display in a profit-making activity, or when exhibiting images publicly, using the screen size function to consistently display signals that does not... side of the screen. A side mask appears on each side, and you cannot select "Contrast", "Brightness", "Color", "Tint", "Sharpness", "Pro Adjust", and "Reset"; Unless doing so would infringe copyright restrictions, it is switched. • The selectable screen sizes differ depending on the frequency...
Owner's Manual
Page 25
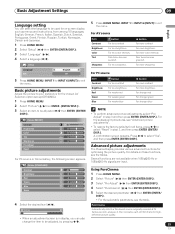
...INPUT) to select "Yes", and then press ENTER (ENTER/DISP.). Picture STANDARD Contrast 40 Brightness 0 Advanced picture adjustments The Plasma Display provides various advanced functions for the chosen AV Selection option (except DYNAMIC). Blue For weaker blue For stronger blue 2 ..."Setup" ( / then ENTER (ENTER/DISP.)). 3 Select "Language" ( / ). 4 Select a language ( / ). Press / to exit the menu. Pro Adjust Reset For PC source or Home Gallery, the following screen appears. Picture MOVIE Contrast 40 Brightness 0 Color 0 Tint 0 Sharpness 0 NOTE • To ...
...INPUT) to select "Yes", and then press ENTER (ENTER/DISP.). Picture STANDARD Contrast 40 Brightness 0 Advanced picture adjustments The Plasma Display provides various advanced functions for the chosen AV Selection option (except DYNAMIC). Blue For weaker blue For stronger blue 2 ..."Setup" ( / then ENTER (ENTER/DISP.)). 3 Select "Language" ( / ). 4 Select a language ( / ). Press / to exit the menu. Pro Adjust Reset For PC source or Home Gallery, the following screen appears. Picture MOVIE Contrast 40 Brightness 0 Color 0 Tint 0 Sharpness 0 NOTE • To ...

Owner's Manual
Page 29
...Press HOME MENU. 2 Select "Power Control" ( / then ENTER (ENTER/DISP.)). 3 Select "Energy Save" ( / ). 4 Select "Save 1" or "Save 2" ( / ). Places the Plasma Display into the standby mode if no signal is received. 1 Press HOME MENU. 2 Select "Power Control" ( / then ENTER (ENTER/DISP.)). 3 Select "Power Management" ( / ). 4 ...for 8 minutes. 1 Press HOME MENU. 2 Select "Power Control" ( / then ENTER (ENTER/DISP.). 3 Select "No Signal off The Plasma Display will be automatically placed into the standby mode if no signal is disabled during display of the HOME MENU. • A message will ...
...Press HOME MENU. 2 Select "Power Control" ( / then ENTER (ENTER/DISP.)). 3 Select "Energy Save" ( / ). 4 Select "Save 1" or "Save 2" ( / ). Places the Plasma Display into the standby mode if no signal is received. 1 Press HOME MENU. 2 Select "Power Control" ( / then ENTER (ENTER/DISP.)). 3 Select "Power Management" ( / ). 4 ...for 8 minutes. 1 Press HOME MENU. 2 Select "Power Control" ( / then ENTER (ENTER/DISP.). 3 Select "No Signal off The Plasma Display will be automatically placed into the standby mode if no signal is disabled during display of the HOME MENU. • A message will ...
Owner's Manual
Page 30
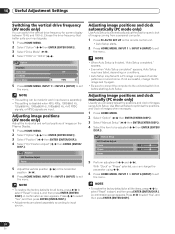
... "Reset" in step 4, and then press ENTER (ENTER/DISP.). appears. • Even when "Auto Setup completed" appears, Auto Setup may have failed, depending on the Plasma Display. 1 Press HOME MENU. 2 Select "Option" ( / then ENTER (ENTER/DISP.)). 3 Select "Position" ( / then ENTER (ENTER/DISP.)). 4 Select "H/V Position Adjust" ( / then ENTER (ENTER/ DISP.)). A confirmation screen...
... "Reset" in step 4, and then press ENTER (ENTER/DISP.). appears. • Even when "Auto Setup completed" appears, Auto Setup may have failed, depending on the Plasma Display. 1 Press HOME MENU. 2 Select "Option" ( / then ENTER (ENTER/DISP.)). 3 Select "Position" ( / then ENTER (ENTER/DISP.)). 4 Select "H/V Position Adjust" ( / then ENTER (ENTER/ DISP.)). A confirmation screen...

Owner's Manual
Page 32
...masks. Option Position Auto Size 4:3 Mode . 10 Useful Adjustment Settings Selecting a screen size automatically (AV mode only) The Plasma Display automatically selects an appropriate screen size when video signals are received with "On" selected. Activates the Auto Size function....Keeps the 4:3 aspect ratio and presents side masks. Selecting a screen size for received 4:3 aspect ratio signals (AV mode only) Specify whether the Plasma Display should choose the 4:3 mode or WIDE mode when 4:3 aspect ratio signals are received from a connected HDMI equipment (see page 33). On...
...masks. Option Position Auto Size 4:3 Mode . 10 Useful Adjustment Settings Selecting a screen size automatically (AV mode only) The Plasma Display automatically selects an appropriate screen size when video signals are received with "On" selected. Activates the Auto Size function....Keeps the 4:3 aspect ratio and presents side masks. Selecting a screen size for received 4:3 aspect ratio signals (AV mode only) Specify whether the Plasma Display should choose the 4:3 mode or WIDE mode when 4:3 aspect ratio signals are received from a connected HDMI equipment (see page 33). On...


