
Owner's Manual
Page 4
After you for buying this Pioneer product. However the method of connecting and operating the...status 22 AV Selection 22 Selecting a screen size manually ...........23 09 Basic Adjustment Settings Language setting 25 Basic picture adjustments 25 Advanced picture adjustments 25 Using PureCinema 25 Using Color Temp 26 Using CTI 26 Using Color Management... 30 Adjusting image positions and clock manually (PC mode only 30 Selecting an input signal type 31 Color system setting 31 Selecting a screen size automatically (AV mode only 32 Selecting a screen size for received 4:3 aspect ratio...
After you for buying this Pioneer product. However the method of connecting and operating the...status 22 AV Selection 22 Selecting a screen size manually ...........23 09 Basic Adjustment Settings Language setting 25 Basic picture adjustments 25 Advanced picture adjustments 25 Using PureCinema 25 Using Color Temp 26 Using CTI 26 Using Color Management... 30 Adjusting image positions and clock manually (PC mode only 30 Selecting an input signal type 31 Color system setting 31 Selecting a screen size automatically (AV mode only 32 Selecting a screen size for received 4:3 aspect ratio...
Owner's Manual
Page 6
... equipment, walls, etc. However, PIONEER cannot be installed by using the still picture mode from tipping over in the event of the Pioneer PRO-FHD1 Plasma Display will automatically power off in the "WIDE" or "FULL" screen setting for more than the PIONEER stand or installation bracket may cause uneven wear. The Pioneer PureVision PRO-FHD1 incorporates the latest in...
... equipment, walls, etc. However, PIONEER cannot be installed by using the still picture mode from tipping over in the event of the Pioneer PRO-FHD1 Plasma Display will automatically power off in the "WIDE" or "FULL" screen setting for more than the PIONEER stand or installation bracket may cause uneven wear. The Pioneer PureVision PRO-FHD1 incorporates the latest in...
Owner's Manual
Page 23
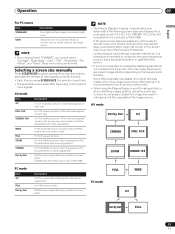
...switched. • The selectable screen sizes differ depending on the types of input signals. Selecting a screen size manually Press SCREEN SIZE to customize settings as desired. AV mode Item 4:3 FULL 14:9 CINEMA 14:9 WIDE FULL ZOOM CINEMA Dot by Dot Description Fills the screen without altering the ...A side mask appears on each side. A thin side mask appears on each side, and you cannot select "Contrast", "Brightness", "Color", "Tint", "Sharpness", "Pro Adjust", and "Reset"; For 16:9 squeeze pictures. PC mode FULL WIDE 4:3 Dot by Dot (except when the input size is 1920x1080.
...switched. • The selectable screen sizes differ depending on the types of input signals. Selecting a screen size manually Press SCREEN SIZE to customize settings as desired. AV mode Item 4:3 FULL 14:9 CINEMA 14:9 WIDE FULL ZOOM CINEMA Dot by Dot Description Fills the screen without altering the ...A side mask appears on each side. A thin side mask appears on each side, and you cannot select "Contrast", "Brightness", "Color", "Tint", "Sharpness", "Pro Adjust", and "Reset"; For 16:9 squeeze pictures. PC mode FULL WIDE 4:3 Dot by Dot (except when the input size is 1920x1080.
Owner's Manual
Page 24
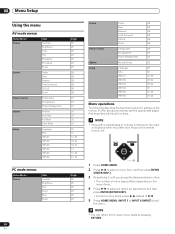
...to exit the menu. 08 Menu Setup Menu Setup Using the menu AV mode menus Home Menu Picture Sound Power Control Option Setup Item Contrast Brightness Color Tint Sharpness Pro Adjust Reset Treble Bass Balance Front Surround FOCUS Reset Energy Save No Signal off Power Management Position Auto...items, press / instead of menu layers differs depending on the remote control unit. NOTE • Items within parentheses ( ) indicate notations for setting up the menus. For the actual procedures, see the appropriate pages that describes individual functions. NOTE • You can return to the upper...
...to exit the menu. 08 Menu Setup Menu Setup Using the menu AV mode menus Home Menu Picture Sound Power Control Option Setup Item Contrast Brightness Color Tint Sharpness Pro Adjust Reset Treble Bass Balance Front Surround FOCUS Reset Energy Save No Signal off Power Management Position Auto...items, press / instead of menu layers differs depending on the remote control unit. NOTE • Items within parentheses ( ) indicate notations for setting up the menus. For the actual procedures, see the appropriate pages that describes individual functions. NOTE • You can return to the upper...
Owner's Manual
Page 25
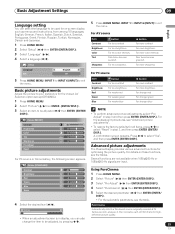
... or Home Gallery, the following screen appears. Basic Adjustment Settings 09 Basic Adjustment Settings English Language setting You can also change the item to be adjusted, by pressing / . 25 En Picture MOVIE Contrast 40 Brightness 0 Color 0 Tint 0 Sharpness 0 NOTE • To perform advanced picture adjustments, select "Pro Adjust" in step 3, and then press ENTER (ENTER/ DISP...
... or Home Gallery, the following screen appears. Basic Adjustment Settings 09 Basic Adjustment Settings English Language setting You can also change the item to be adjusted, by pressing / . 25 En Picture MOVIE Contrast 40 Brightness 0 Color 0 Tint 0 Sharpness 0 NOTE • To perform advanced picture adjustments, select "Pro Adjust" in step 3, and then press ENTER (ENTER/ DISP...
Owner's Manual
Page 26
... Transient Improvement. 4 Select "Color Detail" ( / then ENTER (ENTER/DISP.)). Using CTI 1 Press HOME MENU. 2 Select "Picture" ( / then ENTER (ENTER/DISP.)). 3 Select "Pro Adjust" ( / then ENTER (ENTER/DISP.)). 4 Select "Color Detail" ( / then ENTER (ENTER/DISP.)). 5 Select "CTI... 1 Press HOME MENU. 2 Select "Picture" ( / then ENTER (ENTER/DISP.)). 3 Select "Pro Adjust" ( / then ENTER (ENTER/DISP.)). 6 Select the desired parameter ( / then ENTER (ENTER/ DISP.)). The manual adjustment screen appears. 09 Basic Adjustment Settings PureCinema Selections Off Standard Advanced Deactivates the...
... Transient Improvement. 4 Select "Color Detail" ( / then ENTER (ENTER/DISP.)). Using CTI 1 Press HOME MENU. 2 Select "Picture" ( / then ENTER (ENTER/DISP.)). 3 Select "Pro Adjust" ( / then ENTER (ENTER/DISP.)). 4 Select "Color Detail" ( / then ENTER (ENTER/DISP.)). 5 Select "CTI... 1 Press HOME MENU. 2 Select "Picture" ( / then ENTER (ENTER/DISP.)). 3 Select "Pro Adjust" ( / then ENTER (ENTER/DISP.)). 6 Select the desired parameter ( / then ENTER (ENTER/ DISP.)). The manual adjustment screen appears. 09 Basic Adjustment Settings PureCinema Selections Off Standard Advanced Deactivates the...

Owner's Manual
Page 27
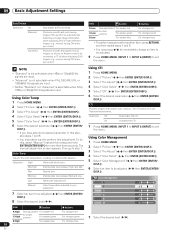
...Press HOME MENU, INPUT 1 to INPUT 6 (INPUT) to exit the menu. Using the Dynamic Range Expander (DRE) functions 1 Press HOME MENU. 2 Select "Picture" ( / then ENTER (ENTER/DISP.)). 3 Select "Pro Adjust" ( / then ENTER (ENTER/DISP.)). 4 Select "DRE" ( / then ENTER (ENTER/DISP.)). 5 Select an item to be adjusted ( / then... signals and color signals. High Enhanced DNR Mid Standard DNR Low Moderate DNR Selections Off On Deactivates the Black Level. Basic Adjustment Settings 09 Item R Y button Closer to magenta Closer to red button Closer to yellow Closer to green • You can select ...
...Press HOME MENU, INPUT 1 to INPUT 6 (INPUT) to exit the menu. Using the Dynamic Range Expander (DRE) functions 1 Press HOME MENU. 2 Select "Picture" ( / then ENTER (ENTER/DISP.)). 3 Select "Pro Adjust" ( / then ENTER (ENTER/DISP.)). 4 Select "DRE" ( / then ENTER (ENTER/DISP.)). 5 Select an item to be adjusted ( / then... signals and color signals. High Enhanced DNR Mid Standard DNR Low Moderate DNR Selections Off On Deactivates the Black Level. Basic Adjustment Settings 09 Item R Y button Closer to magenta Closer to red button Closer to yellow Closer to green • You can select ...

Owner's Manual
Page 29
...Item Disable Enable Description No power management If no signal is detected for power saving. INPUT1 and 4 are disabled, however, when they have "Signal Type" set to "AV", they are disabled. • Operation is disabled during display of the HOME MENU. • A message will be automatically placed into the ... mode. Slightly lowers power consumption while slightly suppressing the brightness drop level. No Signal off " ( / ). 4 Select "Enable" ( / ). Decreases the picture brightness and lowers power consumption. 5 Press HOME MENU, INPUT 1 to INPUT 6 (INPUT) to exit the menu.
...Item Disable Enable Description No power management If no signal is detected for power saving. INPUT1 and 4 are disabled, however, when they have "Signal Type" set to "AV", they are disabled. • Operation is disabled during display of the HOME MENU. • A message will be automatically placed into the ... mode. Slightly lowers power consumption while slightly suppressing the brightness drop level. No Signal off " ( / ). 4 Select "Enable" ( / ). Decreases the picture brightness and lowers power consumption. 5 Press HOME MENU, INPUT 1 to INPUT 6 (INPUT) to exit the menu.
Owner's Manual
Page 38
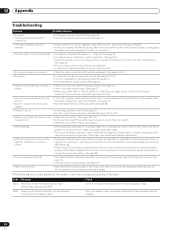
...correct? (See page 33 to 37.) • Is a non-compatible PC signal being input? (See page 37.) • Is the Input Select setting correct? (See page 31.) • Images are normal operation of the Plasma Display is minimized. If the following error codes appear on the Plasma ...is strongly recommended to select a screen size that completely fills the screen until unevenness is high. The picture may look dark in a room that is too bright. • Check the color system setting. (See page 31.) • After-image lag • After displaying a still image or very bright image...
...correct? (See page 33 to 37.) • Is a non-compatible PC signal being input? (See page 37.) • Is the Input Select setting correct? (See page 31.) • Images are normal operation of the Plasma Display is minimized. If the following error codes appear on the Plasma ...is strongly recommended to select a screen size that completely fills the screen until unevenness is high. The picture may look dark in a room that is too bright. • Check the color system setting. (See page 31.) • After-image lag • After displaying a still image or very bright image...

