Owner's Manual
Page 3
...the senses evolve, colors are proud to incorporate this owner's guide and manual to the Panel ...32 2.7 Route then Bundle the Power Cord and Cables ...32...3.5 Block Programs, Channels, or Content ...50 3.5.1 Assign a Parental Control (Block) Password...50 3 En TABLE OF CONTENTS Congratulations on the Remote Control ...12 2 Install Your Flat Panel TV ...14 2.1 Choose a Location and the... TV ...24 2.5 Attach the Color Sensor ...26 2.6 Connect to Broadcast TV & Other Devices (DVR, Receiver, BDR, etc 29 2.6.1 Add Analog (conventional) and Digital TV Channels 29 2.6.2 Connect Your Other Pioneer ...
...the senses evolve, colors are proud to incorporate this owner's guide and manual to the Panel ...32 2.7 Route then Bundle the Power Cord and Cables ...32...3.5 Block Programs, Channels, or Content ...50 3.5.1 Assign a Parental Control (Block) Password...50 3 En TABLE OF CONTENTS Congratulations on the Remote Control ...12 2 Install Your Flat Panel TV ...14 2.1 Choose a Location and the... TV ...24 2.5 Attach the Color Sensor ...26 2.6 Connect to Broadcast TV & Other Devices (DVR, Receiver, BDR, etc 29 2.6.1 Add Analog (conventional) and Digital TV Channels 29 2.6.2 Connect Your Other Pioneer ...
Owner's Manual
Page 4
...Console ...59 4.2 Adjust Specific Picture Elements ...59 4.2.1 Choose a Screen Size (Automatically or Manually 59 4.2.2 Correct the Picture for an AV or PC Source ...61 4.3 Assign Advanced ...(AVC)...75 4.8 Manage the Power ...76 5 Use Other Equipment With Your Flat Panel TV 78 5.1 Program the Remote Control to Operate Other Equipment 78 5.1.1 Use the Learning Feature... Search for a Manufacturer Code 79 5.1.4 Clear Added Manufacturer Codes from the Remote Control 80 5.1.5 Control a Pioneer Receiver ...80 5.1.6 Control a Cable (CBL) or Satellite (SAT) System 81 5.1.7 Control a Video Cassette...
...Console ...59 4.2 Adjust Specific Picture Elements ...59 4.2.1 Choose a Screen Size (Automatically or Manually 59 4.2.2 Correct the Picture for an AV or PC Source ...61 4.3 Assign Advanced ...(AVC)...75 4.8 Manage the Power ...76 5 Use Other Equipment With Your Flat Panel TV 78 5.1 Program the Remote Control to Operate Other Equipment 78 5.1.1 Use the Learning Feature... Search for a Manufacturer Code 79 5.1.4 Clear Added Manufacturer Codes from the Remote Control 80 5.1.5 Control a Pioneer Receiver ...80 5.1.6 Control a Cable (CBL) or Satellite (SAT) System 81 5.1.7 Control a Video Cassette...
Owner's Manual
Page 5
...Glossary ...162 8.5 Index...164 8.6 Trademarks, Licenses, & Patent Information ...165 5 En F)...139 8.2.4 VCR (Brands G - V) ...141 8.2.6 VCR (Brands W - TV Parental Guideline Ratings (age/category-based 136 8.1.3 MPAA Movie Ratings (age-based) ...136 8.1.4 Canadian - French Ratings (age-based)...137 8.2 Manufacturer Codes to Program into ...Panel TV ...104 5.9 Use the TOOLS Menu ...106 5.10 HMG Setup ...118 5.11 Other useful functions...119 5.12 Add Other Audio Equipment...121 5.13 Add a Computer (PC) ...122 5.13.1 Automatic Image Position and Clock Adjustments 122 5.13.2 Manual ...
...Glossary ...162 8.5 Index...164 8.6 Trademarks, Licenses, & Patent Information ...165 5 En F)...139 8.2.4 VCR (Brands G - V) ...141 8.2.6 VCR (Brands W - TV Parental Guideline Ratings (age/category-based 136 8.1.3 MPAA Movie Ratings (age-based) ...136 8.1.4 Canadian - French Ratings (age-based)...137 8.2 Manufacturer Codes to Program into ...Panel TV ...104 5.9 Use the TOOLS Menu ...106 5.10 HMG Setup ...118 5.11 Other useful functions...119 5.12 Add Other Audio Equipment...121 5.13 Add a Computer (PC) ...122 5.13.1 Automatic Image Position and Clock Adjustments 122 5.13.2 Manual ...
Owner's Manual
Page 6
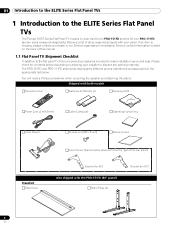
... (when attached to the top right of this manual. 1.1 Flat Panel TV Shipment Checklist In addition to the flat panel TV, there are several accessories included to the ELITE Series Flat Panel TVs The Pioneer ELITE Series Flat Panel TV models include the 60-inch PRO-151FD and the 50-inch PRO-111FD (screen sizes measured diagonally). You will need...
... (when attached to the top right of this manual. 1.1 Flat Panel TV Shipment Checklist In addition to the flat panel TV, there are several accessories included to the ELITE Series Flat Panel TVs The Pioneer ELITE Series Flat Panel TV models include the 60-inch PRO-151FD and the 50-inch PRO-111FD (screen sizes measured diagonally). You will need...
Owner's Manual
Page 29
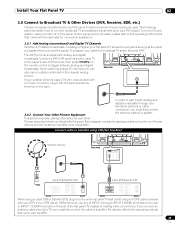
...with the device(s) for connection assistance. 2.6.1 Add Analog (conventional) and Digital TV Channels Whether a TV station broadcasts in to the panel. When watching analog TV channels, you must first connect 2.6.2 Connect Your Other Pioneer Equipment the antenna cable to a splitter. Each diagram can also be used...connection, you must first connect the cable to a splitter. If your equipment is programmed to the operating manual that came with your flat panel TV determines which panel ports are used as the panel is not listed, please refer to the operating instructions ...
...with the device(s) for connection assistance. 2.6.1 Add Analog (conventional) and Digital TV Channels Whether a TV station broadcasts in to the panel. When watching analog TV channels, you must first connect 2.6.2 Connect Your Other Pioneer Equipment the antenna cable to a splitter. Each diagram can also be used...connection, you must first connect the cable to a splitter. If your equipment is programmed to the operating manual that came with your flat panel TV determines which panel ports are used as the panel is not listed, please refer to the operating instructions ...
Owner's Manual
Page 30
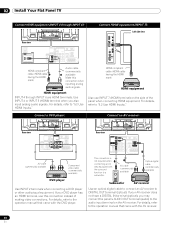
... video connections. If your AV receiver does not have a DIGITAL IN terminal (optical), you also input analog audio signals. For details, refer to the operation manual that came with the DVD player. Connect a DVD player: T T W W Connect an AV receiver: T T W W Rear view Rear view AV cable (commercially available) Component video cable (.... This connection is not required when connecting an AV amp equipped with the surround function to "5.2 Use HDMI Inputs." 02 Install Your Flat Panel TV Connect HDMI equipment (INPUT 4 through INPUT 6 are HDMI terminals.
... video connections. If your AV receiver does not have a DIGITAL IN terminal (optical), you also input analog audio signals. For details, refer to the operation manual that came with the DVD player. Connect a DVD player: T T W W Connect an AV receiver: T T W W Rear view Rear view AV cable (commercially available) Component video cable (.... This connection is not required when connecting an AV amp equipped with the surround function to "5.2 Use HDMI Inputs." 02 Install Your Flat Panel TV Connect HDMI equipment (INPUT 4 through INPUT 6 are HDMI terminals.
Owner's Manual
Page 31
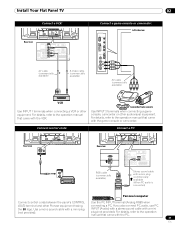
... Your Flat Panel TV Connect a VCR: T T W W Rear view 02 Connect a game console or camcorder: Left side view AV cable (commercially available) S-Video cable (commercially available) AV cable (commercially available) VCR Use INPUT 1 terminals when connecting a VCR or other Pioneer equipment having connecting a PC. For details, refer to the operation manual that came with...
... Your Flat Panel TV Connect a VCR: T T W W Rear view 02 Connect a game console or camcorder: Left side view AV cable (commercially available) S-Video cable (commercially available) AV cable (commercially available) VCR Use INPUT 1 terminals when connecting a VCR or other Pioneer equipment having connecting a PC. For details, refer to the operation manual that came with...
Owner's Manual
Page 36
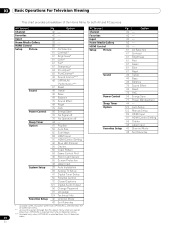
...- 86 - 57 AV Selection 61 Contrast* 61 Brightness* 61 Color* 61 Tint* 61 Sharpness* 64 Pro Adjust* 63 PureCinema** 49 Sound Control*** 48 OPTIMUM Performance*** 61 Reset 49 Treble 49 Bass 49 Balance ... of the Home Menu for both AV and PC sources. Option 122 Auto Setup 122 Manual Setup 84 HDMI Input 91 HDMI Control Setting 56 Orbiter 43 Label Input Favorites Setup 42... 43 Label Input 38 Auto Installation 39 Analog TV Setup 41 Digital Tuner Setup 50 Parental Control 72 Closed Captions 121 Digital Audio Output 50 Change Password 37 Language 124 Technical Info Favorites ...
...- 86 - 57 AV Selection 61 Contrast* 61 Brightness* 61 Color* 61 Tint* 61 Sharpness* 64 Pro Adjust* 63 PureCinema** 49 Sound Control*** 48 OPTIMUM Performance*** 61 Reset 49 Treble 49 Bass 49 Balance ... of the Home Menu for both AV and PC sources. Option 122 Auto Setup 122 Manual Setup 84 HDMI Input 91 HDMI Control Setting 56 Orbiter 43 Label Input Favorites Setup 42... 43 Label Input 38 Auto Installation 39 Analog TV Setup 41 Digital Tuner Setup 50 Parental Control 72 Closed Captions 121 Digital Audio Output 50 Change Password 37 Language 124 Technical Info Favorites ...
Owner's Manual
Page 37
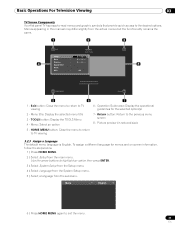
...3 - TOOLS button: Display the TOOLS Menu 4 - Menu: Select an option 7 - HOME MENU button: Close the menu to return to TV viewing 6 - Operation Guide area: Display the operational guidelines for menus and on-screen information, follow the steps below. 1 ) Press HOME MENU....to the previous menu screen 8 - Menus appearing in reduced size) 5 - Return button: Return to exit the menu. 37 En Picture preview (in this manual may differ slightly from the actual menus but the functionality remains the same. 1 2 3 Exit Sound TELEVISION Treble : 0 Bass : 0 Balance : 0...
...3 - TOOLS button: Display the TOOLS Menu 4 - Menu: Select an option 7 - HOME MENU button: Close the menu to return to TV viewing 6 - Operation Guide area: Display the operational guidelines for menus and on-screen information, follow the steps below. 1 ) Press HOME MENU....to the previous menu screen 8 - Menus appearing in reduced size) 5 - Return button: Return to exit the menu. 37 En Picture preview (in this manual may differ slightly from the actual menus but the functionality remains the same. 1 2 3 Exit Sound TELEVISION Treble : 0 Bass : 0 Balance : 0...
Owner's Manual
Page 38
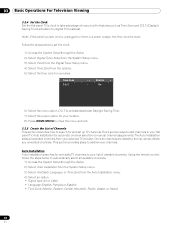
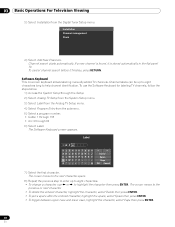
... System Setup menu. 3 ) Select Clock from the Digital Tuner Setup menu. 4 ) Select Time Zone from your selected TV provider. to activate/deactivate Daylight Saving Time. 7 ) Select the proper option for automatic channel selection or manual channel assignments. Once all available channels from the options. 5 ) Select the time zone for your location. 8 ) Press...
... System Setup menu. 3 ) Select Clock from the Digital Tuner Setup menu. 4 ) Select Time Zone from your selected TV provider. to activate/deactivate Daylight Saving Time. 7 ) Select the proper option for automatic channel selection or manual channel assignments. Once all available channels from the options. 5 ) Select the time zone for your location. 8 ) Press...
Owner's Manual
Page 39
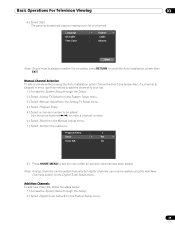
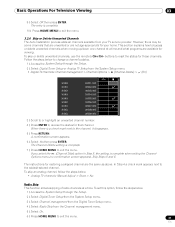
...then EXIT. Program Entry : 1 Store : Yes Tuner NR : On 8 ) Press HOME MENU to enter a channel number. 6 ) Select Store from the Manual Adjust menu. 7 ) Select Yes from the submenu. Add New Channels To add new channels, follow the directions below . 1 ) Access the System Setup through ...the Setup. 2 ) Select Analog TV Setup from the System Setup menu. 3 ) Select Manual Adjust from the System Setup menu. 39 En Language Air/Cable Time Zone : English : Cable : Atlantic Start Note: To ...
...then EXIT. Program Entry : 1 Store : Yes Tuner NR : On 8 ) Press HOME MENU to enter a channel number. 6 ) Select Store from the Manual Adjust menu. 7 ) Select Yes from the submenu. Add New Channels To add new channels, follow the directions below . 1 ) Access the System Setup through ...the Setup. 2 ) Select Analog TV Setup from the System Setup menu. 3 ) Select Manual Adjust from the System Setup menu. 39 En Language Air/Cable Time Zone : English : Cable : Atlantic Start Note: To ...
Owner's Manual
Page 40
... To change a character, use the Software Keyboard for labeling TV channels, follow the steps below. 1 ) Access the System Setup through the Setup. 2 ) Select Analog TV Setup from the System Setup menu. 3 ) Select Label from the Analog TV Setup menu. 4 ) Select Program Entry from the Digital ...135 • Air: 2 through 69 6 ) Select Label. The Software Keyboard screen appears. Software Keyboard This on-screen keyboard allows labeling manually added TV channels. The cursor moves to the next character space. 8 ) Repeat the previous step to enter up to eight characters long to highlight the...
... To change a character, use the Software Keyboard for labeling TV channels, follow the steps below. 1 ) Access the System Setup through the Setup. 2 ) Select Analog TV Setup from the System Setup menu. 3 ) Select Label from the Analog TV Setup menu. 4 ) Select Program Entry from the Digital ...135 • Air: 2 through 69 6 ) Select Label. The Software Keyboard screen appears. Software Keyboard This on-screen keyboard allows labeling manually added TV channels. The cursor moves to the next character space. 8 ) Repeat the previous step to enter up to eight characters long to highlight the...
Owner's Manual
Page 41
... En A confirmation screen appears. 6 ) Select Yes then press ENTER. The instructions for those channels. To set this option, follow the steps below. • Analog TV channels: Manual Adjust > Store > No Radio Skip This function allows skipping of radio channels at a time and what programs are the same as above. Follow the steps...
... En A confirmation screen appears. 6 ) Select Yes then press ENTER. The instructions for those channels. To set this option, follow the steps below. • Analog TV channels: Manual Adjust > Store > No Radio Skip This function allows skipping of radio channels at a time and what programs are the same as above. Follow the steps...

Owner's Manual
Page 44
...buttons (0 through the Setup. 2 ) Select the desired time period. The Sleep Timer provides time periods of your flat panel TV can carry a different program. However, when it is too loud or too soft, refer to "3.4.6 General Sound (Audio) Adjustment...minute until the time has elapsed. decreases the volume at the panel's remote sensor, press and hold VOL+ to TV viewing is down to station. Note: To tune in Standby when the selected time elapses. Pressing VOL+ once also...may simply lack the time to the basic information within this manual and learning all sound, press MUTING.
...buttons (0 through the Setup. 2 ) Select the desired time period. The Sleep Timer provides time periods of your flat panel TV can carry a different program. However, when it is too loud or too soft, refer to "3.4.6 General Sound (Audio) Adjustment...minute until the time has elapsed. decreases the volume at the panel's remote sensor, press and hold VOL+ to TV viewing is down to station. Note: To tune in Standby when the selected time elapses. Pressing VOL+ once also...may simply lack the time to the basic information within this manual and learning all sound, press MUTING.
Owner's Manual
Page 45
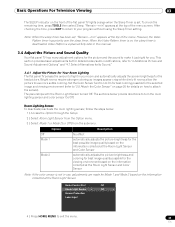
... Off ) from the submenu. When the Video Pattern timer is on, the sleep timer is explained fully later in this manual. 3.4 Adjust the Picture and Sound Quality Your flat panel TV has many adjustment options for the picture and the sound to make it just right for Mode 1 and Mode 2 based... Room Light Sensor and Color Sensor automatically adjusts the picture brightness and coloring for best image quality possible for Your Room Lighting The flat panel TV senses the amount of light in use more subtle coloring. Note: When the sleep timer has been set . Bright rooms require stronger coloring ...
... Off ) from the submenu. When the Video Pattern timer is on, the sleep timer is explained fully later in this manual. 3.4 Adjust the Picture and Sound Quality Your flat panel TV has many adjustment options for the picture and the sound to make it just right for Mode 1 and Mode 2 based... Room Light Sensor and Color Sensor automatically adjusts the picture brightness and coloring for best image quality possible for Your Room Lighting The flat panel TV senses the amount of light in use more subtle coloring. Note: When the sleep timer has been set . Bright rooms require stronger coloring ...
Owner's Manual
Page 46
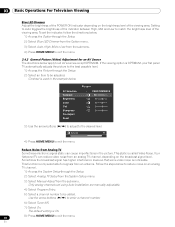
...the indicator, follow the directions below . Contrast is only selectable for an AV Source The directions below to reduce noise on an analog TV channel. 1 ) Access the System Setup through the Setup. 2 ) Select Blue LED Dimmer from the Option menu. 3 ) ... channel number. 6 ) Select Tuner NR. 7 ) Select On. To set using Auto Installation are manually adjustable. 4 ) Select Program Entry. 5 ) Select a channel number to exit the menu. 46 En AV Selection Contrast Brightness Color Tint Sharpness Pro Adjust Reset Picture : PERFORMANCE : 40 : 0 : 0 : 0 : 0 3 ) Use the ...
...the indicator, follow the directions below . Contrast is only selectable for an AV Source The directions below to reduce noise on an analog TV channel. 1 ) Access the System Setup through the Setup. 2 ) Select Blue LED Dimmer from the Option menu. 3 ) ... channel number. 6 ) Select Tuner NR. 7 ) Select On. To set using Auto Installation are manually adjustable. 4 ) Select Program Entry. 5 ) Select a channel number to exit the menu. 46 En AV Selection Contrast Brightness Color Tint Sharpness Pro Adjust Reset Picture : PERFORMANCE : 40 : 0 : 0 : 0 : 0 3 ) Use the ...
Owner's Manual
Page 59
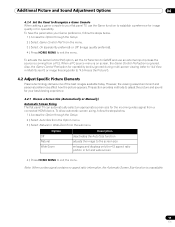
... provides methods to adjust the picture and sound for your best viewing experience. 4.2.1 Choose a Screen Size (Automatically or Manually) Automatic Screen Sizing The flat panel TV can automatically select an appropriate screen size for the incoming video signal from the menu. 3 ) Select On (operability ... the 4:3 aspect ratio portion in Multi-Screen") or image freezing (refer to "4.5 Freeze the Picture"). 4.2 Adjust Specific Picture Elements Plasma technology delivers one of the best images available today. Note: When a video signal contains no aspect ratio information, the Automatic Screen...
... provides methods to adjust the picture and sound for your best viewing experience. 4.2.1 Choose a Screen Size (Automatically or Manually) Automatic Screen Sizing The flat panel TV can automatically select an appropriate screen size for the incoming video signal from the menu. 3 ) Select On (operability ... the 4:3 aspect ratio portion in Multi-Screen") or image freezing (refer to "4.5 Freeze the Picture"). 4.2 Adjust Specific Picture Elements Plasma technology delivers one of the best images available today. Note: When a video signal contains no aspect ratio information, the Automatic Screen...
Owner's Manual
Page 60
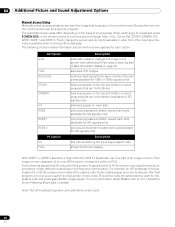
...shows 16:9 screen display With WIDE 1 or WIDE 2 selected, a High Definition (HD) TV broadcast may cause temporary or permanent image retention depending on the remote control to cycle the picture... program. For more information about how the screen appears for each side (available for the plasma cells and guard against after that fill only part of an image or menu. Images that... the top and bottom on sides)." 04 Additional Picture and Sound Adjustment Options Manual Screen Sizing Manually select an appropriate screen size if an image fails to appear in full screen...
...shows 16:9 screen display With WIDE 1 or WIDE 2 selected, a High Definition (HD) TV broadcast may cause temporary or permanent image retention depending on the remote control to cycle the picture... program. For more information about how the screen appears for each side (available for the plasma cells and guard against after that fill only part of an image or menu. Images that... the top and bottom on sides)." 04 Additional Picture and Sound Adjustment Options Manual Screen Sizing Manually select an appropriate screen size if an image fails to appear in full screen...
Owner's Manual
Page 62
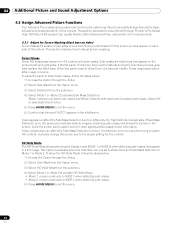
...Additional Picture and Sound Adjustment Options 4.3 Assign Advanced Picture Functions Your flat panel TV provides various advanced functions for video signals without aspect ratio information. This section explores the value offered through Pioneer's Pro Adjust High Definition (HD) support, top quality blacks, better balanced whites, ...section explains how to exit the menu. 62 En If a detection error occurs when trying to watch HD content, manually change the screen size to deactivate this manual. Side masks are hidden. To allow the panel to detect side masks, follow the steps below . 1 )...
...Additional Picture and Sound Adjustment Options 4.3 Assign Advanced Picture Functions Your flat panel TV provides various advanced functions for video signals without aspect ratio information. This section explores the value offered through Pioneer's Pro Adjust High Definition (HD) support, top quality blacks, better balanced whites, ...section explains how to exit the menu. 62 En If a detection error occurs when trying to watch HD content, manually change the screen size to deactivate this manual. Side masks are hidden. To allow the panel to detect side masks, follow the steps below . 1 )...
Owner's Manual
Page 65
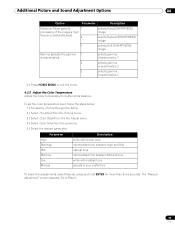
... from the Picture menu. 3 ) Select Color Detail from the Pro Adjust menu. 4 ) Select Color Temp from the submenu. 5 ) Select the desired parameter. Parameter High Mid-High Mid Mid-Low Low Manual Description white with bluish tone intermediate tone between High and Mid natural tone ...intermediate tone between Mid and Low white with reddish tone adjusts to your preference To make fine adjustments, select Manual, press and hold ENTER for better white balance. Additional Picture and Sound Adjustment Options 04 Option Parameter Description Enhancer Mode (selects ...
... from the Picture menu. 3 ) Select Color Detail from the Pro Adjust menu. 4 ) Select Color Temp from the submenu. 5 ) Select the desired parameter. Parameter High Mid-High Mid Mid-Low Low Manual Description white with bluish tone intermediate tone between High and Mid natural tone ...intermediate tone between Mid and Low white with reddish tone adjusts to your preference To make fine adjustments, select Manual, press and hold ENTER for better white balance. Additional Picture and Sound Adjustment Options 04 Option Parameter Description Enhancer Mode (selects ...


