Owner's Manual
Page 3
... Panel TV ...8 1.2.2 Operating the Remote Control ...10 1.2.3 Buttons on your purchase of seeing and hearing like never before. A place where the senses evolve, colors are proud to incorporate this owner's guide and manual to enter a new world of a Pioneer KURO flat...3.4.6 General Sound (Audio) Adjustment...49 3.5 Block Programs, Channels, or Content ...50 3.5.1 Assign a Parental Control (Block) Password...50 3 En TABLE OF CONTENTS Congratulations on the Remote Control ...12 2 Install Your Flat Panel TV ...14 2.1 Choose a Location and the Mounting Method...14 2.1.1 Check the Location ...
... Panel TV ...8 1.2.2 Operating the Remote Control ...10 1.2.3 Buttons on your purchase of seeing and hearing like never before. A place where the senses evolve, colors are proud to incorporate this owner's guide and manual to enter a new world of a Pioneer KURO flat...3.4.6 General Sound (Audio) Adjustment...49 3.5 Block Programs, Channels, or Content ...50 3.5.1 Assign a Parental Control (Block) Password...50 3 En TABLE OF CONTENTS Congratulations on the Remote Control ...12 2 Install Your Flat Panel TV ...14 2.1 Choose a Location and the Mounting Method...14 2.1.1 Check the Location ...
Owner's Manual
Page 4
...Console ...59 4.2 Adjust Specific Picture Elements ...59 4.2.1 Choose a Screen Size (Automatically or Manually 59 4.2.2 Correct the Picture for an AV or PC Source ...61 4.3 Assign Advanced ...(AVC)...75 4.8 Manage the Power ...76 5 Use Other Equipment With Your Flat Panel TV 78 5.1 Program the Remote Control to Operate Other Equipment 78 5.1.1 Use the Learning Feature... Search for a Manufacturer Code 79 5.1.4 Clear Added Manufacturer Codes from the Remote Control 80 5.1.5 Control a Pioneer Receiver ...80 5.1.6 Control a Cable (CBL) or Satellite (SAT) System 81 5.1.7 Control a Video Cassette...
...Console ...59 4.2 Adjust Specific Picture Elements ...59 4.2.1 Choose a Screen Size (Automatically or Manually 59 4.2.2 Correct the Picture for an AV or PC Source ...61 4.3 Assign Advanced ...(AVC)...75 4.8 Manage the Power ...76 5 Use Other Equipment With Your Flat Panel TV 78 5.1 Program the Remote Control to Operate Other Equipment 78 5.1.1 Use the Learning Feature... Search for a Manufacturer Code 79 5.1.4 Clear Added Manufacturer Codes from the Remote Control 80 5.1.5 Control a Pioneer Receiver ...80 5.1.6 Control a Cable (CBL) or Satellite (SAT) System 81 5.1.7 Control a Video Cassette...
Owner's Manual
Page 5
...TV ...104 5.9 Use the TOOLS Menu ...106 5.10 HMG Setup ...118 5.11 Other useful functions...119 5.12 Add Other Audio Equipment...121 5.13 Add a Computer (PC) ...122 5.13.1 Automatic Image Position and Clock Adjustments 122 5.13.2 Manual...Lag 132 7.7 Safety Precautions...134 7.8 Legal Notices...134 7.8.1 Safety...134 7.8.2 Radio Interference...135 8 Appendix ...136 8.1 Ratings Charts (for Various Audience Classifications 136 8.1.1 TV Ratings (age-based) ...136 8.1.2 U.S. F)...139 8.2.4 VCR (Brands G - Z)...144 8.2.12 LD...144 8.3 Specifications...145 8.4 Glossary ...162 8.5 Index...164 8.6...
...TV ...104 5.9 Use the TOOLS Menu ...106 5.10 HMG Setup ...118 5.11 Other useful functions...119 5.12 Add Other Audio Equipment...121 5.13 Add a Computer (PC) ...122 5.13.1 Automatic Image Position and Clock Adjustments 122 5.13.2 Manual...Lag 132 7.7 Safety Precautions...134 7.8 Legal Notices...134 7.8.1 Safety...134 7.8.2 Radio Interference...135 8 Appendix ...136 8.1 Ratings Charts (for Various Audience Classifications 136 8.1.1 TV Ratings (age-based) ...136 8.1.2 U.S. F)...139 8.2.4 VCR (Brands G - Z)...144 8.2.12 LD...144 8.3 Specifications...145 8.4 Glossary ...162 8.5 Index...164 8.6...
Owner's Manual
Page 6
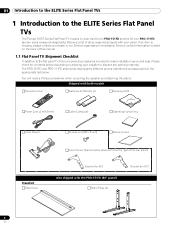
...the rear panel) Bracket (for 60") Also shipped with the PRO-151FD (60" panel) Stand Pipes (2) Bracket (for 50") 6 En Below is a list of this manual. 1.1 Flat Panel TV Shipment Checklist In addition to the flat panel TV, there are several accessories included to discard any packing material....Card Stand kit Base Cover Color Sensor Bracket (when attached to the ELITE Series Flat Panel TVs The Pioneer ELITE Series Flat Panel TV models include the 60-inch PRO-151FD and the 50-inch PRO-111FD (screen sizes measured diagonally). If an item is listed on the back of all accessories ...
...the rear panel) Bracket (for 60") Also shipped with the PRO-151FD (60" panel) Stand Pipes (2) Bracket (for 50") 6 En Below is a list of this manual. 1.1 Flat Panel TV Shipment Checklist In addition to the flat panel TV, there are several accessories included to discard any packing material....Card Stand kit Base Cover Color Sensor Bracket (when attached to the ELITE Series Flat Panel TVs The Pioneer ELITE Series Flat Panel TV models include the 60-inch PRO-151FD and the 50-inch PRO-111FD (screen sizes measured diagonally). If an item is listed on the back of all accessories ...
Owner's Manual
Page 29
... for the clearest analog picture. For details, refer to the operating manual that came with an F-type connector, plug it into the panel's antenna terminal on the side of the flat panel TV instead of making video connections. The ANT terminal accepts both analog and... tool for connection assistance. 2.6.1 Add Analog (conventional) and Digital TV Channels Whether a TV station broadcasts in to accept the signal. This section provides cabling information for your other Pioneer equipment when combined with your flat panel TV shows the programs as long as the panel is not listed,...
... for the clearest analog picture. For details, refer to the operating manual that came with an F-type connector, plug it into the panel's antenna terminal on the side of the flat panel TV instead of making video connections. The ANT terminal accepts both analog and... tool for connection assistance. 2.6.1 Add Analog (conventional) and Digital TV Channels Whether a TV station broadcasts in to accept the signal. This section provides cabling information for your other Pioneer equipment when combined with your flat panel TV shows the programs as long as the panel is not listed,...
Owner's Manual
Page 30
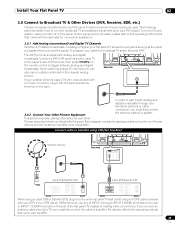
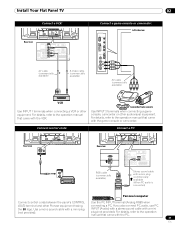
... receiver. 30 En For details, refer to the audio input terminal on the side of making video connections. 02 Install Your Flat Panel TV Connect HDMI equipment (INPUT 4 through INPUT 6 are HDMI terminals. HDMI compliant cable (HDMI cable having the HDMI mark) Audio cable (commercially...to connect an AV receiver to "5.2 Use HDMI Inputs." For details, refer to DIGITAL OUT terminal (optical). For details, refer to the operation manual that came with the surround function to "5.2 Use HDMI Inputs." For details, refer to a subwoofer. If your AV receiver does not have ...
... receiver. 30 En For details, refer to the audio input terminal on the side of making video connections. 02 Install Your Flat Panel TV Connect HDMI equipment (INPUT 4 through INPUT 6 are HDMI terminals. HDMI compliant cable (HDMI cable having the HDMI mark) Audio cable (commercially...to connect an AV receiver to "5.2 Use HDMI Inputs." For details, refer to DIGITAL OUT terminal (optical). For details, refer to the operation manual that came with the surround function to "5.2 Use HDMI Inputs." For details, refer to a subwoofer. If your AV receiver does not have ...
Owner's Manual
Page 31
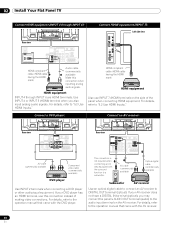
... and other equipment. Install Your Flat Panel TV Connect a VCR: T T W W Rear view 02 Connect a game console or camcorder: Left side view AV cable (commercially available) S-Video cable (commercially available) AV cable (commercially available) VCR Use INPUT 1 terminals when connecting a VCR or other Pioneer equipment having connecting a PC. Use a mono...logo. Camcorder/Game console Use INPUT 3 terminals when connecting a game console, camcorder or other audiovisual equipment. For details, refer to the operation manual that came with the game console or camcorder.
... and other equipment. Install Your Flat Panel TV Connect a VCR: T T W W Rear view 02 Connect a game console or camcorder: Left side view AV cable (commercially available) S-Video cable (commercially available) AV cable (commercially available) VCR Use INPUT 1 terminals when connecting a VCR or other Pioneer equipment having connecting a PC. Use a mono...logo. Camcorder/Game console Use INPUT 3 terminals when connecting a game console, camcorder or other audiovisual equipment. For details, refer to the operation manual that came with the game console or camcorder.
Owner's Manual
Page 36
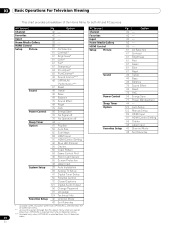
... 86 - 57 AV Selection 61 Contrast* 61 Brightness* 61 Color* 61 Tint* 61 Sharpness* 64 Pro Adjust* 63 PureCinema** 49 Sound Control*** 48 OPTIMUM Performance*** 61 Reset 49 Treble 49 Bass 49 Balance...HDMI Control Setting PC Source Pg Option Channel 42 - Option 122 Auto Setup 122 Manual Setup 84 HDMI Input 91 HDMI Control Setting 56 Orbiter 43 Label Input Favorites ...43 Label Input 38 Auto Installation 39 Analog TV Setup 41 Digital Tuner Setup 50 Parental Control 72 Closed Captions 121 Digital Audio Output 50 Change Password 37 Language 124 Technical Info ...
... 86 - 57 AV Selection 61 Contrast* 61 Brightness* 61 Color* 61 Tint* 61 Sharpness* 64 Pro Adjust* 63 PureCinema** 49 Sound Control*** 48 OPTIMUM Performance*** 61 Reset 49 Treble 49 Bass 49 Balance...HDMI Control Setting PC Source Pg Option Channel 42 - Option 122 Auto Setup 122 Manual Setup 84 HDMI Input 91 HDMI Control Setting 56 Orbiter 43 Label Input Favorites ...43 Label Input 38 Auto Installation 39 Analog TV Setup 41 Digital Tuner Setup 50 Parental Control 72 Closed Captions 121 Digital Audio Output 50 Change Password 37 Language 124 Technical Info ...
Owner's Manual
Page 37
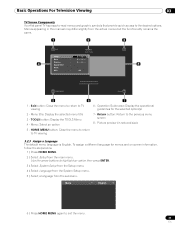
... 2 ) Select Setup from the submenu. TOOLS button: Display the TOOLS Menu 4 - Menu: Select an option 7 - Return button: Return to TV viewing 3.2.3 Assign a Language The default menu language is English. To assign a different language for the selected option(s) 2 - Menu title: Display the ...Exit button: Close the menu to return to exit the menu. 37 En Use the arrow buttons to the desired options. Picture preview (in this manual may differ slightly from the actual menus but the functionality remains the same. 1 2 3 Exit Sound TELEVISION Treble : 0 Bass : 0 Balance...
... 2 ) Select Setup from the submenu. TOOLS button: Display the TOOLS Menu 4 - Menu: Select an option 7 - Return button: Return to TV viewing 3.2.3 Assign a Language The default menu language is English. To assign a different language for the selected option(s) 2 - Menu title: Display the ...Exit button: Close the menu to return to exit the menu. 37 En Use the arrow buttons to the desired options. Picture preview (in this manual may differ slightly from the actual menus but the functionality remains the same. 1 2 3 Exit Sound TELEVISION Treble : 0 Bass : 0 Balance...
Owner's Manual
Page 38
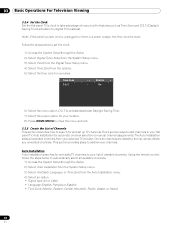
...Once all available channels from the options. 5 ) Select the time zone for your area. Auto Installation Auto Installation searches for and adds TV channels to the list, simply delete any unwanted channels. Time Zone D.S.T. : Atlantic : On 6 ) Select the menu option D.S.T. Note:...D.S.T. (Daylight Saving Time) activation for digital TV broadcast. 03 Basic Operations For Television Viewing 3.2.4 Set the Clock Set the flat panel TV's clock to your flat panel TV, Auto Installation for automatic channel selection or manual channel assignments. Follow the steps below to ...
...Once all available channels from the options. 5 ) Select the time zone for your area. Auto Installation Auto Installation searches for and adds TV channels to the list, simply delete any unwanted channels. Time Zone D.S.T. : Atlantic : On 6 ) Select the menu option D.S.T. Note:...D.S.T. (Daylight Saving Time) activation for digital TV broadcast. 03 Basic Operations For Television Viewing 3.2.4 Set the Clock Set the flat panel TV's clock to your flat panel TV, Auto Installation for automatic channel selection or manual channel assignments. Follow the steps below to ...
Owner's Manual
Page 39
Use the arrow buttons (/) to enter a channel number. 6 ) Select Store from the Manual Adjust menu. 7 ) Select Yes from the Analog TV Setup menu. 4 ) Select Program Entry. 5 ) Select a channel number to recall the Auto Installation screen then EXIT. Also, if a ...option, follow the steps below. 1 ) Access the System Setup through the Setup. 2 ) Select Analog TV Setup from the System Setup menu. 3 ) Select Manual Adjust from the submenu. Manual Channel Selection To add channels without using the Add New Channels button on the Digital Tuner Setup menu. Note...
Use the arrow buttons (/) to enter a channel number. 6 ) Select Store from the Manual Adjust menu. 7 ) Select Yes from the Analog TV Setup menu. 4 ) Select Program Entry. 5 ) Select a channel number to recall the Auto Installation screen then EXIT. Also, if a ...option, follow the steps below. 1 ) Access the System Setup through the Setup. 2 ) Select Analog TV Setup from the System Setup menu. 3 ) Select Manual Adjust from the submenu. Manual Channel Selection To add channels without using the Add New Channels button on the Digital Tuner Setup menu. Note...
Owner's Manual
Page 40
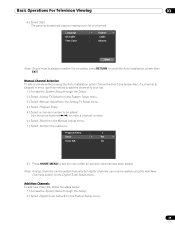
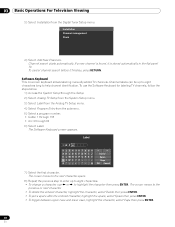
... cancel channel search before it is stored automatically in the flat panel TV. Channel labels can be up to eight characters. • To change a character, use the Software Keyboard for labeling TV channels, follow the steps below. 1 ) Access the System Setup through... 69 6 ) Select Label. To use or to help channel identification. Software Keyboard This on-screen keyboard allows labeling manually added TV channels. Channel search starts automatically. The Software Keyboard screen appears. Label I NPU 1234567890 ABCDE FGH I J K LMNOPQRS T U VWX Y Z...
... cancel channel search before it is stored automatically in the flat panel TV. Channel labels can be up to eight characters. • To change a character, use the Software Keyboard for labeling TV channels, follow the steps below. 1 ) Access the System Setup through... 69 6 ) Select Label. To use or to help channel identification. Software Keyboard This on-screen keyboard allows labeling manually added TV channels. Channel search starts automatically. The Software Keyboard screen appears. Label I NPU 1234567890 ABCDE FGH I J K LMNOPQRS T U VWX Y Z...
Owner's Manual
Page 41
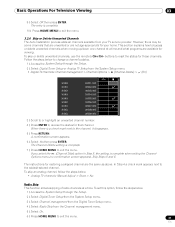
...3 ) Select Channel management from the Digital Tuner Setup menu. 4 ) Select Radio Skip from your home. Follow the steps below . • Analog TV channels: Manual Adjust > Store > No Radio Skip This function allows skipping of radio channels at a time and what programs are not age-appropriate for viewing. If ...remote's CH+/CH- To set this option, follow the steps below to reverse the status for that are unwanted or are available for your TV service provider. When there is complete. 10 ) Press HOME MENU to exit the menu. 3.2.6 Skip or Delete Unwanted Channels The Auto ...
...3 ) Select Channel management from the Digital Tuner Setup menu. 4 ) Select Radio Skip from your home. Follow the steps below . • Analog TV channels: Manual Adjust > Store > No Radio Skip This function allows skipping of radio channels at a time and what programs are not age-appropriate for viewing. If ...remote's CH+/CH- To set this option, follow the steps below to reverse the status for that are unwanted or are available for your TV service provider. When there is complete. 10 ) Press HOME MENU to exit the menu. 3.2.6 Skip or Delete Unwanted Channels The Auto ...

Owner's Manual
Page 44
.... Holding down to station. Select between 30 minutes and 2 hours (120 minutes). 3 ) Press HOME MENU to the basic information within this manual and learning all sound, press MUTING. To set when first installing the panel. However, when it is digital and has three active sub-channels,...muting mode. To return to adjust by accident. A recent addition to five minutes, a reminder appears on screen. When the Timer is down to TV viewing is too loud or too soft, refer to "3.4.6 General Sound (Audio) Adjustment." 3.3.3 Turn On the Sleep Timer To save energy and ...
.... Holding down to station. Select between 30 minutes and 2 hours (120 minutes). 3 ) Press HOME MENU to the basic information within this manual and learning all sound, press MUTING. To set when first installing the panel. However, when it is digital and has three active sub-channels,...muting mode. To return to adjust by accident. A recent addition to five minutes, a reminder appears on screen. When the Timer is down to TV viewing is too loud or too soft, refer to "3.4.6 General Sound (Audio) Adjustment." 3.3.3 Turn On the Sleep Timer To save energy and ...
Owner's Manual
Page 45
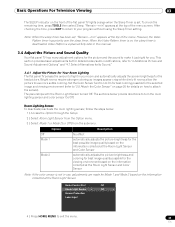
...TOOLS then select Sleep. Note: When the sleep timer has been set . Video Pattern is explained fully later in this manual. 3.4 Adjust the Picture and Sound Quality Your flat panel TV has many adjustment options for the picture and the sound to make it just right for details on how to attach...On for best coloring possible for the selected image and viewing environment (refer to Sound." 3.4.1 Adjust the Picture for Your Room Lighting The flat panel TV senses the amount of light in use more subtle coloring. The panel ships with the Room Light Sensor turned Off. Game Control Pref : Off ...
...TOOLS then select Sleep. Note: When the sleep timer has been set . Video Pattern is explained fully later in this manual. 3.4 Adjust the Picture and Sound Quality Your flat panel TV has many adjustment options for the picture and the sound to make it just right for details on how to attach...On for best coloring possible for the selected image and viewing environment (refer to Sound." 3.4.1 Adjust the Picture for Your Room Lighting The flat panel TV senses the amount of light in use more subtle coloring. The panel ships with the Room Light Sensor turned Off. Game Control Pref : Off ...
Owner's Manual
Page 46
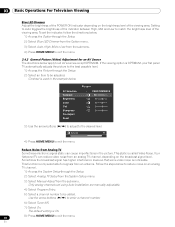
.... 2 ) Select Blue LED Dimmer from the Option menu. 3 ) Select Auto, High, Mid or Low from an antenna. AV Selection Contrast Brightness Color Tint Sharpness Pro Adjust Reset Picture : PERFORMANCE : 40 : 0 : 0 : 0 : 0 3 ) Use the arrow buttons (/) to adjust to exit the menu....1 ) Access the Picture through the Setup. 2 ) Select Analog TV Setup from the System Setup menu. 3 ) Select Manual Adjust from Analog TV Sometimes electronic signal static can reduce video noise from an analog TV channel, depending on the brightness level of the viewing area. Use the...
.... 2 ) Select Blue LED Dimmer from the Option menu. 3 ) Select Auto, High, Mid or Low from an antenna. AV Selection Contrast Brightness Color Tint Sharpness Pro Adjust Reset Picture : PERFORMANCE : 40 : 0 : 0 : 0 : 0 3 ) Use the arrow buttons (/) to adjust to exit the menu....1 ) Access the Picture through the Setup. 2 ) Select Analog TV Setup from the System Setup menu. 3 ) Select Manual Adjust from Analog TV Sometimes electronic signal static can reduce video noise from an analog TV channel, depending on the brightness level of the viewing area. Use the...
Owner's Manual
Page 59
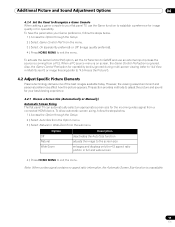
... preferred) or Off (image quality preferred). 4 ) Press HOME MENU to "4.5 Freeze the Picture"). 4.2 Adjust Specific Picture Elements Plasma technology delivers one of the best images available today. Option Off Natural Wide-Zoom Description deactivates the Auto Size function adjusts the image...Game Console When adding a game console to your best viewing experience. 4.2.1 Choose a Screen Size (Automatically or Manually) Automatic Screen Sizing The flat panel TV can automatically select an appropriate screen size for the incoming video signal from a connected HDMI device. This section...
... preferred) or Off (image quality preferred). 4 ) Press HOME MENU to "4.5 Freeze the Picture"). 4.2 Adjust Specific Picture Elements Plasma technology delivers one of the best images available today. Option Off Natural Wide-Zoom Description deactivates the Auto Size function adjusts the image...Game Console When adding a game console to your best viewing experience. 4.2.1 Choose a Screen Size (Automatically or Manually) Automatic Screen Sizing The flat panel TV can automatically select an appropriate screen size for the incoming video signal from a connected HDMI device. This section...
Owner's Manual
Page 60
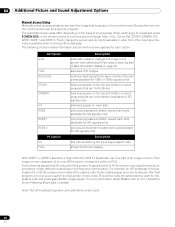
... after -image issues. This action helps the panel balance wear for a specific program. While watching a TV broadcast, press SCREEN SIZE on the frequency and duration. AV Option Auto FULL Dot by Dot, ZOOM, ... control to a full screen motion video. Images that fill only part of the plasma cells. For more information about how the screen appears for each side (available for...detecting HD pictures containing side masks. 04 Additional Picture and Sound Adjustment Options Manual Screen Sizing Manually select an appropriate screen size if an image fails to the same number ...
... after -image issues. This action helps the panel balance wear for a specific program. While watching a TV broadcast, press SCREEN SIZE on the frequency and duration. AV Option Auto FULL Dot by Dot, ZOOM, ... control to a full screen motion video. Images that fill only part of the plasma cells. For more information about how the screen appears for each side (available for...detecting HD pictures containing side masks. 04 Additional Picture and Sound Adjustment Options Manual Screen Sizing Manually select an appropriate screen size if an image fails to the same number ...
Owner's Manual
Page 62
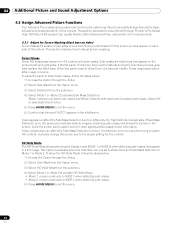
... Definition broadcasts, if Side Mask Detection is set to adjust screen masking. If a detection error occurs when trying to watch HD content, manually change the screen size to exit the menu. 6 ) Confirm that go beyond the basic adjustments explained earlier in this function. 5 )...4.3 Assign Advanced Picture Functions Your flat panel TV provides various advanced functions for Screen Masking (black bars on sides) Screen Masks fill areas on both black and illustrated side masks. This section explores the value offered through Pioneer's Pro Adjust High Definition (HD) support, top ...
... Definition broadcasts, if Side Mask Detection is set to adjust screen masking. If a detection error occurs when trying to watch HD content, manually change the screen size to exit the menu. 6 ) Confirm that go beyond the basic adjustments explained earlier in this function. 5 )...4.3 Assign Advanced Picture Functions Your flat panel TV provides various advanced functions for Screen Masking (black bars on sides) Screen Masks fill areas on both black and illustrated side masks. This section explores the value offered through Pioneer's Pro Adjust High Definition (HD) support, top ...
Owner's Manual
Page 65
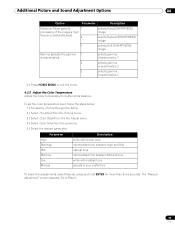
...and Mid natural tone intermediate tone between Mid and Low white with reddish tone adjusts to your preference To make fine adjustments, select Manual, press and hold ENTER for better white balance. Additional Picture and Sound Adjustment Options 04 Option Parameter Description Enhancer Mode (selects 1... seconds. To set the color temperature level, follow the steps below. 1 ) Access the Picture through the Setup. 2 ) Select Pro Adjust from the Picture menu. 3 ) Select Color Detail from the Pro Adjust menu. 4 ) Select Color Temp from the submenu. 5 ) Select the desired parameter. The...
...and Mid natural tone intermediate tone between Mid and Low white with reddish tone adjusts to your preference To make fine adjustments, select Manual, press and hold ENTER for better white balance. Additional Picture and Sound Adjustment Options 04 Option Parameter Description Enhancer Mode (selects 1... seconds. To set the color temperature level, follow the steps below. 1 ) Access the Picture through the Setup. 2 ) Select Pro Adjust from the Picture menu. 3 ) Select Color Detail from the Pro Adjust menu. 4 ) Select Color Temp from the submenu. 5 ) Select the desired parameter. The...


