Owner's Manual
Page 3
... TV ...14 2.1 Choose a Location and the Mounting Method...14 2.1.1 Check the Location for an AV Source 46 3.4.3 Compare Images When Adjusting the Picture...47 3.4.4 Display a Graphical Picture/Sound Adjustment Screen 48 3.4.5 Sound Control...49 3.4.6 General Sound (Audio) Adjustment...49 3.5 Block Programs, Channels, or Content ...50 3.5.1 Assign a Parental Control (Block) Password...50 3 En An experience that set...
... TV ...14 2.1 Choose a Location and the Mounting Method...14 2.1.1 Check the Location for an AV Source 46 3.4.3 Compare Images When Adjusting the Picture...47 3.4.4 Display a Graphical Picture/Sound Adjustment Screen 48 3.4.5 Sound Control...49 3.4.6 General Sound (Audio) Adjustment...49 3.5 Block Programs, Channels, or Content ...50 3.5.1 Assign a Parental Control (Block) Password...50 3 En An experience that set...
Owner's Manual
Page 4
... a PC Source...58 4.1.4 Set the Panel to Recognize a Game Console ...59 4.2 Adjust Specific Picture Elements ...59 4.2.1 Choose a Screen Size (Automatically or Manually 59 4.2.2 Correct the Picture for an AV or PC Source ...61 4.3 Assign Advanced Picture Functions ...62 4.3.1 Adjust for...TV 78 5.1 Program the Remote Control to Operate Other Equipment 78 5.1.1 Use the Learning Feature...78 5.1.2 Assign a Manufacturing Code to the Remote Control 79 5.1.3 Issue a Library Search for a Manufacturer Code 79 5.1.4 Clear Added Manufacturer Codes from the Remote Control 80 5.1.5 Control a Pioneer...
... a PC Source...58 4.1.4 Set the Panel to Recognize a Game Console ...59 4.2 Adjust Specific Picture Elements ...59 4.2.1 Choose a Screen Size (Automatically or Manually 59 4.2.2 Correct the Picture for an AV or PC Source ...61 4.3 Assign Advanced Picture Functions ...62 4.3.1 Adjust for...TV 78 5.1 Program the Remote Control to Operate Other Equipment 78 5.1.1 Use the Learning Feature...78 5.1.2 Assign a Manufacturing Code to the Remote Control 79 5.1.3 Issue a Library Search for a Manufacturer Code 79 5.1.4 Clear Added Manufacturer Codes from the Remote Control 80 5.1.5 Control a Pioneer...

Owner's Manual
Page 12
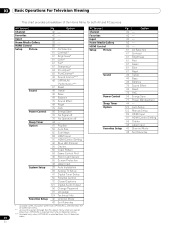
... TV" explains how to use the remote to control other equipment such as an input source AV SELECTION: 4 Select audio/video settings AV Source: OPTIMUM, PERFORMANCE, MOVIE, PURE, GAME, SPORT, Standard PC Source: STANDARD, USER SPLIT: 5 Cycle view thru single-screen, 2-screen, picture-in-picture ...FREEZE: 6 Freeze a frame from a moving image then press again to cancel the freeze function Number buttons 0 thru 9: 7 Select a channel •(dot): 8 Enter a dot for selecting a sub-channel VOL +/-: 9 Set the volume EXIT: 10 Exit the menu...
... TV" explains how to use the remote to control other equipment such as an input source AV SELECTION: 4 Select audio/video settings AV Source: OPTIMUM, PERFORMANCE, MOVIE, PURE, GAME, SPORT, Standard PC Source: STANDARD, USER SPLIT: 5 Cycle view thru single-screen, 2-screen, picture-in-picture ...FREEZE: 6 Freeze a frame from a moving image then press again to cancel the freeze function Number buttons 0 thru 9: 7 Select a channel •(dot): 8 Enter a dot for selecting a sub-channel VOL +/-: 9 Set the volume EXIT: 10 Exit the menu...
Owner's Manual
Page 29
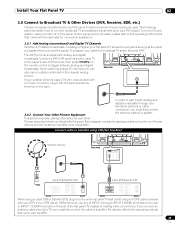
...If your STB has an HDMI terminal, use an outdoor antenna for your other Pioneer equipment when combined with an F-type connector, plug it into the panel's antenna...the clearest analog picture. Connect a VHF/UHF antenna and/or cable TV to the operating instructions that came with your STB. Install Your Flat Panel TV 02 2.6 Connect to Broadcast TV & Other Devices... (DVR, Receiver, BDR, etc.) The type of equipment attached to watch both analog and digital T T W W broadcasts. Connect cable or Satellite using STB (Set Top...
...If your STB has an HDMI terminal, use an outdoor antenna for your other Pioneer equipment when combined with an F-type connector, plug it into the panel's antenna...the clearest analog picture. Connect a VHF/UHF antenna and/or cable TV to the operating instructions that came with your STB. Install Your Flat Panel TV 02 2.6 Connect to Broadcast TV & Other Devices... (DVR, Receiver, BDR, etc.) The type of equipment attached to watch both analog and digital T T W W broadcasts. Connect cable or Satellite using STB (Set Top...
Owner's Manual
Page 36
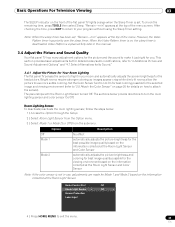
...44 - Option 122 Auto Setup 122 Manual Setup 84 HDMI Input 91 HDMI Control Setting 56 Orbiter 43 Label Input Favorites Setup 42 Channel Mode 43 Sort Favorites 46 Blue... 43 Label Input 38 Auto Installation 39 Analog TV Setup 41 Digital Tuner Setup 50 Parental Control 72 Closed Captions 121 Digital Audio Output 50 Change Password 37 Language 124 Technical Info Favorites...Control Setup Picture Sound Power Control Sleep Timer Option Pg Option 42 - 42 - 42 - 93 - 86 - 57 AV Selection 61 Contrast* 61 Brightness* 61 Color* 61 Tint* 61 Sharpness* 64 Pro Adjust* 63...
...44 - Option 122 Auto Setup 122 Manual Setup 84 HDMI Input 91 HDMI Control Setting 56 Orbiter 43 Label Input Favorites Setup 42 Channel Mode 43 Sort Favorites 46 Blue... 43 Label Input 38 Auto Installation 39 Analog TV Setup 41 Digital Tuner Setup 50 Parental Control 72 Closed Captions 121 Digital Audio Output 50 Change Password 37 Language 124 Technical Info Favorites...Control Setup Picture Sound Power Control Sleep Timer Option Pg Option 42 - 42 - 42 - 93 - 86 - 57 AV Selection 61 Contrast* 61 Brightness* 61 Color* 61 Tint* 61 Sharpness* 64 Pro Adjust* 63...
Owner's Manual
Page 45
...flat panel TV has many adjustment options for the picture and the sound to Sound." 3.4.1 Adjust the Picture for Your Room Lighting The flat panel TV senses the amount of the menu screen. The panel ships with the Room Light Sensor turned Off. Note: When the sleep timer has been set . ...This section provides basic adjustments but for detailed video/audio modifications, refer to "4 Additional Picture and Sound Adjustment Options" ...
...flat panel TV has many adjustment options for the picture and the sound to Sound." 3.4.1 Adjust the Picture for Your Room Lighting The flat panel TV senses the amount of the menu screen. The panel ships with the Room Light Sensor turned Off. Note: When the sleep timer has been set . ...This section provides basic adjustments but for detailed video/audio modifications, refer to "4 Additional Picture and Sound Adjustment Options" ...
Owner's Manual
Page 46
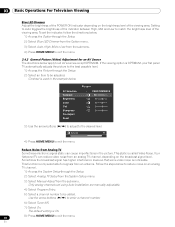
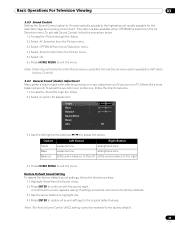
... Contrast Brightness Color Tint Sharpness Pro Adjust Reset Picture : PERFORMANCE : 40 : 0 : 0 : 0 : 0 3 ) Use the arrow buttons (/) to adjust to be added. Reduce Noise from the submenu. This static is OPTIMUM, your flat panel TV automatically adjusts the picture to all AV sources except ... is On. 8 ) Press HOME MENU to exit the menu. 3.4.2 General Picture (Video) Adjustment for signals from an analog TV channel, depending on the broadcast signal level. The default setting is only selectable for an AV Source The directions below to reduce noise on ...
... Contrast Brightness Color Tint Sharpness Pro Adjust Reset Picture : PERFORMANCE : 40 : 0 : 0 : 0 : 0 3 ) Use the arrow buttons (/) to adjust to be added. Reduce Noise from the submenu. This static is OPTIMUM, your flat panel TV automatically adjusts the picture to all AV sources except ... is On. 8 ) Press HOME MENU to exit the menu. 3.4.2 General Picture (Video) Adjustment for signals from an analog TV channel, depending on the broadcast signal level. The default setting is only selectable for an AV Source The directions below to reduce noise on ...

Owner's Manual
Page 47
... each option changes, refer back to the previously set to the other option. A confirmation screen appears asking if settings should be returned to the factory defaults. 3 ) Use the arrow buttons to adjust the flat panel TV's picture. For example, if two options under AV Selection..., PERFORMANCE and MOVIE need adjustment, change after an adjustment. As each parameter or option one option then save the preferred setting before moving on the Before causes a warning message...
... each option changes, refer back to the previously set to the other option. A confirmation screen appears asking if settings should be returned to the factory defaults. 3 ) Use the arrow buttons to adjust the flat panel TV's picture. For example, if two options under AV Selection..., PERFORMANCE and MOVIE need adjustment, change after an adjustment. As each parameter or option one option then save the preferred setting before moving on the Before causes a warning message...
Owner's Manual
Page 48
...from the AV Selection menu causes the Picture menu to display different AV source submenus. To cancel the OPTIMUM Performance option, press EXIT. Note: if no selections are made within 60 seconds, the menu closes automatically and the current settings are saved to memory. 03 Basic... Operations For Television Viewing Follow the steps below . 1 ) Access the Picture through 4 to adjust other picture options. 6 ) Press HOME MENU to exit the menu.
...from the AV Selection menu causes the Picture menu to display different AV source submenus. To cancel the OPTIMUM Performance option, press EXIT. Note: if no selections are made within 60 seconds, the menu closes automatically and the current settings are saved to memory. 03 Basic... Operations For Television Viewing Follow the steps below . 1 ) Access the Picture through 4 to adjust other picture options. 6 ) Press HOME MENU to exit the menu.
Owner's Manual
Page 49
...with the sound reset. To adjust the sound to exit the menu. Restore Default Sound Setting To restore the factory default sound settings, follow the procedure below . 1 ) Highlight Reset from the Picture menu is selected, the only Sound menu option available is selected in the AV Selection menu...directions below. 1 ) Access the Sound through the Setup. 2 ) Select AV Selection from the Picture menu. 3 ) Select OPTIMUM from the AV Selection menu. 4 ) Select Sound Control from an AV source or on TV. Note: When Sound Control from the Sound menu. 2 ) Press ENTER to adjust the option....
...with the sound reset. To adjust the sound to exit the menu. Restore Default Sound Setting To restore the factory default sound settings, follow the procedure below . 1 ) Highlight Reset from the Picture menu is selected, the only Sound menu option available is selected in the AV Selection menu...directions below. 1 ) Access the Sound through the Setup. 2 ) Select AV Selection from the Picture menu. 3 ) Select OPTIMUM from the AV Selection menu. 4 ) Select Sound Control from an AV source or on TV. Note: When Sound Control from the Sound menu. 2 ) Press ENTER to adjust the option....

Owner's Manual
Page 56
...image may be hidden at a minimum. Note: The farthest edges of one hour after -image ghosts or burnin. While the Video Pattern screen is set to exit the menu. A confirmation screen appears. 3 ) Select Start from the Energy Save submenu. Option Off Mode 1 Mode 2 Description No effect... Television Viewing 3.6.3 Turn On the Image Orbiter A built-in feature to Standby one hour. The recommended setting, Energy Save Mode 1, extends the life of the picture imperceptibly while the image is on , only the remote's TV (a) button and the panel's STANDBY/ON button is the Orbiter function.
...image may be hidden at a minimum. Note: The farthest edges of one hour after -image ghosts or burnin. While the Video Pattern screen is set to exit the menu. A confirmation screen appears. 3 ) Select Start from the Energy Save submenu. Option Off Mode 1 Mode 2 Description No effect... Television Viewing 3.6.3 Turn On the Image Orbiter A built-in feature to Standby one hour. The recommended setting, Energy Save Mode 1, extends the life of the picture imperceptibly while the image is on , only the remote's TV (a) button and the panel's STANDBY/ON button is the Orbiter function.
Owner's Manual
Page 57
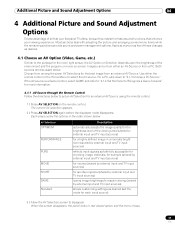
...(shared by external input and TV input sources) for a highly defined image in last viewed option and the menu closes. 57 En Additional Picture and Sound Adjustment Options 04 4 Additional Picture and Sound Adjustment Options To take advantage of these changes as desired (set an AV Selection for an external... AV Source using the remote control. 1 ) Press AV SELECTION on screen. Apply as many or as few of all that your flat panel TV offers, browse ...
...(shared by external input and TV input sources) for a highly defined image in last viewed option and the menu closes. 57 En Additional Picture and Sound Adjustment Options 04 4 Additional Picture and Sound Adjustment Options To take advantage of these changes as desired (set an AV Selection for an external... AV Source using the remote control. 1 ) Press AV SELECTION on screen. Apply as many or as few of all that your flat panel TV offers, browse ...
Owner's Manual
Page 58
Your flat panel TV employs advanced sound reproduction technologies, such as the Color Sensor (when in a normally bright room • USER: allows customizing settings as desired for each input source 58 En To choose an AV source through the Home Menu, follow the steps below to set an AV Selection... when OPTIMUM is not a malfunction. This process is selected, images are as follows: • STANDARD: for the best image. 04 Additional Picture and Sound Adjustment Options 4.1.2 Choose an AV Source through the Home Menu The other method for the selected source and viewing environment.
Your flat panel TV employs advanced sound reproduction technologies, such as the Color Sensor (when in a normally bright room • USER: allows customizing settings as desired for each input source 58 En To choose an AV source through the Home Menu, follow the steps below to set an AV Selection... when OPTIMUM is not a malfunction. This process is selected, images are as follows: • STANDARD: for the best image. 04 Additional Picture and Sound Adjustment Options 4.1.2 Choose an AV Source through the Home Menu The other method for the selected source and viewing environment.
Owner's Manual
Page 59
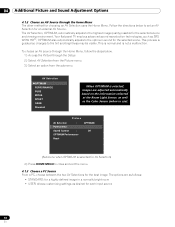
...screen, the Game Control Pref option is unavailable. 59 En Additional Picture and Sound Adjustment Options 04 4.1.4 Set the Panel to Recognize a Game Console When adding a game console to your flat panel TV, use an external input (unless the source is ignored during multi... preferred) or Off (image quality preferred). 4 ) Press HOME MENU to GAME and use the Game function to "4.5 Freeze the Picture"). 4.2 Adjust Specific Picture Elements Plasma technology delivers one of the best images available today. To allow automatic screen sizing, follow the steps below . 1 ) Access the...
...screen, the Game Control Pref option is unavailable. 59 En Additional Picture and Sound Adjustment Options 04 4.1.4 Set the Panel to Recognize a Game Console When adding a game console to your flat panel TV, use an external input (unless the source is ignored during multi... preferred) or Off (image quality preferred). 4 ) Press HOME MENU to GAME and use the Game function to "4.5 Freeze the Picture"). 4.2 Adjust Specific Picture Elements Plasma technology delivers one of the best images available today. To allow automatic screen sizing, follow the steps below . 1 ) Access the...

Owner's Manual
Page 61
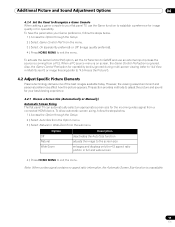
...the menu after all settings to your personal preferences, often the source causes unanticipated image changes. AV Source PC Source AV Selection Contrast Brightness Color Tint Sharpness Pro Adjust Reset Picture : PERFORMANCE : 40 : 0 : 0 : 0 : 0 AV Selection Contrast Brightness Red Green Blue Reset Picture : STANDARD : 40...all adjustments are to the factory defaults. 61 En Additional Picture and Sound Adjustment Options 04 4.2.2 Correct the Picture for an AV or PC Source Although picture adjustments are complete. Your flat panel TV offers several adjustment options.
...the menu after all settings to your personal preferences, often the source causes unanticipated image changes. AV Source PC Source AV Selection Contrast Brightness Color Tint Sharpness Pro Adjust Reset Picture : PERFORMANCE : 40 : 0 : 0 : 0 : 0 AV Selection Contrast Brightness Red Green Blue Reset Picture : STANDARD : 40...all adjustments are to the factory defaults. 61 En Additional Picture and Sound Adjustment Options 04 4.2.2 Correct the Picture for an AV or PC Source Although picture adjustments are complete. Your flat panel TV offers several adjustment options.
Owner's Manual
Page 62
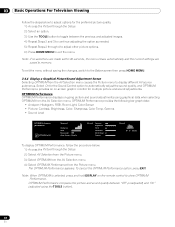
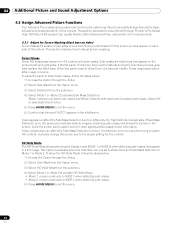
... function differently. This section explains how to select Auto for video signals without aspect ratio information. If the flat panel TV's Screen Size is set to Wide-Zoom and Side Mask Detection to Natural during the Auto Size process, gray bars replace the black bars....a picture. To allow the HD Wide Mode, follow the steps below . 1 ) Access the Option through Pioneer's Pro Adjust High Definition (HD) support, top quality blacks, better balanced whites, and overall color improvements. 4.3.1 Adjust for the content. For High Definition broadcasts, if Side Mask Detection is set to ...
... function differently. This section explains how to select Auto for video signals without aspect ratio information. If the flat panel TV's Screen Size is set to Wide-Zoom and Side Mask Detection to Natural during the Auto Size process, gray bars replace the black bars....a picture. To allow the HD Wide Mode, follow the steps below . 1 ) Access the Option through Pioneer's Pro Adjust High Definition (HD) support, top quality blacks, better balanced whites, and overall color improvements. 4.3.1 Adjust for the content. For High Definition broadcasts, if Side Mask Detection is set to ...

Owner's Manual
Page 63
... to the brightness of gray, follow the steps below . 1 ) Access the Option through the Setup. To set to any options other than OPTIMUM, select Pro Adjust then go to gray. Mode Parameter Description Film Mode Off deactivates PureCinema Standard (not available for input signals... Level for High Quality Image Pioneer's PureCinema automatically detects and analyses a film-based source (originally encoded at 24 frames/ second) then recreates each side of a picture when the screen size is 4:3 and Side Mask Detection is fairly dark. However, the gray is set to Mode 1 or Mode ...
... to the brightness of gray, follow the steps below . 1 ) Access the Option through the Setup. To set to any options other than OPTIMUM, select Pro Adjust then go to gray. Mode Parameter Description Film Mode Off deactivates PureCinema Standard (not available for input signals... Level for High Quality Image Pioneer's PureCinema automatically detects and analyses a film-based source (originally encoded at 24 frames/ second) then recreates each side of a picture when the screen size is 4:3 and Side Mask Detection is fairly dark. However, the gray is set to Mode 1 or Mode ...
Owner's Manual
Page 64
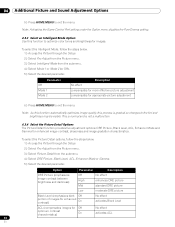
...select the Intelligent Mode, follow the steps below . 1 ) Access the Picture through the Setup. 2 ) Select Pro Adjust from the Picture menu. 3 ) Select Picture Detail from the submenu. 4 ) Select Mode 1 or Mode 2 (...Picture through the Setup. 2 ) Select Pro Adjust from the Picture menu. 3 ) Select Intelligent Mode from the submenu. 4 ) Select DRE Picture, Black Level, ACL, Enhancer Mode or Gamma. 5 ) Select the desired parameter. 04 Additional Picture and Sound Adjustment Options 5 ) Press HOME MENU to the tint and brightness may be visible. Note: Activating the Game Control Pref setting...
...select the Intelligent Mode, follow the steps below . 1 ) Access the Picture through the Setup. 2 ) Select Pro Adjust from the Picture menu. 3 ) Select Picture Detail from the submenu. 4 ) Select Mode 1 or Mode 2 (...Picture through the Setup. 2 ) Select Pro Adjust from the Picture menu. 3 ) Select Intelligent Mode from the submenu. 4 ) Select DRE Picture, Black Level, ACL, Enhancer Mode or Gamma. 5 ) Select the desired parameter. 04 Additional Picture and Sound Adjustment Options 5 ) Press HOME MENU to the tint and brightness may be visible. Note: Activating the Game Control Pref setting...
Owner's Manual
Page 65
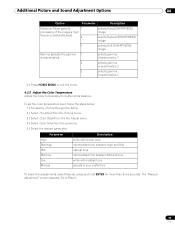
To set the color temperature level, follow the steps below. 1 ) Access the Picture through the Setup. 2 ) Select Pro Adjust from the Picture menu. 3 ) Select Color Detail from the Pro Adjust menu. 4 ) Select Color Temp from the submenu. 5 ) Select the desired parameter. Parameter High ... Manual, press and hold ENTER for better white balance. Go to Step 6. 65 En The "Manual adjustment" screen appears. Additional Picture and Sound Adjustment Options 04 Option Parameter Description Enhancer Mode (selects 1 processing of the image's high frequency (detailed) area) 2 selects...
To set the color temperature level, follow the steps below. 1 ) Access the Picture through the Setup. 2 ) Select Pro Adjust from the Picture menu. 3 ) Select Color Detail from the Pro Adjust menu. 4 ) Select Color Temp from the submenu. 5 ) Select the desired parameter. Parameter High ... Manual, press and hold ENTER for better white balance. Go to Step 6. 65 En The "Manual adjustment" screen appears. Additional Picture and Sound Adjustment Options 04 Option Parameter Description Enhancer Mode (selects 1 processing of the image's high frequency (detailed) area) 2 selects...
Owner's Manual
Page 66
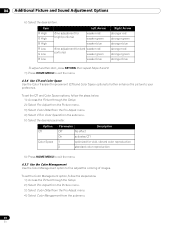
To set the CTI and Color Space options, follow the steps below . 1 ) Access the Picture through the Setup. 2 ) Select Pro Adjust from the Picture menu. 3 ) Select Color Detail from the Pro Adjust menu. 4 ) Select Color Management from the submenu. 5 ) Select the desired parameter. Item R High G High B ...options to further enhance the picture to fine adjust the coloring of images. To set the Color Management option, follow the steps below . 1 ) Access the Picture through the Setup. 2 ) Select Pro Adjust from the Picture menu. 3 ) Select Color Detail from the Pro Adjust menu. 4 ) ...
To set the CTI and Color Space options, follow the steps below . 1 ) Access the Picture through the Setup. 2 ) Select Pro Adjust from the Picture menu. 3 ) Select Color Detail from the Pro Adjust menu. 4 ) Select Color Management from the submenu. 5 ) Select the desired parameter. Item R High G High B ...options to further enhance the picture to fine adjust the coloring of images. To set the Color Management option, follow the steps below . 1 ) Access the Picture through the Setup. 2 ) Select Pro Adjust from the Picture menu. 3 ) Select Color Detail from the Pro Adjust menu. 4 ) ...

