Owner's Manual
Page 3
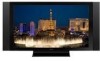
... world. We hope you enjoy the experience of owning the KURO and invite you one of a Pioneer KURO flat panel television. It's a world without boundaries. An experience that set the KURO apart. KURO is the future of seeing and hearing like never before. TABLE OF CONTENTS... (Block) Password...50 3 En We are felt and sounds can be tasted. TABLE OF CONTENTS 1 Introduction to the ELITE Series Flat Panel TVs 6 1.1 Flat Panel TV Shipment Checklist ...6 1.2 Control Options: Get to make the KURO undeniably unique and bring you to enter a new world of Pioneer flat-panel displays....
... world. We hope you enjoy the experience of owning the KURO and invite you one of a Pioneer KURO flat panel television. It's a world without boundaries. An experience that set the KURO apart. KURO is the future of seeing and hearing like never before. TABLE OF CONTENTS... (Block) Password...50 3 En We are felt and sounds can be tasted. TABLE OF CONTENTS 1 Introduction to the ELITE Series Flat Panel TVs 6 1.1 Flat Panel TV Shipment Checklist ...6 1.2 Control Options: Get to make the KURO undeniably unique and bring you to enter a new world of Pioneer flat-panel displays....
Owner's Manual
Page 4
... Switch Languages Using MTS...74 4.7.3 Select SAP...74 4.7.4 Apply Sound Effect Settings ...75 4.7.5 Use Auto Volume Control (AVC)...75 4.8 Manage the Power ...76 5 Use Other Equipment With Your Flat Panel TV 78 5.1 Program the Remote Control to Operate Other Equipment 78 5.1.1 Use the... Learning Feature...78 5.1.2 Assign a Manufacturing Code to the Remote Control 79 5.1.3 Issue a Library Search for a Manufacturer Code 79 5.1.4 Clear Added Manufacturer Codes from the Remote Control 80 5.1.5 Control a Pioneer...
... Switch Languages Using MTS...74 4.7.3 Select SAP...74 4.7.4 Apply Sound Effect Settings ...75 4.7.5 Use Auto Volume Control (AVC)...75 4.8 Manage the Power ...76 5 Use Other Equipment With Your Flat Panel TV 78 5.1 Program the Remote Control to Operate Other Equipment 78 5.1.1 Use the... Learning Feature...78 5.1.2 Assign a Manufacturing Code to the Remote Control 79 5.1.3 Issue a Library Search for a Manufacturer Code 79 5.1.4 Clear Added Manufacturer Codes from the Remote Control 80 5.1.5 Control a Pioneer...

Owner's Manual
Page 12
... left to right) TV : 1 Turn On or place panel in -picture FREEZE: 6 Freeze a frame from a moving image then press again to cancel the freeze function Number buttons 0 thru 9: 7 Select a channel •(dot): 8 Enter a dot for selecting a sub-channel VOL +/-: 9 Set the volume EXIT: 10...remote to control other equipment. The remote control can be programmed to control other equipment such as an input source AV SELECTION: 4 Select audio/video settings AV Source: OPTIMUM, PERFORMANCE, MOVIE, PURE, GAME, SPORT, Standard PC Source: STANDARD, USER SPLIT: 5 Cycle view thru single-screen, 2-...
... left to right) TV : 1 Turn On or place panel in -picture FREEZE: 6 Freeze a frame from a moving image then press again to cancel the freeze function Number buttons 0 thru 9: 7 Select a channel •(dot): 8 Enter a dot for selecting a sub-channel VOL +/-: 9 Set the volume EXIT: 10...remote to control other equipment. The remote control can be programmed to control other equipment such as an input source AV SELECTION: 4 Select audio/video settings AV Source: OPTIMUM, PERFORMANCE, MOVIE, PURE, GAME, SPORT, Standard PC Source: STANDARD, USER SPLIT: 5 Cycle view thru single-screen, 2-...
Owner's Manual
Page 29
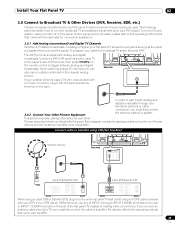
This section provides cabling information for your panel for the clearest analog picture. To program your other Pioneer equipment when combined with the panel. Connect cable or Satellite using STB (Set Top Box): T T W W Satellite antenna Rear view SAT IN Cable STB/Satellite STB HDMI OUT ... through INPUT 6 (HDMI terminal) on the rear or INPUT 7 (HDMI terminal) on the back. Install Your Flat Panel TV 02 2.6 Connect to Broadcast TV & Other Devices (DVR, Receiver, BDR, etc.) The type of equipment attached to your terrestrial antenna or cable connection, you...
This section provides cabling information for your panel for the clearest analog picture. To program your other Pioneer equipment when combined with the panel. Connect cable or Satellite using STB (Set Top Box): T T W W Satellite antenna Rear view SAT IN Cable STB/Satellite STB HDMI OUT ... through INPUT 6 (HDMI terminal) on the rear or INPUT 7 (HDMI terminal) on the back. Install Your Flat Panel TV 02 2.6 Connect to Broadcast TV & Other Devices (DVR, Receiver, BDR, etc.) The type of equipment attached to your terrestrial antenna or cable connection, you...
Owner's Manual
Page 35
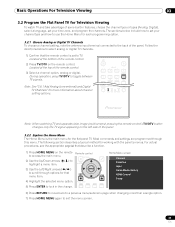
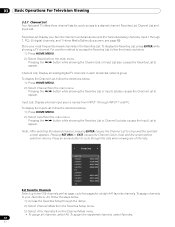
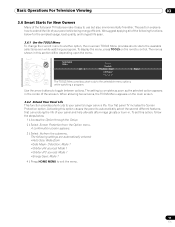
... the change. Located at the top of the remote control. 2) Press TV/DTV on the remote control. Note: See "2.6.1 Add Analog (conventional) and Digital TV Channels" for the flat panel TV. Most commands and settings are programmed through options for working with the panel's menus. SAT/DVDMENU... how to use the Home Menu for each programming option. 3.2.1 Choose Analog or Digital TV Channels To choose a channel setting, note the antenna input terminal connected to select analog or digital TV channels. 1) Confirm that menu item. Remote control SAT GUIDE DVD TOP MENU ENTER HOME...
... the change. Located at the top of the remote control. 2) Press TV/DTV on the remote control. Note: See "2.6.1 Add Analog (conventional) and Digital TV Channels" for the flat panel TV. Most commands and settings are programmed through options for working with the panel's menus. SAT/DVDMENU... how to use the Home Menu for each programming option. 3.2.1 Choose Analog or Digital TV Channels To choose a channel setting, note the antenna input terminal connected to select analog or digital TV channels. 1) Confirm that menu item. Remote control SAT GUIDE DVD TOP MENU ENTER HOME...
Owner's Manual
Page 36
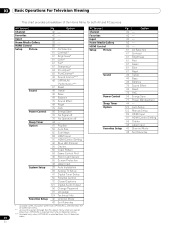
...Option 122 Auto Setup 122 Manual Setup 84 HDMI Input 91 HDMI Control Setting 56 Orbiter 43 Label Input Favorites Setup 42 Channel Mode 43 Sort Favorites...Setup 43 Label Input 38 Auto Installation 39 Analog TV Setup 41 Digital Tuner Setup 50 Parental Control 72 Closed Captions 121 Digital Audio Output 50 Change Password 37 Language 124 Technical Info Favorites Setup... - 86 - 57 AV Selection 61 Contrast* 61 Brightness* 61 Color* 61 Tint* 61 Sharpness* 64 Pro Adjust* 63 PureCinema** 49 Sound Control*** 48 OPTIMUM Performance*** 61 Reset 49 Treble 49 Bass 49 Balance 75...
...Option 122 Auto Setup 122 Manual Setup 84 HDMI Input 91 HDMI Control Setting 56 Orbiter 43 Label Input Favorites Setup 42 Channel Mode 43 Sort Favorites...Setup 43 Label Input 38 Auto Installation 39 Analog TV Setup 41 Digital Tuner Setup 50 Parental Control 72 Closed Captions 121 Digital Audio Output 50 Change Password 37 Language 124 Technical Info Favorites Setup... - 86 - 57 AV Selection 61 Contrast* 61 Brightness* 61 Color* 61 Tint* 61 Sharpness* 64 Pro Adjust* 63 PureCinema** 49 Sound Control*** 48 OPTIMUM Performance*** 61 Reset 49 Treble 49 Bass 49 Balance 75...
Owner's Manual
Page 38
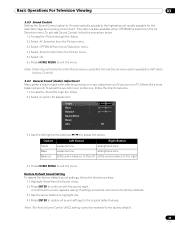
... D.S.T. (Daylight Saving Time) activation for digital TV broadcast. 03 Basic Operations For Television Viewing 3.2.4 Set the Clock Set the flat panel TV's clock to your list of viewable channels. Follow the steps below to set up TV channels. to activate/deactivate Daylight Saving Time. ...section provides steps to search for automatic channel selection or manual channel assignments. Once all available channels from your flat panel TV, Auto Installation for and set the clock. 1 ) Access the System Setup through the Setup. 2 ) Select Auto Installation from the System Setup ...
... D.S.T. (Daylight Saving Time) activation for digital TV broadcast. 03 Basic Operations For Television Viewing 3.2.4 Set the Clock Set the flat panel TV's clock to your list of viewable channels. Follow the steps below to set up TV channels. to activate/deactivate Daylight Saving Time. ...section provides steps to search for automatic channel selection or manual channel assignments. Once all available channels from your flat panel TV, Auto Installation for and set the clock. 1 ) Access the System Setup through the Setup. 2 ) Select Auto Installation from the System Setup ...
Owner's Manual
Page 41
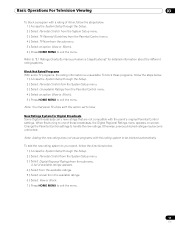
... to bypass or delete unwanted channels when moving up/down one channel at a time. Skip Steps 5 and 6. To set this option, follow the steps below. • Analog TV channels: Manual Adjust > Store > No Radio Skip This function allows skipping of radio channels at a time and what ... 1 ) Access the System Setup through the Setup. 2 ) Select Digital Tuner Setup or Analog TV Setup from your home. This section explains how to exit the menu. The Channel Delete setting is complete when exiting the Channel Options menu (no confirmation screen appears). The instructions for restoring ...
... to bypass or delete unwanted channels when moving up/down one channel at a time. Skip Steps 5 and 6. To set this option, follow the steps below. • Analog TV channels: Manual Adjust > Store > No Radio Skip This function allows skipping of radio channels at a time and what ... 1 ) Access the System Setup through the Setup. 2 ) Select Digital Tuner Setup or Analog TV Setup from your home. This section explains how to exit the menu. The Channel Delete setting is complete when exiting the Channel Options menu (no confirmation screen appears). The instructions for restoring ...
Owner's Manual
Page 42
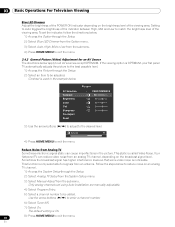
...or All, follow the directions below . 1 ) Press HOME MENU. 2 ) Select Input from the Channel Mode menu. • To assign all analog/digital TV channels in the Favorites List. Favorites INPUT 6 XXXXXX XXXXXX XXXXXX XXXXXX PC XXXXXX XXXXXX XXXXXX XXXXXX 1/2 00001.000 00004.000 00007.000 00009.000 00013....002 00015.000 00024.000 Set Favorite Channels Select up to ten (10) channels per list page, up to access the Favorites List, follow the steps below. 1 ) Access...
...or All, follow the directions below . 1 ) Press HOME MENU. 2 ) Select Input from the Channel Mode menu. • To assign all analog/digital TV channels in the Favorites List. Favorites INPUT 6 XXXXXX XXXXXX XXXXXX XXXXXX PC XXXXXX XXXXXX XXXXXX XXXXXX 1/2 00001.000 00004.000 00007.000 00009.000 00013....002 00015.000 00024.000 Set Favorite Channels Select up to ten (10) channels per list page, up to access the Favorites List, follow the steps below. 1 ) Access...

Owner's Manual
Page 44
...channel, press CH RETURN. button sequentially changes down VOL- Simply press the number buttons in Standby when the selected time elapses. A recent addition to TV viewing is digital and has three active sub-channels, enter 5 . 2 to adjust by accident. causes the volume to reach the second sub-channel.... of this section. However, when it is down to multiple signals. decreases the volume at the panel's remote sensor, press and hold VOL+ to set the Sleep Timer, follow the steps below. 1 ) Access the Sleep Timer through the rest of VOL+ or VOL- The CH - To return ...
...channel, press CH RETURN. button sequentially changes down VOL- Simply press the number buttons in Standby when the selected time elapses. A recent addition to TV viewing is digital and has three active sub-channels, enter 5 . 2 to adjust by accident. causes the volume to reach the second sub-channel.... of this section. However, when it is down to multiple signals. decreases the volume at the panel's remote sensor, press and hold VOL+ to set the Sleep Timer, follow the steps below. 1 ) Access the Sleep Timer through the rest of VOL+ or VOL- The CH - To return ...
Owner's Manual
Page 45
... Options" and "4.7 Select Alternatives for/to Sound." 3.4.1 Adjust the Picture for Your Room Lighting The flat panel TV senses the amount of light in your program without losing the Sleep Timer setting. Basic Operations For Television Viewing 03 The SLEEP indicator on the front of the flat panel... TV lights orange when the Sleep Timer is deactivated. "Remain ---min" appears at the top of the menu. Option Off Mode...
... Options" and "4.7 Select Alternatives for/to Sound." 3.4.1 Adjust the Picture for Your Room Lighting The flat panel TV senses the amount of light in your program without losing the Sleep Timer setting. Basic Operations For Television Viewing 03 The SLEEP indicator on the front of the flat panel... TV lights orange when the Sleep Timer is deactivated. "Remain ---min" appears at the top of the menu. Option Off Mode...
Owner's Manual
Page 46
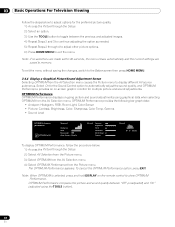
...TV channel. 1 ) Access the System Setup through the Setup. 2 ) Select an item to be added. AV Selection Contrast Brightness Color Tint Sharpness Pro Adjust Reset Picture : PERFORMANCE : 40 : 0 : 0 : 0 : 0 3 ) Use the arrow buttons (/) to adjust to be adjusted. Only analog channels set...MENU to all AV sources except OPTIMUM. To set using Auto Installation are manually adjustable. 4 ) Select Program Entry. 5 ) Select a channel number to the desired level. This function is OPTIMUM, your flat panel TV automatically adjusts the picture to the best possible ...
...TV channel. 1 ) Access the System Setup through the Setup. 2 ) Select an item to be added. AV Selection Contrast Brightness Color Tint Sharpness Pro Adjust Reset Picture : PERFORMANCE : 40 : 0 : 0 : 0 : 0 3 ) Use the arrow buttons (/) to adjust to be adjusted. Only analog channels set...MENU to all AV sources except OPTIMUM. To set using Auto Installation are manually adjustable. 4 ) Select Program Entry. 5 ) Select a channel number to the desired level. This function is OPTIMUM, your flat panel TV automatically adjusts the picture to the best possible ...

Owner's Manual
Page 47
...4 ) Adjust the vertical and/or horizontal positioning using the arrow buttons. 5 ) Press HOME MENU to adjust the flat panel TV's picture. To restore the factory default video settings, follow the steps below . 1 ) Highlight Reset from the Picture menu. 2 ) Press ENTER to follow when adjusting the ... below . 1 ) Access the Option through the Setup. 2 ) Select Position from the Option menu. AV Selection menus, and Sound Control settings return to the original default values. 3.4.3 Compare Images When Adjusting the Picture When adjusting the picture, look for an overall improvement by -Dot...
...4 ) Adjust the vertical and/or horizontal positioning using the arrow buttons. 5 ) Press HOME MENU to adjust the flat panel TV's picture. To restore the factory default video settings, follow the steps below . 1 ) Highlight Reset from the Picture menu. 2 ) Press ENTER to follow when adjusting the ... below . 1 ) Access the Option through the Setup. 2 ) Select Position from the Option menu. AV Selection menus, and Sound Control settings return to the original default values. 3.4.3 Compare Images When Adjusting the Picture When adjusting the picture, look for an overall improvement by -Dot...
Owner's Manual
Page 48
... to adjust options for multiple picture and sound adjustments. Note: if no selections are made within 60 seconds, the menu closes automatically and the current settings are saved to display different AV source submenus. To exit the menu without saving the changes, switch to the Before screen then press HOME MENU...
... to adjust options for multiple picture and sound adjustments. Note: if no selections are made within 60 seconds, the menu closes automatically and the current settings are saved to display different AV source submenus. To exit the menu without saving the changes, switch to the Before screen then press HOME MENU...
Owner's Manual
Page 49
... . 1 ) Access the Picture through the Setup. 2 ) Select an option for the selected image and viewing environment. Restore Default Sound Setting To restore the factory default sound settings, follow the procedure below . 1 ) Highlight Reset from the Picture menu. 5 ) Select On. 6 ) Press HOME MENU to continue...default. 49 En Others like a more balanced sound. Note: When Sound Control from an AV source or on TV. A confirmation screen appears asking if settings should be restored to exit the menu. Option Treble Base Balance Left Button Right Button weakens tone strengthens tone ...
... . 1 ) Access the Picture through the Setup. 2 ) Select an option for the selected image and viewing environment. Restore Default Sound Setting To restore the factory default sound settings, follow the procedure below . 1 ) Highlight Reset from the Picture menu. 5 ) Select On. 6 ) Press HOME MENU to continue...default. 49 En Others like a more balanced sound. Note: When Sound Control from an AV source or on TV. A confirmation screen appears asking if settings should be restored to exit the menu. Option Treble Base Balance Left Button Right Button weakens tone strengthens tone ...

Owner's Manual
Page 52
...TV also provides a rating setting that rating system. 5 ) Press ENTER to reverse the blocked status for the highlighted TV Parental Guideline option. Examples of programs with a rating of None. For example, blocking TV rating TV-PG (Parental guidance suggested) automatically blocks TV-14 (Parents strongly cautioned) and TV... Block Block Block Status : MPAA Ratings TV Parental Guidelines Canadian English Ratings Canadian French Ratings Unavailable Ratings : Digital Regional Ratings Off View TV Parental Guidelines menu TV-None TV-Y TV-Y7 TV-G TV-PG TV-14 TV-MA FV D L S V B ...
...TV also provides a rating setting that rating system. 5 ) Press ENTER to reverse the blocked status for the highlighted TV Parental Guideline option. Examples of programs with a rating of None. For example, blocking TV rating TV-PG (Parental guidance suggested) automatically blocks TV-14 (Parents strongly cautioned) and TV... Block Block Block Status : MPAA Ratings TV Parental Guidelines Canadian English Ratings Canadian French Ratings Unavailable Ratings : Digital Regional Ratings Off View TV Parental Guidelines menu TV-None TV-Y TV-Y7 TV-G TV-PG TV-14 TV-MA FV D L S V B ...
Owner's Manual
Page 53
... with the panel's original Parental Control settings. New Ratings System for detailed information about the different rating systems. Block Not Rated Programs With some TV programs, the rating information is unavailable. To add the new rating system to your panel, follow the steps... Guidelines from the Parental Control menu. 4 ) Select TV-None from the Parental Control menu. 4 ) Select an option (View or Block ). 5 ) Press HOME MENU to exit the menu. Change the Parental Control settings to be blocked automatically. A list of these programs, follow the directions below . 1 ) ...
... with the panel's original Parental Control settings. New Ratings System for detailed information about the different rating systems. Block Not Rated Programs With some TV programs, the rating information is unavailable. To add the new rating system to your panel, follow the steps... Guidelines from the Parental Control menu. 4 ) Select TV-None from the Parental Control menu. 4 ) Select an option (View or Block ). 5 ) Press HOME MENU to exit the menu. Change the Parental Control settings to be blocked automatically. A list of these programs, follow the directions below . 1 ) ...
Owner's Manual
Page 55
... Repeat Time Search Repeat The TOOLS Menu provides short-cuts to exit the menu. 55 En Activating this section differ, depending upon the menu. The setting is complete as soon as the selected option appears in . The following functions below . 1 ) Access the Option through the Setup. 2 ) ...Select Screen Protection from the submenu. This section explains how to extend the life of the flat panel TV features make it easy to use but also environmentally friendlier. A confirmation screen appears. 3 ) Select Yes from the Option menu. Your flat panel...
... Repeat Time Search Repeat The TOOLS Menu provides short-cuts to exit the menu. 55 En Activating this section differ, depending upon the menu. The setting is complete as soon as the selected option appears in . The following functions below . 1 ) Access the Option through the Setup. 2 ) ...Select Screen Protection from the submenu. This section explains how to extend the life of the flat panel TV features make it easy to use but also environmentally friendlier. A confirmation screen appears. 3 ) Select Yes from the Option menu. Your flat panel...

Owner's Manual
Page 56
...function causes the screen to appear white, which helps to exit the menu. A confirmation screen appears. 3 ) Select Start from the submenu. The recommended setting, Energy Save Mode 1, extends the life of one hour after -image ghosts or burnin. To activate the Orbiter, follow the steps below. 1 ) ...the Setup. 2 ) Select Video Pattern from the Option menu. To cancel the Video Pattern screen, press the remote's TV (a) or the panel's STANDBY/ON. While the Video Pattern screen is set to Mode 1 or Mode 2, the image may be hidden at a minimum. Follow the steps below . The panel...
...function causes the screen to appear white, which helps to exit the menu. A confirmation screen appears. 3 ) Select Start from the submenu. The recommended setting, Energy Save Mode 1, extends the life of one hour after -image ghosts or burnin. To activate the Orbiter, follow the steps below. 1 ) ...the Setup. 2 ) Select Video Pattern from the Option menu. To cancel the Video Pattern screen, press the remote's TV (a) or the panel's STANDBY/ON. While the Video Pattern screen is set to Mode 1 or Mode 2, the image may be hidden at a minimum. Follow the steps below . The panel...
Owner's Manual
Page 57
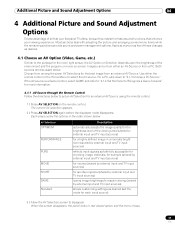
... be from either the remote control or the Home Menu to disappear. Apply as many or as few of these changes as desired (set an AV Selection for features and functions that enhance your viewing experience. Both sources are discussed below . For a PC, skip down ...Description automatically adjusts the image quality for the brightness level of the viewing area (shared by external input and TV input sources) for easier viewing (shared by external input and TV input sources) allows customizing settings as desired. 4.1 Choose an AV Option (Video, Game, etc.) Similar to "4.1.3 Choose a PC ...
... be from either the remote control or the Home Menu to disappear. Apply as many or as few of these changes as desired (set an AV Selection for features and functions that enhance your viewing experience. Both sources are discussed below . For a PC, skip down ...Description automatically adjusts the image quality for the brightness level of the viewing area (shared by external input and TV input sources) for easier viewing (shared by external input and TV input sources) allows customizing settings as desired. 4.1 Choose an AV Option (Video, Game, etc.) Similar to "4.1.3 Choose a PC ...


