Owner's Manual
Page 2
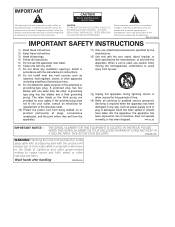
... receptacles, and the point where they exit from the apparatus. 11) Only use attachments/accessories specified by the manufacturer. 12) Use only with the cart, stand, tripod, bracket, or table specified by the manufacturer, or sold with the apparatus. IMPORTANT CAUTION RISK OF ELECTRIC SHOCK DO NOT OPEN The lightning flash...
... receptacles, and the point where they exit from the apparatus. 11) Only use attachments/accessories specified by the manufacturer. 12) Use only with the cart, stand, tripod, bracket, or table specified by the manufacturer, or sold with the apparatus. IMPORTANT CAUTION RISK OF ELECTRIC SHOCK DO NOT OPEN The lightning flash...
Owner's Manual
Page 3
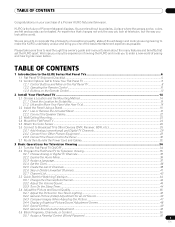
...Stand ...16 2.2.2 Connect the Speaker Cables ...22 2.3 Wall/Ceiling Mounting...23 2.4 Mount the Flat Panel TV ...24 2.5 Attach the Color Sensor ...26 2.6 Connect to Broadcast TV & Other Devices (DVR, Receiver, BDR, etc 29 2.6.1 Add Analog (conventional) and Digital TV Channels 29 2.6.2 Connect Your Other Pioneer...Screen 48 3.4.5 Sound Control...49 3.4.6 General Sound (Audio) Adjustment...49 3.5 Block Programs, Channels, or Content ...50 3.5.1 Assign a Parental Control (Block) Password...50 3 En It's a world without boundaries. We are felt and sounds can be tasted. An experience that set...
...Stand ...16 2.2.2 Connect the Speaker Cables ...22 2.3 Wall/Ceiling Mounting...23 2.4 Mount the Flat Panel TV ...24 2.5 Attach the Color Sensor ...26 2.6 Connect to Broadcast TV & Other Devices (DVR, Receiver, BDR, etc 29 2.6.1 Add Analog (conventional) and Digital TV Channels 29 2.6.2 Connect Your Other Pioneer...Screen 48 3.4.5 Sound Control...49 3.4.6 General Sound (Audio) Adjustment...49 3.5 Block Programs, Channels, or Content ...50 3.5.1 Assign a Parental Control (Block) Password...50 3 En It's a world without boundaries. We are felt and sounds can be tasted. An experience that set...
Owner's Manual
Page 6
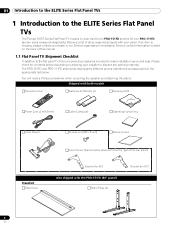
... the speaker and attaching the stand. Below is a list of this manual. 1.1 Flat Panel TV Shipment Checklist In addition to the flat panel TV, there are several accessories included to the ELITE Series Flat Panel TVs The Pioneer ELITE Series Flat Panel TV models include the 60-inch PRO-151FD and the 50-inch PRO-111FD (screen sizes measured diagonally).
... the speaker and attaching the stand. Below is a list of this manual. 1.1 Flat Panel TV Shipment Checklist In addition to the flat panel TV, there are several accessories included to the ELITE Series Flat Panel TVs The Pioneer ELITE Series Flat Panel TV models include the 60-inch PRO-151FD and the 50-inch PRO-111FD (screen sizes measured diagonally).
Owner's Manual
Page 7
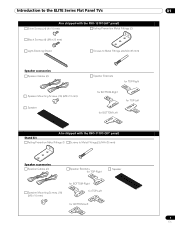
Introduction to the ELITE Series Flat Panel TVs 01 Also shipped with the PRO-151FD (60" panel) Silver Screws (4) (4×10 mm) Falling Prevention Metal Fittings (2) Black Screws (4) (M6×20 mm) Light-Blocking Shield Screws to Metal Fittings (4)...Screws (16) (M5×10 mm) Speaker Speaker Brackets for TOP-Right for BOTTOM-Right for TOP-Left for BOTTOM-Left Also shipped with the PRO-111FD (50" panel) Stand kit Falling Prevention Metal Fittings (2) Screws to Metal Fittings(2) (M4×35 mm) Speaker accessories Speaker Cables (2) Speaker Brackets for TOP-Right Speaker Mounting...
Introduction to the ELITE Series Flat Panel TVs 01 Also shipped with the PRO-151FD (60" panel) Silver Screws (4) (4×10 mm) Falling Prevention Metal Fittings (2) Black Screws (4) (M6×20 mm) Light-Blocking Shield Screws to Metal Fittings (4)...Screws (16) (M5×10 mm) Speaker Speaker Brackets for TOP-Right for BOTTOM-Right for TOP-Left for BOTTOM-Left Also shipped with the PRO-111FD (50" panel) Stand kit Falling Prevention Metal Fittings (2) Screws to Metal Fittings(2) (M4×35 mm) Speaker accessories Speaker Cables (2) Speaker Brackets for TOP-Right Speaker Mounting...
Owner's Manual
Page 14
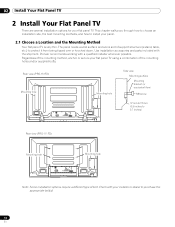
...screw 12 mm to 18 mm (0.5 inches to 0.7 inches) Rear view (PRO-111FD) W Mounting hole W T W W Mounting hole W T W Note: Some installation options require a different type of the mounting holes and/or supplied bolts. Pioneer recommends working with the shipment. Regardless of the mounting method, anchor or secure ...thin. The panel needs a solid surface and some sort of support structure (a stand, table, etc.) to install your flat panel TV using a combination of bolt. Check with your flat panel TV. This chapter walks you through how to choose an installation site, the best...
...screw 12 mm to 18 mm (0.5 inches to 0.7 inches) Rear view (PRO-111FD) W Mounting hole W T W W Mounting hole W T W Note: Some installation options require a different type of the mounting holes and/or supplied bolts. Pioneer recommends working with the shipment. Regardless of the mounting method, anchor or secure ...thin. The panel needs a solid surface and some sort of support structure (a stand, table, etc.) to install your flat panel TV using a combination of bolt. Check with your flat panel TV. This chapter walks you through how to choose an installation site, the best...
Owner's Manual
Page 15
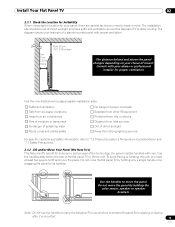
... flexing or twisting the unit, you need at least two people to lift and move the flat panel TV by its handles. Do not move the panel. Over 10 cm (3 15/16 inches) Over 50 cm (19 11/16 inches) The distance behind and above the panel changes depending on your dealer... you need to keep in mind. Do not move the panel. Use the handles attached to the rear of a stand-mounted panel with your choice of direct sunlight and have sufficient ventilation around the flat panel TV to lift the unit. Use the checklist below is an example of the flat panel...
... flexing or twisting the unit, you need at least two people to lift and move the flat panel TV by its handles. Do not move the panel. Over 10 cm (3 15/16 inches) Over 50 cm (19 11/16 inches) The distance behind and above the panel changes depending on your dealer... you need to keep in mind. Do not move the panel. Use the handles attached to the rear of a stand-mounted panel with your choice of direct sunlight and have sufficient ventilation around the flat panel TV to lift the unit. Use the checklist below is an example of the flat panel...
Owner's Manual
Page 16
.... 2 ) Lay the flat panel TV down on page 19 for the PRO-151FD. For PRO-111FD, attach the falling prevention metal fittings after placing the panel to stand upright. (PRO-111FD) Installation screws (M4 × 35 mm: black) Falling prevention metal fitting Attach the Stand to "Attach/Detach the Speaker" on a raised surface with the Pioneer table top stand (stand) attached.
.... 2 ) Lay the flat panel TV down on page 19 for the PRO-151FD. For PRO-111FD, attach the falling prevention metal fittings after placing the panel to stand upright. (PRO-111FD) Installation screws (M4 × 35 mm: black) Falling prevention metal fitting Attach the Stand to "Attach/Detach the Speaker" on a raised surface with the Pioneer table top stand (stand) attached.
Owner's Manual
Page 17
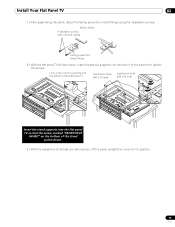
... panel then tighten the screws. Line up the column supports with the bottom of the flat panel TV. Install Your Flat Panel TV 02 7 ) After assembling the stand, attach the falling prevention metal fittings using the installation screws. (PRO-151FD) Installation screws (M4 x 35 mm: black) Falling prevention metal fitting 8 ) With the flat panel...
... panel then tighten the screws. Line up the column supports with the bottom of the flat panel TV. Install Your Flat Panel TV 02 7 ) After assembling the stand, attach the falling prevention metal fittings using the installation screws. (PRO-151FD) Installation screws (M4 x 35 mm: black) Falling prevention metal fitting 8 ) With the flat panel...
Owner's Manual
Page 18
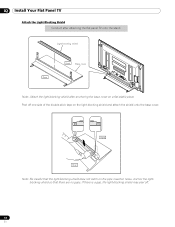
... not catch on the pipe insertion holes. Light-blocking shield Front Base cover Rear Note: Attach the light-blocking shield after attaching the flat panel TV onto the stand. 02 Install Your Flat Panel TV Attach the Light-Blocking Shield Conduct after anchoring the base cover on a flat stable place.
... not catch on the pipe insertion holes. Light-blocking shield Front Base cover Rear Note: Attach the light-blocking shield after attaching the flat panel TV onto the stand. 02 Install Your Flat Panel TV Attach the Light-Blocking Shield Conduct after anchoring the base cover on a flat stable place.
Owner's Manual
Page 19
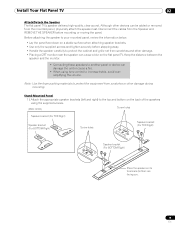
...be added or removed from scratches or other damage. • Placing a CRT monitor near the speaker can cause a blur on the flat panel TV. Stand-Mounted Panel 1 ) Attach the appropriate speaker brackets (left and right) to the top and bottom on a stable surface when attaching speaker brackets.... Attach/Detach the Speaker The flat panel TV's speaker delivers high-quality, clear sound. Although other devices can damage the unit or cause a fire. • When using the supplied screws. (PRO-151FD) Screw holes Speaker bracket (For TOP-Right) Speaker bracket (For BOTTOM-Right) Screw holes ...
...be added or removed from scratches or other damage. • Placing a CRT monitor near the speaker can cause a blur on the flat panel TV. Stand-Mounted Panel 1 ) Attach the appropriate speaker brackets (left and right) to the top and bottom on a stable surface when attaching speaker brackets.... Attach/Detach the Speaker The flat panel TV's speaker delivers high-quality, clear sound. Although other devices can damage the unit or cause a fire. • When using the supplied screws. (PRO-151FD) Screw holes Speaker bracket (For TOP-Right) Speaker bracket (For BOTTOM-Right) Screw holes ...
Owner's Manual
Page 23
... or damage to the panel if the cable's bare wire touches other than the speakers specified. (PRO-111FD) 2.3 Wall/Ceiling Mounting Lay the 50" panel down on a raised surface then remove the stand. Installation bolts (1) Installation bolts (2) 23 En Connecting the speaker cable with the speaker installed Black ...malfunction or damage to the system. • Do not connect any devices to the speaker terminals other equipment. Install Your Flat Panel TV 02 PRO-151FD with the power cord plugged in can result in the power cord after connecting the speakers. • Do not leave speaker...
... or damage to the panel if the cable's bare wire touches other than the speakers specified. (PRO-111FD) 2.3 Wall/Ceiling Mounting Lay the 50" panel down on a raised surface then remove the stand. Installation bolts (1) Installation bolts (2) 23 En Connecting the speaker cable with the speaker installed Black ...malfunction or damage to the system. • Do not connect any devices to the speaker terminals other equipment. Install Your Flat Panel TV 02 PRO-151FD with the power cord plugged in can result in the power cord after connecting the speakers. • Do not leave speaker...
Owner's Manual
Page 24
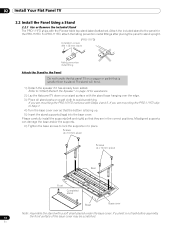
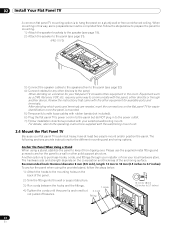
... first. Anchor the Panel When Using a Stand When using the provided stand, follow the steps below to prepare the panel for mounting. 1 ) Attach the speaker brackets to the speaker (see page 19). 2 ) Attach the speaker to the panel (see page 21). (PRO-111FD) 3 ) Connect the speaker cables to ..., and fittings through another device. Review the instructions that came with the wall/ceiling mount unit. 2.4 Mount the Flat Panel TV Because your flat panel TV, consider other devices to keep it from a reinforced ceiling. Another option is anchored but heavy, have at least two people mount...
... first. Anchor the Panel When Using a Stand When using the provided stand, follow the steps below to prepare the panel for mounting. 1 ) Attach the speaker brackets to the speaker (see page 19). 2 ) Attach the speaker to the panel (see page 21). (PRO-111FD) 3 ) Connect the speaker cables to ..., and fittings through another device. Review the instructions that came with the wall/ceiling mount unit. 2.4 Mount the Flat Panel TV Because your flat panel TV, consider other devices to keep it from a reinforced ceiling. Another option is anchored but heavy, have at least two people mount...
Owner's Manual
Page 25
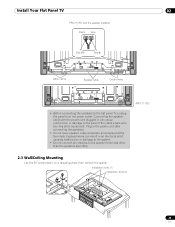
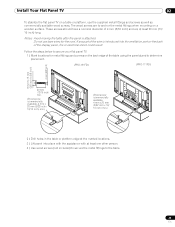
... port on a table or platform, use bare wires for metal fittings and screws on the back edge of the table using the panel stand to determine placement. (PRO-151FD) (PRO-111FD) 8 mm to 15 mm (3/8 inch to anchor the metal fittings when mounting on a wooden surface. Notes: Avoid moving the table ...after the panel is introduced into place with the assistance with at least 20 mm (13/ 16 inch) long. Install Your Flat Panel TV 02 To ...
... port on a table or platform, use bare wires for metal fittings and screws on the back edge of the table using the panel stand to determine placement. (PRO-151FD) (PRO-111FD) 8 mm to 15 mm (3/8 inch to anchor the metal fittings when mounting on a wooden surface. Notes: Avoid moving the table ...after the panel is introduced into place with the assistance with at least 20 mm (13/ 16 inch) long. Install Your Flat Panel TV 02 To ...
Owner's Manual
Page 131
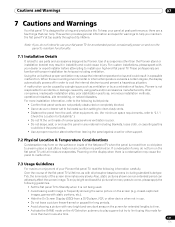
...proper ventilation may result in instability and could result in use parts and accessories designed by a combination of the flat panel TV when the panel is switched on. Pioneer is not being used. • Avoid leaving a still image or frequently showing the same picture on the screen (e.g....the following guidelines. • Set the flat panel TV to Standby when it is not responsible for accidents or damage caused by using this could block the panel vents. • Use a proper mount or stand rather than the Pioneer stand or installation bracket may cause the internal temperature to ...
...proper ventilation may result in instability and could result in use parts and accessories designed by a combination of the flat panel TV when the panel is switched on. Pioneer is not being used. • Avoid leaving a still image or frequently showing the same picture on the screen (e.g....the following guidelines. • Set the flat panel TV to Standby when it is not responsible for accidents or damage caused by using this could block the panel vents. • Use a proper mount or stand rather than the Pioneer stand or installation bracket may cause the internal temperature to ...
Owner's Manual
Page 145
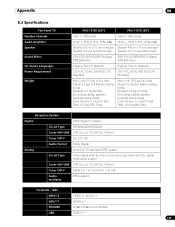
... INPUT 3 VIDEO in, AUDIO in INPUT 7 HDMI in ** 145 En Appendix 08 8.3 Specifications Flat Panel TV Number of pixels Audio Amplifier Speaker Sound Effect On-Screen Languages Power Requirement Weight PRO-151FD (60") PRO-111FD (50") 1920 × 1080 pixels 1920 × 1080 pixels 18 W + 18 W (1 kHz, 10 %,... cables, speaker brackets and screws) Color Sensor: 0.1 kg (0.2 lbs) Total: 61.3 kg (135.1 lbs) Main unit: 33.8 kg (74.5 lbs) Stand: 2.5 kg (5.6 lbs)(including bolts) Speaker: 3.6 kg (7.9 lbs) (including cables, speaker brackets and screws) Color Sensor: 0.1 kg (0.2 lbs) Total: ...
... INPUT 3 VIDEO in, AUDIO in INPUT 7 HDMI in ** 145 En Appendix 08 8.3 Specifications Flat Panel TV Number of pixels Audio Amplifier Speaker Sound Effect On-Screen Languages Power Requirement Weight PRO-151FD (60") PRO-111FD (50") 1920 × 1080 pixels 1920 × 1080 pixels 18 W + 18 W (1 kHz, 10 %,... cables, speaker brackets and screws) Color Sensor: 0.1 kg (0.2 lbs) Total: 61.3 kg (135.1 lbs) Main unit: 33.8 kg (74.5 lbs) Stand: 2.5 kg (5.6 lbs)(including bolts) Speaker: 3.6 kg (7.9 lbs) (including cables, speaker brackets and screws) Color Sensor: 0.1 kg (0.2 lbs) Total: ...
Owner's Manual
Page 162
... frame (all traffic that meet the new standard for home network PCs and other digital devices, as "480p" and "720p" ("p" stands for displaying text and still images. DHCP (Dynamic Host Configuration Protocol) Server Provides a mechanism to allocate IP addresses to recognize products that... electronics (CE) and PCs. Effective scanning lines are expressed as "480i" and "1080i" ("i" stands for converting analog audio signals to the simplified sharing of digital content, such as a flat panel TV. A default gateway (such as a DHCP server in 1/60 of a second for consumer electronics/home...
... frame (all traffic that meet the new standard for home network PCs and other digital devices, as "480p" and "720p" ("p" stands for displaying text and still images. DHCP (Dynamic Host Configuration Protocol) Server Provides a mechanism to allocate IP addresses to recognize products that... electronics (CE) and PCs. Effective scanning lines are expressed as "480i" and "1080i" ("i" stands for converting analog audio signals to the simplified sharing of digital content, such as a flat panel TV. A default gateway (such as a DHCP server in 1/60 of a second for consumer electronics/home...


