Owner's Manual
Page 3
...Add Analog (conventional) and Digital TV Channels 29 2.6.2 Connect Your Other Pioneer Equipment...29 2.6.3 Connect the Power Cord to the Panel ...32 2.7 Route then Bundle the Power Cord and Cables ...32 3 Basic Operations For Television Viewing 34 3.1 Turn the Flat Panel TV ON/OFF ...34 3.2 Program the Flat Panel TV for Television Viewing...35 3.2.1 ... the Picture...47 3.4.4 Display a Graphical Picture/Sound Adjustment Screen 48 3.4.5 Sound Control...49 3.4.6 General Sound (Audio) Adjustment...49 3.5 Block Programs, Channels, or Content ...50 3.5.1 Assign a Parental Control (Block) Password...
...Add Analog (conventional) and Digital TV Channels 29 2.6.2 Connect Your Other Pioneer Equipment...29 2.6.3 Connect the Power Cord to the Panel ...32 2.7 Route then Bundle the Power Cord and Cables ...32 3 Basic Operations For Television Viewing 34 3.1 Turn the Flat Panel TV ON/OFF ...34 3.2 Program the Flat Panel TV for Television Viewing...35 3.2.1 ... the Picture...47 3.4.4 Display a Graphical Picture/Sound Adjustment Screen 48 3.4.5 Sound Control...49 3.4.6 General Sound (Audio) Adjustment...49 3.5 Block Programs, Channels, or Content ...50 3.5.1 Assign a Parental Control (Block) Password...
Owner's Manual
Page 4
...Owners ...55 3.6.1 Use the TOOLS Menu...55 3.6.2 Extend Your Panel Life...55 3.6.3 Turn On the Image Orbiter...56 3.6.4 Trigger the Screen-Saving Video Pattern Periodically 56 3.6.5 ...(AVC)...75 4.8 Manage the Power ...76 5 Use Other Equipment With Your Flat Panel TV 78 5.1 Program the Remote Control to Operate Other Equipment 78 5.1.1 Use the Learning Feature...... Search for a Manufacturer Code 79 5.1.4 Clear Added Manufacturer Codes from the Remote Control 80 5.1.5 Control a Pioneer Receiver ...80 5.1.6 Control a Cable (CBL) or Satellite (SAT) System 81 5.1.7 Control a Video Cassette...
...Owners ...55 3.6.1 Use the TOOLS Menu...55 3.6.2 Extend Your Panel Life...55 3.6.3 Turn On the Image Orbiter...56 3.6.4 Trigger the Screen-Saving Video Pattern Periodically 56 3.6.5 ...(AVC)...75 4.8 Manage the Power ...76 5 Use Other Equipment With Your Flat Panel TV 78 5.1 Program the Remote Control to Operate Other Equipment 78 5.1.1 Use the Learning Feature...... Search for a Manufacturer Code 79 5.1.4 Clear Added Manufacturer Codes from the Remote Control 80 5.1.5 Control a Pioneer Receiver ...80 5.1.6 Control a Cable (CBL) or Satellite (SAT) System 81 5.1.7 Control a Video Cassette...
Owner's Manual
Page 5
...137 8.2 Manufacturer Codes to Program into the Remote Control 138 8.2.1 Cable...138 8.2.2 Satellite...138 8.2.3 VCR (Brands A - N) ...143 8.2.11 DVD (Brands O - TV Parental Guideline Ratings (age/category-based 136 8.1.3 MPAA Movie Ratings (age-based) ...136 8.1.4 Canadian - Z) ...141 8.2.7 PVR ...142 8.2.8 BD (HD-DVD) ...142... 8.2.9 DVD-R ...142 8.2.10 DVD (Brands A - TABLE OF CONTENTS 5.4.2 Turn OFF the Power With an HDMI Command 91 5.4.3 Turn ON the Power With an HDMI Command ...91 5.4.4 Test the Power Control (On/Off)...92 5.5 Connect a Game Console or ...
...137 8.2 Manufacturer Codes to Program into the Remote Control 138 8.2.1 Cable...138 8.2.2 Satellite...138 8.2.3 VCR (Brands A - N) ...143 8.2.11 DVD (Brands O - TV Parental Guideline Ratings (age/category-based 136 8.1.3 MPAA Movie Ratings (age-based) ...136 8.1.4 Canadian - Z) ...141 8.2.7 PVR ...142 8.2.8 BD (HD-DVD) ...142... 8.2.9 DVD-R ...142 8.2.10 DVD (Brands A - TABLE OF CONTENTS 5.4.2 Turn OFF the Power With an HDMI Command 91 5.4.3 Turn ON the Power With an HDMI Command ...91 5.4.4 Test the Power Control (On/Off)...92 5.5 Connect a Game Console or ...

Owner's Manual
Page 12
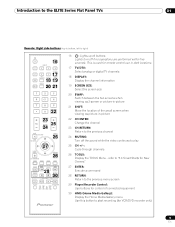
...This section identifies and describes the buttons on the remote control. 01 Introduction to the ELITE Series Flat Panel TVs 1.2.3 Buttons on the Remote Control Except for TV/RCV, CBL/SAT, VCR, or DVD/DVR TV 1 INPUT 1 2 3 4 2 TV/DTV 5 6 7 AV SCREEN SELECTION DISPLAY SIZE 3PC 4 FREEZE 5SPLIT 6 SWAP SHIFT 1 2 3 4... volume EXIT: 10 Exit the menu to return to control other equipment. Remote: Left side buttons (top to bottom, left to right) TV : 1 Turn On or place panel in Standby INPUT: 2 Select a source (INPUT 1 thru INPUT 7) PC: 3 Select the PC terminal as a...
...This section identifies and describes the buttons on the remote control. 01 Introduction to the ELITE Series Flat Panel TVs 1.2.3 Buttons on the Remote Control Except for TV/RCV, CBL/SAT, VCR, or DVD/DVR TV 1 INPUT 1 2 3 4 2 TV/DTV 5 6 7 AV SCREEN SELECTION DISPLAY SIZE 3PC 4 FREEZE 5SPLIT 6 SWAP SHIFT 1 2 3 4... volume EXIT: 10 Exit the menu to return to control other equipment. Remote: Left side buttons (top to bottom, left to right) TV : 1 Turn On or place panel in Standby INPUT: 2 Select a source (INPUT 1 thru INPUT 7) PC: 3 Select the PC terminal as a...
Owner's Manual
Page 13
...Media Gallery): Display the Home Media Gallery menu Use this button to start recording (for remote control use in dark locations. 17 TV/DTV: Select analog or digital TV channels 18 DISPLAY: Display the channel information 19 SCREEN SIZE: Select the screen size 20 SWAP: Switch between the two screens ...28 HDMI CTRL SOURCE 29STOP REC 30HMG RECEIVER VOL INPUT SELECT TV CBL EDIT/LEARN DVD RCV SAT VCR DVR 16 : Lights up all buttons Lights turn off the sound while the video continues to the previous channel 24 MUTING: Turn off if no operations are performed within five seconds. This is...
...Media Gallery): Display the Home Media Gallery menu Use this button to start recording (for remote control use in dark locations. 17 TV/DTV: Select analog or digital TV channels 18 DISPLAY: Display the channel information 19 SCREEN SIZE: Select the screen size 20 SWAP: Switch between the two screens ...28 HDMI CTRL SOURCE 29STOP REC 30HMG RECEIVER VOL INPUT SELECT TV CBL EDIT/LEARN DVD RCV SAT VCR DVR 16 : Lights up all buttons Lights turn off the sound while the video continues to the previous channel 24 MUTING: Turn off if no operations are performed within five seconds. This is...
Owner's Manual
Page 16
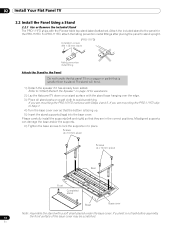
... Front Completed stand Sheet Base cover Note: Assemble the stand with the Pioneer table top stand (stand) attached. En If you are mounting the PRO-111FD skip to the Panel Do not handle the flat panel TV on a soft cloth to place. Misaligned supports can damage the base ... Stand The PRO-111FD ships with a soft sheet placed under the base cover. For PRO-111FD, attach the falling prevention metal fittings after placing the panel to stand upright. (PRO-111FD) Installation screws (M4 × 35 mm: black) Falling prevention metal fitting Attach the Stand to Step 7. 4 ) Turn the base ...
... Front Completed stand Sheet Base cover Note: Assemble the stand with the Pioneer table top stand (stand) attached. En If you are mounting the PRO-111FD skip to the Panel Do not handle the flat panel TV on a soft cloth to place. Misaligned supports can damage the base ... Stand The PRO-111FD ships with a soft sheet placed under the base cover. For PRO-111FD, attach the falling prevention metal fittings after placing the panel to stand upright. (PRO-111FD) Installation screws (M4 × 35 mm: black) Falling prevention metal fitting Attach the Stand to Step 7. 4 ) Turn the base ...
Owner's Manual
Page 34
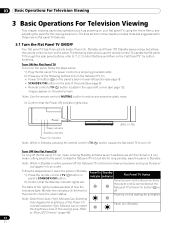
...as the panel is to sit idle for long periods, leave the panel in Standby, pressing the remote control's TV (a) button causes the flat panel TV to turn the flat panel TV On. • Power On button (a) on the panel's back in lower-left corner (see page 12). Panel... such as powering on the side of the panel (see page 8) • Remote control's TV (a) button located in to a properly grounded outlet. 2 ) Press any excessive static noise. 3 ) Confirm that the Standby indicator lights red. Sleep indicator (PRO-111FD) Standby indicator Power On indicator Note: While in Standby.
...as the panel is to sit idle for long periods, leave the panel in Standby, pressing the remote control's TV (a) button causes the flat panel TV to turn the flat panel TV On. • Power On button (a) on the panel's back in lower-left corner (see page 12). Panel... such as powering on the side of the panel (see page 8) • Remote control's TV (a) button located in to a properly grounded outlet. 2 ) Press any excessive static noise. 3 ) Confirm that the Standby indicator lights red. Sleep indicator (PRO-111FD) Standby indicator Power On indicator Note: While in Standby.

Owner's Manual
Page 44
... the Timer is too loud or too soft, refer to "3.4.6 General Sound (Audio) Adjustment." 3.3.3 Turn On the Sleep Timer To save energy and to station. To begin watching TV quickly, refer to the next lowest available channel. button sequentially changes down to the basic information within ... has three active sub-channels, enter 5 . 2 to multiple signals. decreases the volume at the panel's remote sensor, press and hold VOL+ to TV viewing is convenient, we strongly suggest going through the Setup. 2 ) Select the desired time period. A digital channel can carry a different program. For...
... the Timer is too loud or too soft, refer to "3.4.6 General Sound (Audio) Adjustment." 3.3.3 Turn On the Sleep Timer To save energy and to station. To begin watching TV quickly, refer to the next lowest available channel. button sequentially changes down to the basic information within ... has three active sub-channels, enter 5 . 2 to multiple signals. decreases the volume at the panel's remote sensor, press and hold VOL+ to TV viewing is convenient, we strongly suggest going through the Setup. 2 ) Select the desired time period. A digital channel can carry a different program. For...
Owner's Manual
Page 45
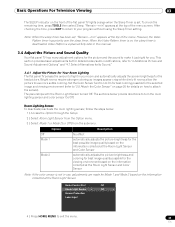
...: Off Screen Protection Label Input 4 ) Press HOME MENU to use , adjustments are made for you. The panel ships with the Room Light Sensor turned Off. Room Lighting Sensor To deactivate/reactivate the room lighting sensor, follow the steps below provide directions to "2.5 Attach the Color Sensor" on the information... and Color Sensor Note: If the color sensor is not in this manual. 3.4 Adjust the Picture and Sound Quality Your flat panel TV has many adjustment options for the picture and the sound to Sound." 3.4.1 Adjust the Picture for Your Room Lighting The flat panel...
...: Off Screen Protection Label Input 4 ) Press HOME MENU to use , adjustments are made for you. The panel ships with the Room Light Sensor turned Off. Room Lighting Sensor To deactivate/reactivate the room lighting sensor, follow the steps below provide directions to "2.5 Attach the Color Sensor" on the information... and Color Sensor Note: If the color sensor is not in this manual. 3.4 Adjust the Picture and Sound Quality Your flat panel TV has many adjustment options for the picture and the sound to Sound." 3.4.1 Adjust the Picture for Your Room Lighting The flat panel...
Owner's Manual
Page 51
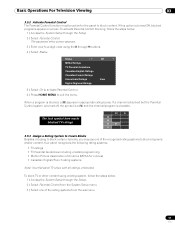
... steps below . 1 ) Access the System Setup through 9 buttons. 4 ) Select Status. Your panel recognizes the following rating systems: • TV ratings • TV Parental Guidelines including unrated programming • Motion Picture Association of the rating systems from the System Setup menu. 3 ) Select one of the recognized ... On to activate Parental Control. 6 ) Press HOME MENU to block content. If a channel is blocked but the Parental Control system is turned off, the symbol is a (V) and the channel/program is blocked, a (B) appears in appropriate rating boxes. If this option is...
... steps below . 1 ) Access the System Setup through 9 buttons. 4 ) Select Status. Your panel recognizes the following rating systems: • TV ratings • TV Parental Guidelines including unrated programming • Motion Picture Association of the rating systems from the System Setup menu. 3 ) Select one of the recognized ... On to activate Parental Control. 6 ) Press HOME MENU to block content. If a channel is blocked but the Parental Control system is turned off, the symbol is a (V) and the channel/program is blocked, a (B) appears in appropriate rating boxes. If this option is...

Owner's Manual
Page 52
...turn, unblocking a rating causes less severe ratings to exit the menu. For other rating options, press / to toggle between block and view. 6 ) Press HOME MENU to become automatically available. For example, blocking TV rating TV-PG (Parental guidance suggested) automatically blocks TV-14 (Parents strongly cautioned) and TV... Block Status : MPAA Ratings TV Parental Guidelines Canadian English Ratings Canadian French Ratings Unavailable Ratings : Digital Regional Ratings Off View TV Parental Guidelines menu TV-None TV-Y TV-Y7 TV-G TV-PG TV-14 TV-MA FV D L S ...
...turn, unblocking a rating causes less severe ratings to exit the menu. For other rating options, press / to toggle between block and view. 6 ) Press HOME MENU to become automatically available. For example, blocking TV rating TV-PG (Parental guidance suggested) automatically blocks TV-14 (Parents strongly cautioned) and TV... Block Status : MPAA Ratings TV Parental Guidelines Canadian English Ratings Canadian French Ratings Unavailable Ratings : Digital Regional Ratings Off View TV Parental Guidelines menu TV-None TV-Y TV-Y7 TV-G TV-PG TV-14 TV-MA FV D L S ...
Owner's Manual
Page 54
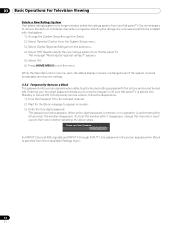
... the new ratings system from individual channels or programs. Deleting the ratings line removes any/all blocks initiated with the picture and sound turned off). Please Input Your Password. While the Parental Control menu is open, the status display remains unchanged even if the system receives .... 1 ) Access the System Setup through INPUT 7, the password entry screen appears when Block is placed into Standby or turned Off. It is unnecessary to view the program until your flat panel TV is selected from your four-digit password allows you to remove blocks from the flat panel...
... the new ratings system from individual channels or programs. Deleting the ratings line removes any/all blocks initiated with the picture and sound turned off). Please Input Your Password. While the Parental Control menu is open, the status display remains unchanged even if the system receives .... 1 ) Access the System Setup through INPUT 7, the password entry screen appears when Block is placed into Standby or turned Off. It is unnecessary to view the program until your flat panel TV is selected from your four-digit password allows you to remove blocks from the flat panel...

Owner's Manual
Page 56
...No Power off (Power Management) settings. 3.6.5 Activate Energy Save to exit the menu. 56 En To cancel the Video Pattern screen, press the remote's TV (a) or the panel's STANDBY/ON. Follow the steps below to activate an Energy Save option. 1 ) Access the Power Control through the Setup. ... automatically changes the position of your panel while keeping power usage at times as the picture position shifts. 03 Basic Operations For Television Viewing 3.6.3 Turn On the Image Orbiter A built-in feature to protect against burn-in Step 3. 1 ) Access the Option through the Setup. 2 ) Select...
...No Power off (Power Management) settings. 3.6.5 Activate Energy Save to exit the menu. 56 En To cancel the Video Pattern screen, press the remote's TV (a) or the panel's STANDBY/ON. Follow the steps below to activate an Energy Save option. 1 ) Access the Power Control through the Setup. ... automatically changes the position of your panel while keeping power usage at times as the picture position shifts. 03 Basic Operations For Television Viewing 3.6.3 Turn On the Image Orbiter A built-in feature to protect against burn-in Step 3. 1 ) Access the Option through the Setup. 2 ) Select...
Owner's Manual
Page 76
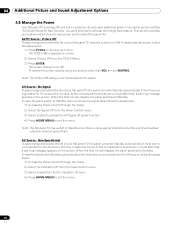
... life of a broadcast schedule (channel goes off menu. 4 ) Press HOME MENU to activate the Energy Save feature. The screen display turns Off. Note: The flat panel TV may switch to exit the menu. To have the panel enter Standby automatically when there are no commands from the TOOLS Menu. 3 )...Owners", you were told how to exit the menu. 76 En To have the screen turn Off. AV/PC Source - 04 Additional Picture and Sound Adjustment Options 4.8 Manage the Power Your flat panel TV is energy efficient but includes functions to extend the panel life. When the final minute ...
... life of a broadcast schedule (channel goes off menu. 4 ) Press HOME MENU to activate the Energy Save feature. The screen display turns Off. Note: The flat panel TV may switch to exit the menu. To have the panel enter Standby automatically when there are no commands from the TOOLS Menu. 3 )...Owners", you were told how to exit the menu. 76 En To have the screen turn Off. AV/PC Source - 04 Additional Picture and Sound Adjustment Options 4.8 Manage the Power Your flat panel TV is energy efficient but includes functions to extend the panel life. When the final minute ...
Owner's Manual
Page 79
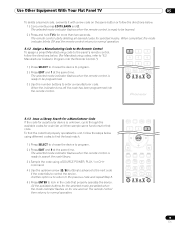
... the directions below. (For Manufacturing codes, refer to "8.2 Manufacturer Codes to Program into the remote control. 1 2 3 4 5 6 7 8 9 RECEIVER VOL INPUT SELECT TV CBL EDIT/LEARN DVD RCV SAT VCR DVR 5.1.3 Issue a Library Search for a Manufacturer Code If the code for a particular device is ready to be learned...buttons to advance to the next code if the code fails to program. 2 ) Press EDIT and 3 at the same time. When the indicator turns off, the code has been programmed into the Remote Control.") 1 ) Press SELECT to choose the device to lock in the code that properly ...
... the directions below. (For Manufacturing codes, refer to "8.2 Manufacturer Codes to Program into the remote control. 1 2 3 4 5 6 7 8 9 RECEIVER VOL INPUT SELECT TV CBL EDIT/LEARN DVD RCV SAT VCR DVR 5.1.3 Issue a Library Search for a Manufacturer Code If the code for a particular device is ready to be learned...buttons to advance to the next code if the code fails to program. 2 ) Press EDIT and 3 at the same time. When the indicator turns off, the code has been programmed into the Remote Control.") 1 ) Press SELECT to choose the device to lock in the code that properly ...
Owner's Manual
Page 80
..., are as follows: • RECEIVER STANDBY/ON (turns the Pioneer Receiver On/Off) • RECEIVER INPUT (cycles through/selects an input) • RECEIVER VOL - (adjusts the volume lower) • RECEIVER VOL + (adjusts the volume higher) HDMI CTRL SOURCE STOP REC HMG RECEIVER VOL INPUT SELECT TV CBL EDIT/LEARN DVD RCV SAT VCR...
..., are as follows: • RECEIVER STANDBY/ON (turns the Pioneer Receiver On/Off) • RECEIVER INPUT (cycles through/selects an input) • RECEIVER VOL - (adjusts the volume lower) • RECEIVER VOL + (adjusts the volume higher) HDMI CTRL SOURCE STOP REC HMG RECEIVER VOL INPUT SELECT TV CBL EDIT/LEARN DVD RCV SAT VCR...
Owner's Manual
Page 81
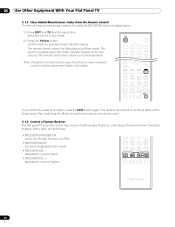
...function) (arrows to select from SAT GUIDE or MENU screens) • 4 SAT MENU (displays the satellite broadcasting menu screen) • 5 SOURCE (turns the equipment power on and off) • 6 CH ENTER* (enters the selected channel with the direct channel selection buttons) • 7 CH RETURN*... (press buttons that correspond to 8. Use Other Equipment With Your Flat Panel TV 05 5.1.6 Control a Cable (CBL) or Satellite (SAT) System When Mode is set to CBL/SAT, a cable converter uses the buttons 1, 6, 7, ...
...function) (arrows to select from SAT GUIDE or MENU screens) • 4 SAT MENU (displays the satellite broadcasting menu screen) • 5 SOURCE (turns the equipment power on and off) • 6 CH ENTER* (enters the selected channel with the direct channel selection buttons) • 7 CH RETURN*... (press buttons that correspond to 8. Use Other Equipment With Your Flat Panel TV 05 5.1.6 Control a Cable (CBL) or Satellite (SAT) System When Mode is set to CBL/SAT, a cable converter uses the buttons 1, 6, 7, ...

Owner's Manual
Page 82
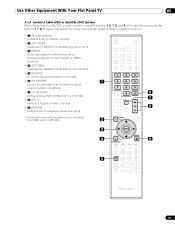
05 Use Other Equipment With Your Flat Panel TV 5.1.7 Control a Video Cassette Recorder (VCR) When Mode is set to VCR, verify that the proper Input is ... device. • 1 REWind (rewinds the VCR tape and allows searches) • 2 PAUSE/STILL (pauses playback and displays still images) • 3 SOURCE (turns the VCR's power on and off) • 4 CH +/- (selects a higher or lower channel) • 5 PLAY (selects playback) • 6 FF ... RETURN SAT / DVD MENU 1 HDMI CTRL 5 6 2 SOURCE STOP REC 7 3 HMG 8 RECEIVER VOL INPUT SELECT TV CBL EDIT/LEARN DVD RCV SAT VCR DVR 82 En
05 Use Other Equipment With Your Flat Panel TV 5.1.7 Control a Video Cassette Recorder (VCR) When Mode is set to VCR, verify that the proper Input is ... device. • 1 REWind (rewinds the VCR tape and allows searches) • 2 PAUSE/STILL (pauses playback and displays still images) • 3 SOURCE (turns the VCR's power on and off) • 4 CH +/- (selects a higher or lower channel) • 5 PLAY (selects playback) • 6 FF ... RETURN SAT / DVD MENU 1 HDMI CTRL 5 6 2 SOURCE STOP REC 7 3 HMG 8 RECEIVER VOL INPUT SELECT TV CBL EDIT/LEARN DVD RCV SAT VCR DVR 82 En
Owner's Manual
Page 83
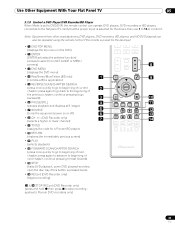
Use Other Equipment With Your Flat Panel TV 05 5.1.8 Control a DVD Player/DVR Recorder/BD Player When Mode is preset for a Pioneer BD player) • 10 RETURN (restores the immediately previous screen) • 11 PLAY (selects playback) • 12 ...FORWARD SCAN/CHAPTER SEARCH (press once quickly to go to beginning of the previous chapter; continue pressing to go backward) • 6 PAUSE/STILL (pauses playback and displays still image) • 7 SOURCE (turns...
Use Other Equipment With Your Flat Panel TV 05 5.1.8 Control a DVD Player/DVR Recorder/BD Player When Mode is preset for a Pioneer BD player) • 10 RETURN (restores the immediately previous screen) • 11 PLAY (selects playback) • 12 ...FORWARD SCAN/CHAPTER SEARCH (press once quickly to go to beginning of the previous chapter; continue pressing to go backward) • 6 PAUSE/STILL (pauses playback and displays still image) • 7 SOURCE (turns...
Owner's Manual
Page 86
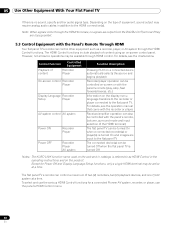
...and input selection of equipment, sound output may be available through the HDMI Control functions. For details, see the charts below. Except for a connected Pioneer AV system, recorder, or player, use the various HDMI Control functions for Power Off and Display Language Setup functions, only a single HDMI terminal ... HDMI Control functions include playback of content using an on the type of the HDMI terminal) The flat panel TV can be turned On when a connected recorder(s) or player(s) is referred to as a recorder, player, or AV system through HDMI control. For details, see the ...
...and input selection of equipment, sound output may be available through the HDMI Control functions. For details, see the charts below. Except for a connected Pioneer AV system, recorder, or player, use the various HDMI Control functions for Power Off and Display Language Setup functions, only a single HDMI terminal ... HDMI Control functions include playback of content using an on the type of the HDMI terminal) The flat panel TV can be turned On when a connected recorder(s) or player(s) is referred to as a recorder, player, or AV system through HDMI control. For details, see the ...


