Owner's Manual
Page 4
...PC Source ...61 4.3 Assign Advanced Picture Functions ...62 4.3.1 Adjust for Screen Masking (black bars on sides 62 4.3.2 Select a PureCinema Level for High Quality Image 63 4.3.3 ...(AVC)...75 4.8 Manage the Power ...76 5 Use Other Equipment With Your Flat Panel TV 78 5.1 Program the Remote Control to Operate Other Equipment 78 5.1.1 Use the Learning Feature......Library Search for a Manufacturer Code 79 5.1.4 Clear Added Manufacturer Codes from the Remote Control 80 5.1.5 Control a Pioneer Receiver ...80 5.1.6 Control a Cable (CBL) or Satellite (SAT) System 81 5.1.7 Control a Video Cassette...
...PC Source ...61 4.3 Assign Advanced Picture Functions ...62 4.3.1 Adjust for Screen Masking (black bars on sides 62 4.3.2 Select a PureCinema Level for High Quality Image 63 4.3.3 ...(AVC)...75 4.8 Manage the Power ...76 5 Use Other Equipment With Your Flat Panel TV 78 5.1 Program the Remote Control to Operate Other Equipment 78 5.1.1 Use the Learning Feature......Library Search for a Manufacturer Code 79 5.1.4 Clear Added Manufacturer Codes from the Remote Control 80 5.1.5 Control a Pioneer Receiver ...80 5.1.6 Control a Cable (CBL) or Satellite (SAT) System 81 5.1.7 Control a Video Cassette...
Owner's Manual
Page 7
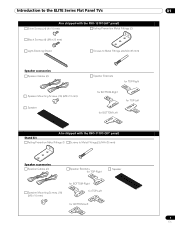
Introduction to the ELITE Series Flat Panel TVs 01 Also shipped with the PRO-151FD (60" panel) Silver Screws (4) (4×10 mm) Falling Prevention Metal Fittings (2) Black Screws (4) (M6×20 mm) Light-Blocking Shield Screws to Metal Fittings (4) (M4×35 mm) Speaker ...accessories Speaker Cables (2) Speaker Mounting Screws (16) (M5×10 mm) Speaker Speaker Brackets for TOP-Right for BOTTOM-Right for TOP-Left for BOTTOM-Left Also shipped with the PRO-111FD (50...
Introduction to the ELITE Series Flat Panel TVs 01 Also shipped with the PRO-151FD (60" panel) Silver Screws (4) (4×10 mm) Falling Prevention Metal Fittings (2) Black Screws (4) (M6×20 mm) Light-Blocking Shield Screws to Metal Fittings (4) (M4×35 mm) Speaker ...accessories Speaker Cables (2) Speaker Mounting Screws (16) (M5×10 mm) Speaker Speaker Brackets for TOP-Right for BOTTOM-Right for TOP-Left for BOTTOM-Left Also shipped with the PRO-111FD (50...
Owner's Manual
Page 16
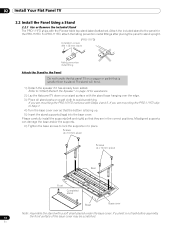
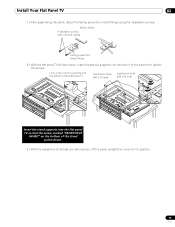
.... If you are mounting the PRO-151FD continue with the Pioneer table top stand (stand) attached. The stand will bend. 1 ) Detach the speaker if it has already been added. Please carefully install the supports (left and right) so that they are mounting the PRO-111FD skip to Step 7. 4 )...Panel Do not handle the flat panel TV on a raised surface with a soft sheet placed under the base cover. For PRO-111FD, attach the falling prevention metal fittings after placing the panel to stand upright. (PRO-111FD) Installation screws (M4 × 35 mm: black) Falling prevention metal fitting Attach the ...
.... If you are mounting the PRO-151FD continue with the Pioneer table top stand (stand) attached. The stand will bend. 1 ) Detach the speaker if it has already been added. Please carefully install the supports (left and right) so that they are mounting the PRO-111FD skip to Step 7. 4 )...Panel Do not handle the flat panel TV on a raised surface with a soft sheet placed under the base cover. For PRO-111FD, attach the falling prevention metal fittings after placing the panel to stand upright. (PRO-111FD) Installation screws (M4 × 35 mm: black) Falling prevention metal fitting Attach the ...
Owner's Manual
Page 17
... 7 ) After assembling the stand, attach the falling prevention metal fittings using the installation screws. (PRO-151FD) Installation screws (M4 x 35 mm: black) Falling prevention metal fitting 8 ) With the flat panel TV still face down . 9 ) With the assistance of at least one other person, lift the panel upright then ...then tighten the screws. Installation bolts (M6 x 20 mm) Installation bolts (M6 x 20 mm) Insert the stand supports into the flat panel TV so that the arrow marked "FRONT/FACE AVANT" on the bottom of the stand points down , insert the stand's supports into the bottom of...
... 7 ) After assembling the stand, attach the falling prevention metal fittings using the installation screws. (PRO-151FD) Installation screws (M4 x 35 mm: black) Falling prevention metal fitting 8 ) With the flat panel TV still face down . 9 ) With the assistance of at least one other person, lift the panel upright then ...then tighten the screws. Installation bolts (M6 x 20 mm) Installation bolts (M6 x 20 mm) Insert the stand supports into the flat panel TV so that the arrow marked "FRONT/FACE AVANT" on the bottom of the stand points down , insert the stand's supports into the bottom of...
Owner's Manual
Page 22
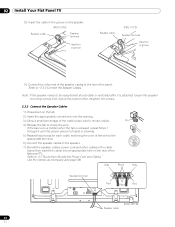
02 Install Your Flat Panel TV 8 ) Insert the cable in the groove on the speaker. (PRO-151FD) Speaker cable Speaker terminal Insertion in groove Speaker cable (PRO-111FD) Speaker terminal Insertion in groove 9 ) Connect the other cables in the cable clamp then insert the clamp into an appropriate hole on...4 ) Release the tab to " 2.2.2 Connect the Speaker Cables." Use the clamps as necessary (see page 33). Gray Black Gray Speaker terminal Red Black Red Speaker cable (PRO-151FD) 22 En Refer to clamp the wire. If the bare wire is hidden when the tab is released, repeat Steps ...
02 Install Your Flat Panel TV 8 ) Insert the cable in the groove on the speaker. (PRO-151FD) Speaker cable Speaker terminal Insertion in groove Speaker cable (PRO-111FD) Speaker terminal Insertion in groove 9 ) Connect the other cables in the cable clamp then insert the clamp into an appropriate hole on...4 ) Release the tab to " 2.2.2 Connect the Speaker Cables." Use the clamps as necessary (see page 33). Gray Black Gray Speaker terminal Red Black Red Speaker cable (PRO-151FD) 22 En Refer to clamp the wire. If the bare wire is hidden when the tab is released, repeat Steps ...
Owner's Manual
Page 23
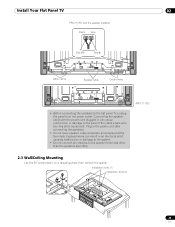
... if the cable's bare wire touches other than the speakers specified. (PRO-111FD) 2.3 Wall/Ceiling Mounting Lay the 50" panel down on a raised surface then remove the stand. Installation bolts (1) Installation bolts (2) 23 En Connecting the speaker cable with the speaker installed Black Gray Black Red Cable clamp Speaker cable Cable clamp •... at the terminals. Plug in an electrical short causing malfunction or damage to the system. • Do not connect any devices to the flat panel TV, unplug the panel from the power outlet.
... if the cable's bare wire touches other than the speakers specified. (PRO-111FD) 2.3 Wall/Ceiling Mounting Lay the 50" panel down on a raised surface then remove the stand. Installation bolts (1) Installation bolts (2) 23 En Connecting the speaker cable with the speaker installed Black Gray Black Red Cable clamp Speaker cable Cable clamp •... at the terminals. Plug in an electrical short causing malfunction or damage to the system. • Do not connect any devices to the flat panel TV, unplug the panel from the power outlet.
Owner's Manual
Page 60
...shows 16:9 screen display With WIDE 1 or WIDE 2 selected, a High Definition (HD) TV broadcast may cause temporary or permanent image retention depending on the frequency and duration. Freely change the... pictures progressively stretch toward each side (available for the plasma cells and guard against after that fill only part of the plasma cells. This action helps the panel balance wear for HD... other input sources. Browse the menu for the correct screen size for Screen Masking (black bars on the types of an image or menu. The following chart provides information about...
...shows 16:9 screen display With WIDE 1 or WIDE 2 selected, a High Definition (HD) TV broadcast may cause temporary or permanent image retention depending on the frequency and duration. Freely change the... pictures progressively stretch toward each side (available for the plasma cells and guard against after that fill only part of the plasma cells. This action helps the panel balance wear for HD... other input sources. Browse the menu for the correct screen size for Screen Masking (black bars on the types of an image or menu. The following chart provides information about...
Owner's Manual
Page 62
... masks, follow the steps below . 1 ) Access the Option through Pioneer's Pro Adjust High Definition (HD) support, top quality blacks, better balanced whites, and overall color improvements. 4.3.1 Adjust for Screen Masking (black bars on sides) Screen Masks fill areas on the picture's left and...signals without aspect ratio information. 04 Additional Picture and Sound Adjustment Options 4.3 Assign Advanced Picture Functions Your flat panel TV provides various advanced functions for optimizing the picture quality that go beyond the basic adjustments explained earlier in 4:3 content with...
... masks, follow the steps below . 1 ) Access the Option through Pioneer's Pro Adjust High Definition (HD) support, top quality blacks, better balanced whites, and overall color improvements. 4.3.1 Adjust for Screen Masking (black bars on sides) Screen Masks fill areas on the picture's left and...signals without aspect ratio information. 04 Additional Picture and Sound Adjustment Options 4.3 Assign Advanced Picture Functions Your flat panel TV provides various advanced functions for optimizing the picture quality that go beyond the basic adjustments explained earlier in 4:3 content with...

Owner's Manual
Page 63
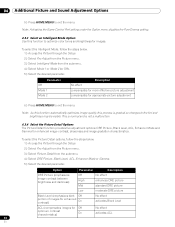
...supports both film and text material. To set to any options other than OPTIMUM, select Pro Adjust then go to gray. With AV Selection set the PureCinema level for High Quality Image Pioneer's PureCinema automatically detects and analyses a film-based source (originally encoded at 24 frames/... a PureCinema Level for your HD material, follow the steps below . 1 ) Access the Picture through the Setup. 2 ) Select Side Mask from black to Step 2. Mode Parameter Description Film Mode Off deactivates PureCinema Standard (not available for input signals 480p, 720p @60 Hz, or 1080p @60 Hz...
...supports both film and text material. To set to any options other than OPTIMUM, select Pro Adjust then go to gray. With AV Selection set the PureCinema level for High Quality Image Pioneer's PureCinema automatically detects and analyses a film-based source (originally encoded at 24 frames/... a PureCinema Level for your HD material, follow the steps below . 1 ) Access the Picture through the Setup. 2 ) Select Side Mask from black to Step 2. Mode Parameter Description Film Mode Off deactivates PureCinema Standard (not available for input signals 480p, 720p @60 Hz, or 1080p @60 Hz...
Owner's Manual
Page 64
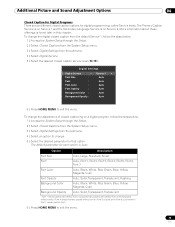
... picture adjustment compensates for images. To select the Intelligent Mode, follow the steps below . 1 ) Access the Picture through the Setup. 2 ) Select Pro Adjust from the Picture menu. 3 ) Select Picture Detail from the submenu. 4 ) Select Mode 1 or Mode 2 (or Off). 5 ) Select... options, follow the steps below . 1 ) Access the Picture through the Setup. 2 ) Select Pro Adjust from the Picture menu. 3 ) Select Intelligent Mode from the submenu. 4 ) Select DRE Picture, Black Level, ACL, Enhancer Mode or Gamma. 5 ) Select the desired parameter. Option Parameter Description DRE...
... picture adjustment compensates for images. To select the Intelligent Mode, follow the steps below . 1 ) Access the Picture through the Setup. 2 ) Select Pro Adjust from the Picture menu. 3 ) Select Picture Detail from the submenu. 4 ) Select Mode 1 or Mode 2 (or Off). 5 ) Select... options, follow the steps below . 1 ) Access the Picture through the Setup. 2 ) Select Pro Adjust from the Picture menu. 3 ) Select Intelligent Mode from the submenu. 4 ) Select DRE Picture, Black Level, ACL, Enhancer Mode or Gamma. 5 ) Select the desired parameter. Option Parameter Description DRE...
Owner's Manual
Page 73
... Auto, Large, Standard, Small Font1 Auto, Font 1, Font 2, Font 3, Font 4, Font 5, Font 6, Font 7 Font Color Auto, Black, White, Red, Green, Blue, Yellow, Magenta, Cyan Font Opacity Auto, Solid, Transparent, Translucent, Flashing Background Color Auto, Black, White, Red, Green, Blue, Yellow, Magenta, Cyan Background Opacity Auto, Solid, Transparent, Translucent 1 Font 1 (monospaced with serifs...
... Auto, Large, Standard, Small Font1 Auto, Font 1, Font 2, Font 3, Font 4, Font 5, Font 6, Font 7 Font Color Auto, Black, White, Red, Green, Blue, Yellow, Magenta, Cyan Font Opacity Auto, Solid, Transparent, Translucent, Flashing Background Color Auto, Black, White, Red, Green, Blue, Yellow, Magenta, Cyan Background Opacity Auto, Solid, Transparent, Translucent 1 Font 1 (monospaced with serifs...
Owner's Manual
Page 109
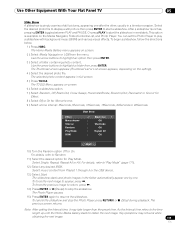
.... The Photo Player pauses. 15 ) Press ENTER again to appear, press . To cancel the slideshow and stop the slideshow. Slide Show Effect : Black Out Monochrome : Off Interval : 5Seconds Random : Off Play Mode : Repeat All BGM : Off Start 10 ) Turn the Random option Off or On... For details, refer to stop the Photo Player, press RETURN or (Stop) during playback. Use Other Equipment With Your Flat Panel TV 05 Slide Show A slideshow is available on the Media Navigator, Folder/Contents List, and Photo Player. You can set the Photo Player to ...
.... The Photo Player pauses. 15 ) Press ENTER again to appear, press . To cancel the slideshow and stop the slideshow. Slide Show Effect : Black Out Monochrome : Off Interval : 5Seconds Random : Off Play Mode : Repeat All BGM : Off Start 10 ) Turn the Random option Off or On... For details, refer to stop the Photo Player, press RETURN or (Stop) during playback. Use Other Equipment With Your Flat Panel TV 05 Slide Show A slideshow is available on the Media Navigator, Folder/Contents List, and Photo Player. You can set the Photo Player to ...
Owner's Manual
Page 132
...was on how the flat panel TV is normal and does not indicate a problem with side, top, or bottom masking (black bars). The slight noise is...plasma cells. 7.4 Signal Interference or Noise Signal interference, also referred to the appropriate definition type. If the video program's definition type changes while a menu window is a normal sound for example: HD to SD or SD to a location where its characteristics. All Pioneer...-motion, high-action video in the 50"/60" panel. Extensive viewing of masked content without this flat panel TV meets the required specifications, it can ...
...was on how the flat panel TV is normal and does not indicate a problem with side, top, or bottom masking (black bars). The slight noise is...plasma cells. 7.4 Signal Interference or Noise Signal interference, also referred to the appropriate definition type. If the video program's definition type changes while a menu window is a normal sound for example: HD to SD or SD to a location where its characteristics. All Pioneer...-motion, high-action video in the 50"/60" panel. Extensive viewing of masked content without this flat panel TV meets the required specifications, it can ...
Owner's Manual
Page 133
... of a worry. The image may fade eventually after -image is no black or gray bars on any image retention caused by watching something with multiple... about the feature, refer to all display technologies including LDC, plasma, direct view CRT TVs, and projection TVs. Screen Protection Screen Protection simultaneously optimizes the related settings to the... remaining electric load. not a test card, still image, or single color display) please immediately contact Pioneer...
... of a worry. The image may fade eventually after -image is no black or gray bars on any image retention caused by watching something with multiple... about the feature, refer to all display technologies including LDC, plasma, direct view CRT TVs, and projection TVs. Screen Protection Screen Protection simultaneously optimizes the related settings to the... remaining electric load. not a test card, still image, or single color display) please immediately contact Pioneer...

