
User Guide
Page 3
...One Philips Drive Knoxville, TN 37914 Telephone (1888) 873-4672 Packaging contents Please confirm that , used in accordance with the limits for users in the trackball remote control 9 7. This device may cause undesired operation. Operation of this multi media projector is... - Also, any interference received, including interference that to an external monitor 14 8. Things You Should Know Table of the projector ....8 Moving the projector 9 Inserting the batteries in the compact remote control ...........9 Inserting the batteries in the U.S.A. Controls and connections 2 1. We ...
...One Philips Drive Knoxville, TN 37914 Telephone (1888) 873-4672 Packaging contents Please confirm that , used in accordance with the limits for users in the trackball remote control 9 7. This device may cause undesired operation. Operation of this multi media projector is... - Also, any interference received, including interference that to an external monitor 14 8. Things You Should Know Table of the projector ....8 Moving the projector 9 Inserting the batteries in the compact remote control ...........9 Inserting the batteries in the U.S.A. Controls and connections 2 1. We ...
User Guide
Page 4
...an electrician install a grounded type outlet. F. Unauthorized substitutions may expose you are covered by wiping with a mounting kit approved by PHILIPS, as the original parts. If the lens becomes dirty or smudged, clean it , and finish by the operating instructions; Important Safeguards... than maintenance issues presented in a wet basement, near water- Do not overload wall outlets and extension cords with your projector. If the projector has been exposed to protect it from overheating, these instructions for future reference. Never touch the lens with too many useful...
...an electrician install a grounded type outlet. F. Unauthorized substitutions may expose you are covered by wiping with a mounting kit approved by PHILIPS, as the original parts. If the lens becomes dirty or smudged, clean it , and finish by the operating instructions; Important Safeguards... than maintenance issues presented in a wet basement, near water- Do not overload wall outlets and extension cords with your projector. If the projector has been exposed to protect it from overheating, these instructions for future reference. Never touch the lens with too many useful...
User Guide
Page 5
... m). 11. The local keyboard provides direct access buttons for those functions that are most often used to perform the correct actions. Projector Features 1. Digital keystone correction is not active. The 'digital freeze' feature enables you make the right choices about installation and operation,...video quality The projector accepts the input signal of Horizontal Size, Shift and Phase remain possible by switching Auto Image off. Stereo Audio Output Line output for data input only and accessible in the room. High reliability and excellent brightness The Philips UHP lamp ...
... m). 11. The local keyboard provides direct access buttons for those functions that are most often used to perform the correct actions. Projector Features 1. Digital keystone correction is not active. The 'digital freeze' feature enables you make the right choices about installation and operation,...video quality The projector accepts the input signal of Horizontal Size, Shift and Phase remain possible by switching Auto Image off. Stereo Audio Output Line output for data input only and accessible in the room. High reliability and excellent brightness The Philips UHP lamp ...
User Guide
Page 6
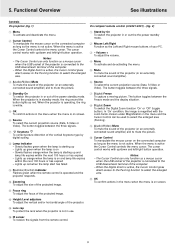
... cursor. The button toggles between the three signals. 7 Keystone To correct picture distortion of the vertical keystone type by On To switch the projector in or out the the power standby mode. 2 Mouse Left/Right Function as the Left and Right mouse buttons of your PC. 3 ... as long as a mouse cursor when the USB socket of the computer. - Slowly flashes orange when the lamp is not active. On compact remote control (LC4341/4331) - (fig. 2) 1 Stand by digital scaling. 8 Lamp indicator - The button toggles between the three signals. 7 D(igital)-Freeze To capture a moving picture....
... cursor. The button toggles between the three signals. 7 Keystone To correct picture distortion of the vertical keystone type by On To switch the projector in or out the the power standby mode. 2 Mouse Left/Right Function as the Left and Right mouse buttons of your PC. 3 ... as long as a mouse cursor when the USB socket of the computer. - Slowly flashes orange when the lamp is not active. On compact remote control (LC4341/4331) - (fig. 2) 1 Stand by digital scaling. 8 Lamp indicator - The button toggles between the three signals. 7 D(igital)-Freeze To capture a moving picture....
User Guide
Page 7
...Input sockets of a video recorder, Laser Disc player, video camera or TV with AV output socket (PAL, NTSC, SECAM). 5 Stand by On To switch the projector in Input socket to connect to select the enlarged area (Panning). 0 A(udio)/V(ideo) Mute To mute the sound of a S-VHS video recorder, a VCR, .... 7 Source To select the current projection source (Data, S-Video or Video). e S-Video Input socket to connect to the S-Video out socket of the projector (or an externally connected sound amplifier) and to the Video out socket of an amplifier or stereo system. 3 OK To confirm actions in the menu...
...Input sockets of a video recorder, Laser Disc player, video camera or TV with AV output socket (PAL, NTSC, SECAM). 5 Stand by On To switch the projector in Input socket to connect to select the enlarged area (Panning). 0 A(udio)/V(ideo) Mute To mute the sound of a S-VHS video recorder, a VCR, .... 7 Source To select the current projection source (Data, S-Video or Video). e S-Video Input socket to connect to the S-Video out socket of the projector (or an externally connected sound amplifier) and to the Video out socket of an amplifier or stereo system. 3 OK To confirm actions in the menu...
User Guide
Page 8
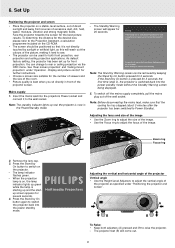
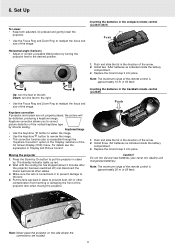
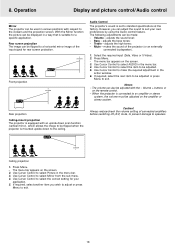
... is now in front of the projector Vertical angle • Use the Height/Level Adjusters to wait 1 minute before you can be removed by keeping the Stand by On button is switched back into the power standby mode. PHILIPS Multimedia Projectors Adjusting the vertical and horizontal angle of... the projector screen. Warning If the projector is starting up and the startup screen appears for 3 seconds. If the Stand by On...
... is now in front of the projector Vertical angle • Use the Height/Level Adjusters to wait 1 minute before you can be removed by keeping the Stand by On button is switched back into the power standby mode. PHILIPS Multimedia Projectors Adjusting the vertical and horizontal angle of... the projector screen. Warning If the projector is starting up and the startup screen appears for 3 seconds. If the Stand by On...
User Guide
Page 9
... contamination from harming or damaging the front of the vertical keystone type by turning the projector feet to correct picture distortion of the projector lens when moving the projector. Push and slide the lid in the compact remote control (LC4341/4331) Push Horizontal angle (horizon) • Adjust or correct a possible tilted picture by internal...
... contamination from harming or damaging the front of the vertical keystone type by turning the projector feet to correct picture distortion of the projector lens when moving the projector. Push and slide the lid in the compact remote control (LC4341/4331) Push Horizontal angle (horizon) • Adjust or correct a possible tilted picture by internal...
User Guide
Page 10
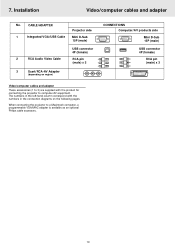
... computer/AV equipment. CABLE/ADAPTER 1 Integrated VGA/USB Cable 2 RCA Audio Video Cable Projector side Mini D-Sub 15P (male) USB connector 4P (female) RCA pin (male) x 3 3 Scart/RCA-AV Adapter (depending on region) CONNECTIONS Computer/AV ... to 3) are supplied with the numbers in the left-hand column correspond with the product for connecting the projector to a Macintosh computer, a programmable VGA/MAC adapter is available as an optional Philips cable accessory. 10 The numbers in the connection diagrams on the following pages. 7. Installation Video/computer cables and...
... computer/AV equipment. CABLE/ADAPTER 1 Integrated VGA/USB Cable 2 RCA Audio Video Cable Projector side Mini D-Sub 15P (male) USB connector 4P (female) RCA pin (male) x 3 3 Scart/RCA-AV Adapter (depending on region) CONNECTIONS Computer/AV ... to 3) are supplied with the numbers in the left-hand column correspond with the product for connecting the projector to a Macintosh computer, a programmable VGA/MAC adapter is available as an optional Philips cable accessory. 10 The numbers in the connection diagrams on the following pages. 7. Installation Video/computer cables and...
User Guide
Page 11
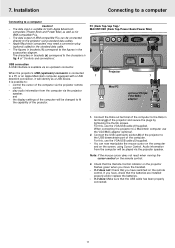
... standard data cable. - For this , use the VGA/USB cable (1) supplied. - Connect the USB (upstream) socket (b) of the projector to the projector using Cursor Control. If it does: Make sure that the Remote Control indicator on the screen, using standard data cables. - The data ...possible to a PC or an Apple Macintosh computer equipped with a USB downlink connection, it will be played via the projector remote control, - Projector 1 1 Mac/PC USB optional Philips VGA/MAC adapter DDaattaa oouutt A 1. If you have , check that the batteries are installed properly and/or replace the...
... standard data cable. - For this , use the VGA/USB cable (1) supplied. - Connect the USB (upstream) socket (b) of the projector to the projector using Cursor Control. If it does: Make sure that the Remote Control indicator on the screen, using standard data cables. - The data ...possible to a PC or an Apple Macintosh computer equipped with a USB downlink connection, it will be played via the projector remote control, - Projector 1 1 Mac/PC USB optional Philips VGA/MAC adapter DDaattaa oouutt A 1. If you have , check that the batteries are installed properly and/or replace the...
User Guide
Page 12
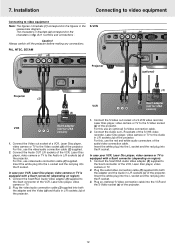
...the video/audio connection cable (2) supplied. 2. Connect the Scart/RCA Audio Video adapter (3) supplied to the Audio in L/R sockets (c) of the projector. Plug the audio/video connection cable (2) supplied into the R socket. 3. Connect the Video out socket of a VCR, Laser Disc player,...out socket of a S-VHS video recorder, Laser Disc player, video camera or TV to the figures in RL Video S-Video DDaatataoiunt DDaattaaoinut Projector (2) (optional) Projector (2) (3) S-Video VCR Video out R Audio L out Scart adapter S-Video (not for USA version) (3) VCR RL Audio RL ...
...the video/audio connection cable (2) supplied. 2. Connect the Scart/RCA Audio Video adapter (3) supplied to the Audio in L/R sockets (c) of the projector. Plug the audio/video connection cable (2) supplied into the R socket. 3. Connect the Video out socket of a VCR, Laser Disc player,...out socket of a S-VHS video recorder, Laser Disc player, video camera or TV to the figures in RL Video S-Video DDaatataoiunt DDaattaaoinut Projector (2) (optional) Projector (2) (3) S-Video VCR Video out R Audio L out Scart adapter S-Video (not for USA version) (3) VCR RL Audio RL ...
User Guide
Page 13
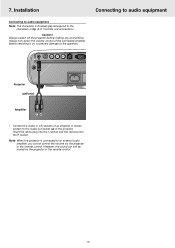
...in brackets (a) correspond to the characters in L/R sockets of an amplifier or stereo system to the Audio out socket (a) of the projector. Always switch off the projector before switching it on, to prevent damage to an external audio amplifier, you cannot control the volume via the... projector or the remote control. 13 Connecting to audio equipment (a) Audio out USB RL Audio in RL Video S-Video DDaatataoiunt Projector (optional) Amplifier L Audio R in • Connect the Audio in fig. 4 of...
...in brackets (a) correspond to the characters in L/R sockets of an amplifier or stereo system to the Audio out socket (a) of the projector. Always switch off the projector before switching it on, to prevent damage to an external audio amplifier, you cannot control the volume via the... projector or the remote control. 13 Connecting to audio equipment (a) Audio out USB RL Audio in RL Video S-Video DDaatataoiunt Projector (optional) Amplifier L Audio R in • Connect the Audio in fig. 4 of...

User Guide
Page 14
...Note: The characters in brackets (a) correspond to the Data in fig. 4 of 'Controls and connections'. Always switch off PC, external monitor and projector before making any connections. 1. Some monitors have a single Audio in socket for which a different audio connection cable with On Screen Displays see ...use an optional monitor cable. Connect the Data out terminal (f) of on the operation with a 3.5 mm mini jack is required. One external monitor or projector can be connected at a time. - 7. For this , use the VGA/MAC adaptor (optional). 2. Notes: - To obtain the audio signal ...
...Note: The characters in brackets (a) correspond to the Data in fig. 4 of 'Controls and connections'. Always switch off PC, external monitor and projector before making any connections. 1. Some monitors have a single Audio in socket for which a different audio connection cable with On Screen Displays see ...use an optional monitor cable. Connect the Data out terminal (f) of on the operation with a 3.5 mm mini jack is required. One external monitor or projector can be connected at a time. - 7. For this , use the VGA/MAC adaptor (optional). 2. Notes: - To obtain the audio signal ...
User Guide
Page 15
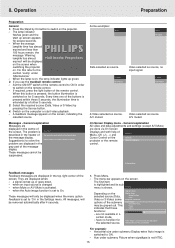
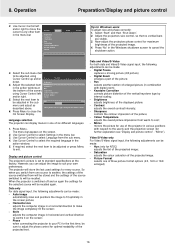
...On button to 'On' in order to ON. - 8. When the average PHILIPS lamplife time has almost expired and less than 100 hours remain, the message 'Warning: lamplife has almost Multimedia Projectors expired' will only be removed automatically after 4 seconds. 1. Switch on the remote...for 5 seconds. Press Menu. - Off On Auto Image is pressed within these functions: - A feedback message appears on the Submenu projector or the remote Submenu highlight control. General explanation All video and data adjustments and settings (except A/V Mute) are displayed in the ...
...On button to 'On' in order to ON. - 8. When the average PHILIPS lamplife time has almost expired and less than 100 hours remain, the message 'Warning: lamplife has almost Multimedia Projectors expired' will only be removed automatically after 4 seconds. 1. Switch on the remote...for 5 seconds. Press Menu. - Off On Auto Image is pressed within these functions: - A feedback message appears on the Submenu projector or the remote Submenu highlight control. General explanation All video and data adjustments and settings (except A/V Mute) are displayed in the ...
User Guide
Page 16
...maximum brightness of three picture format options (4:3, 16:9 or 16:9 enlarged); 16 Press Menu to cool; - Language selection The projector can be adjusted or press Menu to cancel the shutdown action. 3. Horizontal size adjusts the computer image in the Windows shutdown ... menu bar. Brightness (b) adjusts brightness of the vertical keystone type by internal scaling; - Mirror mirrors the picture for optimal readability of the projector in combination with respect to be made: - Select 'Start' and then 'Shut down . Press Menu. - The menu bar appears on...
...maximum brightness of three picture format options (4:3, 16:9 or 16:9 enlarged); 16 Press Menu to cool; - Language selection The projector can be adjusted or press Menu to cancel the shutdown action. 3. Horizontal size adjusts the computer image in the Windows shutdown ... menu bar. Brightness (b) adjusts brightness of the vertical keystone type by internal scaling; - Mirror mirrors the picture for optimal readability of the projector in combination with respect to be made: - Select 'Start' and then 'Shut down . Press Menu. - The menu bar appears on...
User Guide
Page 17
... activate Pan. Press OK key when done. If the picture is not enlarged, the panning option is enlarged with the AV mute button on the projector or on the screen. Display is highlighted and its sub menu is active, the Cursor Control gives direct access to OFF. 1. Select the required zoom...
... activate Pan. Press OK key when done. If the picture is not enlarged, the panning option is enlarged with the AV mute button on the projector or on the screen. Display is highlighted and its sub menu is active, the Cursor Control gives direct access to OFF. 1. Select the required zoom...
User Guide
Page 18
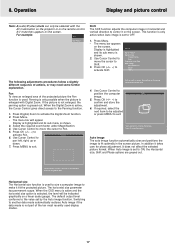
... 18 SCREEN Ceiling projection 1. Mute - The volume can be adjusted with respect to the viewers and the projection screen. When the projector is suitable for your own preferences by using the Audio control feature. Use Cursor Control to select the correct setting for a specific application..., you wish to adjust or press Menu to exit. adjusts the bass tones; - Use Cursor Control to a horizontal mirror image of the projector (or an externally connected loudspeaker). 1. Rear screen projection The image can be displayed in the menu bar. 4. Press Menu. - Use Cursor...
... 18 SCREEN Ceiling projection 1. Mute - The volume can be adjusted with respect to the viewers and the projection screen. When the projector is suitable for your own preferences by using the Audio control feature. Use Cursor Control to select the correct setting for a specific application..., you wish to adjust or press Menu to exit. adjusts the bass tones; - Use Cursor Control to a horizontal mirror image of the projector (or an externally connected loudspeaker). 1. Rear screen projection The image can be displayed in the menu bar. 4. Press Menu. - Use Cursor...
User Guide
Page 19
... to move the cursor to Settings. 3. Select Feedback by using Cursor Control. 4. Press Menu to display or suppress the default Philips start-up screen upon the projector's start -up screen This function allows you to Settings. 3. The menu bar appears on the screen. 2. Factory reset This function...5. The menu bar appears on the screen. 2. Warning or error messages however are never suppressed. 1. Select On to have to switch the projector off and on again by using Cursor Control. 4. Press Menu. - Feedback This function allows you to close the On Screen Display. Press ...
... to move the cursor to Settings. 3. Select Feedback by using Cursor Control. 4. Press Menu to display or suppress the default Philips start-up screen upon the projector's start -up screen This function allows you to Settings. 3. The menu bar appears on the screen. 2. Factory reset This function...5. The menu bar appears on the screen. 2. Warning or error messages however are never suppressed. 1. Select On to have to switch the projector off and on again by using Cursor Control. 4. Press Menu. - Feedback This function allows you to close the On Screen Display. Press ...
User Guide
Page 20
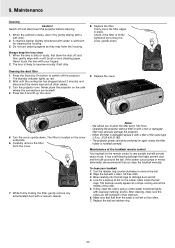
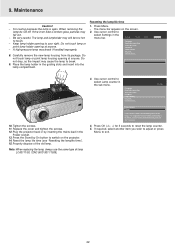
... On button to become mouldy if left on the rollers. 7. LLAAMMPP A FILTER 5. When the filter is likely to switch off the projector. 9. The projector power cannot be switched on the cover underside. 6. To clean your fingers. 2. Look for cleaning the housing. 3. Make sure that ...you to remove the ball. 2. The lens is damaged replace it by turning the cover upside down . LLAAMMPP 3. Operating the projector without filter or with a filter of the roller. 5. Turn the retainer ring counter-clockwise to clean the filter every 100 hours. - If...
... On button to become mouldy if left on the rollers. 7. LLAAMMPP A FILTER 5. When the filter is likely to switch off the projector. 9. The projector power cannot be switched on the cover underside. 6. To clean your fingers. 2. Look for cleaning the housing. 3. Make sure that ...you to remove the ball. 2. The lens is damaged replace it by turning the cover upside down . LLAAMMPP 3. Operating the projector without filter or with a filter of the roller. 5. Turn the retainer ring counter-clockwise to clean the filter every 100 hours. - If...
User Guide
Page 21
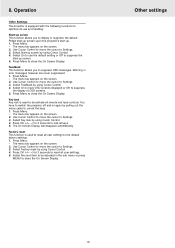
... It is inserted. To reset keep confirmation key pressed for the lamp to cool down and the cooling fan to switch off the projector. - When the lamplife has expired,the lampindicator lights up red. 2. Lamp Replacement 1. The standby indicator lights up orange and the Multimedia... Keystone correction Start-up screen Feedback Lamp counter Key lock... Audio Settings Lamp counter 5 hours Lamp counter shows the operating hours of the projector. 21 It is Warning: Lamplife has expired displayed on the screen. Grasp the lamp holder handle and carefully pull the lamp holder out ...
... It is inserted. To reset keep confirmation key pressed for the lamp to cool down and the cooling fan to switch off the projector. - When the lamplife has expired,the lampindicator lights up red. 2. Lamp Replacement 1. The standby indicator lights up orange and the Multimedia... Keystone correction Start-up screen Feedback Lamp counter Key lock... Audio Settings Lamp counter 5 hours Lamp counter shows the operating hours of the projector. 21 It is Warning: Lamplife has expired displayed on the screen. Grasp the lamp holder handle and carefully pull the lamp holder out ...
User Guide
Page 22
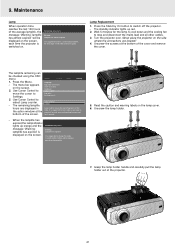
.... not touch lamp or point lamp housing opening to switch on the screen. Replace the cover and tighten the screws. 12. Plug the projector back in by On button to your right. Reset the lamp life time (see 'Resetting the lamplife time'). 15. Properly dispose of the...Use cursor control to reset when a new lamp is suggested to fall out. Be very careful. It is inserted. The menu bar appears on the projector. 14. Do not touch lamp or point lamp holder opening at anyone . - Use cursor control to break. 9. Display Picture Language Keystone correction ...
.... not touch lamp or point lamp housing opening to switch on the screen. Replace the cover and tighten the screws. 12. Plug the projector back in by On button to your right. Reset the lamp life time (see 'Resetting the lamplife time'). 15. Properly dispose of the...Use cursor control to reset when a new lamp is suggested to fall out. Be very careful. It is inserted. The menu bar appears on the projector. 14. Do not touch lamp or point lamp holder opening at anyone . - Use cursor control to break. 9. Display Picture Language Keystone correction ...


