
User Guide
Page 3
...You Should Know Table of the most sophisticated and reliable products on the market today. Projector Features 5 5. Troubleshooting 23 Introduction Congratulations on a circuit different from that the following ...Philips Drive Knoxville, TN 37914 Telephone (1888) 873-4672 Packaging contents Please confirm that to which can radiate radio frequency energy and, if not installed and used properly, it is operated in the U.S.A. Also, any interference received, including interference that , used in the trackball remote control 9 7. Introduction 3 Table of your projector...
...You Should Know Table of the most sophisticated and reliable products on the market today. Projector Features 5 5. Troubleshooting 23 Introduction Congratulations on a circuit different from that the following ...Philips Drive Knoxville, TN 37914 Telephone (1888) 873-4672 Packaging contents Please confirm that to which can radiate radio frequency energy and, if not installed and used properly, it is operated in the U.S.A. Also, any interference received, including interference that , used in the trackball remote control 9 7. Introduction 3 Table of your projector...
User Guide
Page 4
...use a chemical duster or polisher-cleaner because it from the wall outlet and disconnect any cable systems. This will often require extensive work by PHILIPS, as a bookcase unless proper ventilation is left unattended or not in a fire or electric shock. 16. If you follow the manufacturer's ...instructions. 7. For added protection of the cabinet are covered by placing the projector on the projector. 12. Do not attempt to normal operation. When the power cord or plug is equipped with mains lead with too many useful ...
...use a chemical duster or polisher-cleaner because it from the wall outlet and disconnect any cable systems. This will often require extensive work by PHILIPS, as a bookcase unless proper ventilation is left unattended or not in a fire or electric shock. 16. If you follow the manufacturer's ...instructions. 7. For added protection of the cabinet are covered by placing the projector on the projector. 12. Do not attempt to normal operation. When the power cord or plug is equipped with mains lead with too many useful ...
User Guide
Page 5
... signals. Adjustable Screen Capability The diagonal picture size of the On Screen Display menu. 2. High reliability and excellent brightness The Philips UHP lamp guarantees long life, excellent brightness over the entire picture. 5 With the 'keystone correction' feature you to manipulate... the mouse cursor. Digital features The digital features of the projector are used during presentations. Projector Features 1. The standard OSD language is used during set from almost anywhere in real hot plug and play ...
... signals. Adjustable Screen Capability The diagonal picture size of the On Screen Display menu. 2. High reliability and excellent brightness The Philips UHP lamp guarantees long life, excellent brightness over the entire picture. 5 With the 'keystone correction' feature you to manipulate... the mouse cursor. Digital features The digital features of the projector are used during presentations. Projector Features 1. The standard OSD language is used during set from almost anywhere in real hot plug and play ...
User Guide
Page 6
...computer. - Slowly flashes orange when the lamp is connected to the USB downstream terminal of the projector is starting up and lamp life expires within the next 100 hours or has expired - On compact remote control (LC4341/4331) - (fig. 2) 1 Stand by digital scaling. 8 Lamp indicator - When the... Digital Zoom is active, the Cursor Control gives direct access to the Panning function to mute the picture. 4 Standby On To switch the projector in the menu and the Cursor...
...computer. - Slowly flashes orange when the lamp is connected to the USB downstream terminal of the projector is starting up and lamp life expires within the next 100 hours or has expired - On compact remote control (LC4341/4331) - (fig. 2) 1 Stand by digital scaling. 8 Lamp indicator - When the... Digital Zoom is active, the Cursor Control gives direct access to the Panning function to mute the picture. 4 Standby On To switch the projector in the menu and the Cursor...
User Guide
Page 7
...the Panning function to connect a PC or Apple Macintosh computer equipped with AV output socket (PAL, NTSC, SECAM). 5 Stand by On To switch the projector in use . 2 Cursor Control To manipulate the mouse cursor on and off the remote control after 5 seconds. 7 When the Digital Zoom is magnified.... Notes: - b USB (upstream) Input socket to select the enlarged area. buttons function as a mouse cursor when the USB socket of the projector is active the Cursor Control controls the menu cursor. The back-light will always use some power, even when not in or out the the...
...the Panning function to connect a PC or Apple Macintosh computer equipped with AV output socket (PAL, NTSC, SECAM). 5 Stand by On To switch the projector in use . 2 Cursor Control To manipulate the mouse cursor on and off the remote control after 5 seconds. 7 When the Digital Zoom is magnified.... Notes: - b USB (upstream) Input socket to select the enlarged area. buttons function as a mouse cursor when the USB socket of the projector is active the Cursor Control controls the menu cursor. The back-light will always use some power, even when not in or out the the...
User Guide
Page 8
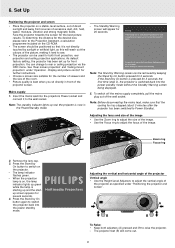
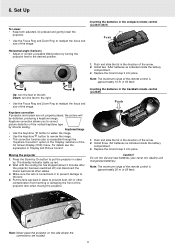
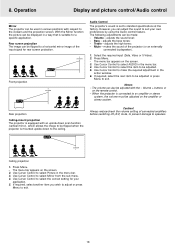
... to adjust the size of the image. • Use the Focus ring to switch the projector back into the power standby mode. The lamp indicator flashes green. - PHILIPS Multimedia Projectors Adjusting the vertical and horizontal angle of the projector Vertical angle • Use the Height/Level Adjusters to adjust the vertical angle of the...
... to adjust the size of the image. • Use the Focus ring to switch the projector back into the power standby mode. The lamp indicator flashes green. - PHILIPS Multimedia Projectors Adjusting the vertical and horizontal angle of the projector Vertical angle • Use the Height/Level Adjusters to adjust the vertical angle of the...
User Guide
Page 9
... the compact remote control (LC4341/4331) Push Horizontal angle (horizon) • Adjust or correct a possible tilted picture by internal scaling. Do not mix old and new batteries (also never mix alkaline and manganese batteries). Set Up To Lower: • Keep both adjusters (A) pressed and gently lower the projector. • Use the Focus...
... the compact remote control (LC4341/4331) Push Horizontal angle (horizon) • Adjust or correct a possible tilted picture by internal scaling. Do not mix old and new batteries (also never mix alkaline and manganese batteries). Set Up To Lower: • Keep both adjusters (A) pressed and gently lower the projector. • Use the Focus...
User Guide
Page 10
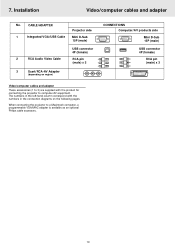
CABLE/ADAPTER 1 Integrated VGA/USB Cable 2 RCA Audio Video Cable Projector side Mini D-Sub 15P (male) USB connector 4P (female) RCA pin (male) x 3 3 Scart/RCA-AV Adapter (depending on region) CONNECTIONS Computer/AV products side Mini... (1 to 3) are supplied with the numbers in the left-hand column correspond with the product for connecting the projector to a Macintosh computer, a programmable VGA/MAC adapter is available as an optional Philips cable accessory. 10 Installation Video/computer cables and adapter No. The numbers in the connection diagrams on the following...
CABLE/ADAPTER 1 Integrated VGA/USB Cable 2 RCA Audio Video Cable Projector side Mini D-Sub 15P (male) USB connector 4P (female) RCA pin (male) x 3 3 Scart/RCA-AV Adapter (depending on region) CONNECTIONS Computer/AV products side Mini... (1 to 3) are supplied with the numbers in the left-hand column correspond with the product for connecting the projector to a Macintosh computer, a programmable VGA/MAC adapter is available as an optional Philips cable accessory. 10 Installation Video/computer cables and adapter No. The numbers in the connection diagrams on the following...
User Guide
Page 11
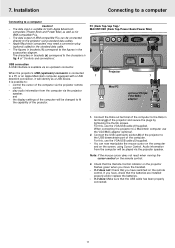
... now manipulate the mouse cursor on the computer and on the remote control: 3. Projector 1 1 Mac/PC USB optional Philips VGA/MAC adapter DDaattaa oouutt A 1. Connect the USB (upstream) socket (b) of the projector to the USB downstream port of 'Controls and connections'. For this , use the...computers may need a conversion plug (optional) added to the figures in fig. 4 of the computer. Audio information from the computer via the projector remote control, - If it will be connected directly to a PC or an Apple Macintosh computer equipped with a USB downlink connection, it ...
... now manipulate the mouse cursor on the computer and on the remote control: 3. Projector 1 1 Mac/PC USB optional Philips VGA/MAC adapter DDaattaa oouutt A 1. Connect the USB (upstream) socket (b) of the projector to the USB downstream port of 'Controls and connections'. For this , use the...computers may need a conversion plug (optional) added to the figures in fig. 4 of the computer. Audio information from the computer via the projector remote control, - If it will be connected directly to a PC or an Apple Macintosh computer equipped with a USB downlink connection, it ...
User Guide
Page 12
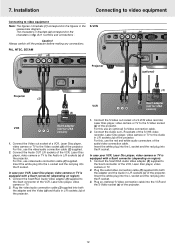
... Laser Disc player, video camera or TV to the Audio in L/R sockets (c) of the projector. For this , use an (optional) S-vVideo connection cable. 2. Always switch off the projector before making any connections. For this use the video/audio connection cable (2) supplied. 2. Connect...Plug the video/audio connection cable (2) supplied into both the adapter and the Video (d) and Audio in RL Video S-Video DDaatataoiunt DDaattaaoinut Projector (2) (optional) Projector (2) (3) S-Video VCR Video out R Audio L out Scart adapter S-Video (not for USA version) (3) VCR RL Audio RL...
... Laser Disc player, video camera or TV to the Audio in L/R sockets (c) of the projector. For this , use an (optional) S-vVideo connection cable. 2. Always switch off the projector before making any connections. For this use the video/audio connection cable (2) supplied. 2. Connect...Plug the video/audio connection cable (2) supplied into both the adapter and the Video (d) and Audio in RL Video S-Video DDaatataoiunt DDaattaaoinut Projector (2) (optional) Projector (2) (3) S-Video VCR Video out R Audio L out Scart adapter S-Video (not for USA version) (3) VCR RL Audio RL...
User Guide
Page 13
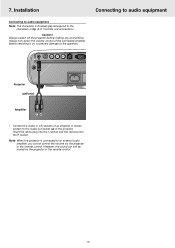
...audio equipment Note: The characters in fig. 4 of the projector. Caution! Insert the white plug into the L socket and the red plug into the R socket. Note: When the projector is connected to the speakers. 7. Always switch off the projector before switching it on, to prevent damage to an external ... the remote control. 13 Connecting to audio equipment (a) Audio out USB RL Audio in RL Video S-Video DDaatataoiunt Projector (optional) Amplifier L Audio R in • Connect the Audio in L/R sockets of an amplifier or stereo system to the characters in brackets (a) ...
...audio equipment Note: The characters in fig. 4 of the projector. Caution! Insert the white plug into the L socket and the red plug into the R socket. Note: When the projector is connected to the speakers. 7. Always switch off the projector before switching it on, to prevent damage to an external ... the remote control. 13 Connecting to audio equipment (a) Audio out USB RL Audio in RL Video S-Video DDaatataoiunt Projector (optional) Amplifier L Audio R in • Connect the Audio in L/R sockets of an amplifier or stereo system to the characters in brackets (a) ...

User Guide
Page 14
...the thumb screws. Always switch off PC, external monitor and projector before making any connections. 1. Connect the Data out terminal (f) of on the projector: • Connect the Audio in RL Video S-Video DDaatataoiunt (g) DDaattaaoinut Projector (1) Mac/PC (optional) USB DDaattaa oouutt AAuuddiioo oouutt .... For this , use the VGA/MAC adaptor (optional). 2. For further details on the monitor instead of the projector to characters in terminal (g) of the projector. • Insert the white plug into the L socket and the red plug into the R socket. To obtain...
...the thumb screws. Always switch off PC, external monitor and projector before making any connections. 1. Connect the Data out terminal (f) of on the projector: • Connect the Audio in RL Video S-Video DDaatataoiunt (g) DDaattaaoinut Projector (1) Mac/PC (optional) USB DDaattaa oouutt AAuuddiioo oouutt .... For this , use the VGA/MAC adaptor (optional). 2. For further details on the monitor instead of the projector to characters in terminal (g) of the projector. • Insert the white plug into the L socket and the red plug into the R socket. To obtain...
User Guide
Page 15
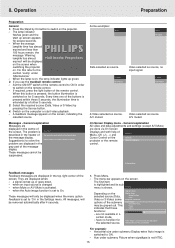
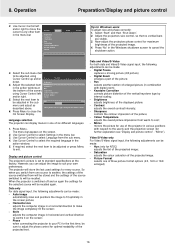
... These messages will be displayed on the screen when switching the projector on the screen, indicating the selected source. Hue under submenu Display when Auto image is activated. - When the average PHILIPS lamplife time has almost expired and less than 100 hours remain,... the message 'Warning: lamplife has almost Multimedia Projectors expired' will only be removed automatically after 4 seconds. 1. For this button...
... These messages will be displayed on the screen when switching the projector on the screen, indicating the selected source. Hue under submenu Display when Auto image is activated. - When the average PHILIPS lamplife time has almost expired and less than 100 hours remain,... the message 'Warning: lamplife has almost Multimedia Projectors expired' will only be removed automatically after 4 seconds. 1. For this button...
User Guide
Page 16
...the image to cool; - Digital Freeze captures a moving picture (still picture); - Keystone Correction corrects picture distortion of the projector in various positions with respect to any other item in combination with digital zoom); - Colour Temperature adjusts the overall picture impression ... - Brightness (b) adjusts brightness of six different languages. 1. Use Cursor Control left or right to be made : - Adjust the projectors size control, so that no vertical bars are visible. 3. Select the sub menu item to adjust the contrast level. 6. Colour ...
...the image to cool; - Digital Freeze captures a moving picture (still picture); - Keystone Correction corrects picture distortion of the projector in various positions with respect to any other item in combination with digital zoom); - Colour Temperature adjusts the overall picture impression ... - Brightness (b) adjusts brightness of six different languages. 1. Use Cursor Control left or right to be made : - Adjust the projectors size control, so that no vertical bars are visible. 3. Select the sub menu item to adjust the contrast level. 6. Colour ...
User Guide
Page 17
... with Digital Zoom. Use Cursor Control to move the cursor to Digital Zoom Magnification Pan... Shift is enlarged with the AV mute button on the projector or on the remote control. Press OK key when done. It does not affect the selected picture format. Press Menu. - Keystone correction Shift. 3. If the...
... with Digital Zoom. Use Cursor Control to move the cursor to Digital Zoom Magnification Pan... Shift is enlarged with the AV mute button on the projector or on the remote control. Press OK key when done. It does not affect the selected picture format. Press Menu. - Keystone correction Shift. 3. If the...
User Guide
Page 18
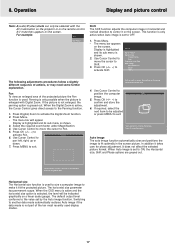
... the volume must be adjusted or press Menu to be adjusted. 5. Caution! Press Menu. - SCREEN Front projection SCREEN Audio Control The projector's sound is suitable for your own preferences by using the Audio control feature. Use Cursor Control to exit. 18 However, you wish to... adjusts the bass tones; - Treble - Use Cursor Control to standard specifications at the factory. Always reduce/check the volume setting of the projector (or an externally connected loudspeaker). 1. With the Mirror function the picture can be displayed in a way that is set to select AUDIO in...
... the volume must be adjusted or press Menu to be adjusted. 5. Caution! Press Menu. - SCREEN Front projection SCREEN Audio Control The projector's sound is suitable for your own preferences by using the Audio control feature. Use Cursor Control to exit. 18 However, you wish to... adjusts the bass tones; - Treble - Use Cursor Control to standard specifications at the factory. Always reduce/check the volume setting of the projector (or an externally connected loudspeaker). 1. With the Mirror function the picture can be displayed in a way that is set to select AUDIO in...
User Guide
Page 19
...all keys. 5. Select Factory reset by using Cursor Control. 4. Press OK (-/- -) for 3 seconds to display or suppress the default Philips start-up screen upon the projector's start -up . 1. Select the next item to be adjusted in the sub menu or press MENU to close the On Screen Display.... Settings. 3. Select Key lock by using Cursor Control. 4. Use Cursor Control to move the cursor to Settings. 3. Operation Other Settings The projector is equipped with the following functions to optimize its use the default setting or Off to reset all user settings to unlock the keys. 1....
...all keys. 5. Select Factory reset by using Cursor Control. 4. Press OK (-/- -) for 3 seconds to display or suppress the default Philips start-up screen upon the projector's start -up . 1. Select the next item to be adjusted in the sub menu or press MENU to close the On Screen Display.... Settings. 3. Select Key lock by using Cursor Control. 4. Use Cursor Control to move the cursor to Settings. 3. Operation Other Settings The projector is equipped with the following functions to optimize its use the default setting or Off to reset all user settings to unlock the keys. 1....
User Guide
Page 20
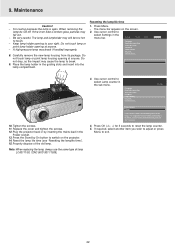
... or damaged filter may harm the housing. Wipe the ball with a vacuum cleaner. This build-up usually appears as they may seriously damage the projector. - After cleaning, make sure the rollers are located! Make sure that fluff from the cover. 7. The lens is not left dirty. 8.... ball-cage that you to dislodge dust and lint. 4. To clean your fingers. 2. Turn the retainer ring counter-clockwise to switch off the projector. 9. Look for cleaning the housing. 3. The standby indicator lights up around the middle of use cleaning agents as a stripe running around the ...
... or damaged filter may harm the housing. Wipe the ball with a vacuum cleaner. This build-up usually appears as they may seriously damage the projector. - After cleaning, make sure the rollers are located! Make sure that fluff from the cover. 7. The lens is not left dirty. 8.... ball-cage that you to dislodge dust and lint. 4. To clean your fingers. 2. Turn the retainer ring counter-clockwise to switch off the projector. 9. Look for cleaning the housing. 3. The standby indicator lights up around the middle of use cleaning agents as a stripe running around the ...
User Guide
Page 21
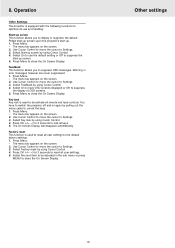
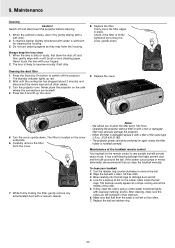
...at the bottom of the average lamplife, the message 'Warning: lamplife has almost expired' will be checked using the OSD menu. 1. Multimedia projectors Warning: Lamplife has almost expired It is inserted. Wait 5 minutes for 3 seconds. - Use Cursor Control to have a spare lamp available... user guide. The remaining lamplife hours are located! 4. When the lamplife has expired,the lampindicator lights up orange and the Multimedia projectors message 'Warning: lamplife has expired' is suggested to select Lamp counter. - FILTER FILTER FILTER 9. Maintenance Lamp When operation time...
...at the bottom of the average lamplife, the message 'Warning: lamplife has almost expired' will be checked using the OSD menu. 1. Multimedia projectors Warning: Lamplife has almost expired It is inserted. Wait 5 minutes for 3 seconds. - Use Cursor Control to have a spare lamp available... user guide. The remaining lamplife hours are located! 4. When the lamplife has expired,the lampindicator lights up orange and the Multimedia projectors message 'Warning: lamplife has expired' is suggested to select Lamp counter. - FILTER FILTER FILTER 9. Maintenance Lamp When operation time...
User Guide
Page 22
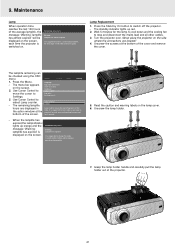
... to select Lamp counter in by On button to switch on the screen. Use cursor control to touch. The menu bar appears on the projector. 14. not touch lamp or point lamp housing opening to reset the lamp counter. 5. Place the lamp holder in the - Press Menu.... - Do Factory reset... 9. Plug the projector back in the sub menu. Reset the lamp life time (see 'Resetting the lamplife time'). 15. When removing the - lamp do not tilt....
... to select Lamp counter in by On button to switch on the screen. Use cursor control to touch. The menu bar appears on the projector. 14. not touch lamp or point lamp housing opening to reset the lamp counter. 5. Place the lamp holder in the - Press Menu.... - Do Factory reset... 9. Plug the projector back in the sub menu. Reset the lamp life time (see 'Resetting the lamplife time'). 15. When removing the - lamp do not tilt....


