
User Guide
Page 3
...harmful interference in the projector box. Please put the projector in accordance with the user's guide, may not cause harmful interference, and 2. Projector - Controls and connections 2 1. Introduction 3 Table of the trackball remote control 20 Lamp 21 Lamp replacement 21 Resetting the lamplife... for USA version) - Troubleshooting 23 Introduction Congratulations on a circuit different from that the following : Philips Consumer Electronics Company One Philips Drive Knoxville, TN 37914 Telephone (1888) 873-4672 Packaging contents Please confirm that to a computer. Integrated VGA...
...harmful interference in the projector box. Please put the projector in accordance with the user's guide, may not cause harmful interference, and 2. Projector - Controls and connections 2 1. Introduction 3 Table of the trackball remote control 20 Lamp 21 Lamp replacement 21 Resetting the lamplife... for USA version) - Troubleshooting 23 Introduction Congratulations on a circuit different from that the following : Philips Consumer Electronics Company One Philips Drive Knoxville, TN 37914 Telephone (1888) 873-4672 Packaging contents Please confirm that to a computer. Integrated VGA...
User Guide
Page 4
..., use and servicing. 1. Do not allow anything to clean the projector unit. As a safety feature, this projector, observe the following conditions: A. When replacement parts are covered by PHILIPS, as the original parts. Do not attempt to lightning and power...-line surges. 14. E. Upon completion of the projector and to clean the air filter after every 100 lamp...
..., use and servicing. 1. Do not allow anything to clean the projector unit. As a safety feature, this projector, observe the following conditions: A. When replacement parts are covered by PHILIPS, as the original parts. Do not attempt to lightning and power...-line surges. 14. E. Upon completion of the projector and to clean the air filter after every 100 lamp...
User Guide
Page 9
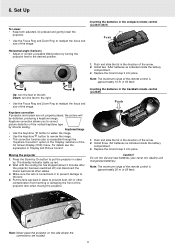
...Replace the lid and snap it into place. Keystone correction allows you to put the projector in stand by. Press the Stand by On button to correct picture distortion of the vertical keystone type by turning the projector... in 'Display and Picture Control'. Stabnyd A MVute Volume Lamp RC Keystone Menu OK Note: Never place the projector on the side where the connections are not properly placed,...feet to the lens. 4. Put the lens cap back in the compact remote control (LC4341/4331) Push Horizontal angle (horizon) • Adjust or correct a possible tilted picture by...
...Replace the lid and snap it into place. Keystone correction allows you to put the projector in stand by. Press the Stand by On button to correct picture distortion of the vertical keystone type by turning the projector... in 'Display and Picture Control'. Stabnyd A MVute Volume Lamp RC Keystone Menu OK Note: Never place the projector on the side where the connections are not properly placed,...feet to the lens. 4. Put the lens cap back in the compact remote control (LC4341/4331) Push Horizontal angle (horizon) • Adjust or correct a possible tilted picture by...
User Guide
Page 21
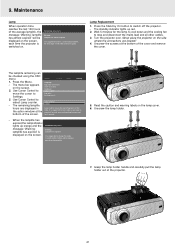
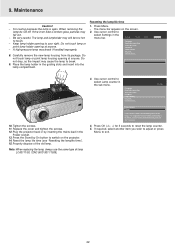
... the cooling fan to switch off the projector. - It is inserted. Lamp Replacement 1. Press the Menu. - The remaining lamplife hours are located! 4. Audio Settings Lamp counter 5 hours Lamp counter shows the operating hours of the projector. 21 Grasp the lamp holder handle and carefully pull the lamp holder out of the lamp. Press the Stand by On button to...
... the cooling fan to switch off the projector. - It is inserted. Lamp Replacement 1. Press the Menu. - The remaining lamplife hours are located! 4. Audio Settings Lamp counter 5 hours Lamp counter shows the operating hours of the projector. 21 Grasp the lamp holder handle and carefully pull the lamp holder out of the lamp. Press the Stand by On button to...
User Guide
Page 22
...the - Reset the lamp life time (see 'Resetting the lamplife time'). 15. 9. Do not drop, as the impact may still be too hot menu bar. Settings FILTER 10. Plug the projector back in the - The menu bar appears on the projector. 14. Note: When replacing the lamp, always use the ...same type of lamp LCA3111/00, 12NC 8670 931 11009). 3. Press Menu. -
...the - Reset the lamp life time (see 'Resetting the lamplife time'). 15. 9. Do not drop, as the impact may still be too hot menu bar. Settings FILTER 10. Plug the projector back in the - The menu bar appears on the projector. 14. Note: When replacing the lamp, always use the ...same type of lamp LCA3111/00, 12NC 8670 931 11009). 3. Press Menu. -
User Guide
Page 23
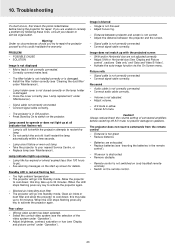
... hue (see 'Inserting the batteries in Off position. • Press Stand by following these hints, consult your nearest Service Centre, or • Replace lamp (see 'Maintenance'). Lamp ceased to activate the projector again. Troubleshooting If a fault occurs, first check the points listed below before switching off ; Mains lead is not adjusted. • Adjust volume...
... hue (see 'Inserting the batteries in Off position. • Press Stand by following these hints, consult your nearest Service Centre, or • Replace lamp (see 'Maintenance'). Lamp ceased to activate the projector again. Troubleshooting If a fault occurs, first check the points listed below before switching off ; Mains lead is not adjusted. • Adjust volume...
