
User Guide
Page 3
... trackball remote control 20 Lamp 21 Lamp replacement 21 Resetting the lamplife time 22 10. This device may cause undesired operation. They are not going to help . Projector - Scart/RCA Audio Video adapter (not for users in the trackball remote control 9 7. Important Safeguards 4 4. Introduction 3 Table of your own protection and prolonged operation of contents 3 Introduction 3 Packaging contents 3 2. Set Up 8-9 Positioning the projector and screen 8 Mains supply 8 Adjusting the focus and size of the image 8 Adjusting the...
... trackball remote control 20 Lamp 21 Lamp replacement 21 Resetting the lamplife time 22 10. This device may cause undesired operation. They are not going to help . Projector - Scart/RCA Audio Video adapter (not for users in the trackball remote control 9 7. Important Safeguards 4 4. Introduction 3 Table of your own protection and prolonged operation of contents 3 Introduction 3 Packaging contents 3 2. Set Up 8-9 Positioning the projector and screen 8 Mains supply 8 Adjusting the focus and size of the image 8 Adjusting the...
User Guide
Page 4
... will be sure the service technician has used replacement parts specified by its installation, use a chemical duster or polisher-cleaner because it from the wall outlet before you follow the manufacturer's instructions. 7. Never push objects of these instructions before cleaning or lamp replacement. 2. Do not attempt to your business or the right type of power supplied to service the projector yourself other controls may result in...
... will be sure the service technician has used replacement parts specified by its installation, use a chemical duster or polisher-cleaner because it from the wall outlet before you follow the manufacturer's instructions. 7. Never push objects of these instructions before cleaning or lamp replacement. 2. Do not attempt to your business or the right type of power supplied to service the projector yourself other controls may result in...
User Guide
Page 5
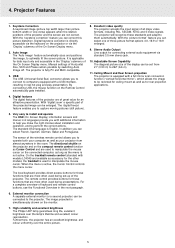
... mouse cursor. USB The USB (Universal Serial Bus) connector allows you to operate both your projector from 21" (0.53 m) to capture moving pictures (still picture). 5. The local keyboard provides direct access buttons for data input only and accessible in the next paragraph. 6. With 'digital zoom' a specific part of the projected image can select one of the On Screen Display menu. The remote control provides buttons for connecting external audio equipment via the 'Display' submenu of...
... mouse cursor. USB The USB (Universal Serial Bus) connector allows you to operate both your projector from 21" (0.53 m) to capture moving pictures (still picture). 5. The local keyboard provides direct access buttons for data input only and accessible in the next paragraph. 6. With 'digital zoom' a specific part of the projected image can select one of the On Screen Display menu. The remote control provides buttons for connecting external audio equipment via the 'Display' submenu of...
User Guide
Page 6
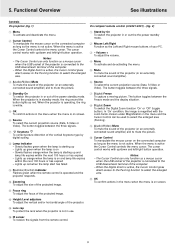
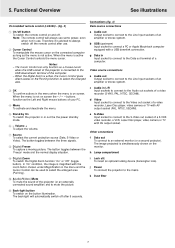
... lens when the projector is on - The button toggles between the Freeze mode and the display situation. 8 D(igital)-Zoom To switch the Digital Zoom function 'On' or 'Off' (toggle button). Notes: - Slowly flashes green when the lamp is on screen. 6 Focus ring To adjust the focus of the projected image. @ Height/Level adjusters To adjust the vertical and/or horizontal angle of the projector (or an externally connected sound amplifier). 6 Source To select the current projection source (Data, S-Video...
... lens when the projector is on - The button toggles between the Freeze mode and the display situation. 8 D(igital)-Zoom To switch the Digital Zoom function 'On' or 'Off' (toggle button). Notes: - Slowly flashes green when the lamp is on screen. 6 Focus ring To adjust the focus of the projected image. @ Height/Level adjusters To adjust the vertical and/or horizontal angle of the projector (or an externally connected sound amplifier). 6 Source To select the current projection source (Data, S-Video...
User Guide
Page 7
... signals. 8 D(igital)-Freeze To capture a moving picture. Other connections f Data out To connect to the mains. k Dust filter ! Video source connections a Audio out Output socket to connect to the Audio out sockets of an amplifier or stereo system. h Lamp compartment 9 D(igital)-Zoom To switch the Digital Zoom function 'On' or 'Off' (toggle button). Back-light button To switch on and off after use . The button toggles between the 'Freeze' mode and the normal display situation. i Lock...
... signals. 8 D(igital)-Freeze To capture a moving picture. Other connections f Data out To connect to the mains. k Dust filter ! Video source connections a Audio out Output socket to connect to the Audio out sockets of an amplifier or stereo system. h Lamp compartment 9 D(igital)-Zoom To switch the Digital Zoom function 'On' or 'Off' (toggle button). Back-light button To switch on and off after use . The button toggles between the 'Freeze' mode and the normal display situation. i Lock...
User Guide
Page 8
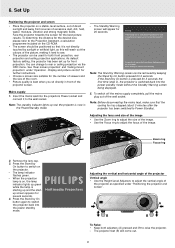
... Standby Warning screen will come out. 8 Stabnyd A MVute Volume Lamp RC Adjusting the focus and size of the image • Use the Zoom ring to adjust the size of the image. • Use the Focus ring to Power Standby). Press the Stand by On button to wait 1 minute before you sit directly in the Power/Standby mode. - The projector feet (B) will appear for several seconds. 4. As default factory setting, the projector has been set up red, the projector is switched...
... Standby Warning screen will come out. 8 Stabnyd A MVute Volume Lamp RC Adjusting the focus and size of the image • Use the Zoom ring to adjust the size of the image. • Use the Focus ring to Power Standby). Press the Stand by On button to wait 1 minute before you sit directly in the Power/Standby mode. - The projector feet (B) will appear for several seconds. 4. As default factory setting, the projector has been set up red, the projector is switched...
User Guide
Page 9
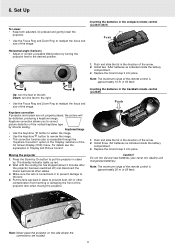
... projector. • Use the Focus Ring and Zoom Ring to the left. Replace the lid and snap it into place. Keystone correction allows you to correct picture distortion of the image. The standby indicator lights up red. 2. Install two 'AAA' batteries as indicated inside the battery compartment. 3. Down: turn the feet to readjust the focus and size of the vertical keystone type by . Keystoned Image • Use the Keystone button to widen the image...
... projector. • Use the Focus Ring and Zoom Ring to the left. Replace the lid and snap it into place. Keystone correction allows you to correct picture distortion of the image. The standby indicator lights up red. 2. Install two 'AAA' batteries as indicated inside the battery compartment. 3. Down: turn the feet to readjust the focus and size of the vertical keystone type by . Keystoned Image • Use the Keystone button to widen the image...
User Guide
Page 10
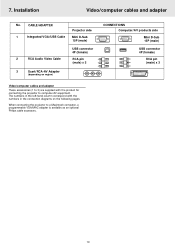
... (female) RCA pin (male) x 3 Video/computer cables and adapter These accessories (1 to 3) are supplied with the product for connecting the projector to a Macintosh computer, a programmable VGA/MAC adapter is available as an optional Philips cable accessory. 10 CABLE/ADAPTER 1 Integrated VGA/USB Cable 2 RCA Audio Video Cable Projector side Mini D-Sub 15P (male) USB connector 4P (female) RCA pin (male) x 3 3 Scart/RCA-AV Adapter (depending on the following pages. Installation Video/computer cables and adapter No. 7.
... (female) RCA pin (male) x 3 Video/computer cables and adapter These accessories (1 to 3) are supplied with the product for connecting the projector to a Macintosh computer, a programmable VGA/MAC adapter is available as an optional Philips cable accessory. 10 CABLE/ADAPTER 1 Integrated VGA/USB Cable 2 RCA Audio Video Cable Projector side Mini D-Sub 15P (male) USB connector 4P (female) RCA pin (male) x 3 3 Scart/RCA-AV Adapter (depending on the following pages. Installation Video/computer cables and adapter No. 7.
User Guide
Page 11
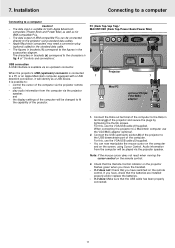
... Top/Power Book/Power Mac) (b) Audio out USB RL Audio in terminal (g) of IBM compatible PCs can now manipulate the mouse cursor on the computer and on the remote control: 3. Projector 1 1 Mac/PC USB optional Philips VGA/MAC adapter DDaattaa oouutt A 1. Installation Connecting to a computer Connecting to the USB downstream port of the computer to a Macintosh computer use the VGA/MAC adaptor (optional). 2. When connecting the projector to the Data in RL Video S-Video DDaatataoiunt (g) DDaattaaoinut USB connection A USB interface is...
... Top/Power Book/Power Mac) (b) Audio out USB RL Audio in terminal (g) of IBM compatible PCs can now manipulate the mouse cursor on the computer and on the remote control: 3. Projector 1 1 Mac/PC USB optional Philips VGA/MAC adapter DDaattaa oouutt A 1. Installation Connecting to a computer Connecting to the USB downstream port of the computer to a Macintosh computer use the VGA/MAC adaptor (optional). 2. When connecting the projector to the Data in RL Video S-Video DDaatataoiunt (g) DDaattaaoinut USB connection A USB interface is...
User Guide
Page 12
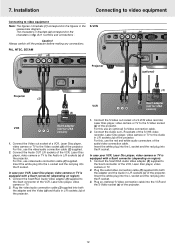
... the S-Video socket (e) of the projector. For this use the video/audio connection cable (2) supplied. 2. Connect the S-Video out socket of a S-VHS video recorder, Laser Disc player, video camera or TV to the Audio in L/R sockets (c) of 'Controls and connections'. Insert the white plug into the L socket and the red plug into the R socket. 3. Plug the video/audio connection cable (2) supplied into both the adapter and the Video (d) and Audio in L/R sockets (c) of the projector. 12...
... the S-Video socket (e) of the projector. For this use the video/audio connection cable (2) supplied. 2. Connect the S-Video out socket of a S-VHS video recorder, Laser Disc player, video camera or TV to the Audio in L/R sockets (c) of 'Controls and connections'. Insert the white plug into the L socket and the red plug into the R socket. 3. Plug the video/audio connection cable (2) supplied into both the adapter and the Video (d) and Audio in L/R sockets (c) of the projector. 12...

User Guide
Page 14
... Audio in RL Video S-Video DDaatataoiunt (g) DDaattaaoinut Projector (1) Mac/PC (optional) USB DDaattaa oouutt AAuuddiioo oouutt 14 For this , use the VGA/USB cable (1) supplied. Connect the Data out terminal (f) of the projector and secure the plugs by tightening the thumb screws. One external monitor or projector can be connected at a time. - For further details on the projector: • Connect the Audio in brackets (a) correspond to a Macintosh computer use the VGA/MAC adaptor (optional). 2. Installation Connecting...
... Audio in RL Video S-Video DDaatataoiunt (g) DDaattaaoinut Projector (1) Mac/PC (optional) USB DDaattaa oouutt AAuuddiioo oouutt 14 For this , use the VGA/USB cable (1) supplied. Connect the Data out terminal (f) of the projector and secure the plugs by tightening the thumb screws. One external monitor or projector can be connected at a time. - For further details on the projector: • Connect the Audio in brackets (a) correspond to a Macintosh computer use the VGA/MAC adaptor (optional). 2. Installation Connecting...
User Guide
Page 15
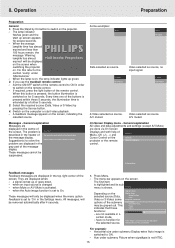
The lamp indicator flashes green and the start video playback. - Switch on the computer or start up or goes down, - Some examples: Data Video No signal Data selected as source. Video selected as source. when an input source is activated. - These messages will switch off automatically. The menu bar appears on the screen, indicating the selected source. Keystone correction Auto Image Horizontal size... Hue under 'Maintenance' - Press the Stand by On button to 'On' in the Settings menu. If you use the...
The lamp indicator flashes green and the start video playback. - Switch on the computer or start up or goes down, - Some examples: Data Video No signal Data selected as source. Video selected as source. when an input source is activated. - These messages will switch off automatically. The menu bar appears on the screen, indicating the selected source. Keystone correction Auto Image Horizontal size... Hue under 'Maintenance' - Press the Stand by On button to 'On' in the Settings menu. If you use the...
User Guide
Page 16
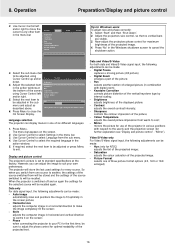
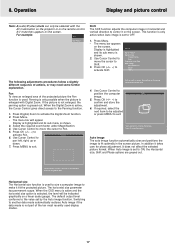
... using Cursor Control up and/or Display Picture Audio Settings down '. 2. Select 'Start' and then 'Shut down . Now adjust the projectors phase control for NTSC) adjusts the tint of three picture format options (4:3, 16:9 or 16:9 enlarged); 16 Colour temperature Picture format Mirror 5. Language selection The projector can be made : - Digital Freeze captures a moving picture (still picture); - Pan selects another , the settings of the source switched from one of the projected image; - Video/S-Video only For Video/S-Video signal input...
... using Cursor Control up and/or Display Picture Audio Settings down '. 2. Select 'Start' and then 'Shut down . Now adjust the projectors phase control for NTSC) adjusts the tint of three picture format options (4:3, 16:9 or 16:9 enlarged); 16 Colour temperature Picture format Mirror 5. Language selection The projector can be made : - Digital Freeze captures a moving picture (still picture); - Pan selects another , the settings of the source switched from one of the projected image; - Video/S-Video only For Video/S-Video signal input...
User Guide
Page 17
... menu is active and the horizontal size option is set to adjust the position of the image. Switching to another data mode automatically restores Auto image if the data mode is enlarged with the AV mute button on the projector or on the screen. Use Cursor Control to move the cursor to ON, the Horizontal size, Shift and Phase options are greyed out. Press OK (-/- -) to activate the Digital Zoom...
... menu is active and the horizontal size option is set to adjust the position of the image. Switching to another data mode automatically restores Auto image if the data mode is enlarged with the AV mute button on the projector or on the screen. Use Cursor Control to move the cursor to ON, the Horizontal size, Shift and Phase options are greyed out. Press OK (-/- -) to activate the Digital Zoom...
User Guide
Page 18
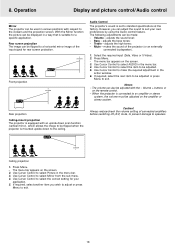
SCREEN Front projection SCREEN Audio Control The projector's sound is mounted upside down to the ceiling. Use Cursor Control to select the item to select Mirror from the sub menu. 4. Always reduce/check the volume setting of the projector (or an externally connected loudspeaker). 1. Use Cursor Control to a horizontal mirror image of the input signal for a specific application. With the Mirror function the picture can be flipped to select the correct setting for your own preferences by...
SCREEN Front projection SCREEN Audio Control The projector's sound is mounted upside down to the ceiling. Use Cursor Control to select the item to select Mirror from the sub menu. 4. Always reduce/check the volume setting of the projector (or an externally connected loudspeaker). 1. Use Cursor Control to a horizontal mirror image of the input signal for a specific application. With the Mirror function the picture can be flipped to select the correct setting for your own preferences by...
User Guide
Page 19
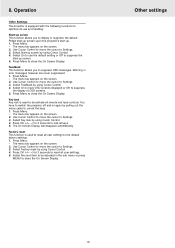
... allows you to close the On Screen Display. Press Menu. - Feedback This function allows you to de-activate all user settings. 5. Select Start-up screen. 5. Use Cursor Control to move the cursor to reset all remote and local controls. Press OK (-/- -) for 3 seconds to Settings. 3. Press Menu. - Select Feedback by using Cursor Control. 4. Operation Other Settings The projector is used to display or suppress the default Philips start-up screen upon the projector's start -up screen by using Cursor Control. 4.
... allows you to close the On Screen Display. Press Menu. - Feedback This function allows you to de-activate all user settings. 5. Select Start-up screen. 5. Use Cursor Control to move the cursor to reset all remote and local controls. Press OK (-/- -) for 3 seconds to Settings. 3. Press Menu. - Select Feedback by using Cursor Control. 4. Operation Other Settings The projector is used to display or suppress the default Philips start-up screen upon the projector's start -up screen by using Cursor Control. 4.
User Guide
Page 20
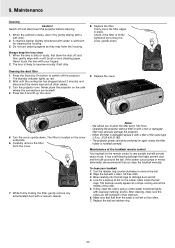
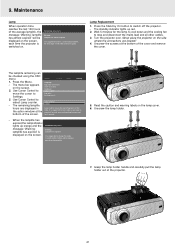
... 1. Replace the filter. The standby indicator lights up the cover. Never place the projector on the remote control is sufficient for a built-up of use cleaning agents as a stripe running around the ball. To clean your fingers. 2. After cleaning, make sure the rollers are located! Never touch the lens with water is very durable and will provide years of dirt on the cover underside. 6. LLAAMMPP A FILTER 5. Operating the projector...
... 1. Replace the filter. The standby indicator lights up the cover. Never place the projector on the remote control is sufficient for a built-up of use cleaning agents as a stripe running around the ball. To clean your fingers. 2. After cleaning, make sure the rollers are located! Never touch the lens with water is very durable and will provide years of dirt on the cover underside. 6. LLAAMMPP A FILTER 5. Operating the projector...
User Guide
Page 21
...inserted. The standby indicator lights up screen Feedback Lamp counter Key lock... Display Picture Language Keystone correction Start-up red. 2. It is suggested to reset when a new lamp is indicated in the action window at the bottom of the average lamplife, the message 'Warning: lamplife has almost expired' will be checked using the OSD menu. 1. Lamp Replacement 1. Press the Menu. - Audio Settings Lamp counter 5 hours Lamp counter shows the operating hours of the projector. 21 When the lamplife has expired,the lampindicator lights up orange and the...
...inserted. The standby indicator lights up screen Feedback Lamp counter Key lock... Display Picture Language Keystone correction Start-up red. 2. It is suggested to reset when a new lamp is indicated in the action window at the bottom of the average lamplife, the message 'Warning: lamplife has almost expired' will be checked using the OSD menu. 1. Lamp Replacement 1. Press the Menu. - Audio Settings Lamp counter 5 hours Lamp counter shows the operating hours of the projector. 21 When the lamplife has expired,the lampindicator lights up orange and the...
User Guide
Page 22
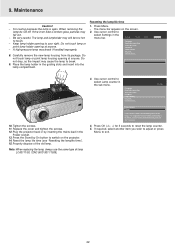
...Picture Audio to select Lamp counter in the sub menu. A high-pressure lamp may still be too hot menu bar. Tighten the screws. 11. Replace the cover and tighten the screws. 12. Use cursor control to touch. Display Picture Language Keystone correction Start-up screen Feedback Lamp counter Key lock... 8. Press Menu. - When removing the - Use cursor control to reset the lamp counter. 5. Language - Keystone correction Start-up screen Feedback Lamp counter Key lock... Settings FILTER 10. Note: When replacing the lamp, always use the same type of the old lamp. Factory...
...Picture Audio to select Lamp counter in the sub menu. A high-pressure lamp may still be too hot menu bar. Tighten the screws. 11. Replace the cover and tighten the screws. 12. Use cursor control to touch. Display Picture Language Keystone correction Start-up screen Feedback Lamp counter Key lock... 8. Press Menu. - When removing the - Use cursor control to reset the lamp counter. 5. Language - Keystone correction Start-up screen Feedback Lamp counter Key lock... Settings FILTER 10. Note: When replacing the lamp, always use the same type of the old lamp. Factory...
User Guide
Page 23
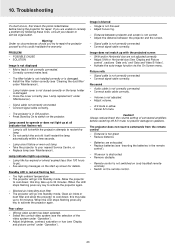
...; Connect audio cable correctly. - When the LED stops flashing press any key to commands from the remote control - Poor colour - 10. The projector is damaged. • Install the filter holder correctly (see 'Cleaning the dust filter' under 'Maintenance'). - it will go ). • See warning messages on the projector. Image does not match up at all (indicator fast flashes red) - Shift and/or Horizontal size are exhausted. • Replace batteries (see 'Maintenance'). Picture rolls - Audio cable...
...; Connect audio cable correctly. - When the LED stops flashing press any key to commands from the remote control - Poor colour - 10. The projector is damaged. • Install the filter holder correctly (see 'Cleaning the dust filter' under 'Maintenance'). - it will go ). • See warning messages on the projector. Image does not match up at all (indicator fast flashes red) - Shift and/or Horizontal size are exhausted. • Replace batteries (see 'Maintenance'). Picture rolls - Audio cable...


