
User Guide
Page 3
...the vertical and horizontal angle of your own protection and prolonged operation of the projector ....8 Moving the projector 9 Inserting the batteries in the compact remote control ...........9 Inserting the batteries in the projector box. Operation is encouraged to try to help . Integrated VGA/USB cable... Also, any interference received, including interference that , used in accordance with Part 15 of the following : Philips Consumer Electronics Company One Philips Drive Knoxville, TN 37914 Telephone (1888) 873-4672 Packaging contents Please confirm that to which case the user...
...the vertical and horizontal angle of your own protection and prolonged operation of the projector ....8 Moving the projector 9 Inserting the batteries in the compact remote control ...........9 Inserting the batteries in the projector box. Operation is encouraged to try to help . Integrated VGA/USB cable... Also, any interference received, including interference that , used in accordance with Part 15 of the following : Philips Consumer Electronics Company One Philips Drive Knoxville, TN 37914 Telephone (1888) 873-4672 Packaging contents Please confirm that to which case the user...
User Guide
Page 5
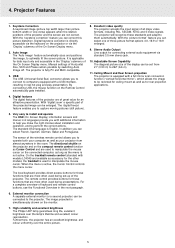
...format' feature you can be enlarged. Digital features The digital features of the projector are of three picture format options 4:3, 16:9 or 16:9 enlarged. 9. The directional shuttle on the projector and on the compact remote control function as Cursor Control and are most often used to perform the ... with models LC4345 and available as for the other models) the trackball is not active. High reliability and excellent brightness The Philips UHP lamp guarantees long life, excellent brightness over the entire picture. 5 The standard OSD language is active, the Cursor Control...
...format' feature you can be enlarged. Digital features The digital features of the projector are of three picture format options 4:3, 16:9 or 16:9 enlarged. 9. The directional shuttle on the projector and on the compact remote control function as Cursor Control and are most often used to perform the ... with models LC4345 and available as for the other models) the trackball is not active. High reliability and excellent brightness The Philips UHP lamp guarantees long life, excellent brightness over the entire picture. 5 The standard OSD language is active, the Cursor Control...
User Guide
Page 6
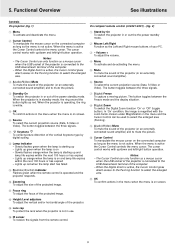
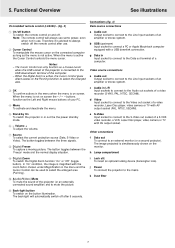
...button lights up /down and left /right button operation. When the Digital Zoom is not active. 5. Functional Overview See illustrations Controls On projector (fig. 1) 1 Menu To activate and deactivate the menu. 2 Cursor Control To manipulate the mouse cursor on - Slowly flashes green when...the USB downstream terminal of the power standby mode. Lights up and lamp life expires within the next 100 hours or has expired - On compact remote control (LC4341/4331) - (fig. 2) 1 Stand by digital scaling. 8 Lamp indicator - The button toggles between the three signals. 7 D(igital)-Freeze ...
...button lights up /down and left /right button operation. When the Digital Zoom is not active. 5. Functional Overview See illustrations Controls On projector (fig. 1) 1 Menu To activate and deactivate the menu. 2 Cursor Control To manipulate the mouse cursor on - Slowly flashes green when...the USB downstream terminal of the power standby mode. Lights up and lamp life expires within the next 100 hours or has expired - On compact remote control (LC4341/4331) - (fig. 2) 1 Stand by digital scaling. 8 Lamp indicator - The button toggles between the three signals. 7 D(igital)-Freeze ...
User Guide
Page 7
...' (toggle button). The button toggles between the 'Freeze' mode and the normal display situation. Note: The remote control will automatically switch off . c Audio in Input socket to connect to the Data out terminal of the projector (or an externally connected sound amplifier) and to the Video out socket of an amplifier or...
...' (toggle button). The button toggles between the 'Freeze' mode and the normal display situation. Note: The remote control will automatically switch off . c Audio in Input socket to connect to the Data out terminal of the projector (or an externally connected sound amplifier) and to the Video out socket of an amplifier or...
User Guide
Page 9
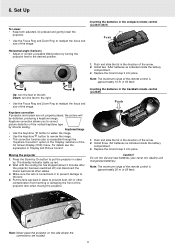
...the image. • This correction function also is turned back in stand by turning the projector feet to the desired position. 1. Inserting the batteries in the direction of the remote control is approximately 20 m (± 65 feet). Note: The maximum range of the arrow...indicated inside the battery compartment. 3. Push and slide the lid in the trackball remote control (LC4345) Push 1. Make sure the lens is accessible through the 'Keystone Correction' option in the compact remote control (LC4341/4331) Push Horizontal angle (horizon) • Adjust or correct a possible tilted...
...the image. • This correction function also is turned back in stand by turning the projector feet to the desired position. 1. Inserting the batteries in the direction of the remote control is approximately 20 m (± 65 feet). Note: The maximum range of the arrow...indicated inside the battery compartment. 3. Push and slide the lid in the trackball remote control (LC4345) Push 1. Make sure the lens is accessible through the 'Keystone Correction' option in the compact remote control (LC4341/4331) Push Horizontal angle (horizon) • Adjust or correct a possible tilted...
User Guide
Page 11
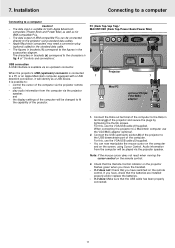
... via an upstream connector. Audio information from the computer via the projector remote control, - The characters in brackets (a) correspond to the Data in terminal (g) of the computer. Projector 1 1 Mac/PC USB optional Philips VGA/MAC adapter DDaattaa oouutt A 1. It is connected to the projector using Cursor Control. Note: If the mouse cursor does not react...
... via an upstream connector. Audio information from the computer via the projector remote control, - The characters in brackets (a) correspond to the Data in terminal (g) of the computer. Projector 1 1 Mac/PC USB optional Philips VGA/MAC adapter DDaattaa oouutt A 1. It is connected to the projector using Cursor Control. Note: If the mouse cursor does not react...
User Guide
Page 13
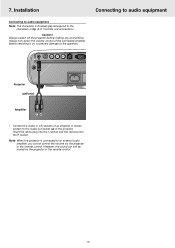
... of the connected amplifier before making any connections. Always switch off the projector before switching it on, to prevent damage to audio equipment (a) Audio out USB RL Audio in RL Video S-Video DDaatataoiunt Projector (optional) Amplifier L Audio R in • Connect the Audio in... fig. 4 of 'Controls and connections'. However, the sound can still be muted via the projector or the remote control. Caution! Connecting to the speakers. Installation Connecting to audio equipment Note: The characters in brackets (a) correspond to the characters...
... of the connected amplifier before making any connections. Always switch off the projector before switching it on, to prevent damage to audio equipment (a) Audio out USB RL Audio in RL Video S-Video DDaatataoiunt Projector (optional) Amplifier L Audio R in • Connect the Audio in... fig. 4 of 'Controls and connections'. However, the sound can still be muted via the projector or the remote control. Caution! Connecting to the speakers. Installation Connecting to audio equipment Note: The characters in brackets (a) correspond to the characters...
User Guide
Page 15
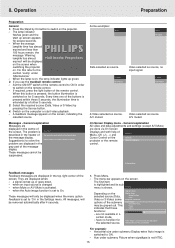
...messages cannot be displayed when the menu option Feedback is switched on the Submenu projector or the remote Submenu highlight control. Video selected as source. The menu bar appears on the remote control. - The first item is highlighted and its sub menu is changed ...Settings Depending on . 8. When the average PHILIPS lamplife time has almost expired and less than 100 hours remain, the message 'Warning: lamplife has almost Multimedia Projectors expired' will only be suppressed. Every time one of the remote control. Select the required source (Data, Video...
...messages cannot be displayed when the menu option Feedback is switched on the Submenu projector or the remote Submenu highlight control. Video selected as source. The menu bar appears on the remote control. - The first item is highlighted and its sub menu is changed ...Settings Depending on . 8. When the average PHILIPS lamplife time has almost expired and less than 100 hours remain, the message 'Warning: lamplife has almost Multimedia Projectors expired' will only be suppressed. Every time one of the remote control. Select the required source (Data, Video...
User Guide
Page 17
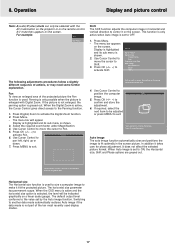
... not enlarged, the panning option is shown. 3. Display is highlighted and its sub menu is enlarged with the AV mute button on the projector or on the remote control. Press MENU to position the image. Move pointer to select the area to Digital Zoom Magnification Pan... When the OSD menu is active...
... not enlarged, the panning option is shown. 3. Display is highlighted and its sub menu is enlarged with the AV mute button on the projector or on the remote control. Press MENU to position the image. Move pointer to select the area to Digital Zoom Magnification Pan... When the OSD menu is active...
User Guide
Page 18
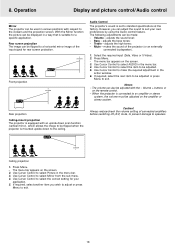
...tones; - Use Cursor Control to select the item to exit. When the projector is mounted upside down scan function (vertical mirror), which allows the image to be adjusted or press Menu to be adjusted on the remote control. - Use Cursor Control to an amplifier or stereo system, the ...volume must be adjusted. 5. Caution! Operation Display and picture control/Audio control Mirror The projector can also be displayed in a way that is set to...
...tones; - Use Cursor Control to select the item to exit. When the projector is mounted upside down scan function (vertical mirror), which allows the image to be adjusted or press Menu to be adjusted on the remote control. - Use Cursor Control to an amplifier or stereo system, the ...volume must be adjusted. 5. Caution! Operation Display and picture control/Audio control Mirror The projector can also be displayed in a way that is set to...
User Guide
Page 19
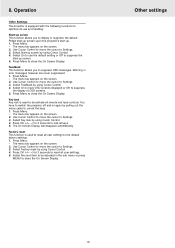
...move the cursor to suppress OSD messages. Select Factory reset by pulling out the mains cable to display or suppress the default Philips start-up screen upon the projector's start -up screen This function allows you to Settings. 3. Press Menu to de-activate all keys. 5. The menu... bar appears on the screen. 2. The menu bar appears on the screen. 2. Press Menu. - Select Start-up . 1. Key lock Key lock is used to reset all user settings to lock all remote...
...move the cursor to suppress OSD messages. Select Factory reset by pulling out the mains cable to display or suppress the default Philips start-up screen upon the projector's start -up screen This function allows you to Settings. 3. Press Menu to de-activate all keys. 5. The menu... bar appears on the screen. 2. The menu bar appears on the screen. 2. Press Menu. - Select Start-up . 1. Key lock Key lock is used to reset all user settings to lock all remote...
User Guide
Page 20
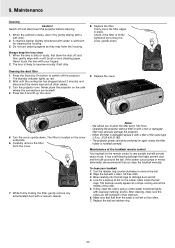
...has stopped (about 3 minutes and disconnect the mains lead and all other cables. Press tab A and lift up red. 2. Operating the projector without filter or with isopropyl (rubbing) alcohol. Maintenance of the same type (12 nc: 3122 434 01180). - Turn the retainer ring ...ball cage. To clean your fingers. 2. Switch off the projector. 9. Replace the filter. Firmly press the filter edges in their channels. 6. Never place the projector on the remote control is likely to switch off and disconnect the projector before cleaning. 1. While firmly holding the filter, gently ...
...has stopped (about 3 minutes and disconnect the mains lead and all other cables. Press tab A and lift up red. 2. Operating the projector without filter or with isopropyl (rubbing) alcohol. Maintenance of the same type (12 nc: 3122 434 01180). - Turn the retainer ring ...ball cage. To clean your fingers. 2. Switch off the projector. 9. Replace the filter. Firmly press the filter edges in their channels. 6. Never place the projector on the remote control is likely to switch off and disconnect the projector before cleaning. 1. While firmly holding the filter, gently ...
User Guide
Page 23
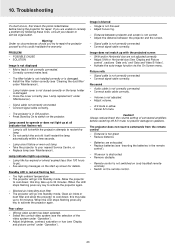
... Mains lead is blurred - Lamp holder cover is not closed correctly or the lamp holder is not switched on (only trackball remote controle). • Switch on the projector. Standby LED is not correctly connected. • Connect audio cable correctly. - When the LED stops flashing press any key ...If you try to cool down ; The filter holder is not installed correctly or is in the remote control'). - Lamp ceased to operate or does not light up to cool down ; Allow the projector to 30 minutes. No sound - PROBLEM - it will restart the lamp automatically within a few ...
... Mains lead is blurred - Lamp holder cover is not closed correctly or the lamp holder is not switched on (only trackball remote controle). • Switch on the projector. Standby LED is not correctly connected. • Connect audio cable correctly. - When the LED stops flashing press any key ...If you try to cool down ; The filter holder is not installed correctly or is in the remote control'). - Lamp ceased to operate or does not light up to cool down ; Allow the projector to 30 minutes. No sound - PROBLEM - it will restart the lamp automatically within a few ...

