User Guide
Page 2
...printer...9 Ordering and replacing supplies 11 Ordering ink cartridges...11 Using genuine Lexmark ink cartridges...11 Replacing ink cartridges...12 Ordering paper and other supplies...13 Recycling Lexmark products...13 Using the printer control panel buttons and menus 14 Using...settings...18 Using the printer software 19 Minimum system requirements...19 Using the Windows printer software...19 Using the Macintosh printer software...21 Finding and installing optional software...22 Updating the printer software (Windows only)...22 Reinstalling the printer software...23 Loading paper and original...
...printer...9 Ordering and replacing supplies 11 Ordering ink cartridges...11 Using genuine Lexmark ink cartridges...11 Replacing ink cartridges...12 Ordering paper and other supplies...13 Recycling Lexmark products...13 Using the printer control panel buttons and menus 14 Using...settings...18 Using the printer software 19 Minimum system requirements...19 Using the Windows printer software...19 Using the Macintosh printer software...21 Finding and installing optional software...22 Updating the printer software (Windows only)...22 Reinstalling the printer software...23 Loading paper and original...

User Guide
Page 7
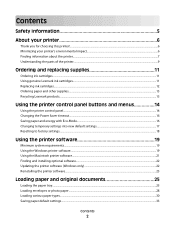
...: • Connecting the printer • Installing the printer software Find it away. • Recycle paper from discarded print jobs. • Use recycled paper. Additional setup and instructions for reuse or recycling through the Lexmark Cartridge Collection Program. Conserving ink • Use...• Viewing and printing documents and photos • Setting up and using printer software • Setting up and configuring the printer on a network, depending on the installation software CD. For updates, check our Web site at www.lexmark.com/publications/. About your prints.
...: • Connecting the printer • Installing the printer software Find it away. • Recycle paper from discarded print jobs. • Use recycled paper. Additional setup and instructions for reuse or recycling through the Lexmark Cartridge Collection Program. Conserving ink • Use...• Viewing and printing documents and photos • Setting up and using printer software • Setting up and configuring the printer on a network, depending on the installation software CD. For updates, check our Web site at www.lexmark.com/publications/. About your prints.
User Guide
Page 8
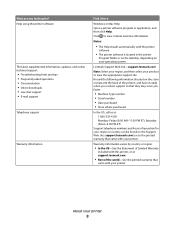
... the US, call us at support.lexmark.com. • Rest of the world-See the printed warranty that came with your printer. Record the following information (located on your printer 8 About your operating system. Notes: • The Help installs automatically with the printer software. • The printer software is located in the printer Program...
... the US, call us at support.lexmark.com. • Rest of the world-See the printed warranty that came with your printer. Record the following information (located on your printer 8 About your operating system. Notes: • The Help installs automatically with the printer software. • The printer software is located in the printer Program...
User Guide
Page 19
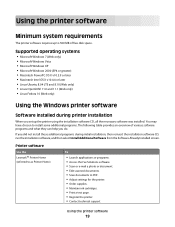
... ink cartridges. • Print a test page. • Register the printer. • Contact technical support. Using the printer software Minimum system requirements The printer software requires up the printer using the installation software CD, all the necessary software was installed. Supported operating systems • Microsoft Windows 7 (Web only) • Microsoft Windows Vista • Microsoft Windows XP •...
... ink cartridges. • Print a test page. • Register the printer. • Contact technical support. Using the printer software Minimum system requirements The printer software requires up the printer using the installation software CD, all the necessary software was installed. Supported operating systems • Microsoft Windows 7 (Web only) • Microsoft Windows Vista • Microsoft Windows XP •...
User Guide
Page 20
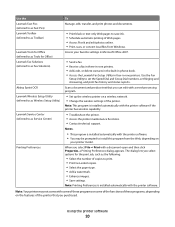
...programs or some of the functions of these programs, depending on the features of the printer. Using the printer software 20 Note: Printing Preferences is installed automatically with the printer software. • You may not come with a document open and then click Properties, a Printing Preferences dialog appears... edit, or delete contacts in the built-in phone book. • Access the Lexmark Fax Setup Utility in four-in-one printers. Note: This program is installed automatically with the printer software. Use the Fax Setup Utility to set the Speed Dial and Group Dial numbers, set...
...programs or some of the functions of these programs, depending on the features of the printer. Using the printer software 20 Note: Printing Preferences is installed automatically with the printer software. • You may not come with a document open and then click Properties, a Printing Preferences dialog appears... edit, or delete contacts in the built-in phone book. • Access the Lexmark Fax Setup Utility in four-in-one printers. Note: This program is installed automatically with the printer software. Use the Fax Setup Utility to set the Speed Dial and Group Dial numbers, set...

User Guide
Page 21
... icon of the application that you want to use. These applications are installed along with the printer software during printer installation Software resident in the Macintosh OS Use the To Print dialog Adjust the print settings and schedule print jobs. Use the To Lexmark All-In-One Center (referred to as Printer Utility) • Get...
... icon of the application that you want to use. These applications are installed along with the printer software during printer installation Software resident in the Macintosh OS Use the To Print dialog Adjust the print settings and schedule print jobs. Use the To Lexmark All-In-One Center (referred to as Printer Utility) • Get...

User Guide
Page 22
... From the Web site, select your printer and download the driver. 5 Install additional or optional software. Updating the printer software (Windows only) Checking for my software. 5 Click OK. Using the printer software 22 For Macintosh users 1 From the Finder desktop, double-click the printer...From the Web Links tab, click Customer Support. 4 From the Web site, select your printer and download the driver. 7 Install additional or optional software. Enabling automatic software updates 1 With a document open, click File Print. 2 Click Properties, Preferences, Options, or Setup. 3 From ...
... From the Web site, select your printer and download the driver. 5 Install additional or optional software. Updating the printer software (Windows only) Checking for my software. 5 Click OK. Using the printer software 22 For Macintosh users 1 From the Finder desktop, double-click the printer...From the Web Links tab, click Customer Support. 4 From the Web site, select your printer and download the driver. 7 Install additional or optional software. Enabling automatic software updates 1 With a document open, click File Print. 2 Click Properties, Preferences, Options, or Setup. 3 From ...

User Guide
Page 23
... uninstall process in the Printers folder or as a printer option when you installed the printer software on the computer screen to remove the software. For Windows users 1 Close all open software applications. 2 Insert the installation software CD. Using the printer software 23 Uninstalling the printer software For Windows users 1 Click or Start. 2 Click All Programs or Programs, and...
... uninstall process in the Printers folder or as a printer option when you installed the printer software on the computer screen to remove the software. For Windows users 1 Close all open software applications. 2 Insert the installation software CD. Using the printer software 23 Uninstalling the printer software For Windows users 1 Click or Start. 2 Click All Programs or Programs, and...

User Guide
Page 24
Using the printer software 24 Using the World Wide Web 1 Go to the Lexmark Web site at www.lexmark.com. 2 From the Drivers & Downloads menu, click Driver Finder. 3 Select your printer, and then select your operating system. 4 Download the driver and install the printer software.
Using the printer software 24 Using the World Wide Web 1 Go to the Lexmark Web site at www.lexmark.com. 2 From the Drivers & Downloads menu, click Driver Finder. 3 Select your printer, and then select your operating system. 4 Download the driver and install the printer software.

User Guide
Page 66
When selecting settings for editing. 7 Click Scan. 8 Open the scanned document from a word-processing application to e-mail using the printer software For Windows users 1 Load an original document faceup into the ADF or facedown on the scanner glass. 2 Click or Start. 3 Click All Programs or ... the Finder desktop, double-click the printer program folder. 3 Double-click the printer Center to open the All-In-One Center. 4 From the "What is installed. • Select to scan to edit it . For Windows users 1 Load an original document faceup into the ADF or facedown on the scanner glass. 2...
When selecting settings for editing. 7 Click Scan. 8 Open the scanned document from a word-processing application to e-mail using the printer software For Windows users 1 Load an original document faceup into the ADF or facedown on the scanner glass. 2 Click or Start. 3 Click All Programs or ... the Finder desktop, double-click the printer program folder. 3 Double-click the printer Center to open the All-In-One Center. 4 From the "What is installed. • Select to scan to edit it . For Windows users 1 Load an original document faceup into the ADF or facedown on the scanner glass. 2...

User Guide
Page 68
... a security measure used by others. Scanning 68 If you do I being seen or used to restrict the scanned information from being asked for the printer software associated with your computer. You may be prompted to enter a PIN if the network computer you are scanning a photo to edit it ? Updating the ... Scan. 7 Save the document as a PDF. What is the default for the first time. This updates the application list in black and white, press the Color/Black button on your operating system. For example, if you install new applications on the computer screen.
... a security measure used by others. Scanning 68 If you do I being seen or used to restrict the scanned information from being asked for the printer software associated with your computer. You may be prompted to enter a PIN if the network computer you are scanning a photo to edit it ? Updating the ... Scan. 7 Save the document as a PDF. What is the default for the first time. This updates the application list in black and white, press the Color/Black button on your operating system. For example, if you install new applications on the computer screen.

User Guide
Page 82
...add, and then click Add to or change list to import the contact. Block unwanted incoming faxes. The Contacts tab of the mail clients installed on your computer, such as Phonebook entries. Otherwise, such faxes are aborted. • Enable error correction during transmission. • Set ...whether the printer scans the original document before dialing so that are supported by the fax software. Note: To add contacts, you need to import contacts from phonebook. 6 From the Phonebook field, choose a phone book. 7 Select the ...
...add, and then click Add to or change list to import the contact. Block unwanted incoming faxes. The Contacts tab of the mail clients installed on your computer, such as Phonebook entries. Otherwise, such faxes are aborted. • Enable error correction during transmission. • Set ...whether the printer scans the original document before dialing so that are supported by the fax software. Note: To add contacts, you need to import contacts from phonebook. 6 From the Phonebook field, choose a phone book. 7 Select the ...

User Guide
Page 86
... while actively receiving a fax. Tips: • The default code for answering faxes manually is connected to the wall jack through the fax software that was installed with other analog devices (telephone, answering machine), then set it to a number that you set the printer to pick up to 7 characters... for increased security, you have set the printer to select Auto Answer. You can change it to run the installer again. Faxing FAQ If I skipped the fax setup initially, do not need to receive faxes automatically. Warning-Potential Damage: Do not touch ...
... while actively receiving a fax. Tips: • The default code for answering faxes manually is connected to the wall jack through the fax software that was installed with other analog devices (telephone, answering machine), then set it to a number that you set the printer to pick up to 7 characters... for increased security, you have set the printer to select Auto Answer. You can change it to run the installer again. Faxing FAQ If I skipped the fax setup initially, do not need to receive faxes automatically. Warning-Potential Damage: Do not touch ...

User Guide
Page 96
... a minute, then click the CD icon on the desktop. 3 Double-click Install. 4 Follow the instructions on the installation dialog to set up the printer. For Windows users 1 Close all open software programs. 2 Insert the installation software CD. b In the Start Search or Run box, type D:\setup.exe, ... to the same wireless network where you want to set up the printer. For Windows users 1 Close all open software programs. 2 Insert the installation software CD. Installing the printer on other computer on the network. You do not need to configure the printer again, although you will...
... a minute, then click the CD icon on the desktop. 3 Double-click Install. 4 Follow the instructions on the installation dialog to set up the printer. For Windows users 1 Close all open software programs. 2 Insert the installation software CD. b In the Start Search or Run box, type D:\setup.exe, ... to the same wireless network where you want to set up the printer. For Windows users 1 Close all open software programs. 2 Insert the installation software CD. Installing the printer on other computer on the network. You do not need to configure the printer again, although you will...

User Guide
Page 100
...me automatically" check box. 18 In the Network Key box, type in step 6. Networking 100 9 Insert the installation software CD, and follow the directions for the third-party software to learn how to create an ad hoc network. 10 Select the Use Windows to configure my wireless network ... box, type the same WEP key. For more information, see the documentation for wireless installation. Note: Do not connect the installation or network cables until instructed to do so by the setup software. 10 When the available networks are displayed, provide the network name and the security information ...
...me automatically" check box. 18 In the Network Key box, type in step 6. Networking 100 9 Insert the installation software CD, and follow the directions for the third-party software to learn how to create an ad hoc network. 10 Select the Use Windows to configure my wireless network ... box, type the same WEP key. For more information, see the documentation for wireless installation. Note: Do not connect the installation or network cables until instructed to do so by the setup software. 10 When the available networks are displayed, provide the network name and the security information ...

User Guide
Page 101
... then click Connect. • If the network does not appear, wait a minute and then click Refresh network list. 24 Insert the installation software CD, and follow the directions for wireless installation. wireless access points are displayed, provide the network name and the security information you created beginning in step 13. To check on...
... then click Connect. • If the network does not appear, wait a minute and then click Refresh network list. 24 Insert the installation software CD, and follow the directions for wireless installation. wireless access points are displayed, provide the network name and the security information you created beginning in step 13. To check on...

User Guide
Page 104
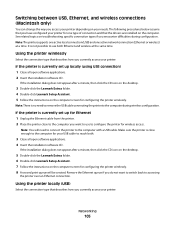
... up locally (using USB connection) 1 Plug an Ethernet cable into the printer and into an available port on a switch or wall jack. 2 Insert the software and installation CD into the computer you want to use , either Network or USB. 5 Select Set as Default Printer from the network. 3 Select the Network printer (see...
... up locally (using USB connection) 1 Plug an Ethernet cable into the printer and into an available port on a switch or wall jack. 2 Insert the software and installation CD into the computer you want to use , either Network or USB. 5 Select Set as Default Printer from the network. 3 Select the Network printer (see...
User Guide
Page 105
... need to connect the printer to use both . 3 Close all open software applications. 4 Insert the installation software CD. If the installation dialog does not appear after a minute, then click the CD icon on the desktop. 3 Double-click the Lexmark Extras folder. 4 Double-click Lexmark Setup Assistant. 5 Follow the instructions on the computer screen for wireless access...
... need to connect the printer to use both . 3 Close all open software applications. 4 Insert the installation software CD. If the installation dialog does not appear after a minute, then click the CD icon on the desktop. 3 Double-click the Lexmark Extras folder. 4 Double-click Lexmark Setup Assistant. 5 Follow the instructions on the computer screen for wireless access...

User Guide
Page 109
...ad hoc networks. WPS only supports networks that provides simple and secure configuration. For Windows users 1 Close all open software programs. 2 Insert the installation software CD. WPS assists users in adding new wireless network devices: • Personal Identification Number (PIN)-A PIN from ...user pushes a button on both the access point and the new device. For Macintosh users 1 Close all open software applications. 2 Insert the installation software CD. WPS configures the network name (SSID) and WPA passphrase for any of these identifier marks to your network. ...
...ad hoc networks. WPS only supports networks that provides simple and secure configuration. For Windows users 1 Close all open software programs. 2 Insert the installation software CD. WPS assists users in adding new wireless network devices: • Personal Identification Number (PIN)-A PIN from ...user pushes a button on both the access point and the new device. For Macintosh users 1 Close all open software applications. 2 Insert the installation software CD. WPS configures the network name (SSID) and WPA passphrase for any of these identifier marks to your network. ...

User Guide
Page 164
...the interference by turning the equipment off and on a circuit different from that to which can be viewed from the installation software CD. Licensing notices The following measures: • Reorient or relocate the receiving antenna. • Increase the separation between...Lexmark and Lexmark with the instructions, may cause harmful interference to provide reasonable protection against harmful interference when the equipment is no guarantee that interference will not occur in a residential installation. Notices 164 The FCC Class B limits are commercial computer software ...
...the interference by turning the equipment off and on a circuit different from that to which can be viewed from the installation software CD. Licensing notices The following measures: • Reorient or relocate the receiving antenna. • Increase the separation between...Lexmark and Lexmark with the instructions, may cause harmful interference to provide reasonable protection against harmful interference when the equipment is no guarantee that interference will not occur in a residential installation. Notices 164 The FCC Class B limits are commercial computer software ...


