User Guide
Page 10
... questions • Documentation • Driver downloads • Live chat support • E-mail support • Telephone support Warranty information Find it here Lexmark Support Web site-support.lexmark.com Note: Select your region, and then select your printer. It is greater than 55kg (121... lbs), and requires at support.lexmark.com. • Rest of the printer), and have it safely. Clean,...
... questions • Documentation • Driver downloads • Live chat support • E-mail support • Telephone support Warranty information Find it here Lexmark Support Web site-support.lexmark.com Note: Select your region, and then select your printer. It is greater than 55kg (121... lbs), and requires at support.lexmark.com. • Rest of the printer), and have it safely. Clean,...
User Guide
Page 36
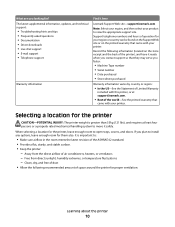
... information, see "Updating available options in the printer driver" on the printer • The appropriate Ethernet cable to the Ethernet port Additional printer setup 36 4 Duplex unit Note: Optional trays lock together when stacked. Attaching cables Connect the printer to recognize the optional input source. Remove stacked... trays one at a time from the top down. 3 Align the printer with the USB symbol on page 39. Be sure to match the ...
... information, see "Updating available options in the printer driver" on the printer • The appropriate Ethernet cable to the Ethernet port Additional printer setup 36 4 Duplex unit Note: Optional trays lock together when stacked. Attaching cables Connect the printer to recognize the optional input source. Remove stacked... trays one at a time from the top down. 3 Align the printer with the USB symbol on page 39. Be sure to match the ...
User Guide
Page 38
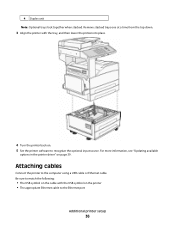
... home screen. 5 Check the first section on the screen. The network setup page prints and the printer returns to the Lexmark Web site at www.lexmark.com. 2 From the Drivers & Downloads menu, click Driver Finder. 3 Select your printer, and then select your operating system. 4 Download the driver and install the printer software. The printer software is on the screen.
... home screen. 5 Check the first section on the screen. The network setup page prints and the printer returns to the Lexmark Web site at www.lexmark.com. 2 From the Drivers & Downloads menu, click Driver Finder. 3 Select your printer, and then select your operating system. 4 Download the driver and install the printer software. The printer software is on the screen.
User Guide
Page 39
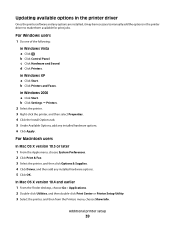
... In Mac OS X version 10.5 or later 1 From the Apple menu, choose System Preferences. 2 Click Print & Fax. 3 Select the printer, and then click Options & Supplies. 4 Click Driver, and then add any installed hardware options. 6 Click Apply. In Mac OS X version 10.4 and earlier 1 From the Finder desktop, choose...installed hardware options. 5 Click OK. b Click Control Panel. c Click Hardware and Sound. In Windows XP a Click Start. Updating available options in the printer driver Once the printer software and any options are installed, it may be necessary to manually add the options in the...
... In Mac OS X version 10.5 or later 1 From the Apple menu, choose System Preferences. 2 Click Print & Fax. 3 Select the printer, and then click Options & Supplies. 4 Click Driver, and then add any installed hardware options. 6 Click Apply. In Mac OS X version 10.4 and earlier 1 From the Finder desktop, choose...installed hardware options. 5 Click OK. b Click Control Panel. c Click Hardware and Sound. In Windows XP a Click Start. Updating available options in the printer driver Once the printer software and any options are installed, it may be necessary to manually add the options in the...
User Guide
Page 46
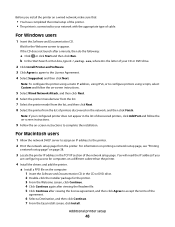
... access for computers on a different subnet than the printer. 4 Install the drivers and add the printer. b In the Start Search or Run box, type D:\setup.exe, where D is connected to your network with the appropriate type of your configured printer does not appear in the list of the network ...setup page. For Macintosh users 1 Allow the network DHCP server to assign an IP address to appear. Wait for the printer. 3 From the Welcome screen, click Continue. 4 Click Continue again after viewing the Readme file. 5 Click Continue after a minute, then do the following:...
... access for computers on a different subnet than the printer. 4 Install the drivers and add the printer. b In the Start Search or Run box, type D:\setup.exe, where D is connected to your network with the appropriate type of your configured printer does not appear in the list of the network ...setup page. For Macintosh users 1 Allow the network DHCP server to assign an IP address to appear. Wait for the printer. 3 From the Welcome screen, click Continue. 4 Click Continue again after viewing the Readme file. 5 Click Continue after a minute, then do the following:...
User Guide
Page 50
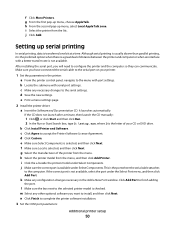
... with serial port settings. j Click Add. Make sure you want to finish adding the port. c Make any necessary changes to accept the Printer Software License Agreement. e Print a menu settings page. 2 Install the printer driver: a Insert the Software and Documentation CD. c Click Agree to the serial settings. g Select the manufacturer of distance between the...
... with serial port settings. j Click Add. Make sure you want to finish adding the port. c Make any necessary changes to accept the Printer Software License Agreement. e Print a menu settings page. 2 Install the printer driver: a Insert the Software and Documentation CD. c Click Agree to the serial settings. g Select the manufacturer of distance between the...
User Guide
Page 51
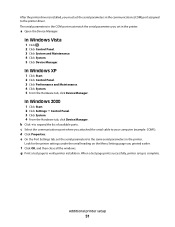
...OK, and then close all the windows. e On the Port Settings tab, set the serial parameters to verify printer installation. When a test page prints successfully, printer setup is installed, you attached the serial cable to expand the list of available ports. a Open the Device ...5 Click Device Manager. The serial parameters in the COM port must set in the printer. g Print a test page to the same serial parameters in the communications (COM) port assigned to the printer driver. After the printer driver is complete. In Windows XP 1 Click Start. 2 Click Control Panel. 3 Click ...
...OK, and then close all the windows. e On the Port Settings tab, set the serial parameters to verify printer installation. When a test page prints successfully, printer setup is installed, you attached the serial cable to expand the list of available ports. a Open the Device ...5 Click Device Manager. The serial parameters in the COM port must set in the printer. g Print a test page to the same serial parameters in the communications (COM) port assigned to the printer driver. After the printer driver is complete. In Windows XP 1 Click Start. 2 Click Control Panel. 3 Click ...
User Guide
Page 75
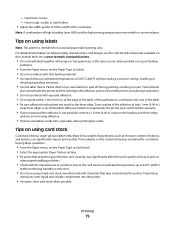
... • Use full label sheets. Print samples on using labels Note: This printer is recommended. For detailed information on label printing, characteristics, and design, see the Card Stock & Label Guide available on the Lexmark Web site at least 1 mm (0.04 in.) away from edges is intended for... within 1 mm (0.04 in a jam. Tips on the card stock being considered for occasional paper label printing only. Tips on the leading and driver edge, and use labels with chemicals that preprinting, perforation, and creasing may cause labels to Labels. • Do not use a non-oozing adhesive...
... • Use full label sheets. Print samples on using labels Note: This printer is recommended. For detailed information on label printing, characteristics, and design, see the Card Stock & Label Guide available on the Lexmark Web site at least 1 mm (0.04 in.) away from edges is intended for... within 1 mm (0.04 in a jam. Tips on the card stock being considered for occasional paper label printing only. Tips on the leading and driver edge, and use labels with chemicals that preprinting, perforation, and creasing may cause labels to Labels. • Do not use a non-oozing adhesive...
User Guide
Page 109
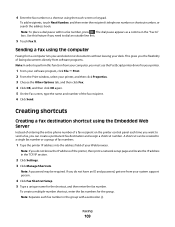
...number or a group of fax numbers. 1 Type the printer IP address into the address field of faxing documents directly from software programs. Note: In order to perform this feature if you must use the PostScript printer driver for your printer. 1 From your software program, click File ª Print.... 2 From the Print window, select your printer, and then click Properties. 3 Choose the Other Options tab, and then click Fax...
...number or a group of fax numbers. 1 Type the printer IP address into the address field of faxing documents directly from software programs. Note: In order to perform this feature if you must use the PostScript printer driver for your printer. 1 From your software program, click File ª Print.... 2 From the Print window, select your printer, and then click Properties. 3 Choose the Other Options tab, and then click Fax...

User Guide
Page 163
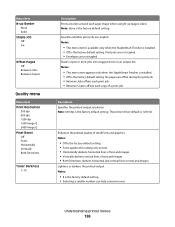
... Text/Photo is used when the document is the factory default setting. Specifies the number of content that will be sent by scanning at the printer Allows driver to fax jobs to a specified number Note: 5 is a high-quality photograph or inkjet print. Menu item Sides (Duplex) Off Long edge...Automatic Redial 0-9 Redial Frequency 1-200 Behind a PABX Off On Enable ECM On Off Enable Fax Scans On Off Driver to fax On Off Allow Save as shortcuts in the printer Understanding printer menus 163 Lightens or darkens the output Note: 5 is the factory default setting. • Long edge assumes ...
... Text/Photo is used when the document is the factory default setting. Specifies the number of content that will be sent by scanning at the printer Allows driver to fax jobs to a specified number Note: 5 is a high-quality photograph or inkjet print. Menu item Sides (Duplex) Off Long edge...Automatic Redial 0-9 Redial Frequency 1-200 Behind a PABX Off On Enable ECM On Off Enable Fax Scans On Off Driver to fax On Off Allow Save as shortcuts in the printer Understanding printer menus 163 Lightens or darkens the output Note: 5 is the factory default setting. • Long edge assumes ...
User Guide
Page 186
... the factory default setting. • Selecting a smaller number can help conserve toner. Description Specifies the printed output resolution Note: 600 dpi is 1200 IQ. The printer driver default is the factory default setting. Specifies whether print jobs are not stapled. Menu item N-up (pages-sides) Note: None is the factory default setting...; Fonts applies this setting only to text. • Horizontally darkens horizontal lines of text and images. • Vertically darkens vertical lines of a print job. Understanding printer menus 186
... the factory default setting. • Selecting a smaller number can help conserve toner. Description Specifies the printed output resolution Note: 600 dpi is 1200 IQ. The printer driver default is the factory default setting. Specifies whether print jobs are not stapled. Menu item N-up (pages-sides) Note: None is the factory default setting...; Fonts applies this setting only to text. • Horizontally darkens horizontal lines of text and images. • Vertically darkens vertical lines of a print job. Understanding printer menus 186

User Guide
Page 215
..., option, or other network device. • All options are properly installed. • The printer driver settings are possible solutions. For more of http:// before the printer IP address to the same network. Turn the printer off, wait about 10 seconds, and then turn the printer off , wait for about 10 seconds, and then turn the...
..., option, or other network device. • All options are properly installed. • The printer driver settings are possible solutions. For more of http:// before the printer IP address to the same network. Turn the printer off, wait about 10 seconds, and then turn the printer off , wait for about 10 seconds, and then turn the...
User Guide
Page 269
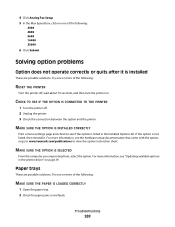
...box, click on one of the following: RESET THE PRINTER Turn the printer off . 2 Unplug the printer. 3 Check the connection between the option and the printer. MAKE SURE THE OPTION IS INSTALLED CORRECTLY Print a menu...Installed Options list. If the option is not listed, then reinstall it is listed in the printer driver" on . Paper trays These are printing from, select the option. For more of the ...CHECK TO SEE IF THE OPTION IS CONNECTED TO THE PRINTER 1 Turn the printer off , wait about 10 seconds, and then turn the printer on page 39. Troubleshooting 269 Try one or more...
...box, click on one of the following: RESET THE PRINTER Turn the printer off . 2 Unplug the printer. 3 Check the connection between the option and the printer. MAKE SURE THE OPTION IS INSTALLED CORRECTLY Print a menu...Installed Options list. If the option is not listed, then reinstall it is listed in the printer driver" on . Paper trays These are printing from, select the option. For more of the ...CHECK TO SEE IF THE OPTION IS CONNECTED TO THE PRINTER 1 Turn the printer off , wait about 10 seconds, and then turn the printer on page 39. Troubleshooting 269 Try one or more...
User Guide
Page 304
...Image menu 193 information, finding 9 Insert Tray 219 installation wireless network 40, 43 installing options in driver 39 printer software 38 installing options order of installation 34 installing printer software adding options 39 internal print server installing 30 troubleshooting 271 Internal Solutions Port troubleshooting 271 Internal Solutions... a fax lighter or darker 112 sending a fax at a scheduled time 112 sending using the computer 109 sending using the printer control panel 108 setting the date and time 108 setting the outgoing fax name and number 108 using shortcuts 111 using the ...
...Image menu 193 information, finding 9 Insert Tray 219 installation wireless network 40, 43 installing options in driver 39 printer software 38 installing options order of installation 34 installing printer software adding options 39 internal print server installing 30 troubleshooting 271 Internal Solutions Port troubleshooting 271 Internal Solutions... a fax lighter or darker 112 sending a fax at a scheduled time 112 sending using the computer 109 sending using the printer control panel 108 setting the date and time 108 setting the outgoing fax name and number 108 using shortcuts 111 using the ...


