
Owner's Manual
Page 4
... or pinched particularly at plugs, convenience receptacles, and the point where they exit from the apparatus. Do not overload wall outlets. yyUse only with a cart, stand, tripod, bracket, or table specified by the manufacturer. yyNever touch this apparatus during a thunder or lightning storm. Pay particular attention to qualified service personnel. Protect...
... or pinched particularly at plugs, convenience receptacles, and the point where they exit from the apparatus. Do not overload wall outlets. yyUse only with a cart, stand, tripod, bracket, or table specified by the manufacturer. yyNever touch this apparatus during a thunder or lightning storm. Pay particular attention to qualified service personnel. Protect...

Owner's Manual
Page 8
...a cable box 39 Turning the TV on a wall 31 - Connecting to use Magic Motion Remote Control 37 - Using LG Apps 59 - Viewing Videos 73 - Attaching the stand 28 - Mounting on for the first time 40 Watching TV 41 Accessing Home Menu 42 Managing channels 42 - Connecting an... - Precautions to Take when Using the Magic Motion Remote Control 38 WATCHING TV 38 Connecting to music Changing AV modes 46 - Notice 56 LG Apps function 56 - Connecting USB storage devices 65 - Registering Magic Motion Remote Control 37 - Adjusting aspect ratio 46 - Using favorite channels ...
...a cable box 39 Turning the TV on a wall 31 - Connecting to use Magic Motion Remote Control 37 - Using LG Apps 59 - Viewing Videos 73 - Attaching the stand 28 - Mounting on for the first time 40 Watching TV 41 Accessing Home Menu 42 Managing channels 42 - Connecting an... - Precautions to Take when Using the Magic Motion Remote Control 38 WATCHING TV 38 Connecting to music Changing AV modes 46 - Notice 56 LG Apps function 56 - Connecting USB storage devices 65 - Registering Magic Motion Remote Control 37 - Adjusting aspect ratio 46 - Using favorite channels ...
Owner's Manual
Page 9
... Connection Overview 105 Connecting to a PC 110 - Composite Connection 110 Connecting to a HD receiver, DVD, or VCR player 105 - Screen and frame 119 - Cabinet and stand 119 - When watching 3D imaging 83 - CHANNEL Settings 88 - AUDIO Settings 95 - NETWORK Settings 102 - HDMI Connection 106 - DVI to a Headphone ( LCD ) 116 Connecting the...
... Connection Overview 105 Connecting to a PC 110 - Composite Connection 110 Connecting to a HD receiver, DVD, or VCR player 105 - Screen and frame 119 - Cabinet and stand 119 - When watching 3D imaging 83 - CHANNEL Settings 88 - AUDIO Settings 95 - NETWORK Settings 102 - HDMI Connection 106 - DVI to a Headphone ( LCD ) 116 Connecting the...

Owner's Manual
Page 22
...to move the TV in the box or packing material that the TV originally came in. Setting up the TV Put your TV on a pedestal stand and mount the TV on the surface to protect the screen from you are not mounting the TV to a wall, use the following illustration. yyWhen... transporting the TV by hand, hold the transparent part, speaker, or speaker grill area. Stand Body Stand Base CAUTION yyLay a foam mat or soft protective cloth on a table or wall. CAUTION yyAvoid touching the screen at least 2 people. Attaching the...
...to move the TV in the box or packing material that the TV originally came in. Setting up the TV Put your TV on a pedestal stand and mount the TV on the surface to protect the screen from you are not mounting the TV to a wall, use the following illustration. yyWhen... transporting the TV by hand, hold the transparent part, speaker, or speaker grill area. Stand Body Stand Base CAUTION yyLay a foam mat or soft protective cloth on a table or wall. CAUTION yyAvoid touching the screen at least 2 people. Attaching the...

Owner's Manual
Page 23
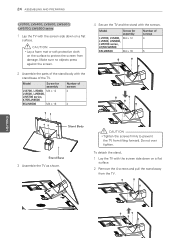
... cover into the opening from accumulating dust and dirt. - ASSEMBLING AND PREPARING 23 3 Secure the TV and the stand with the screen side down on a flat surface. 2 Remove the 4 screws and pull the stand away from tilting forward. Protection cover tape Protection cover Attach the protection cover tape. - When installing the wall..., M4 x 28 60PZ950U Number of the TV until it locks in place. This will protect the opening at the bottom of screws 4 4 To detach the stand, 1 Lay the TV with the 4 screws.
... cover into the opening from accumulating dust and dirt. - ASSEMBLING AND PREPARING 23 3 Secure the TV and the stand with the screen side down on a flat surface. 2 Remove the 4 screws and pull the stand away from tilting forward. Protection cover tape Protection cover Attach the protection cover tape. - When installing the wall..., M4 x 28 60PZ950U Number of the TV until it locks in place. This will protect the opening at the bottom of screws 4 4 To detach the stand, 1 Lay the TV with the 4 screws.
Owner's Manual
Page 24
...LV5400, M4 x 12 LV5500, LW5600, LW5700 series, 47/55LW6500 65LW6500 M4 x 16 Number of screws 4 5 ENEGNLGISH Stand Body Stand Base 3 Assemble the TV as shown. Model Screw for assembly LV3700, LV5400, M4 x 12 LV5500, LW5600, LW5700 series, 47/55LW6500 65LW6500 M4 x 16 Number of screws 4 4 4 Secure the TV ...and the stand with the screws. To detach the stand, 1 Lay the TV with the screen side down on a flat surface. Make sure no...
...LV5400, M4 x 12 LV5500, LW5600, LW5700 series, 47/55LW6500 65LW6500 M4 x 16 Number of screws 4 5 ENEGNLGISH Stand Body Stand Base 3 Assemble the TV as shown. Model Screw for assembly LV3700, LV5400, M4 x 12 LV5500, LW5600, LW5700 series, 47/55LW6500 65LW6500 M4 x 16 Number of screws 4 4 4 Secure the TV ...and the stand with the screws. To detach the stand, 1 Lay the TV with the screen side down on a flat surface. Make sure no...

Owner's Manual
Page 25
Screw for assembly M4 x 16 Number of screws 4 Stand Body Stand Base 3 Assemble the parts of the stand rear cover with the TV. 4 Secure the TV and the stand with the stand base of the stand body with the 4 screws. Screw for assembly M4 x 16 Number of screws 4 CAUTION yyTighten the ...objects press against the screen. 2 Assemble the parts of the TV. To detach the stand, 1 Lay the TV with the screen side down on a flat surface. 2 Remove the 4 screws and pull the stand away from tilting forward. Do not over tighten. ASSEMBLING AND PREPARING 25 LV9500, LW9800 series...
Screw for assembly M4 x 16 Number of screws 4 Stand Body Stand Base 3 Assemble the parts of the stand rear cover with the TV. 4 Secure the TV and the stand with the stand base of the stand body with the 4 screws. Screw for assembly M4 x 16 Number of screws 4 CAUTION yyTighten the ...objects press against the screen. 2 Assemble the parts of the TV. To detach the stand, 1 Lay the TV with the screen side down on a flat surface. 2 Remove the 4 screws and pull the stand away from tilting forward. Do not over tighten. ASSEMBLING AND PREPARING 25 LV9500, LW9800 series...

Owner's Manual
Page 26
... over tighten. ENEGNLGISH Front 26 ASSEMBLING AND PREPARING LK530, LK550 series 1 Lay the TV with the screen side down on a flat surface. To detach the stand, 1 Lay the TV with the screen side down on the surface to prevent the TV from damage. Screw for assembly M4 x 20 Number of screws... 4 3 Assemble the TV as shown. 4 Secure the TV and the stand with the stand base of the TV. CAUTION yyLay a foam mat or soft protective cloth on a flat surface. 2 Remove the 4 screws and pull the...
... over tighten. ENEGNLGISH Front 26 ASSEMBLING AND PREPARING LK530, LK550 series 1 Lay the TV with the screen side down on a flat surface. To detach the stand, 1 Lay the TV with the screen side down on the surface to prevent the TV from damage. Screw for assembly M4 x 20 Number of screws... 4 3 Assemble the TV as shown. 4 Secure the TV and the stand with the stand base of the TV. CAUTION yyLay a foam mat or soft protective cloth on a flat surface. 2 Remove the 4 screws and pull the...

Owner's Manual
Page 28
... left or right and adjust the angle of the TV to a wall outlet. CAUTION yyDo not place the TV near or on sources of the stand. 10 cm 10 cm (4 inch) 10 cm 10 cm ENEGNLGISH 2 Connect the power cord to suit your view. 20 20 WARNING yyTo prevent TV from...
... left or right and adjust the angle of the TV to a wall outlet. CAUTION yyDo not place the TV near or on sources of the stand. 10 cm 10 cm (4 inch) 10 cm 10 cm ENEGNLGISH 2 Connect the power cord to suit your view. 20 20 WARNING yyTo prevent TV from...

Owner's Manual
Page 66
... icon to open the Browse Folder window. 6 Select the folder containing the files you want to take part in the anonymous collection of Nero MediaHome stand-alone yy1.2 GHz Intel® Pentium® III or AMD Sempron™ 2200+ processors yyMemory: 256 MB RAM yyGraphics card with at the More button...
... icon to open the Browse Folder window. 6 Select the folder containing the files you want to take part in the anonymous collection of Nero MediaHome stand-alone yy1.2 GHz Intel® Pentium® III or AMD Sempron™ 2200+ processors yyMemory: 256 MB RAM yyGraphics card with at the More button...

Owner's Manual
Page 94
Wall Mount Type Optimized sound mode for a stand-type TV. You can adjust it manually. »»(-) setting : Make audio output faster than the default. »»(+) setting : Make audio output slower than ... If the device with the ARC feature is turned on and SIMPLINK is enabled, the device speaker is not automatically used when SIMPLINK is enabled. Stand type Optimized sound mode for a wall-mounted TV. AV Sync. Adjusts the sync of the TV speaker and SPDIF. Off Even if the device with...
Wall Mount Type Optimized sound mode for a stand-type TV. You can adjust it manually. »»(-) setting : Make audio output faster than the default. »»(+) setting : Make audio output slower than ... If the device with the ARC feature is turned on and SIMPLINK is enabled, the device speaker is not automatically used when SIMPLINK is enabled. Stand type Optimized sound mode for a wall-mounted TV. AV Sync. Adjusts the sync of the TV speaker and SPDIF. Off Even if the device with...

Owner's Manual
Page 119
Cabinet and stand To remove dust or light dirt, wipe the cabinet with a dry cloth. To remove major dirt, wipe the cabinet with a soft cloth dampened in scratches ...
Cabinet and stand To remove dust or light dirt, wipe the cabinet with a dry cloth. To remove major dirt, wipe the cabinet with a soft cloth dampened in scratches ...
Owner's Manual
Page 122
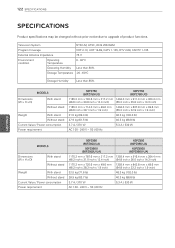
...80% Storage Temperature -20 - 60°C Storage Humidity Less than 85% MODELS Dimensions (W x H x D) With stand Without stand Weight With stand Without stand Current Value / Power consumption Power requirement 50PZ750 (50PZ750-UG) 60PZ750 (60PZ750-UG) 1185.2 mm x 782.6 mm x... A / 370 W 5.3 A / 530 W AC 100 - 240 V ~ 50 / 60 Hz MODELS Dimensions (W x H x D) With stand Without stand Weight With stand Without stand Current Value / Power consumption Power requirement 50PZ950 (50PZ950-UA) 60PZ950 (60PZ950-UA) 50PZ950U (50PZ950U-UA) 60PZ950U (60PZ950U-UA) 1175.2 mm x 787.6...
...80% Storage Temperature -20 - 60°C Storage Humidity Less than 85% MODELS Dimensions (W x H x D) With stand Without stand Weight With stand Without stand Current Value / Power consumption Power requirement 50PZ750 (50PZ750-UG) 60PZ750 (60PZ750-UG) 1185.2 mm x 782.6 mm x... A / 370 W 5.3 A / 530 W AC 100 - 240 V ~ 50 / 60 Hz MODELS Dimensions (W x H x D) With stand Without stand Weight With stand Without stand Current Value / Power consumption Power requirement 50PZ950 (50PZ950-UA) 60PZ950 (60PZ950-UA) 50PZ950U (50PZ950U-UA) 60PZ950U (60PZ950U-UA) 1175.2 mm x 787.6...

Owner's Manual
Page 123
... / 60 Hz Other Country: AC 100 - 240 V ~ 50 / 60 Hz MODELS Dimensions (W x H x D) With stand Without stand Weight With stand Without stand Current Value / Power consumption Power requirement 42LV5400 (42LV5400-UB) 47LV5400 (47LV5400-UB) 55LV5400 (55LV5400-UB) 42LV5500 (42LV5500-UA) (42LV5500... 50 / 60 Hz Other Country: AC 100 - 240 V ~ 50 / 60 Hz MODELS Dimensions (W x H x D) With stand Without stand Weight With stand Without stand Current Value / Power consumption Power requirement 42LW5600 (42LW5600-UA) 47LW5600 (47LW5600-UA) 55LW5600 (55LW5600-UA) 1005.0 mm x 688.0 mm...
... / 60 Hz Other Country: AC 100 - 240 V ~ 50 / 60 Hz MODELS Dimensions (W x H x D) With stand Without stand Weight With stand Without stand Current Value / Power consumption Power requirement 42LV5400 (42LV5400-UB) 47LV5400 (47LV5400-UB) 55LV5400 (55LV5400-UB) 42LV5500 (42LV5500-UA) (42LV5500... 50 / 60 Hz Other Country: AC 100 - 240 V ~ 50 / 60 Hz MODELS Dimensions (W x H x D) With stand Without stand Weight With stand Without stand Current Value / Power consumption Power requirement 42LW5600 (42LW5600-UA) 47LW5600 (47LW5600-UA) 55LW5600 (55LW5600-UA) 1005.0 mm x 688.0 mm...

Owner's Manual
Page 124
...V ~ 50 / 60 Hz Other Country: AC 100 - 240 V ~ 50 / 60 Hz MODELS Dimensions (W x H x D) With stand Without stand Weight With stand Without stand Current Value / Power consumption Power requirement 47LW5700 (47LW5700-UE) 55LW5700 (55LW5700-UE) 1109.0 mm x 744.0 mm x 255.0 mm 1286.0 ...- 240 V ~ 50 / 60 Hz ENEGNLGISH MODELS Dimensions (W x H x D) With stand Without stand Weight With stand Without stand Current Value / Power consumption Power requirement 47LW6500 (47LW6500-UA) 55LW6500 (55LW6500-UA) 65LW6500 (65LW6500-UA) 1119.0 mm x 749.0 mm 1297.0 mm x 851.0 mm 1555.0 mm x...
...V ~ 50 / 60 Hz Other Country: AC 100 - 240 V ~ 50 / 60 Hz MODELS Dimensions (W x H x D) With stand Without stand Weight With stand Without stand Current Value / Power consumption Power requirement 47LW5700 (47LW5700-UE) 55LW5700 (55LW5700-UE) 1109.0 mm x 744.0 mm x 255.0 mm 1286.0 ...- 240 V ~ 50 / 60 Hz ENEGNLGISH MODELS Dimensions (W x H x D) With stand Without stand Weight With stand Without stand Current Value / Power consumption Power requirement 47LW6500 (47LW6500-UA) 55LW6500 (55LW6500-UA) 65LW6500 (65LW6500-UA) 1119.0 mm x 749.0 mm 1297.0 mm x 851.0 mm 1555.0 mm x...

Owner's Manual
Page 125
...V ~ 50 / 60 Hz Other Country: AC 100 - 240 V ~ 50 / 60 Hz MODELS Dimensions (W x H x D) With stand Without stand Weight With stand Without stand Current Value / Power consumption Power requirement 42LK530 (42LK530-UC) 47LK530 (47LK530-UC) 55LK530 (55LK530-UC) 1024.0 mm x 685.0 mm 1137.0...W 2.5 A / 250 W 3.2 A / 320 W AC 100 - 240V ~ 50 / 60 Hz MODELS Dimensions (W x H x D) With stand Without stand Weight With stand Without stand Current Value / Power consumption Power requirement 42LK550 (42LK550-UA) (42LK550-UG) 47LK550 (47LK550-UA) 1019.0 mm x 698.0 mm x 265.0 mm ...
...V ~ 50 / 60 Hz Other Country: AC 100 - 240 V ~ 50 / 60 Hz MODELS Dimensions (W x H x D) With stand Without stand Weight With stand Without stand Current Value / Power consumption Power requirement 42LK530 (42LK530-UC) 47LK530 (47LK530-UC) 55LK530 (55LK530-UC) 1024.0 mm x 685.0 mm 1137.0...W 2.5 A / 250 W 3.2 A / 320 W AC 100 - 240V ~ 50 / 60 Hz MODELS Dimensions (W x H x D) With stand Without stand Weight With stand Without stand Current Value / Power consumption Power requirement 42LK550 (42LK550-UA) (42LK550-UG) 47LK550 (47LK550-UA) 1019.0 mm x 698.0 mm x 265.0 mm ...

Specification
Page 2
65LW6500 65" Class 3D 1080p LED LCD TV PANEL SPECIFICATIONS Screen Size ...) Headphone Out 1 (Rear) Wireless Control 1 (Rear) CABINET/ACCESSORIES Swivel 20º/20º VESA Compatible • (600mm x 600mm) LG Cinema 3D Glasses 4 Pair Remote Control Magic Motion & Standard (Backlit) POWER ENERGY STAR® Qualified • Voltage. THD 10%) Speaker System... II 3D SPECIFICATIONS 3D 2D to 3D Converting Depth Control Level 3D Depth Control 3D to 2D CONNECTIVITY LG Smart TV LG App Store Web Browser Wi-Fi® Ready DLNA Certified® Windows 7 Certified SIMPLINK (HDMI CEC...
65LW6500 65" Class 3D 1080p LED LCD TV PANEL SPECIFICATIONS Screen Size ...) Headphone Out 1 (Rear) Wireless Control 1 (Rear) CABINET/ACCESSORIES Swivel 20º/20º VESA Compatible • (600mm x 600mm) LG Cinema 3D Glasses 4 Pair Remote Control Magic Motion & Standard (Backlit) POWER ENERGY STAR® Qualified • Voltage. THD 10%) Speaker System... II 3D SPECIFICATIONS 3D 2D to 3D Converting Depth Control Level 3D Depth Control 3D to 2D CONNECTIVITY LG Smart TV LG App Store Web Browser Wi-Fi® Ready DLNA Certified® Windows 7 Certified SIMPLINK (HDMI CEC...


