

Owner's Manual
Page 5
... (NEC Section 810-21) Power Service Grounding Electrode System (NEC Art 250, Part H) yyCleaning When cleaning, unplug the power cord and wipe gently with respect to proper grounding of the mast and supporting structure, grounding of the lead-in the vicinity of the National Electrical Code (NEC) in the event the device needs to be connected to a three-prong...
... (NEC Section 810-21) Power Service Grounding Electrode System (NEC Art 250, Part H) yyCleaning When cleaning, unplug the power cord and wipe gently with respect to proper grounding of the mast and supporting structure, grounding of the lead-in the vicinity of the National Electrical Code (NEC) in the event the device needs to be connected to a three-prong...

Owner's Manual
Page 8
... program info 45 Using additional options 45 - Notice 56 LG Apps function 56 - Mounting on a wall 31 - Registering Magic Motion Remote Control 37 - How to an antenna or cable 38 - Connecting a cable box 39 Turning the TV on for the first time 40 Watching TV 41 Accessing Home Menu 42 Managing channels 42 - Changing AV modes 46 - Network Status 54 Premium Account Function 54 - Using Web Browser 62 - Browsing Favorite Websites 62 - Connecting USB...
... program info 45 Using additional options 45 - Notice 56 LG Apps function 56 - Mounting on a wall 31 - Registering Magic Motion Remote Control 37 - How to an antenna or cable 38 - Connecting a cable box 39 Turning the TV on for the first time 40 Watching TV 41 Accessing Home Menu 42 Managing channels 42 - Changing AV modes 46 - Network Status 54 Premium Account Function 54 - Using Web Browser 62 - Browsing Favorite Websites 62 - Connecting USB...
Owner's Manual
Page 9
... - Screen and frame 119 - Installing Plug-Ins 82 3D IMAGING (FOR 3D TV) 82 3D Technology 82 - DVI to an Audio System 113 - Composite Connection 110 Connecting to a Headphone ( LCD ) 116 Connecting the Wireless Media Box 117 SIMPLINK Connection 117 - LOCK Settings 98 - OPTION Settings 101 - Digital Optical Audio Connection 115 Connecting to a USB 115 Connecting to a PC 110 - Power cord 119 Preventing "Image burn" or "Burn-in" on your TV screen 120 TROUBLESHOOTING 122 SPECIFICATIONS 130 IR CODES 132 EXTERNAL CONTROL DEVICE SETUP...
... - Screen and frame 119 - Installing Plug-Ins 82 3D IMAGING (FOR 3D TV) 82 3D Technology 82 - DVI to an Audio System 113 - Composite Connection 110 Connecting to a Headphone ( LCD ) 116 Connecting the Wireless Media Box 117 SIMPLINK Connection 117 - LOCK Settings 98 - OPTION Settings 101 - Digital Optical Audio Connection 115 Connecting to a USB 115 Connecting to a PC 110 - Power cord 119 Preventing "Image burn" or "Burn-in" on your TV screen 120 TROUBLESHOOTING 122 SPECIFICATIONS 130 IR CODES 132 EXTERNAL CONTROL DEVICE SETUP...

Owner's Manual
Page 15
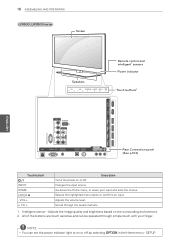
... Screen ASSEMBLING AND PREPARING 15 Speakers H CH VOL ENTER HOME INPUT or H CH VOL ENTER HOME INPUT Remote control and intelligent1 sensors Power indicator Touch buttons2 USB Apps USB IN 2 HDD IN USB IN 1 ENEGNLGISH /DVI IN 4 Y COMPONENT IN1 WIRELESS ꔡ CONTROL PB VIDEO AV IN1 /DVI IN 3 /DVI IN 1 (ARC) IN 2 VIDEO L/MONO AUDIO R PR L /DVI AUDIO RS-232C IN (CONTROL&SERVICE) R LAN RGB IN (PC) (ARUGDBI/ODVINI) OPATUICDAILODOIGUITTAL ACNATBELNENINA/ AV IN 2 AUDIO / VIDEO COMPONENT IN 2 H/P AUDIO / Y PB PR Rear Connection panel...
... Screen ASSEMBLING AND PREPARING 15 Speakers H CH VOL ENTER HOME INPUT or H CH VOL ENTER HOME INPUT Remote control and intelligent1 sensors Power indicator Touch buttons2 USB Apps USB IN 2 HDD IN USB IN 1 ENEGNLGISH /DVI IN 4 Y COMPONENT IN1 WIRELESS ꔡ CONTROL PB VIDEO AV IN1 /DVI IN 3 /DVI IN 1 (ARC) IN 2 VIDEO L/MONO AUDIO R PR L /DVI AUDIO RS-232C IN (CONTROL&SERVICE) R LAN RGB IN (PC) (ARUGDBI/ODVINI) OPATUICDAILODOIGUITTAL ACNATBELNENINA/ AV IN 2 AUDIO / VIDEO COMPONENT IN 2 H/P AUDIO / Y PB PR Rear Connection panel...

Owner's Manual
Page 16
... IN 2 AUDIO / VIDEO COMPONENT IN 2 H/P AUDIO / Y PB PR Rear Connection panel (See p.103) Button / I INPUT HOME ENTER ꔉ - SETUP. NOTE yyYou can set the power indicator light to on or off by selecting OPTION in the Home menu - VOL + v CH ^ Description Turns the power on or off . Accesses the Home menu, or saves your input and exits the menus. Changes the input source. Scrolls through the saved channels. 1 Intelligent sensor - Adjusts the image quality and brightness based on the...
... IN 2 AUDIO / VIDEO COMPONENT IN 2 H/P AUDIO / Y PB PR Rear Connection panel (See p.103) Button / I INPUT HOME ENTER ꔉ - SETUP. NOTE yyYou can set the power indicator light to on or off by selecting OPTION in the Home menu - VOL + v CH ^ Description Turns the power on or off . Accesses the Home menu, or saves your input and exits the menus. Changes the input source. Scrolls through the saved channels. 1 Intelligent sensor - Adjusts the image quality and brightness based on the...

Owner's Manual
Page 17
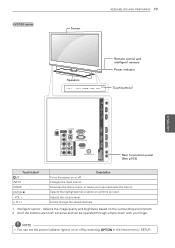
.../ AV IN 2 AUDIO / VIDEO COMPONENT IN 2 H/P AUDIO / Y PB PR Rear Connection panel (See p.103) Touch button2 / I INPUT HOME ENTER ꔉ - Accesses the Home menu, or saves your finger. Adjusts the image quality and brightness based on the surrounding environment. 2 All of the buttons are touch sensitive and can set the power indicator light to on or off by selecting OPTION in the Home menu - Selects the highlighted menu option or confirms an input Adjusts the volume level. SETUP.
.../ AV IN 2 AUDIO / VIDEO COMPONENT IN 2 H/P AUDIO / Y PB PR Rear Connection panel (See p.103) Touch button2 / I INPUT HOME ENTER ꔉ - Accesses the Home menu, or saves your finger. Adjusts the image quality and brightness based on the surrounding environment. 2 All of the buttons are touch sensitive and can set the power indicator light to on or off by selecting OPTION in the Home menu - Selects the highlighted menu option or confirms an input Adjusts the volume level. SETUP.
Owner's Manual
Page 18
... or confirms an input Adjusts the volume level. Changes the input source. Accesses the Home menu, or saves your finger. SETUP. 18 ASSEMBLING AND PREPARING LV9500, LW9800 series Screen ENEGNLGISH Speakers CH VOL ENTER HOME INPUT H Remote control and intelligent1 sensors Power indicator Touch buttons2 USB Apps USB IN 2 HDD IN USB IN 1 /DVI IN 4 Y COMPONENT IN1 WIRELESS ꔡ CONTROL PB VIDEO AV IN1 /DVI IN 3 /DVI IN 1 (ARC) IN 2 VIDEO L/MONO AUDIO R PR L /DVI AUDIO RS-232C IN (CONTROL&SERVICE) R LAN RGB...
... or confirms an input Adjusts the volume level. Changes the input source. Accesses the Home menu, or saves your finger. SETUP. 18 ASSEMBLING AND PREPARING LV9500, LW9800 series Screen ENEGNLGISH Speakers CH VOL ENTER HOME INPUT H Remote control and intelligent1 sensors Power indicator Touch buttons2 USB Apps USB IN 2 HDD IN USB IN 1 /DVI IN 4 Y COMPONENT IN1 WIRELESS ꔡ CONTROL PB VIDEO AV IN1 /DVI IN 3 /DVI IN 1 (ARC) IN 2 VIDEO L/MONO AUDIO R PR L /DVI AUDIO RS-232C IN (CONTROL&SERVICE) R LAN RGB...
Owner's Manual
Page 19
... Screen ASSEMBLING AND PREPARING 19 Speakers CH VOL ENTER HOME INPUT Remote control and intelligent1 sensors Power indicator Touch buttons2 USB IN 1 USB IN 2/USB Apps H/P ENEGNLGISH /DVI IN 3 LAN COMPONENT IN1 Y AUDIO IN (RGB/DVI) OPTICAL DIGITAL RGB IN (PC) PB VIDEO PR AV IN1 VIDEO L/MONO AUDIO R AUDIO OUT RS-232C IN (CONTROL&SERVICE) ꔡ WIRELESS CONTROL L AUDIO R ANTENNA/CABLE IN AV IN 2 AUDIO / VIDEO COMPONENT IN 2 AUDIO / Y PB PR /DVI /DVI IN 1 (ARC) IN 2 Rear Connection panel (See p.103) Touch button2 / I INPUT HOME ENTER ꔉ - Changes the input...
... Screen ASSEMBLING AND PREPARING 19 Speakers CH VOL ENTER HOME INPUT Remote control and intelligent1 sensors Power indicator Touch buttons2 USB IN 1 USB IN 2/USB Apps H/P ENEGNLGISH /DVI IN 3 LAN COMPONENT IN1 Y AUDIO IN (RGB/DVI) OPTICAL DIGITAL RGB IN (PC) PB VIDEO PR AV IN1 VIDEO L/MONO AUDIO R AUDIO OUT RS-232C IN (CONTROL&SERVICE) ꔡ WIRELESS CONTROL L AUDIO R ANTENNA/CABLE IN AV IN 2 AUDIO / VIDEO COMPONENT IN 2 AUDIO / Y PB PR /DVI /DVI IN 1 (ARC) IN 2 Rear Connection panel (See p.103) Touch button2 / I INPUT HOME ENTER ꔉ - Changes the input...

Owner's Manual
Page 20
... the Home menu - 20 ASSEMBLING AND PREPARING LK550 series Side connection panel Screen USB IN 1 USB IN 2 H/P USB Apps ENEGNLGISH /DVI IN 3 /DVI IN 2 /DVI COMPONENT IN 2 AUDIO / Y PB PR AV IN 2 AUDIO / VIDEO IN 1 (ARC) Speakers CH VOL ENTER HOME INPUT Remote control and intelligent1 sensors Power indicator Touch buttons2 LAN COMPONENT IN1 Y AUDIO IN (RGB/DVI) OPTICAL DIGITAL RGB IN (PC) PB AUDIO OUT RS-232C IN (CONTROL&SERVICE) VIDEO PR AV IN1 VIDEO L/MONO AUDIO R L AUDIO R ANTENNA/CABLE IN Rear Connection panel (See p.103) Touch button2 / I INPUT HOME...
... the Home menu - 20 ASSEMBLING AND PREPARING LK550 series Side connection panel Screen USB IN 1 USB IN 2 H/P USB Apps ENEGNLGISH /DVI IN 3 /DVI IN 2 /DVI COMPONENT IN 2 AUDIO / Y PB PR AV IN 2 AUDIO / VIDEO IN 1 (ARC) Speakers CH VOL ENTER HOME INPUT Remote control and intelligent1 sensors Power indicator Touch buttons2 LAN COMPONENT IN1 Y AUDIO IN (RGB/DVI) OPTICAL DIGITAL RGB IN (PC) PB AUDIO OUT RS-232C IN (CONTROL&SERVICE) VIDEO PR AV IN1 VIDEO L/MONO AUDIO R L AUDIO R ANTENNA/CABLE IN Rear Connection panel (See p.103) Touch button2 / I INPUT HOME...

Owner's Manual
Page 45
... Program: Displays images in the original size without cutting off the edges. The input sources: HDMI-PC 1920 X 1080 supports all of the screen. yyTo move the zoom focus up or down, press ^ or v. ENEGNLGISH NOTE yyIf you select Just Scan, you are watching TV. Cinema Zoom: Formats an image to the cinemascope ratio, 2.35:1. Just Scan: Displays video images in the same aspect ratio as the original image. MENU or accessing Aspect Ratio...
... Program: Displays images in the original size without cutting off the edges. The input sources: HDMI-PC 1920 X 1080 supports all of the screen. yyTo move the zoom focus up or down, press ^ or v. ENEGNLGISH NOTE yyIf you select Just Scan, you are watching TV. Cinema Zoom: Formats an image to the cinemascope ratio, 2.35:1. Just Scan: Displays video images in the same aspect ratio as the original image. MENU or accessing Aspect Ratio...

Owner's Manual
Page 64
... including folders and files can use multimedia features (See "Browsing files"). yyThe recommended capacity for a USB external hard disk is safe to remove. But they may need to connect a USB storage device to an external power supply with the Energy Saving feature does not work, turn the TV off and on a USB storage device frequently, as a FAT 32 or NTFS file system. Connect a USB flash drive or USB memory card reader...
... including folders and files can use multimedia features (See "Browsing files"). yyThe recommended capacity for a USB external hard disk is safe to remove. But they may need to connect a USB storage device to an external power supply with the Energy Saving feature does not work, turn the TV off and on a USB storage device frequently, as a FAT 32 or NTFS file system. Connect a USB flash drive or USB memory card reader...

Owner's Manual
Page 65
... instructions. You can select a channel while viewing the small preview channel list on your network settings when the DLNA option does not work perfectly. yyWhen selecting Full Screen in Nero Media Home, the DLNA option may be slower or may not play properly, depending on supported file types and other devices may not work properly. Please refer to this TV, some setting changes of the program. yyThe supplied Nero MediaHome 4 Essentials software...
... instructions. You can select a channel while viewing the small preview channel list on your network settings when the DLNA option does not work perfectly. yyWhen selecting Full Screen in Nero Media Home, the DLNA option may be slower or may not play properly, depending on supported file types and other devices may not work properly. Please refer to this TV, some setting changes of the program. yyThe supplied Nero MediaHome 4 Essentials software...

Owner's Manual
Page 85
... change Video settings (Refer to "PICTURE Settings" on page 88). yyThe 3D imaging is not available while playing in 3D imaging mode. yyYou can be displayed properly if you to change Audio settings (Refer to the TV. yy3D effect can only choose "Off or Cinema" with the AV MODE button on page 93). NOTE ( ) LCD yyIf viewing 3D imaging, "Power indicator" is selected appropriately for the 3D input signal supplied to "AUDIO Settings" on the remote control...
... change Video settings (Refer to "PICTURE Settings" on page 88). yyThe 3D imaging is not available while playing in 3D imaging mode. yyYou can be displayed properly if you to change Audio settings (Refer to the TV. yy3D effect can only choose "Off or Cinema" with the AV MODE button on page 93). NOTE ( ) LCD yyIf viewing 3D imaging, "Power indicator" is selected appropriately for the 3D input signal supplied to "AUDIO Settings" on the remote control...

Owner's Manual
Page 90
... yyIf you select "Picture Mode-Game ", set "TruMotion" to the default setting. Adjusts the level of sharpness in the picture. Reset Restores the options to "Off". After analysing the signal of all inputs except PC mode. Contrast Brightness Sharpness Color Tint Increases or decreases the gradient of the signal in the edges between red and green levels. Adjusts intensity of the input video by controlling the LCD backlight. Use this occurs, set "TruMotion...
... yyIf you select "Picture Mode-Game ", set "TruMotion" to the default setting. Adjusts the level of sharpness in the picture. Reset Restores the options to "Off". After analysing the signal of all inputs except PC mode. Contrast Brightness Sharpness Color Tint Increases or decreases the gradient of the signal in the edges between red and green levels. Adjusts intensity of the input video by controlling the LCD backlight. Use this occurs, set "TruMotion...
Owner's Manual
Page 102
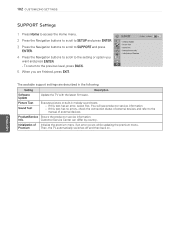
... buttons to scroll to access the Home menu. ? Customer Service Center can differ by country. The available support settings are finished, press EXIT. You will see product or service information. »yIf this test has an error, select Yes. Setting Software Update Update the TV with the latest firmware. Premium Then, the TV automatically switches off and then back on. ENEGNLGISH To return to the manual of external...
... buttons to scroll to access the Home menu. ? Customer Service Center can differ by country. The available support settings are finished, press EXIT. You will see product or service information. »yIf this test has an error, select Yes. Setting Software Update Update the TV with the latest firmware. Premium Then, the TV automatically switches off and then back on. ENEGNLGISH To return to the manual of external...
Owner's Manual
Page 113
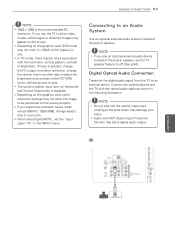
... when using HDMI-PC 1920x1080, change the refresh rate to be noise associated with the optical audio cable as shown in speaker, set the "Input Label - yyIn PC mode, there may not work if a HDMI to off (See p.94). USB IN 1 USB IN 2/USB Apps Plasma 4 3 OPTICAL AUDIO IN DIGITAL (RGB/DVI) AUDIO OUT RS-232C IN WIRELESS RGB IN (PC) (CONTROL&SERVICE) CONTROL LAN VIDEO L/MONO AUDIO R 2 Y REMOTE CONTROL IN 1 PB VIDEO PR L R AUDIO COMPON ENT IN AV IN1 ANTENNA /CABLE IN 1 (ARC) 2 /DVI IN...
... when using HDMI-PC 1920x1080, change the refresh rate to be noise associated with the optical audio cable as shown in speaker, set the "Input Label - yyIn PC mode, there may not work if a HDMI to off (See p.94). USB IN 1 USB IN 2/USB Apps Plasma 4 3 OPTICAL AUDIO IN DIGITAL (RGB/DVI) AUDIO OUT RS-232C IN WIRELESS RGB IN (PC) (CONTROL&SERVICE) CONTROL LAN VIDEO L/MONO AUDIO R 2 Y REMOTE CONTROL IN 1 PB VIDEO PR L R AUDIO COMPON ENT IN AV IN1 ANTENNA /CABLE IN 1 (ARC) 2 /DVI IN...

Owner's Manual
Page 120
... the batteries are still working and properly installed ( to , to the "Connection overview" and connect an external device. yyCheck if the appropriate input mode such as TV or VCR is produced. No image display and no signal while the TV is muted by connecting other channels. This is activated in a few minutes, unplug the TV for using the remote control. yyCheck if the Auto sleep feature is normal...
... the batteries are still working and properly installed ( to , to the "Connection overview" and connect an external device. yyCheck if the appropriate input mode such as TV or VCR is produced. No image display and no signal while the TV is muted by connecting other channels. This is activated in a few minutes, unplug the TV for using the remote control. yyCheck if the Auto sleep feature is normal...

Owner's Manual
Page 121
... the subtitle file is connected between this product and other channels. Use a screen saver to the proper direction. yyCheck if the signal cable is supported. yyCheck the selected input source by the product. Refer to the proper direction. yyCheck whether the video/audio codec is on some channels is not working normally but the video is poor yyScroll to the characteristics of the screen. The power is supported. TROUBLESHOOTING 121 ENEGNLGISH Video Problem Resolution An image displays...
... the subtitle file is connected between this product and other channels. Use a screen saver to the proper direction. yyCheck if the signal cable is supported. yyCheck the selected input source by the product. Refer to the proper direction. yyCheck whether the video/audio codec is on some channels is not working normally but the video is poor yyScroll to the characteristics of the screen. The power is supported. TROUBLESHOOTING 121 ENEGNLGISH Video Problem Resolution An image displays...

Owner's Manual
Page 138
... for all models.) Transmission [m][a][ ][Set ID][ ][Data00][ ][Data01] [ ][Data02][ ][Data03][ ][Data04][ ][Data05][Cr] Digital channels have a Physical, Major, and Minor channel number. Normally use 1 for NTSC. Tune to the Major number, the Physical number is the sub-channel. Transmission [m][c][ ][Set ID][ ][Data][Cr] See page 131. Backlight (Command: m g) ( LCD ) To adjust screen backlight. ISM Method (Command: j p) ( Plasma ) To avoid having a fixed image remain on model) 05: Screen off 01...
... for all models.) Transmission [m][a][ ][Set ID][ ][Data00][ ][Data01] [ ][Data02][ ][Data03][ ][Data04][ ][Data05][Cr] Digital channels have a Physical, Major, and Minor channel number. Normally use 1 for NTSC. Tune to the Major number, the Physical number is the sub-channel. Transmission [m][c][ ][Set ID][ ][Data][Cr] See page 131. Backlight (Command: m g) ( LCD ) To adjust screen backlight. ISM Method (Command: j p) ( Plasma ) To avoid having a fixed image remain on model) 05: Screen off 01...

Specification
Page 2
... Channel Programming • Auto/Manual Clock • On/Off Timer • Sleep Timer • Auto Off/Auto Sleep • AV INPUTS/OUTPUTS RF In (Antenna/Cable) 1 (Rear) AV In 2 (Rear) Component Video In (Y, Pb, Pr) + Audio 2 (Rear) HDMI™/HDCP Input 4 (Side) USB 2.0 2 (Side) Digital Audio Out (Optical) 1 (Rear) RGB In (D-Sub 15 Pin) - 65LW6500 65" Class 3D 1080p LED LCD TV PANEL SPECIFICATIONS Screen Size Resolution TruMotion (Frame Rate) Contrast Ratio (DCR) BROADCASTING SYSTEM Analog Digital VIDEO XD Engine Aspect Ratio Correction Color Temperature Control...
... Channel Programming • Auto/Manual Clock • On/Off Timer • Sleep Timer • Auto Off/Auto Sleep • AV INPUTS/OUTPUTS RF In (Antenna/Cable) 1 (Rear) AV In 2 (Rear) Component Video In (Y, Pb, Pr) + Audio 2 (Rear) HDMI™/HDCP Input 4 (Side) USB 2.0 2 (Side) Digital Audio Out (Optical) 1 (Rear) RGB In (D-Sub 15 Pin) - 65LW6500 65" Class 3D 1080p LED LCD TV PANEL SPECIFICATIONS Screen Size Resolution TruMotion (Frame Rate) Contrast Ratio (DCR) BROADCASTING SYSTEM Analog Digital VIDEO XD Engine Aspect Ratio Correction Color Temperature Control...


