

Owner's Manual
Page 4
Black(Darkness) Level 55 Picture Reset 56 Image Sticking Minimization(ISM) Method 57 Low-Power Picture Mode 58 SOUND & LANGUAGE CONTROL Auto Volume Leveler 59 Preset Sound Settings - NICAM Reception 65 - CONTENTS CONTENTS ACCESSORIES 1 PREPARATION Front Panel Controls 4 Back Panel Information 6 Stand Installation 8 Attaching the TV to a Wall 9 Back Cover for PC Mode 28 WATCHIINNGGTTVV//PROGRAMMMMEECCOONNTTRROOLL Remote Control Key Functions 32 Turning on the TV 34 Programme Selection 34 Volume Adjustment 34 On Screen Menu Selection and Adjustment ..........35 Auto Programme...
Black(Darkness) Level 55 Picture Reset 56 Image Sticking Minimization(ISM) Method 57 Low-Power Picture Mode 58 SOUND & LANGUAGE CONTROL Auto Volume Leveler 59 Preset Sound Settings - NICAM Reception 65 - CONTENTS CONTENTS ACCESSORIES 1 PREPARATION Front Panel Controls 4 Back Panel Information 6 Stand Installation 8 Attaching the TV to a Wall 9 Back Cover for PC Mode 28 WATCHIINNGGTTVV//PROGRAMMMMEECCOONNTTRROOLL Remote Control Key Functions 32 Turning on the TV 34 Programme Selection 34 Volume Adjustment 34 On Screen Menu Selection and Adjustment ..........35 Auto Programme...

Owner's Manual
Page 6
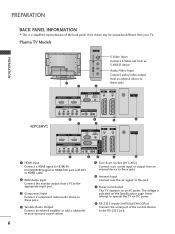
VOL PR POWER Button INPUT Button MENU Button OK Button VOLUME Buttons PROGRAMME Buttons 4 PREPARATION FRONT PANEL CONTROLS I If your TV. Plasma TV Models PREPARATION INPUT MENU OK VOL PR INPUT MENU OK INPUT VOLMENU OK PR Remote Control Sensor Power/Standby Indicator • illuminates red in standby mode. • illuminates green when the set is a simplified representation of the front panel. Here shown may be somewhat different from your product has a protection film attached, remove the film...
VOL PR POWER Button INPUT Button MENU Button OK Button VOLUME Buttons PROGRAMME Buttons 4 PREPARATION FRONT PANEL CONTROLS I If your TV. Plasma TV Models PREPARATION INPUT MENU OK VOL PR INPUT MENU OK INPUT VOLMENU OK PR Remote Control Sensor Power/Standby Indicator • illuminates red in standby mode. • illuminates green when the set is a simplified representation of the front panel. Here shown may be somewhat different from your product has a protection film attached, remove the film...
Owner's Manual
Page 8
... AUDIO (PC) (RGB/DVI) S-Video Input Connect S-Video out from an external device to these jacks. AV IN 3 AV 2 ANTENNA IN VIDEO L/MONO AUDIO R S-VIDEO 5 AV 2 6 ANTENNA IN COMPONENT IN VIDEO AUDIO VARIABLE AUDIO OUT RS-232C IN (CONTROL & SERVICE) 3 4 1 HDMI Input Connect a HDMI signal to these jacks. 6 Antenna Input Connect over-the-air signals to the RS-232C jack. 6 Or DVI(VIDEO)signal to HDMI/DVI port with DVI to HDMI cable. 2 RGB/Audio Input Connect the monitor output from an external device to HDMI IN. Here shown may be somewhat different from your surround sound...
... AUDIO (PC) (RGB/DVI) S-Video Input Connect S-Video out from an external device to these jacks. AV IN 3 AV 2 ANTENNA IN VIDEO L/MONO AUDIO R S-VIDEO 5 AV 2 6 ANTENNA IN COMPONENT IN VIDEO AUDIO VARIABLE AUDIO OUT RS-232C IN (CONTROL & SERVICE) 3 4 1 HDMI Input Connect a HDMI signal to these jacks. 6 Antenna Input Connect over-the-air signals to the RS-232C jack. 6 Or DVI(VIDEO)signal to HDMI/DVI port with DVI to HDMI cable. 2 RGB/Audio Input Connect the monitor output from an external device to HDMI IN. Here shown may be somewhat different from your surround sound...
Owner's Manual
Page 17
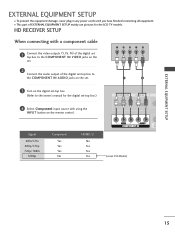
... SETUP When connecting with using the INPUT button on the set. 2 Connect the audio output of EXTERNAL EQUIPMENT SETUP mainly use pictures for the LCD TV models. EXTERNAL EQUIPMENT SETUP EXTERNAL EQUIPMENT SETUP I This part of the digital set-top box to the COMPONENT IN AUDIO jacks on the set. 1 2 3 Turn on the digital set-top box. (Refer to the owner's manual for the digital set-top box.) 4 Select Component input source with a component cable 1 Connect the video outputs (Y, PB, PR) of the digital set top box to the COMPONENT IN VIDEO jacks on the remote control. Signal...
... SETUP When connecting with using the INPUT button on the set. 2 Connect the audio output of EXTERNAL EQUIPMENT SETUP mainly use pictures for the LCD TV models. EXTERNAL EQUIPMENT SETUP EXTERNAL EQUIPMENT SETUP I This part of the digital set-top box to the COMPONENT IN AUDIO jacks on the set. 1 2 3 Turn on the digital set-top box. (Refer to the owner's manual for the digital set-top box.) 4 Select Component input source with a component cable 1 Connect the video outputs (Y, PB, PR) of the digital set top box to the COMPONENT IN VIDEO jacks on the remote control. Signal...
Owner's Manual
Page 18
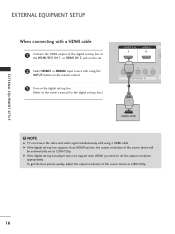
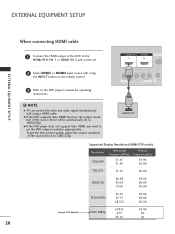
... the best picture quality, adjust the output resolution of the source device to 1280x720p. 16 NOTE G TV can receive the video and audio signal simultaneously with using a HDMI cable. EXTERNAL EQUIPMENT SETUP EXTERNAL EQUIPMENT SETUP When connecting with a HDMI cable 1 Connect the HDMI output of the digital set-top box to the HDMI/DVI IN 1 or HDMI IN 2 jack on the set. 2 Select HDMI1 or HDMI2 input source with using the INPUT button on the remote control. 3 Turn on the digital set-top box. (Refer to the owner's manual for the digital set-top box...
... the best picture quality, adjust the output resolution of the source device to 1280x720p. 16 NOTE G TV can receive the video and audio signal simultaneously with using a HDMI cable. EXTERNAL EQUIPMENT SETUP EXTERNAL EQUIPMENT SETUP When connecting with a HDMI cable 1 Connect the HDMI output of the digital set-top box to the HDMI/DVI IN 1 or HDMI IN 2 jack on the set. 2 Select HDMI1 or HDMI2 input source with using the INPUT button on the remote control. 3 Turn on the digital set-top box. (Refer to the owner's manual for the digital set-top box...
Owner's Manual
Page 19
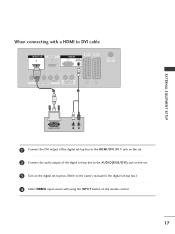
When connecting with a HDMI to DVI cable 1 1 2 EXTERNAL EQUIPMENT SETUP 1 Connect the DVI output of the digital set-top box to the HDMI/DVI IN 1 jack on the set. 2 Connect the audio output of the digital set-top box to the AUDIO(RGB/DVI) jack on the set. 3 Turn on the digital set-top box. (Refer to the owner's manual for the digital set-top box.) 4 Select HDMI1 input source with using the INPUT button on the remote control. 17
When connecting with a HDMI to DVI cable 1 1 2 EXTERNAL EQUIPMENT SETUP 1 Connect the DVI output of the digital set-top box to the HDMI/DVI IN 1 jack on the set. 2 Connect the audio output of the digital set-top box to the AUDIO(RGB/DVI) jack on the set. 3 Turn on the digital set-top box. (Refer to the owner's manual for the digital set-top box.) 4 Select HDMI1 input source with using the INPUT button on the remote control. 17
Owner's Manual
Page 22
... G If the DVD supports Auto HDMI function, the output resolution of the source device will be automatically set the DVD output resolution appropriately. G If the DVD player does not support Auto HDMI, you need to the DVD player's manual for operating instructions. ! VIDEO L/MONO AUDIO R EXTERNAL EQUIPMENT SETUP AV IN 3 When connecting HDMI cable 1 Connect the HDMI output of the DVD to the HDMI/DVI IN 1 or HDMI IN 2 jack on the set. 1 2 EXTERNAL EQUIPMENT SETUP 2 Select HDMI1 or HDMI2 input source with using the INPUT button on the remote control. 1 3 Refer to set to 1280x720p.
... G If the DVD supports Auto HDMI function, the output resolution of the source device will be automatically set the DVD output resolution appropriately. G If the DVD player does not support Auto HDMI, you need to the DVD player's manual for operating instructions. ! VIDEO L/MONO AUDIO R EXTERNAL EQUIPMENT SETUP AV IN 3 When connecting HDMI cable 1 Connect the HDMI output of the DVD to the HDMI/DVI IN 1 or HDMI IN 2 jack on the set. 1 2 EXTERNAL EQUIPMENT SETUP 2 Select HDMI1 or HDMI2 input source with using the INPUT button on the remote control. 1 3 Refer to set to 1280x720p.

Owner's Manual
Page 23
... an adequate distance between the TV and VCR for viewing. 21 EXTERNAL EQUIPMENT SETUP VCR SETUP I Typically a frozen still picture from a VCR. the fixed images on the sides of the VCR. 3 Press the PLAY button on the screen. When connecting with an antenna ANT OUT S-VIDEO VIDEO L R 1 ANT IN OUTPUT SWITCH Wall Jack 2 Antenna 1 Connect the ANT OUT socket of the VCR to the ANTENNA IN socket on the set. 2 Connect the antenna cable to the ANT IN socket of...
... an adequate distance between the TV and VCR for viewing. 21 EXTERNAL EQUIPMENT SETUP VCR SETUP I Typically a frozen still picture from a VCR. the fixed images on the sides of the VCR. 3 Press the PLAY button on the screen. When connecting with an antenna ANT OUT S-VIDEO VIDEO L R 1 ANT IN OUTPUT SWITCH Wall Jack 2 Antenna 1 Connect the ANT OUT socket of the VCR to the ANTENNA IN socket on the set. 2 Connect the antenna cable to the ANT IN socket of...
Owner's Manual
Page 29
...'s supported to 848x480, 852x480 in XGA modes. (XGA Models) 27 G Connect the audio cable from the PC to the Audio input on the set ). G The synchronization input waveform for a long period of time.The fixed image may become permanently imprinted on the screen;use too long RGB-PC cable,there might be changed, change the PC graphic card or consult it to the RGB (PC) port of the set .(Audio cables are...
...'s supported to 848x480, 852x480 in XGA modes. (XGA Models) 27 G Connect the audio cable from the PC to the Audio input on the set ). G The synchronization input waveform for a long period of time.The fixed image may become permanently imprinted on the screen;use too long RGB-PC cable,there might be changed, change the PC graphic card or consult it to the RGB (PC) port of the set .(Audio cables are...
Owner's Manual
Page 30
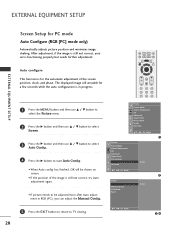
...) Automatically adjusts picture position and minimizes image shaking. LIST EXIT MENU Q.VIEW * OK FAV VOL PR MUTE 1 2 3 4 5 6 7 8 9 Picture Picture Mode Colour Temperature XD Advanced Aspect Ratio Picture Reset Screen XD Demo DE F G OK MENU 1 Picture Picture Mode Colour Temperature XD Advanced Aspect Ratio Picture Reset Screen XD Demo G To Set DE F G OK MENU 2 Screen Auto cCoonnffiigg.. After adjustment, if the image is still not correct, your set is in RGB (PC), you can adjust the Manual Config.. EXTERNAL EQUIPMENT SETUP EXTERNAL EQUIPMENT SETUP Screen Setup for...
...) Automatically adjusts picture position and minimizes image shaking. LIST EXIT MENU Q.VIEW * OK FAV VOL PR MUTE 1 2 3 4 5 6 7 8 9 Picture Picture Mode Colour Temperature XD Advanced Aspect Ratio Picture Reset Screen XD Demo DE F G OK MENU 1 Picture Picture Mode Colour Temperature XD Advanced Aspect Ratio Picture Reset Screen XD Demo G To Set DE F G OK MENU 2 Screen Auto cCoonnffiigg.. After adjustment, if the image is still not correct, your set is in RGB (PC), you can adjust the Manual Config.. EXTERNAL EQUIPMENT SETUP EXTERNAL EQUIPMENT SETUP Screen Setup for...
Owner's Manual
Page 31
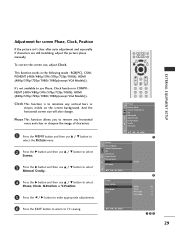
..., adjust the picture phase manually. EXTERNAL EQUIPMENT SETUP LIST EXIT MENU Q.VIEW * OK FAV VOL PR MUTE 1 2 3 4 5 6 7 8 9 Picture Picture Mode Colour Temperature XD Advanced Aspect Ratio Picture Reset Screen XD Demo DE F G OK MENU Picture Picture Mode Colour Temperature XD Advanced Aspect Ratio Picture Reset Screen XD Demo DE F G OK MENU G To Set Screen Auto Config. This function works in COMPONENT (480i/480p/576i/576p/720p/1080i), HDMI (480p/576p/720p/1080i/1080p(except VGA Models)). Clock This function is to select Manual Config.. 4 Press the G button and then use...
..., adjust the picture phase manually. EXTERNAL EQUIPMENT SETUP LIST EXIT MENU Q.VIEW * OK FAV VOL PR MUTE 1 2 3 4 5 6 7 8 9 Picture Picture Mode Colour Temperature XD Advanced Aspect Ratio Picture Reset Screen XD Demo DE F G OK MENU Picture Picture Mode Colour Temperature XD Advanced Aspect Ratio Picture Reset Screen XD Demo DE F G OK MENU G To Set Screen Auto Config. This function works in COMPONENT (480i/480p/576i/576p/720p/1080i), HDMI (480p/576p/720p/1080i/1080p(except VGA Models)). Clock This function is to select Manual Config.. 4 Press the G button and then use...
Owner's Manual
Page 32
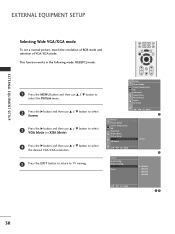
LIST EXIT MENU Q.VIEW * OK FAV VOL PR MUTE Picture Picture Mode Colour Temperature XD Advanced Aspect Ratio Picture Reset Screen XD Demo DE F G OK MENU 1 Picture Picture Mode Colour Temperature XD Advanced Aspect Ratio Picture Reset Screen XD Demo G To Set DE F G OK MENU 2 Screen Auto Config. XVGA Mode Reset G 1024x768 1280x768 1360x768 1366x768 DE F G OK MENU 34 30 This function works in the following mode: RGB[PC] mode. 1 Press the MENU button and then use D / E button to select the Picture menu. 2 Press the G button and then use D / E button to select Screen. 3 Press ...
LIST EXIT MENU Q.VIEW * OK FAV VOL PR MUTE Picture Picture Mode Colour Temperature XD Advanced Aspect Ratio Picture Reset Screen XD Demo DE F G OK MENU 1 Picture Picture Mode Colour Temperature XD Advanced Aspect Ratio Picture Reset Screen XD Demo G To Set DE F G OK MENU 2 Screen Auto Config. XVGA Mode Reset G 1024x768 1280x768 1360x768 1366x768 DE F G OK MENU 34 30 This function works in the following mode: RGB[PC] mode. 1 Press the MENU button and then use D / E button to select the Picture menu. 2 Press the G button and then use D / E button to select Screen. 3 Press ...

Owner's Manual
Page 33
... the adjusted value 1 Press the MENU button and then use D / E button to select the Picture menu. 2 Press the G button and then use D / E button to select Screen. 3 Press the G button and then use D / E button to select Reset. 4 Press the G button. 5 Press the EXIT button to return to original factory settings) This function operates in current mode. Manual Config. EXTERNAL EQUIPMENT SETUP Initializing (Reset to normal TV viewing. LIST EXIT MENU Q.VIEW * OK FAV VOL PR MUTE 1 2 3 4 5 6 7 8 9 Picture Picture Mode Colour Temperature XD Advanced Aspect Ratio Picture Reset...
... the adjusted value 1 Press the MENU button and then use D / E button to select the Picture menu. 2 Press the G button and then use D / E button to select Screen. 3 Press the G button and then use D / E button to select Reset. 4 Press the G button. 5 Press the EXIT button to return to original factory settings) This function operates in current mode. Manual Config. EXTERNAL EQUIPMENT SETUP Initializing (Reset to normal TV viewing. LIST EXIT MENU Q.VIEW * OK FAV VOL PR MUTE 1 2 3 4 5 6 7 8 9 Picture Picture Mode Colour Temperature XD Advanced Aspect Ratio Picture Reset...
Owner's Manual
Page 37
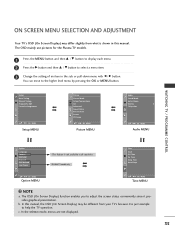
... and then D / E button to select a menu item. 3 Change the setting of an item in all countries. * PLASMA TV models only Time Clock Off Time On Time Sleep Time Auto Sleep DE F G OK MENU Option MENU DE F G OK MENU Time MENU ! In the teletext mode, menus are not displayed. 35 c. Setup Auto Tuning Manual Tuning Programme Edit Favourite Programme DE F G OK MENU Setup MENU Picture Picture Mode Colour Temperature XD Advanced Aspect Ratio Picture Reset Screen XD Demo DE F G OK MENU Picture MENU Audio Sound Mode Auto Volume Balance 0 TV Speaker DE F G OK MENU Audio MENU WATCHING TV...
... and then D / E button to select a menu item. 3 Change the setting of an item in all countries. * PLASMA TV models only Time Clock Off Time On Time Sleep Time Auto Sleep DE F G OK MENU Option MENU DE F G OK MENU Time MENU ! In the teletext mode, menus are not displayed. 35 c. Setup Auto Tuning Manual Tuning Programme Edit Favourite Programme DE F G OK MENU Setup MENU Picture Picture Mode Colour Temperature XD Advanced Aspect Ratio Picture Reset Screen XD Demo DE F G OK MENU Picture MENU Audio Sound Mode Auto Volume Balance 0 TV Speaker DE F G OK MENU Audio MENU WATCHING TV...

Owner's Manual
Page 48
... 4:3 aspect ratio, with gray bars appearing at both the left and right sides. Then change into other mode. Full DE 4:3 PICTURE CONTROL 46 INPUT TV INPUT POWER MODE TV DVD RATIO VCR SIMPLINK SLEEP TEXT I/II LIST EXIT MENU Q.VIEW * OK FAV VOL PR MUTE • Spectacle When your TV receives the wide screen signal, it will adjust the picture horizontally, in a linear proportion, to fill the entire screen fully. If a fixed image is displayed...
... 4:3 aspect ratio, with gray bars appearing at both the left and right sides. Then change into other mode. Full DE 4:3 PICTURE CONTROL 46 INPUT TV INPUT POWER MODE TV DVD RATIO VCR SIMPLINK SLEEP TEXT I/II LIST EXIT MENU Q.VIEW * OK FAV VOL PR MUTE • Spectacle When your TV receives the wide screen signal, it will adjust the picture horizontally, in a linear proportion, to fill the entire screen fully. If a fixed image is displayed...

Owner's Manual
Page 50
... Picture menu. 2 Press the G button and then D / E button to select Picture Mode. 3 Press the G button and then D / E button to select Dynamic, Standard, Mild, User1 or User2. 4 Press the EXIT button to return to normal TV viewing. • Picture Mode adjusts the TV for optimum picture reproduction at the factory and can't be changed. FAV VOL PR MUTE 1 2 3 4 5 6 7 8 9 Picture Picture Mode Colour Temperature XD Advanced Aspect Ratio Picture Reset Screen XD Demo DE F G OK MENU 1 Picture Picture Mode Colour Temperature XD Advanced Aspect Ratio Picture Reset Screen...
... Picture menu. 2 Press the G button and then D / E button to select Picture Mode. 3 Press the G button and then D / E button to select Dynamic, Standard, Mild, User1 or User2. 4 Press the EXIT button to return to normal TV viewing. • Picture Mode adjusts the TV for optimum picture reproduction at the factory and can't be changed. FAV VOL PR MUTE 1 2 3 4 5 6 7 8 9 Picture Picture Mode Colour Temperature XD Advanced Aspect Ratio Picture Reset Screen XD Demo DE F G OK MENU 1 Picture Picture Mode Colour Temperature XD Advanced Aspect Ratio Picture Reset Screen...
Owner's Manual
Page 65
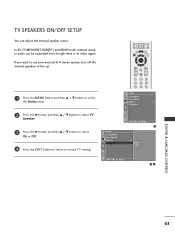
... select On or Off. 4 Press the EXIT button to return to normal TV viewing. LIST EXIT MENU Q.VIEW * OK FAV VOL PR MUTE 1 2 3 4 5 6 7 8 9 Audio Sound Mode Auto Volume Balance 0 TV Speaker Audio Sound Mode Auto Volume Balance TV Speaker DE F G OK MENU 1 0 G Off On DE F G OK MENU 23 SOUND & LANGUAGE CONTROL 63 TV SPEAKERS ON/OFF SETUP You can be outputted even though there is no video signal. In AV, COMPONENT, RGB[PC] and HDMI mode, internal speaker audio can adjust the internal speaker...
... select On or Off. 4 Press the EXIT button to return to normal TV viewing. LIST EXIT MENU Q.VIEW * OK FAV VOL PR MUTE 1 2 3 4 5 6 7 8 9 Audio Sound Mode Auto Volume Balance 0 TV Speaker Audio Sound Mode Auto Volume Balance TV Speaker DE F G OK MENU 1 0 G Off On DE F G OK MENU 23 SOUND & LANGUAGE CONTROL 63 TV SPEAKERS ON/OFF SETUP You can be outputted even though there is no video signal. In AV, COMPONENT, RGB[PC] and HDMI mode, internal speaker audio can adjust the internal speaker...
Owner's Manual
Page 76
... the VCR. The remote control doesn't work I Station or cable product experiencing problems, tune to -)? The video function does not work normally. I Check your service center, if the picture has not appeared after switching on some channels I Check to receive weaker station. I Try another product's power cord into wall power outlet? I Check whether the product is any function to +, - APPENDIX TROUBLESHOOTING The operation does not work . No picture & No sound I Check...
... the VCR. The remote control doesn't work I Station or cable product experiencing problems, tune to -)? The video function does not work normally. I Check your service center, if the picture has not appeared after switching on some channels I Check to receive weaker station. I Try another product's power cord into wall power outlet? I Check whether the product is any function to +, - APPENDIX TROUBLESHOOTING The operation does not work . No picture & No sound I Check...

Owner's Manual
Page 77
... a problem in menu option. There is turned on background & Horizontal Noise & Incorrect position I A change in ambient humidity or temperature may be with the product. range. Press MUTE button. I Press the VOL+/- (or Volume) button. No output from I Work the Auto configure or adjust clock, phase, or H/V position. of I Check the signal cable. APPENDIX 75 I Sound muted? I Are the audio cables installed properly? Screen colour is out of the speakers...
... a problem in menu option. There is turned on background & Horizontal Noise & Incorrect position I A change in ambient humidity or temperature may be with the product. range. Press MUTE button. I Press the VOL+/- (or Volume) button. No output from I Work the Auto configure or adjust clock, phase, or H/V position. of I Check the signal cable. APPENDIX 75 I Sound muted? I Are the audio cables installed properly? Screen colour is out of the speakers...
Owner's Manual
Page 81
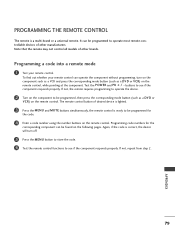
... control all models of desired device is lighted. 3 Press the MENU and MUTE buttons simultaneously, the remote control is ready to be programmed for the corresponding component can be programmed, then press the corresponding mode button (such as a D V D or V C R) on the remote control. If not, the remote requires programming to operate the device. 2 Turn on the component to operate most remote-controllable devices of other brands. Programming code numbers for the code. 4 Enter a code number using the number buttons on the remote control...
... control all models of desired device is lighted. 3 Press the MENU and MUTE buttons simultaneously, the remote control is ready to be programmed for the corresponding component can be programmed, then press the corresponding mode button (such as a D V D or V C R) on the remote control. If not, the remote requires programming to operate the device. 2 Turn on the component to operate most remote-controllable devices of other brands. Programming code numbers for the code. 4 Enter a code number using the number buttons on the remote control...


