
Owner's Manual
Page 3
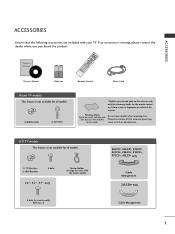
... LIST PIP POSTION INPUT MENU I/II OK SLEEP VOL Q.VIEW 1 MUTE PR 4 2 7 5 3 * 8 6 TIME 0 REVEAL ? Please be cautious of the exterior. INDEX 9 FAV Owner's Manual Batteries Remote Control Power Cord Plasma TV models This feature is stain or fingerprint on the exterior only with the cleansing cloths for all models. 2- Wall Brackets...
... LIST PIP POSTION INPUT MENU I/II OK SLEEP VOL Q.VIEW 1 MUTE PR 4 2 7 5 3 * 8 6 TIME 0 REVEAL ? Please be cautious of the exterior. INDEX 9 FAV Owner's Manual Batteries Remote Control Power Cord Plasma TV models This feature is stain or fingerprint on the exterior only with the cleansing cloths for all models. 2- Wall Brackets...

Owner's Manual
Page 4
... - CONTENTS CONTENTS ACCESSORIES 1 PREPARATION Front Panel Controls 4 Back Panel Information 6 Stand Installation 8 Attaching the TV to a Wall 9 Back Cover for PC Mode 28 WATCHIINNGGTTVV//PROGRAMMMMEECCOONNTTRROOLL Remote Control Key Functions 32 Turning on the TV 34 Programme Selection 34 Volume Adjustment 34 On Screen Menu Selection and Adjustment ..........35 Auto Programme Tuning...
... - CONTENTS CONTENTS ACCESSORIES 1 PREPARATION Front Panel Controls 4 Back Panel Information 6 Stand Installation 8 Attaching the TV to a Wall 9 Back Cover for PC Mode 28 WATCHIINNGGTTVV//PROGRAMMMMEECCOONNTTRROOLL Remote Control Key Functions 32 Turning on the TV 34 Programme Selection 34 Volume Adjustment 34 On Screen Menu Selection and Adjustment ..........35 Auto Programme Tuning...

Owner's Manual
Page 5
CONTENTS TIME SETTING Clock Setup 67 Auto On/Off Timer Setting 68 Sleep Timer Setting 69 Auto Shut-off Setting 70 TELETEXT Switch On/Off 71 SIMPLE Text 71 TOP Text 72 FASTEXT 72 Special Teletext Functions 73 APPENDIX Troubleshooting 74 Maintenance 76 Product Specifications 77 Programming the Remote Control 79 3
CONTENTS TIME SETTING Clock Setup 67 Auto On/Off Timer Setting 68 Sleep Timer Setting 69 Auto Shut-off Setting 70 TELETEXT Switch On/Off 71 SIMPLE Text 71 TOP Text 72 FASTEXT 72 Special Teletext Functions 73 APPENDIX Troubleshooting 74 Maintenance 76 Product Specifications 77 Programming the Remote Control 79 3

Owner's Manual
Page 6
... film and then wipe the product with a polishing cloth. Plasma TV Models PREPARATION INPUT MENU OK VOL PR INPUT MENU OK INPUT VOLMENU OK PR Remote Control Sensor Power/Standby Indicator • illuminates red in standby mode. • illuminates green when the set is a simplified representation of the front panel. PREPARATION...
... film and then wipe the product with a polishing cloth. Plasma TV Models PREPARATION INPUT MENU OK VOL PR INPUT MENU OK INPUT VOLMENU OK PR Remote Control Sensor Power/Standby Indicator • illuminates red in standby mode. • illuminates green when the set is a simplified representation of the front panel. PREPARATION...

Owner's Manual
Page 7
LCD TV Models 26LC4*, 32LC4*, 37LC4*, 42LC4*, 26LC5*, 32LC5*, 37LC5*, 42LC5* PREPARATION R Remote Control Sensor Power/Standby Indicator • illuminates red in standby mode. • illuminates green when the set is switched on. 26LC3R* PR VOL OK MENU INPUT /I PROGRAMME Buttons VOLUME Buttons OK Button MENU Button INPUT Button POWER Button R Remote Control Sensor Power/Standby Indicator • illuminates red in standby mode. • illuminates green when the set is switched on. 5
LCD TV Models 26LC4*, 32LC4*, 37LC4*, 42LC4*, 26LC5*, 32LC5*, 37LC5*, 42LC5* PREPARATION R Remote Control Sensor Power/Standby Indicator • illuminates red in standby mode. • illuminates green when the set is switched on. 26LC3R* PR VOL OK MENU INPUT /I PROGRAMME Buttons VOLUME Buttons OK Button MENU Button INPUT Button POWER Button R Remote Control Sensor Power/Standby Indicator • illuminates red in standby mode. • illuminates green when the set is switched on. 5
Owner's Manual
Page 17
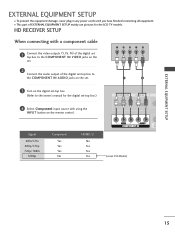
... the audio output of EXTERNAL EQUIPMENT SETUP mainly use pictures for the digital set -top box. (Refer to the COMPONENT IN VIDEO jacks on the remote control.
... the audio output of EXTERNAL EQUIPMENT SETUP mainly use pictures for the digital set -top box. (Refer to the COMPONENT IN VIDEO jacks on the remote control.
Owner's Manual
Page 18
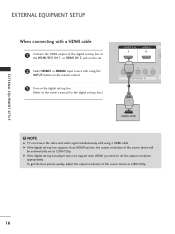
... digital set-top box to the owner's manual for the digital set . 2 Select HDMI1 or HDMI2 input source with using the INPUT button on the remote control. 3 Turn on the digital set-top box. (Refer to the HDMI/DVI IN 1 or HDMI IN 2 jack on the set -top box.) 1 2 1 ! G If the...
... digital set-top box to the owner's manual for the digital set . 2 Select HDMI1 or HDMI2 input source with using the INPUT button on the remote control. 3 Turn on the digital set-top box. (Refer to the HDMI/DVI IN 1 or HDMI IN 2 jack on the set -top box.) 1 2 1 ! G If the...
Owner's Manual
Page 19
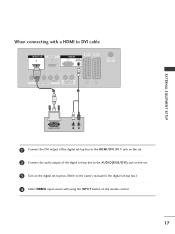
When connecting with a HDMI to DVI cable 1 1 2 EXTERNAL EQUIPMENT SETUP 1 Connect the DVI output of the digital set-top box to the HDMI/DVI IN 1 jack on the set. 2 Connect the audio output of the digital set-top box to the AUDIO(RGB/DVI) jack on the set. 3 Turn on the digital set-top box. (Refer to the owner's manual for the digital set-top box.) 4 Select HDMI1 input source with using the INPUT button on the remote control. 17
When connecting with a HDMI to DVI cable 1 1 2 EXTERNAL EQUIPMENT SETUP 1 Connect the DVI output of the digital set-top box to the HDMI/DVI IN 1 jack on the set. 2 Connect the audio output of the digital set-top box to the AUDIO(RGB/DVI) jack on the set. 3 Turn on the digital set-top box. (Refer to the owner's manual for the digital set-top box.) 4 Select HDMI1 input source with using the INPUT button on the remote control. 17

Owner's Manual
Page 20
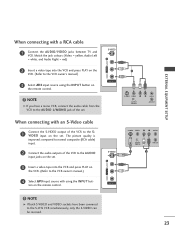
EXTERNAL EQUIPMENT SETUP EXTERNAL EQUIPMENT SETUP DVD SETUP When connecting with using the INPUT button on the remote control. 5 Refer to the DVD player's manual for operating instructions. 1 2 Component Input ports To get better picture quality, connect a DVD player to the component input ...
EXTERNAL EQUIPMENT SETUP EXTERNAL EQUIPMENT SETUP DVD SETUP When connecting with using the INPUT button on the remote control. 5 Refer to the DVD player's manual for operating instructions. 1 2 Component Input ports To get better picture quality, connect a DVD player to the component input ...
Owner's Manual
Page 21
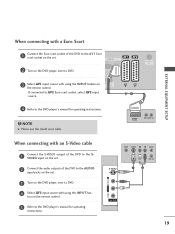
ton on the remote control. 5 Refer to the DVD player's manual for operating instructions. VIDEO L/MONO AUDIO R VIDEO S-VIDEO L R ANT IN S-VIDEO OUTPUT SWITCH ANT OUT 1 2 AV IN 3 1 2 19 ... to the S VIDEO input on the set. 2 Connect the audio outputs of the DVD to the AUDIO input jacks on the set . 2 Turn on the remote control. If connected to AV2 Euro scart socket, select AV2 input source. 4 Refer to the DVD player's manual for operating instructions. !
ton on the remote control. 5 Refer to the DVD player's manual for operating instructions. VIDEO L/MONO AUDIO R VIDEO S-VIDEO L R ANT IN S-VIDEO OUTPUT SWITCH ANT OUT 1 2 AV IN 3 1 2 19 ... to the S VIDEO input on the set. 2 Connect the audio outputs of the DVD to the AUDIO input jacks on the set . 2 Turn on the remote control. If connected to AV2 Euro scart socket, select AV2 input source. 4 Refer to the DVD player's manual for operating instructions. !
Owner's Manual
Page 22
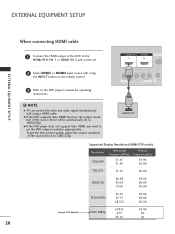
... SETUP AV IN 3 When connecting HDMI cable 1 Connect the HDMI output of the DVD to the HDMI/DVI IN 1 or HDMI IN 2 jack on the remote control. 1 3 Refer to 1280x720p. NOTE G TV can receive the video and audio signal simultaneously with using a HDMI cable. G If the DVD supports Auto HDMI function...
... SETUP AV IN 3 When connecting HDMI cable 1 Connect the HDMI output of the DVD to the HDMI/DVI IN 1 or HDMI IN 2 jack on the remote control. 1 3 Refer to 1280x720p. NOTE G TV can receive the video and audio signal simultaneously with using a HDMI cable. G If the DVD supports Auto HDMI function...

Owner's Manual
Page 24
AUDIO/ VIDEO (R) AUDIO (L) ! If connected to use the signal shielded Euro scart cable. 22 NOTE G If you want to use the EURO scart cable, you have to AV2 Euro scart socket, select AV2 input source. EXTERNAL EQUIPMENT SETUP EXTERNAL EQUIPMENT SETUP When connecting with a Euro Scart 1 Connect the Euro scart socket of the VCR to the A V 1 Euro scart socket on the set. 2 Insert a video tape into the VCR and press PLAY on the VCR. (Refer to the VCR owner's manual.) 3 Select AV1 input source with using the INPUT button 1 on the remote control.
AUDIO/ VIDEO (R) AUDIO (L) ! If connected to use the signal shielded Euro scart cable. 22 NOTE G If you want to use the EURO scart cable, you have to AV2 Euro scart socket, select AV2 input source. EXTERNAL EQUIPMENT SETUP EXTERNAL EQUIPMENT SETUP When connecting with a Euro Scart 1 Connect the Euro scart socket of the VCR to the A V 1 Euro scart socket on the set. 2 Insert a video tape into the VCR and press PLAY on the VCR. (Refer to the VCR owner's manual.) 3 Select AV1 input source with using the INPUT button 1 on the remote control.
Owner's Manual
Page 25
... the VCR and press PLAY on the VCR. (Refer to the VCR owner's manual.) 4 Select AV3 input source with using the INPUT button on the remote control. ton on the...
... the VCR and press PLAY on the VCR. (Refer to the VCR owner's manual.) 4 Select AV3 input source with using the INPUT button on the remote control. ton on the...

Owner's Manual
Page 26
Refer to external equipment operating guide. 24 EXTERNAL EQUIPMENT SETUP EXTERNAL EQUIPMENT SETUP OTHER A/V SOURCE SETUP Camcorder Video Game Set VIDEO L/MONO AUDIO R S-VIDEO AV IN 3 VIDEO L R 1 1 Connect the AUDIO/VIDEO jacks between TV and external equipment. Match the jack colours. (Video = yellow, Audio Left = white, and Audio Right = red) 2 Select AV3 input source with using the INPUT button on the remote control. 3 Operate the corresponding external equipment.
Refer to external equipment operating guide. 24 EXTERNAL EQUIPMENT SETUP EXTERNAL EQUIPMENT SETUP OTHER A/V SOURCE SETUP Camcorder Video Game Set VIDEO L/MONO AUDIO R S-VIDEO AV IN 3 VIDEO L R 1 1 Connect the AUDIO/VIDEO jacks between TV and external equipment. Match the jack colours. (Video = yellow, Audio Left = white, and Audio Right = red) 2 Select AV3 input source with using the INPUT button on the remote control. 3 Operate the corresponding external equipment.
Owner's Manual
Page 28
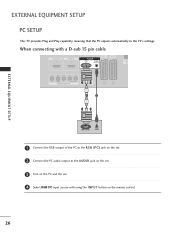
When connecting with a D-sub 15 pin cable EXTERNAL EQUIPMENT SETUP 1 2 RGB OUTPUT AUDIO 1 Connect the RGB output of the PC to the RGB (P C) jack on the set. 2 Connect the PC1audio outpu2 t to the TV's settings. EXTERNAL EQUIPMENT SETUP PC SETUP This TV provides Plug and Play capability, meaning that the PC adjusts automatically to the AUDIO jack on the set. 3 Turn on the PC and the set. 4 Select RGB PC input source with using the INPUT button on the remote control. 26
When connecting with a D-sub 15 pin cable EXTERNAL EQUIPMENT SETUP 1 2 RGB OUTPUT AUDIO 1 Connect the RGB output of the PC to the RGB (P C) jack on the set. 2 Connect the PC1audio outpu2 t to the TV's settings. EXTERNAL EQUIPMENT SETUP PC SETUP This TV provides Plug and Play capability, meaning that the PC adjusts automatically to the AUDIO jack on the set. 3 Turn on the PC and the set. 4 Select RGB PC input source with using the INPUT button on the remote control. 26

Owner's Manual
Page 34
...DVD Controls some video cassette recorders or DVD players control buttons when you toggle this button, the Simplink menu appears at the remote control sensor on from standby or off to TV. Control connected AV devices by changing mode source. LIST Displays the programme ...picture format. SIMPLINK See a list of AV devices connected to standby. Brightness Adjusts screen brightness. WATCHING TV / PROGRAMME CONTROL REMOTE CONTROL KEY FUNCTIONS When using the remote control, aim it at the screen.(G p.44) SLEEP Sets the sleep timer. Q.VIEW Returns to the previously viewed programme...
...DVD Controls some video cassette recorders or DVD players control buttons when you toggle this button, the Simplink menu appears at the remote control sensor on from standby or off to TV. Control connected AV devices by changing mode source. LIST Displays the programme ...picture format. SIMPLINK See a list of AV devices connected to standby. Brightness Adjusts screen brightness. WATCHING TV / PROGRAMME CONTROL REMOTE CONTROL KEY FUNCTIONS When using the remote control, aim it at the screen.(G p.44) SLEEP Sets the sleep timer. Q.VIEW Returns to the previously viewed programme...

Owner's Manual
Page 35
.... UP/DOWN 0~9 number Selects a programme. WATCHING TV / PROGRAMME CONTROL INPUT TV INPUT POWER MODE TV DVD RATIO VCR SIMPLINK SLEEP TEXT I/II MODE Selects the remote operating modes. 1 TELETEXT These buttons are used batteries with -). BUTTONS For further details, see the 'Teletext' section. I Close cover. 33 I Install two 1.5V AA batteries...
.... UP/DOWN 0~9 number Selects a programme. WATCHING TV / PROGRAMME CONTROL INPUT TV INPUT POWER MODE TV DVD RATIO VCR SIMPLINK SLEEP TEXT I/II MODE Selects the remote operating modes. 1 TELETEXT These buttons are used batteries with -). BUTTONS For further details, see the 'Teletext' section. I Close cover. 33 I Install two 1.5V AA batteries...

Owner's Manual
Page 36
... number. I In standby mode to turn TV on, press the , INPUT, P R D / E button on the TV or press the POWER, T V, INPUT, PR +/-, NUMBER( 0~9 ) buttons on the remote control and then the TV will be turned on .
... number. I In standby mode to turn TV on, press the , INPUT, P R D / E button on the TV or press the POWER, T V, INPUT, PR +/-, NUMBER( 0~9 ) buttons on the remote control and then the TV will be turned on .

Owner's Manual
Page 45
... POWER, INPUT, T V, P R + / - This set is programmed to remember which option it . WATCHING TV / PROGRAMME CONTROL KEY LOCK The TV can be set so that the remote control is needed to control it was last set to even if you turn the set off , press the r / I, INPUT, P R D / E button on the set . 43...
... POWER, INPUT, T V, P R + / - This set is programmed to remember which option it . WATCHING TV / PROGRAMME CONTROL KEY LOCK The TV can be set so that the remote control is needed to control it was last set to even if you turn the set off , press the r / I, INPUT, P R D / E button on the set . 43...
Owner's Manual
Page 47
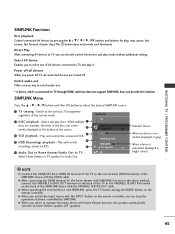
... : Select and play media without additional settings. G When you switch the Input source with SIMPLINK, press the TV button among the MODE button on the remote controller, you power off all devices When you can directly control the devices and play discs. WATCHING TV / PROGRAMME CONTROL SIMPLINK Functions Disc playback Control... to the previous TV programme regardless of the SIMPLINK device with the HDMI cable. G When operating the external device with the INPUT button on the remote controller.
... : Select and play media without additional settings. G When you switch the Input source with SIMPLINK, press the TV button among the MODE button on the remote controller, you power off all devices When you can directly control the devices and play discs. WATCHING TV / PROGRAMME CONTROL SIMPLINK Functions Disc playback Control... to the previous TV programme regardless of the SIMPLINK device with the HDMI cable. G When operating the external device with the INPUT button on the remote controller.


