
Owner's Manual
Page 1
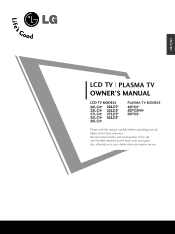
See the label attached on the back cover and quote this manual carefully before operating your dealer when you require service. ENGLISH LCD TV PLASMA TV OWNER'S MANUAL LCD TV MODELS 26LC4* 32LC4* 37LC4* 42LC4* 26LC3* 26LC5* 32LC5* 37LC5* 42LC5* PLASMA TV MODELS 42PC5* 42PC5RV* 50PC5* Please read this information to your set . Retain it for future reference. Record model number and serial number of the set .
See the label attached on the back cover and quote this manual carefully before operating your dealer when you require service. ENGLISH LCD TV PLASMA TV OWNER'S MANUAL LCD TV MODELS 26LC4* 32LC4* 37LC4* 42LC4* 26LC3* 26LC5* 32LC5* 37LC5* 42LC5* PLASMA TV MODELS 42PC5* 42PC5RV* 50PC5* Please read this information to your set . Retain it for future reference. Record model number and serial number of the set .
Owner's Manual
Page 3
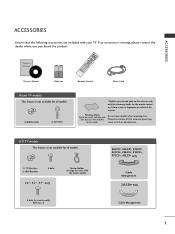
... when removing stain. ARC INPUTTINVPUT POWER PIP TEXT PR- Polishing Cloth Polish the screen with the cloth This feature is not available for all models. 2-Wall brackets 2-eye-bolts *Slightly wipe stained spot on the exterior only with the cleansing cloths for the product exterior if there is ... feature is missing, please contact the dealer where you purchased the product. If an accessory is not available for all models. 2- Please be cautious of the exterior. ACCESSORIES ACCESSORIES Ensure that excessive power may cause scratch or discoloration. PIP PIP PR+ SIZE TV DVD...
... when removing stain. ARC INPUTTINVPUT POWER PIP TEXT PR- Polishing Cloth Polish the screen with the cloth This feature is not available for all models. 2-Wall brackets 2-eye-bolts *Slightly wipe stained spot on the exterior only with the cleansing cloths for the product exterior if there is ... feature is missing, please contact the dealer where you purchased the product. If an accessory is not available for all models. 2- Please be cautious of the exterior. ACCESSORIES ACCESSORIES Ensure that excessive power may cause scratch or discoloration. PIP PIP PR+ SIZE TV DVD...

Owner's Manual
Page 6
... the product with a polishing cloth. VOL PR POWER Button INPUT Button MENU Button OK Button VOLUME Buttons PROGRAMME Buttons 4 I This is switched on. Plasma TV Models PREPARATION INPUT MENU OK VOL PR INPUT MENU OK INPUT VOLMENU OK PR Remote Control Sensor Power/Standby Indicator • illuminates red in standby mode...
... the product with a polishing cloth. VOL PR POWER Button INPUT Button MENU Button OK Button VOLUME Buttons PROGRAMME Buttons 4 I This is switched on. Plasma TV Models PREPARATION INPUT MENU OK VOL PR INPUT MENU OK INPUT VOLMENU OK PR Remote Control Sensor Power/Standby Indicator • illuminates red in standby mode...

Owner's Manual
Page 7
LCD TV Models 26LC4*, 32LC4*, 37LC4*, 42LC4*, 26LC5*, 32LC5*, 37LC5*, 42LC5* PREPARATION R Remote Control Sensor Power/Standby Indicator • illuminates red in standby mode. • illuminates green when the set is switched on. 26LC3R* PR VOL OK MENU INPUT /I PROGRAMME Buttons VOLUME Buttons OK Button MENU Button INPUT Button POWER Button R Remote Control Sensor Power/Standby Indicator • illuminates red in standby mode. • illuminates green when the set is switched on. 5
LCD TV Models 26LC4*, 32LC4*, 37LC4*, 42LC4*, 26LC5*, 32LC5*, 37LC5*, 42LC5* PREPARATION R Remote Control Sensor Power/Standby Indicator • illuminates red in standby mode. • illuminates green when the set is switched on. 26LC3R* PR VOL OK MENU INPUT /I PROGRAMME Buttons VOLUME Buttons OK Button MENU Button INPUT Button POWER Button R Remote Control Sensor Power/Standby Indicator • illuminates red in standby mode. • illuminates green when the set is switched on. 5
Owner's Manual
Page 8
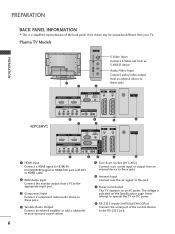
.... 7 Power Cord Socket This TV operates on DC power. 8 RS-232C Input(CONTROL&SERVICE)Port Connect the serial port of the back panel. Plasma TV Models AV IN 3 VIDEO L/MONO AUDIO R S-VIDEO VIDEO L/MONO AUDIO R S-VIDEO VIDEO L/MONO AUDIO R S-VIDEO AV IN 3 AV IN 3 7 1 2 HDMI/DVI IN 1 HDMI IN 2 COMPONENT IN...
.... 7 Power Cord Socket This TV operates on DC power. 8 RS-232C Input(CONTROL&SERVICE)Port Connect the serial port of the back panel. Plasma TV Models AV IN 3 VIDEO L/MONO AUDIO R S-VIDEO VIDEO L/MONO AUDIO R S-VIDEO VIDEO L/MONO AUDIO R S-VIDEO AV IN 3 AV IN 3 7 1 2 HDMI/DVI IN 1 HDMI IN 2 COMPONENT IN...
Owner's Manual
Page 9
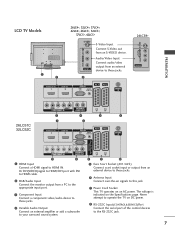
... add a subwoofer to your surround sound system. 8 5 6 5 Euro Scart Socket (AV1/AV2) Connect scart socket input or output from an S-VIDEO device. PREPARATION LCD TV Models 26LC4*, 32LC4*, 37LC4*, 42LC4*, 26LC5*, 32LC5*, 37LC5*, 42LC5* HDMI IN 2 HDMI/DVI IN 1 HDMI IN 2 7 RGB IN 1 AV 1 AV 2 ANTENNA IN S-VIDEO S-VIDEO AV IN...
... add a subwoofer to your surround sound system. 8 5 6 5 Euro Scart Socket (AV1/AV2) Connect scart socket input or output from an S-VIDEO device. PREPARATION LCD TV Models 26LC4*, 32LC4*, 37LC4*, 42LC4*, 26LC5*, 32LC5*, 37LC5*, 42LC5* HDMI IN 2 HDMI/DVI IN 1 HDMI IN 2 7 RGB IN 1 AV 1 AV 2 ANTENNA IN S-VIDEO S-VIDEO AV IN...

Owner's Manual
Page 10
PREPARATION PREPARATION STAND INSTALLATION (Only 26, 32, 37 inch LCD TV models) 1 Carefully place the product screen side down on a cushioned surface that will protect product and screen from damage. 2 Assemble the product stand with the product as shown. 3 Install the 4 bolts securely, in the back of the product in the holes provided. 8
PREPARATION PREPARATION STAND INSTALLATION (Only 26, 32, 37 inch LCD TV models) 1 Carefully place the product screen side down on a cushioned surface that will protect product and screen from damage. 2 Assemble the product stand with the product as shown. 3 Install the 4 bolts securely, in the back of the product in the holes provided. 8

Owner's Manual
Page 11
... set up close to the wall so the product doesn't fall over when it is to fix it is not available for all models. Plasma TV models LCD TV models 1 1 2 2 1 Use the eye-bolts or TV brackets/bolts to fix the product to tie the product. NOTE G When moving the product to tie...
... set up close to the wall so the product doesn't fall over when it is to fix it is not available for all models. Plasma TV models LCD TV models 1 1 2 2 1 Use the eye-bolts or TV brackets/bolts to fix the product to tie the product. NOTE G When moving the product to tie...
Owner's Manual
Page 12
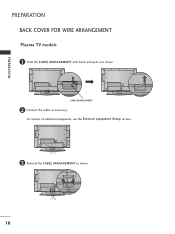
CABLE MANAGEMENT 2 Connect the cables as shown. PREPARATION PREPARATION BACK COVER FOR WIRE ARRANGEMENT Plasma TV models 1 Hold the CABLE MANAGEMENT with hands and push it as necessary. To connect an additional equipment, see the External equipment Setup section. 3 Reinstall the CABLE MANAGEMENT as shown. 10
CABLE MANAGEMENT 2 Connect the cables as shown. PREPARATION PREPARATION BACK COVER FOR WIRE ARRANGEMENT Plasma TV models 1 Hold the CABLE MANAGEMENT with hands and push it as necessary. To connect an additional equipment, see the External equipment Setup section. 3 Reinstall the CABLE MANAGEMENT as shown. 10
Owner's Manual
Page 13
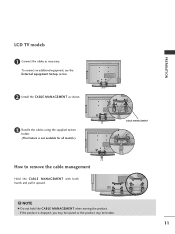
NOTE G Do not hold the CABLE MANAGEMENT when moving the product. - PREPARATION LCD TV models 1 Connect the cables as shown. 3 Bundle the cables using the supplied twister holder. (This feature is dropped, you may be injured or the product may be broken. 11 To connect an additional equipment, see the External equipment Setup section. 2 Install the CABLE MANAGEMENT as necessary. If the product is not available for all models.) CABLE MANAGEMENT How to remove the cable management Hold the CABLE MANAGEMENT with both hands and pull it upward. !
NOTE G Do not hold the CABLE MANAGEMENT when moving the product. - PREPARATION LCD TV models 1 Connect the cables as shown. 3 Bundle the cables using the supplied twister holder. (This feature is dropped, you may be injured or the product may be broken. 11 To connect an additional equipment, see the External equipment Setup section. 2 Install the CABLE MANAGEMENT as necessary. If the product is not available for all models.) CABLE MANAGEMENT How to remove the cable management Hold the CABLE MANAGEMENT with both hands and pull it upward. !
Owner's Manual
Page 17
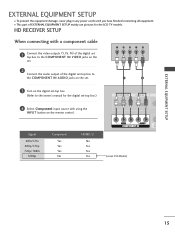
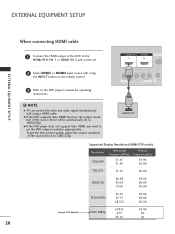
Signal 480i/576i 480p/576p 720p/1080i 1080p Component Yes Yes Yes No HDMI1/2 No Yes Yes Yes (except VGA Models) 1 2 15 I To prevent the equipment damage, never plug in any power cords until you have finished connecting all equipment. HD RECEIVER SETUP When connecting ...with using the INPUT button on the digital set-top box. (Refer to the owner's manual for the LCD TV models. EXTERNAL EQUIPMENT SETUP EXTERNAL EQUIPMENT SETUP I This part of EXTERNAL EQUIPMENT SETUP mainly use pictures for the digital set-top box.) 4 Select Component input...
Signal 480i/576i 480p/576p 720p/1080i 1080p Component Yes Yes Yes No HDMI1/2 No Yes Yes Yes (except VGA Models) 1 2 15 I To prevent the equipment damage, never plug in any power cords until you have finished connecting all equipment. HD RECEIVER SETUP When connecting ...with using the INPUT button on the digital set-top box. (Refer to the owner's manual for the LCD TV models. EXTERNAL EQUIPMENT SETUP EXTERNAL EQUIPMENT SETUP I This part of EXTERNAL EQUIPMENT SETUP mainly use pictures for the digital set-top box.) 4 Select Component input...
Owner's Manual
Page 22
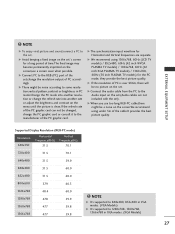
... 45.00 37.50 59.94 60.00 50.00 1920x1080i 33.72 33.75 28.125 59.94 60.00 50.00 (except VGA Models) 1920x1080p 67.432 67.5 56.25 59.94 60 50 20
... 45.00 37.50 59.94 60.00 50.00 1920x1080i 33.72 33.75 28.125 59.94 60.00 50.00 (except VGA Models) 1920x1080p 67.432 67.5 56.25 59.94 60 50 20
Owner's Manual
Page 29
... be no picture on the screen.We recommend using 1366x768, 60Hz (LCD TV models) / 852x480, 60Hz (42 inch WVGA PLASMA TV models) / 1024x768, 60Hz (42 inch XGA PLASMA TV models) / 1360x768, 60Hz (50 inch PLASMA TV models) for the PC mode, they provide the best picture quality. G The synchronization...the set 's screen for Horizontal and Vertical frequencies are not included with the set . NOTE G It's supported to 848x480, 852x480 in VGA modes. (VGA Models) G It's supported to the RGB (PC) port of PC accordingly. G There might be changed, change the resolution output of the set . G We...
... be no picture on the screen.We recommend using 1366x768, 60Hz (LCD TV models) / 852x480, 60Hz (42 inch WVGA PLASMA TV models) / 1024x768, 60Hz (42 inch XGA PLASMA TV models) / 1360x768, 60Hz (50 inch PLASMA TV models) for the PC mode, they provide the best picture quality. G The synchronization...the set 's screen for Horizontal and Vertical frequencies are not included with the set . NOTE G It's supported to 848x480, 852x480 in VGA modes. (VGA Models) G It's supported to the RGB (PC) port of PC accordingly. G There might be changed, change the resolution output of the set . G We...
Owner's Manual
Page 31
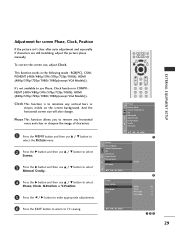
... on the screen background. This function works in COMPONENT (480i/480p/576i/576p/720p/1080i), HDMI (480p/576p/720p/1080i/1080p(except VGA Models)). Clock This function is to minimize any horizontal noise and clear or sharpen the image of characters. 1 Press the MENU button and then ... use Phase, Clock function in the following mode : RGB[PC], COMPONENT (480i/480p/576i/576p/720p/1080i), HDMI (480p/576p/720p/1080i/1080p(except VGA Models)). EXTERNAL EQUIPMENT SETUP LIST EXIT MENU Q.VIEW * OK FAV VOL PR MUTE 1 2 3 4 5 6 7 8 9 Picture Picture Mode Colour Temperature XD ...
... on the screen background. This function works in COMPONENT (480i/480p/576i/576p/720p/1080i), HDMI (480p/576p/720p/1080i/1080p(except VGA Models)). Clock This function is to minimize any horizontal noise and clear or sharpen the image of characters. 1 Press the MENU button and then ... use Phase, Clock function in the following mode : RGB[PC], COMPONENT (480i/480p/576i/576p/720p/1080i), HDMI (480p/576p/720p/1080i/1080p(except VGA Models)). EXTERNAL EQUIPMENT SETUP LIST EXIT MENU Q.VIEW * OK FAV VOL PR MUTE 1 2 3 4 5 6 7 8 9 Picture Picture Mode Colour Temperature XD ...

Owner's Manual
Page 34
... RATIO Selects your desired picture format. TV INPUT Returns to the default settings brightness by pressing the D / E / F / G, O K buttons and buttons for teletext (only TELETEXT buttons models) or Programme edit. WATCHING TV / PROGRAMME CONTROL LIST EXIT MENU Q.VIEW * OK FAV VOL PR MUTE 1 2 3 4 5 6 7 8 9 0 TIME HOLD SIZE ? SIMPLINK See a list of AV devices...
... RATIO Selects your desired picture format. TV INPUT Returns to the default settings brightness by pressing the D / E / F / G, O K buttons and buttons for teletext (only TELETEXT buttons models) or Programme edit. WATCHING TV / PROGRAMME CONTROL LIST EXIT MENU Q.VIEW * OK FAV VOL PR MUTE 1 2 3 4 5 6 7 8 9 0 TIME HOLD SIZE ? SIMPLINK See a list of AV devices...
Owner's Manual
Page 37
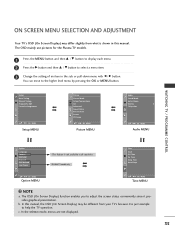
ON SCREEN MENU SELECTION AND ADJUSTMENT Your TV's OSD (On Screen Display) may be different from what is not available in all countries. * PLASMA TV models only Time Clock Off Time On Time Sleep Time Auto Sleep DE F G OK MENU Option MENU DE F G OK MENU Time MENU ! You can ..., the OSD (On Screen Display) may differ slightly from your TV's because it provides graphical presentation. The OSD mainly use pictures for the Plasma TV models. 1 Press the MENU button and then D / E button to display each menu. 2 Press the G button and then D / E button to select a menu item. 3 Change the ...
ON SCREEN MENU SELECTION AND ADJUSTMENT Your TV's OSD (On Screen Display) may be different from what is not available in all countries. * PLASMA TV models only Time Clock Off Time On Time Sleep Time Auto Sleep DE F G OK MENU Option MENU DE F G OK MENU Time MENU ! You can ..., the OSD (On Screen Display) may differ slightly from your TV's because it provides graphical presentation. The OSD mainly use pictures for the Plasma TV models. 1 Press the MENU button and then D / E button to display each menu. 2 Press the G button and then D / E button to select a menu item. 3 Change the ...

Owner's Manual
Page 59
... displayed on the set this function in a ghost image remaining even when you unnecessary to remain on the screen, the screen will result in LCD models. Inversion This is automatically inverted every 30 minutes. 1 Press the MENU button and then D / E button to select the Option menu. 2 Press the G button and then...
... displayed on the set this function in a ghost image remaining even when you unnecessary to remain on the screen, the screen will result in LCD models. Inversion This is automatically inverted every 30 minutes. 1 Press the MENU button and then D / E button to select the Option menu. 2 Press the G button and then...

Owner's Manual
Page 60
... or Off. 4 Press the EXIT button to return to reduce the power consumption of the set. It's not available to use this function in LCD models. 1 Press the MENU button and then D / E button to select the Option menu.
... or Off. 4 Press the EXIT button to return to reduce the power consumption of the set. It's not available to use this function in LCD models. 1 Press the MENU button and then D / E button to select the Option menu.

Owner's Manual
Page 79
... 44.1 lbs 16.3 kg / 35.9 lbs 1032.7 x 685.5 x 88.5 mm 40.7 x 27.0 x 3.5 inches 24.5 kg / 54.0 lbs 20 kg / 44.1 lbs Power requirement Power Consumption MODELS Dimensions with stand (Width x Height x Depth) without stand AC100-240V~ 50/60Hz 1.3A AC100-240V~ 50/60Hz 1.5A AC100-240V~ 50/60Hz 1.8A AC100-240V...~ 50/60Hz 2.2A 130W 150W 170W 200W 26LC5* 26LC51-ZA 26LC51C-ZA 32LC5* 32LC51-ZA/32LC52-ZC 32LC52C-ZC 32LC53-ZA/32LC54-ZD 37LC5* 37LC51-ZA 37LC53-ZA 42LC5* 42LC51-ZA 42LC53-ZA 42LC54-ZD 676.6 x 531.0x 221.0 mm 26.6 x 20.9 x 8.7 inches 806.6 x 606.5 x 249 mm 31.8 x 23.9 x 9.8...
... 44.1 lbs 16.3 kg / 35.9 lbs 1032.7 x 685.5 x 88.5 mm 40.7 x 27.0 x 3.5 inches 24.5 kg / 54.0 lbs 20 kg / 44.1 lbs Power requirement Power Consumption MODELS Dimensions with stand (Width x Height x Depth) without stand AC100-240V~ 50/60Hz 1.3A AC100-240V~ 50/60Hz 1.5A AC100-240V~ 50/60Hz 1.8A AC100-240V...~ 50/60Hz 2.2A 130W 150W 170W 200W 26LC5* 26LC51-ZA 26LC51C-ZA 32LC5* 32LC51-ZA/32LC52-ZC 32LC52C-ZC 32LC53-ZA/32LC54-ZD 37LC5* 37LC51-ZA 37LC53-ZA 42LC5* 42LC51-ZA 42LC53-ZA 42LC54-ZD 676.6 x 531.0x 221.0 mm 26.6 x 20.9 x 8.7 inches 806.6 x 606.5 x 249 mm 31.8 x 23.9 x 9.8...

Owner's Manual
Page 80
APPENDIX PRODUCT SPECIFICATIONS MODELS 26LC42* 26LC42-ZC 32LC42* 32LC42-ZC 37LC42* 37LC42-ZC 42LC42* 42LC42-ZC Dimensions with stand (Width x Height x Depth) without stand 676.4 x 529.2x 228.9 mm ....8 lbs 11.74kg / 25.9 lbs 20.0 kg / 44.1 lbs 16.3 kg / 36.0 lbs 24.5 kg / 54.0 lbs 20 kg / 44.1 lbs Power requirement Power Consumption MODELS Dimensions with stand (Width x Height x Depth) without stand Weight Power requirement Power Consumption with stand without stand Television System Program Coverage External Antenna Impedance AC100...
APPENDIX PRODUCT SPECIFICATIONS MODELS 26LC42* 26LC42-ZC 32LC42* 32LC42-ZC 37LC42* 37LC42-ZC 42LC42* 42LC42-ZC Dimensions with stand (Width x Height x Depth) without stand 676.4 x 529.2x 228.9 mm ....8 lbs 11.74kg / 25.9 lbs 20.0 kg / 44.1 lbs 16.3 kg / 36.0 lbs 24.5 kg / 54.0 lbs 20 kg / 44.1 lbs Power requirement Power Consumption MODELS Dimensions with stand (Width x Height x Depth) without stand Weight Power requirement Power Consumption with stand without stand Television System Program Coverage External Antenna Impedance AC100...


