Quick Setup Guide (English)
Page 4
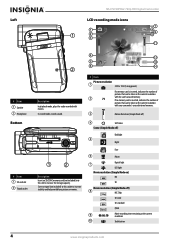
... memory card: number of pictures remaining at current resolution 9 Video format 10 Stabilization 11 Zoom meter 12 Date and time 13 Battery indicator 14 Color balance (Simple Mode off only) Inser Your cam memory NOTE: Whe card instea To inse • Insert and t To rem 1 Push in , but the battery will not charge unless the camcorder is turned off.You cannot use your computer. OR Open the Rotate th movies. OR - • Connect the USB cable...
... memory card: number of pictures remaining at current resolution 9 Video format 10 Stabilization 11 Zoom meter 12 Date and time 13 Battery indicator 14 Color balance (Simple Mode off only) Inser Your cam memory NOTE: Whe card instea To inse • Insert and t To rem 1 Push in , but the battery will not charge unless the camcorder is turned off.You cannot use your computer. OR Open the Rotate th movies. OR - • Connect the USB cable...
Quick Setup Guide (English)
Page 7
... SET, then select OFF. AVI is • Simple Mode: On. AVI files may be viewed and edited with the included MediaImpression software. If you are a Mac™ user, you should change the default file format to play video. To record movies: 1 Turn on Mac computers with AVI as follows: · Motion Detection: Off · Scene Mode: Auto · Color Balance: Auto · Time Stamp: Off · Help Text: On · TV Format: NTSC · File Format: AVI To turn...
... SET, then select OFF. AVI is • Simple Mode: On. AVI files may be viewed and edited with the included MediaImpression software. If you are a Mac™ user, you should change the default file format to play video. To record movies: 1 Turn on Mac computers with AVI as follows: · Motion Detection: Off · Scene Mode: Auto · Color Balance: Auto · Time Stamp: Off · Help Text: On · TV Format: NTSC · File Format: AVI To turn...
Quick Setup Guide (English)
Page 8
.... If you formatted the card in the camcorder (see User Guide for viewing pictures and video: • ArcSoft MediaImpression - required to view the User Guide on the camcorder. 3 Set the TV's video input to YouTube™ • Adobe® Reader® - otherwise, one new drive (camcorder's internal memory) will appear. 2 Click Install MediaImpression or Install Adobe Reader, then follow the on the Camera's, Camcorders & Photo Frames link under Products. 8 ENGLISH 10-0624 NS-DV720PBL2_10-0624_QSG_V1_EN.indd...
.... If you formatted the card in the camcorder (see User Guide for viewing pictures and video: • ArcSoft MediaImpression - required to view the User Guide on the camcorder. 3 Set the TV's video input to YouTube™ • Adobe® Reader® - otherwise, one new drive (camcorder's internal memory) will appear. 2 Click Install MediaImpression or Install Adobe Reader, then follow the on the Camera's, Camcorders & Photo Frames link under Products. 8 ENGLISH 10-0624 NS-DV720PBL2_10-0624_QSG_V1_EN.indd...
User Manual (English)
Page 2
...LCD playback mode icons 5 Setting up your camcorder 6 Installing the battery 6 Charging the battery 6 Inserting or removing an SD/SDHC memory card 6 Getting started 7 Turning your camcorder on or off 7 Turning on your camcorder for the first time 7 Initial settings 8 Recording a movie 8 Viewing movies 8 Deleting movies 8 Taking a picture 9 Taking a close-up picture 9 Viewing pictures 9 Deleting pictures 10 Using camcorder features 10 Using the light 10 Using the self-timer 10 Using zoom 11 Adjusting camcorder settings 11 Turning Simple Mode off 11 Turning operation sounds...
...LCD playback mode icons 5 Setting up your camcorder 6 Installing the battery 6 Charging the battery 6 Inserting or removing an SD/SDHC memory card 6 Getting started 7 Turning your camcorder on or off 7 Turning on your camcorder for the first time 7 Initial settings 8 Recording a movie 8 Viewing movies 8 Deleting movies 8 Taking a picture 9 Taking a close-up picture 9 Viewing pictures 9 Deleting pictures 10 Using camcorder features 10 Using the light 10 Using the self-timer 10 Using zoom 11 Adjusting camcorder settings 11 Turning Simple Mode off 11 Turning operation sounds...

User Manual (English)
Page 3
Contents Resetting to factory defaults 18 Viewing movies and pictures on a TV 18 Connecting to an HDMI enabled TV 18 Connecting to a TV using the supplied A/V cable 18 Viewing movies and pictures on a computer 19 Installing software 19 Transferring movies or pictures to a computer 19 Burning a movie to a DVD 19 Troubleshooting 20 Specifications and default settings 21 Specifications 21 Default settings 21 Legal notices 22 One-year limited warranty 23 www.insigniaproducts.com iii
Contents Resetting to factory defaults 18 Viewing movies and pictures on a TV 18 Connecting to an HDMI enabled TV 18 Connecting to a TV using the supplied A/V cable 18 Viewing movies and pictures on a computer 19 Installing software 19 Transferring movies or pictures to a computer 19 Burning a movie to a DVD 19 Troubleshooting 20 Specifications and default settings 21 Specifications 21 Default settings 21 Legal notices 22 One-year limited warranty 23 www.insigniaproducts.com iii
User Manual (English)
Page 5
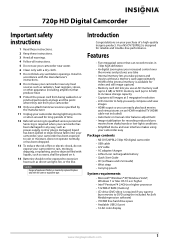
... manual color balance adjustment • Image stabilization for reliable and trouble-free performance. Your NS-DV720PBL2 is designed for recording reduces blurry movies from your camcorder. 10 Only use attachments/accessories specified by the manufacturer. 11 Unplug your camcorder during lightning storms or when unused for long periods of time. 12 Refer all instructions. 5 Do not use your camcorder has been damaged in 720p high definition • 4x digital zoom...
... manual color balance adjustment • Image stabilization for reliable and trouble-free performance. Your NS-DV720PBL2 is designed for recording reduces blurry movies from your camcorder. 10 Only use attachments/accessories specified by the manufacturer. 11 Unplug your camcorder during lightning storms or when unused for long periods of time. 12 Refer all instructions. 5 Do not use your camcorder has been damaged in 720p high definition • 4x digital zoom...
User Manual (English)
Page 6
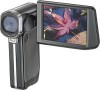
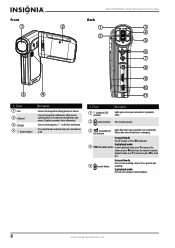
...Flashes blue when the battery is in playback mode. 2 (camera) button Press to take a picture. 3 (record/power) LED indicator Lights blue when your camcorder is recharging. Displays camcorder status information. In playback mode Press to start and pause movie playback. 2 www.insigniaproducts.com Press W to stop 5 (movie) button recording. In record mode Press to start recording a movie. NS-DV720PBL2 720p HD Digital Camcorder Front Back 1 2 1 3 4 2 5 6 7 8 9 10 3 4 11 # Item 1 Lens 2 LCD panel 3 LED light 4 (power button) Description Focuses the image...
...Flashes blue when the battery is in playback mode. 2 (camera) button Press to take a picture. 3 (record/power) LED indicator Lights blue when your camcorder is recharging. Displays camcorder status information. In playback mode Press to start and pause movie playback. 2 www.insigniaproducts.com Press W to stop 5 (movie) button recording. In record mode Press to start recording a movie. NS-DV720PBL2 720p HD Digital Camcorder Front Back 1 2 1 3 4 2 5 6 7 8 9 10 3 4 11 # Item 1 Lens 2 LCD panel 3 LED light 4 (power button) Description Focuses the image...
User Manual (English)
Page 7
... 3 Press to turn the indicators on the LCD display on or off the light. Press to switch between record and playback mode. Press to move up pictures of the image. SET Press to open the record menu and to confirm changes to this button while a movie is playing or is paused, the playback volume is paused. Connect a non-high-definition TV to this port. Note: The digital light function increases the sensitivity of the camcorder's imaging sensor, which...
... 3 Press to turn the indicators on the LCD display on or off the light. Press to switch between record and playback mode. Press to move up pictures of the image. SET Press to open the record menu and to confirm changes to this button while a movie is playing or is paused, the playback volume is paused. Connect a non-high-definition TV to this port. Note: The digital light function increases the sensitivity of the camcorder's imaging sensor, which...
User Manual (English)
Page 8
NS-DV720PBL2 720p HD Digital Camcorder Left LCD recording mode icons 1 1 2 3 7 8 9 10 11 # Item 1 Speaker 2 Microphone Bottom # Item 1 SD card slot 2 Tripod socket 2 Description In playback mode, plays the audio recorded with your camcorder's unused internal memory. 3 Motion Detection (Simple Mode off) 4 Self-timer Scene (Simple Mode off) Backlight 5 Night Face 6 Macro Digital light 7 LED light Movie resolution (Simple Mode on) HD SD Movie resolution (Simple Mode off) 8 HD 720p SD wide SD standard QVGA 9 00:06:10...
NS-DV720PBL2 720p HD Digital Camcorder Left LCD recording mode icons 1 1 2 3 7 8 9 10 11 # Item 1 Speaker 2 Microphone Bottom # Item 1 SD card slot 2 Tripod socket 2 Description In playback mode, plays the audio recorded with your camcorder's unused internal memory. 3 Motion Detection (Simple Mode off) 4 Self-timer Scene (Simple Mode off) Backlight 5 Night Face 6 Macro Digital light 7 LED light Movie resolution (Simple Mode on) HD SD Movie resolution (Simple Mode off) 8 HD 720p SD wide SD standard QVGA 9 00:06:10...
User Manual (English)
Page 10
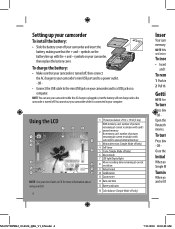
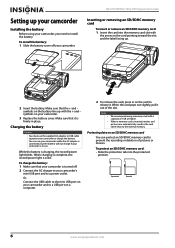
..., pull it is charging, the record/power light blinks. While the battery is firmly in on your camcorder or charge the battery. To install the battery: 1 Slide the battery cover off . 2 Connect the AC charger to the internal memory. Notes • • We recommend using your camcorder. 3 Replace the battery cover. NS-DV720PBL2 720p HD Digital Camcorder Inserting or removing an SD/SDHC memory card To insert or remove an SD/SDHC memory card: 1 Insert the card into the protected position...
..., pull it is charging, the record/power light blinks. While the battery is firmly in on your camcorder or charge the battery. To install the battery: 1 Slide the battery cover off . 2 Connect the AC charger to the internal memory. Notes • • We recommend using your camcorder. 3 Replace the battery cover. NS-DV720PBL2 720p HD Digital Camcorder Inserting or removing an SD/SDHC memory card To insert or remove an SD/SDHC memory card: 1 Insert the card into the protected position...
User Manual (English)
Page 12
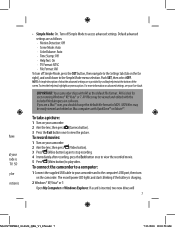
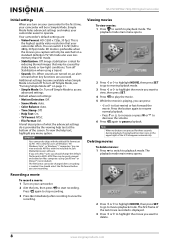
... When no buttons are a Mac™ user, you want to view, then press SET. 4 Press to play the movie. 5 While the movie is preferable when the movies you capture will be caused by the viewing help text, highlight any menu option. NS-DV720PBL2 720p HD Digital Camcorder Initial settings When you turn off Simple Mode, see "Turning Simple Mode off Simple Mode to access advanced settings. Your camcorder's default settings are accessed. SD mode is playing, you start recording. Turn off " on...
... When no buttons are a Mac™ user, you want to view, then press SET. 4 Press to play the movie. 5 While the movie is preferable when the movies you capture will be caused by the viewing help text, highlight any menu option. NS-DV720PBL2 720p HD Digital Camcorder Initial settings When you turn off Simple Mode, see "Turning Simple Mode off Simple Mode to access advanced settings. Your camcorder's default settings are accessed. SD mode is playing, you start recording. Turn off " on...
User Manual (English)
Page 14
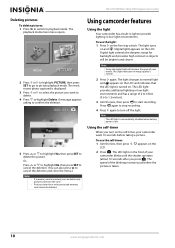
... again. NS-DV720PBL2 720p HD Digital Camcorder Deleting pictures To delete pictures: 1 Press to switch to provide lighting in low-light environments. A message appears asking to confirm the deletion. 5 Press or to highlight Yes, then press SET to picture playback mode. To use the self-timer: 1 Aim the lens, then press . The light turns on and (digital light) appears on a write-protected memory card cannot be brighter and clearer. The LED light provides additional lighting in image quality...
... again. NS-DV720PBL2 720p HD Digital Camcorder Deleting pictures To delete pictures: 1 Press to switch to provide lighting in low-light environments. A message appears asking to confirm the deletion. 5 Press or to highlight Yes, then press SET to picture playback mode. To use the self-timer: 1 Aim the lens, then press . The light turns on and (digital light) appears on a write-protected memory card cannot be brighter and clearer. The LED light provides additional lighting in image quality...
User Manual (English)
Page 16
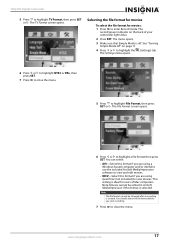
... video images your camcorder lights blue. 2 Press SET. The Menu opens. 3 Press or to highlight the (movie) tab, press to highlight a resolution, then press SET. To turn stabilization on . • QVGA-(Only accessible when Simple Mode is also excellent for still images. This resolution is 320 x 240, 30 fps, 4:3 format. Note: SD Std. This mode requires the least amount of your videos or upload them to use less memory...
... video images your camcorder lights blue. 2 Press SET. The Menu opens. 3 Press or to highlight the (movie) tab, press to highlight a resolution, then press SET. To turn stabilization on . • QVGA-(Only accessible when Simple Mode is also excellent for still images. This resolution is 320 x 240, 30 fps, 4:3 format. Note: SD Std. This mode requires the least amount of your videos or upload them to use less memory...
User Manual (English)
Page 18
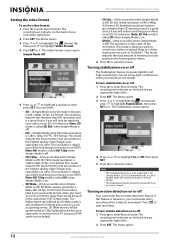
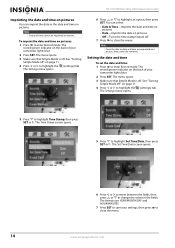
... camcorder lights blue. 2 Press SET. The Settings menu opens. 5 Press to enter Record mode. To imprint the date and time on pictures: 1 Press to highlight Time Stamp, then press SET or . The record/power indicator on the back of your settings, then press to highlight the (settings) tab. The Time Stamp screen opens. 5 Press to highlight an option, then press SET. NS-DV720PBL2 720p HD Digital Camcorder Imprinting the date and time on pictures You can select: • Date & Time...
... camcorder lights blue. 2 Press SET. The Settings menu opens. 5 Press to enter Record mode. To imprint the date and time on pictures: 1 Press to highlight Time Stamp, then press SET or . The record/power indicator on the back of your settings, then press to highlight the (settings) tab. The Time Stamp screen opens. 5 Press to highlight an option, then press SET. NS-DV720PBL2 720p HD Digital Camcorder Imprinting the date and time on pictures You can select: • Date & Time...

User Manual (English)
Page 19
... the LCD displays the "!" Make sure that Simple Mode is off " on page 11. The record/power indicator on it. The menu opens. Selecting the menu language To select the menu language: 1 Press to enter Record mode. To erase an SD/SDHC memory card or the internal memory: 1 Press to enter Record mode. Card inserted 4 Press or to highlight the (settings) tab. The menu opens. 3 Make sure that you backup any files you want to save...
... the LCD displays the "!" Make sure that Simple Mode is off " on page 11. The record/power indicator on it. The menu opens. Selecting the menu language To select the menu language: 1 Press to enter Record mode. To erase an SD/SDHC memory card or the internal memory: 1 Press to enter Record mode. Card inserted 4 Press or to highlight the (settings) tab. The menu opens. 3 Make sure that you backup any files you want to save...
User Manual (English)
Page 21
720p HD Digital Camcorder 5 Press to view movies. The menu opens. 3 Make sure that Simple Mode is selected. Note The file format cannot be edited in ArcSoft MediaImpression if this format is off " on the back of Mac computers. See "Turning Simple Mode off . This setting is created. Note: Movies cannot be changed after a recording is ideal for movies: 1 Press to close the menu. The record/power indicator on page 11. 4 Press...
720p HD Digital Camcorder 5 Press to view movies. The menu opens. 3 Make sure that Simple Mode is selected. Note The file format cannot be edited in ArcSoft MediaImpression if this format is off " on the back of Mac computers. See "Turning Simple Mode off . This setting is created. Note: Movies cannot be changed after a recording is ideal for movies: 1 Press to close the menu. The record/power indicator on page 11. 4 Press...
User Manual (English)
Page 22
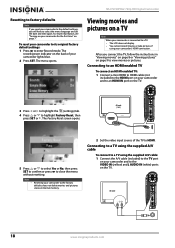
.... The menu opens. Note • Resetting your camcorder to the factory defaults does not delete movies and pictures store on internal memory. 2 Set the video input source of your camcorder lights blue. 2 Press SET. AV mode 18 www.insigniaproducts.com Connecting to a TV using the supplied A/V cable To connect to a TV using your camcorder's HDMI connection. NS-DV720PBL2 720p HD Digital Camcorder Resetting to factory defaults Note If you reset your camcorder to the default settings, you connect the TV, follow the instructions in "Viewing movies" on...
.... The menu opens. Note • Resetting your camcorder to the factory defaults does not delete movies and pictures store on internal memory. 2 Set the video input source of your camcorder lights blue. 2 Press SET. AV mode 18 www.insigniaproducts.com Connecting to a TV using the supplied A/V cable To connect to a TV using your camcorder's HDMI connection. NS-DV720PBL2 720p HD Digital Camcorder Resetting to factory defaults Note If you reset your camcorder to the default settings, you connect the TV, follow the instructions in "Viewing movies" on...
User Manual (English)
Page 23
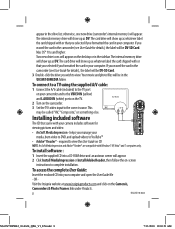
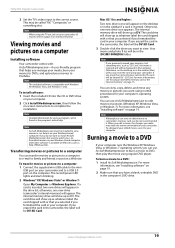
... mini USB port on your camcorder. For more information, see "Installing software" on page 15. www.insigniaproducts.com 19 To transfer movies or pictures to a computer: 1 Connect the supplied mini USB cable to view. otherwise, one new drive icon appears. You can view, copy, delete, and move any movies or pictures you can use ArcSoft MediaImpression to burn a movie to DVD, then play the movie using the TV out jack on -screen instructions to edit movies or pictures (Windows XP, Windows...
... mini USB port on your camcorder. For more information, see "Installing software" on page 15. www.insigniaproducts.com 19 To transfer movies or pictures to a computer: 1 Connect the supplied mini USB cable to view. otherwise, one new drive icon appears. You can view, copy, delete, and move any movies or pictures you can use ArcSoft MediaImpression to burn a movie to DVD, then play the movie using the TV out jack on -screen instructions to edit movies or pictures (Windows XP, Windows...
User Manual (English)
Page 24
... Make Movie. Stop recording, turn on the light, then start recording. icon camcorder to Disc screen opens. 9 Click Start. The shutter sounds when a picture has been taken. 5 Under Folders (1), open the folder that contains the movies you want to burn. 7 In the Make Movie area, click the select button (3). 8 Click Burn to the DVD. 20 www.insigniaproducts.com Charge the battery. Indoor pictures look blurry and dark Your camcorder extends the exposure time...
... Make Movie. Stop recording, turn on the light, then start recording. icon camcorder to Disc screen opens. 9 Click Start. The shutter sounds when a picture has been taken. 5 Under Folders (1), open the folder that contains the movies you want to burn. 7 In the Make Movie area, click the select button (3). 8 Click Burn to the DVD. 20 www.insigniaproducts.com Charge the battery. Indoor pictures look blurry and dark Your camcorder extends the exposure time...
User Manual (English)
Page 25
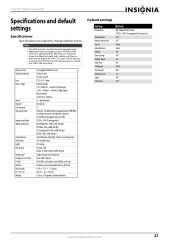
...tiny black or bright dots (white, red, blue, or green) may appear on the LCD screen. Note The LCD screen is available for movie and picture capture) SD/SDHC card support (up to change without battery Default settings Setting Resolution Stabilization Motion Detection Scene Color Balance Sound Time Stamp Simple Mode Help Text TV Format File Format Volume Level Light Self-timer Default HD 720p/HD for movies 2592 x 1944 (5 megapixels) for effective use. Image sensor Operation modes Lens Focus range Zoom Shutter LCD monitor Storage media Image resolution Video resolution Color balance Self...
...tiny black or bright dots (white, red, blue, or green) may appear on the LCD screen. Note The LCD screen is available for movie and picture capture) SD/SDHC card support (up to change without battery Default settings Setting Resolution Stabilization Motion Detection Scene Color Balance Sound Time Stamp Simple Mode Help Text TV Format File Format Volume Level Light Self-timer Default HD 720p/HD for movies 2592 x 1944 (5 megapixels) for effective use. Image sensor Operation modes Lens Focus range Zoom Shutter LCD monitor Storage media Image resolution Video resolution Color balance Self...


