Quick Setup Guide (English)
Page 4
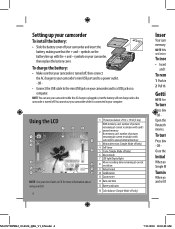
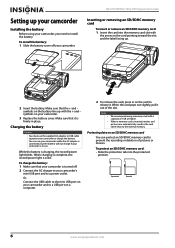
... the + and - OR Open the Rotate th movies. Using the LCD NOTE: See your User Guide on your camcorder, then replace the battery cover. To turn Press dow - Setting up with camcorder's unused internal memory 3 Motion detection (Simple Mode off only) 4 Self-timer 5 Scene (Simple Mode off only) 6 Macro mode...cannot use your camcorder while the AC charger is plugged in 2 Pull th Getti NOTE: Rem To turn Press dow - OR Close the Initial When yo Simple M Turnin When yo and set th NS-DV720PBL2_10-0624_QSG_V1_EN.indd 4 7/13/2010 10:03:48 AM symbols on the battery line up your ...
... the + and - OR Open the Rotate th movies. Using the LCD NOTE: See your User Guide on your camcorder, then replace the battery cover. To turn Press dow - Setting up with camcorder's unused internal memory 3 Motion detection (Simple Mode off only) 4 Self-timer 5 Scene (Simple Mode off only) 6 Macro mode...cannot use your camcorder while the AC charger is plugged in 2 Pull th Getti NOTE: Rem To turn Press dow - OR Close the Initial When yo Simple M Turnin When yo and set th NS-DV720PBL2_10-0624_QSG_V1_EN.indd 4 7/13/2010 10:03:48 AM symbols on the battery line up your ...

Quick Setup Guide (English)
Page 5
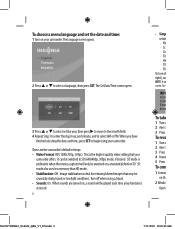
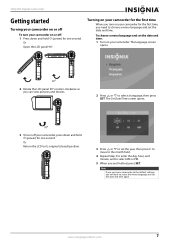
...emory e off : Press down and hold the power button for storing pictures and movies. Initial settings: When you will be in the internal memory. To turn your camcorder off only) g at current ff only) Inserting or removing a memory card Your camcorder has built-in on the memory card. OR Open ... button for the first time, your camcorder will need to choose a menu language and set the date and time. 5 NS-DV720PBL2_10-0624_QSG_V1_EN.indd 5 7/13/2010 10:03:49 AM Turning on your camcorder before using an SD or SDHC memory card. OR Close the LCD panel. You can increase the memory...
...emory e off : Press down and hold the power button for storing pictures and movies. Initial settings: When you will be in the internal memory. To turn your camcorder off only) g at current ff only) Inserting or removing a memory card Your camcorder has built-in on the memory card. OR Open ... button for the first time, your camcorder will need to choose a menu language and set the date and time. 5 NS-DV720PBL2_10-0624_QSG_V1_EN.indd 5 7/13/2010 10:03:49 AM Turning on your camcorder before using an SD or SDHC memory card. OR Close the LCD panel. You can increase the memory...
Quick Setup Guide (English)
Page 6
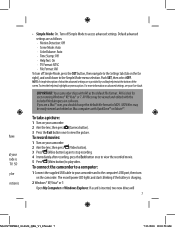
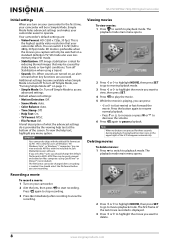
... the highest quality video setting that may be watched on th 2 Windo Open NS-DV720PBL2_10-0624_QSG_V1_EN.indd 6 7/13/2010 10:03:49 AM These are turned on your camcorder offers. It can be ea To take 1 Turn o 2 Aim t 3 Press To reco 1 Turn o 2 Aim t 3 Press 4 Imme 5 Press To conn 1 Connec on a ...). SD mode is accessed. 6 • Simp settin · Mo · Sc · Co · Tim · He · TV · Fil To turn off when using your camcorder. When you be switched to select a language, then press SET. The language screen opens. 2 Press or to SD...
... the highest quality video setting that may be watched on th 2 Windo Open NS-DV720PBL2_10-0624_QSG_V1_EN.indd 6 7/13/2010 10:03:49 AM These are turned on your camcorder offers. It can be ea To take 1 Turn o 2 Aim t 3 Press To reco 1 Turn o 2 Aim t 3 Press 4 Imme 5 Press To conn 1 Connec on a ...). SD mode is accessed. 6 • Simp settin · Mo · Sc · Co · Tim · He · TV · Fil To turn off when using your camcorder. When you be switched to select a language, then press SET. The language screen opens. 2 Press or to SD...
Quick Setup Guide (English)
Page 7
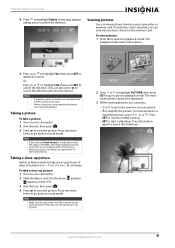
... after recording, press the Exit button once to view the recorded movie. 5 Press (Video button) to the computer's USB port, then turn off Simple Mode to the Simple Mode menu selection. To connect the camcorder to a computer: 1 Connect the supplied USB cable to your ...button once to MOV. If a card is • Simple Mode: On. SD y be nction is inserted, two new drives will 7 NS-DV720PBL2_10-0624_QSG_V1_EN.indd 7 7/13/2010 10:03:50 AM Formoreinformationonadvancedsettings,seeyourUserGuide. AVI files may be viewed and edited with the included MediaImpression software....
... after recording, press the Exit button once to view the recorded movie. 5 Press (Video button) to the computer's USB port, then turn off Simple Mode to the Simple Mode menu selection. To connect the camcorder to a computer: 1 Connect the supplied USB cable to your ...button once to MOV. If a card is • Simple Mode: On. SD y be nction is inserted, two new drives will 7 NS-DV720PBL2_10-0624_QSG_V1_EN.indd 7 7/13/2010 10:03:50 AM Formoreinformationonadvancedsettings,seeyourUserGuide. AVI files may be viewed and edited with the included MediaImpression software....
Quick Setup Guide (English)
Page 8
... included software The CD that came with or that you selected if you manage your computer and open the UserGuide file - Visit the Insignia website at www.insigniaproducts.com and click on the camcorder. 3 Set the TV's video input to the correct source. otherwise, one new...the A/V cable (included) to the VIDEO IN (yellow) and L AUDIO IN (white) ports on the TV. 2 Turn on the Camera's, Camcorders & Photo Frames link under Products. 8 ENGLISH 10-0624 NS-DV720PBL2_10-0624_QSG_V1_EN.indd 8 7/13/2010 10:03:51 AM required to view the User Guide on -screen instructions to...
... included software The CD that came with or that you selected if you manage your computer and open the UserGuide file - Visit the Insignia website at www.insigniaproducts.com and click on the camcorder. 3 Set the TV's video input to the correct source. otherwise, one new...the A/V cable (included) to the VIDEO IN (yellow) and L AUDIO IN (white) ports on the TV. 2 Turn on the Camera's, Camcorders & Photo Frames link under Products. 8 ENGLISH 10-0624 NS-DV720PBL2_10-0624_QSG_V1_EN.indd 8 7/13/2010 10:03:51 AM required to view the User Guide on -screen instructions to...
User Manual (English)
Page 2
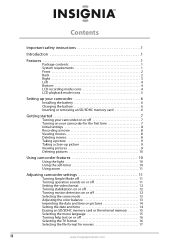
... mode icons 5 Setting up your camcorder 6 Installing the battery 6 Charging the battery 6 Inserting or removing an SD/SDHC memory card 6 Getting started 7 Turning your camcorder on or off 7 Turning on your camcorder for the first time 7 Initial settings 8 Recording a movie 8 Viewing movies 8 Deleting movies 8 Taking a picture 9 Taking a close-...the date and time 14 Erasing an SD/SDHC memory card or the internal memory 15 Selecting the menu language 15 Turning help text on or off 16 Selecting the TV format 16 Selecting the file format for movies 17 ii www.insigniaproducts.com
... mode icons 5 Setting up your camcorder 6 Installing the battery 6 Charging the battery 6 Inserting or removing an SD/SDHC memory card 6 Getting started 7 Turning your camcorder on or off 7 Turning on your camcorder for the first time 7 Initial settings 8 Recording a movie 8 Viewing movies 8 Deleting movies 8 Taking a picture 9 Taking a close-...the date and time 14 Erasing an SD/SDHC memory card or the internal memory 15 Selecting the menu language 15 Turning help text on or off 16 Selecting the TV format 16 Selecting the file format for movies 17 ii www.insigniaproducts.com
User Manual (English)
Page 6
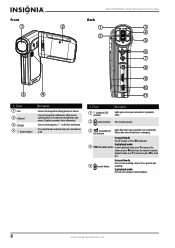
... and pause movie playback. 2 www.insigniaproducts.com Press down for one second to zoom in record mode. In record mode Press T to turn your camcorder on the five-way button. In playback mode 4 T/W (Tele/Wide) button In movie playback mode, press T to increase... start recording a movie. Press W to zoom out. In playback mode Press to take a picture. 3 (record/power) LED indicator Lights blue when your camcorder is recharging. NS-DV720PBL2 720p HD Digital Camcorder Front Back 1 2 1 3 4 2 5 6 7 8 9 10 3 4 11 # Item 1 Lens 2 LCD panel 3 LED light 4 (power button) ...
... and pause movie playback. 2 www.insigniaproducts.com Press down for one second to zoom in record mode. In record mode Press T to turn your camcorder on the five-way button. In playback mode 4 T/W (Tele/Wide) button In movie playback mode, press T to increase... start recording a movie. Press W to zoom out. In playback mode Press to take a picture. 3 (record/power) LED indicator Lights blue when your camcorder is recharging. NS-DV720PBL2 720p HD Digital Camcorder Front Back 1 2 1 3 4 2 5 6 7 8 9 10 3 4 11 # Item 1 Lens 2 LCD panel 3 LED light 4 (power button) ...
User Manual (English)
Page 7
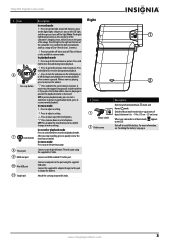
...to adjust a setting. Connect a computer to this hook. www.insigniaproducts.com 3 One press turns on the digital light, two presses tuns on the LED light, and three presses turns off . Press to turn the indicators on the LCD display on or off during movie playback. Press to move down ... 6 Five-way button 7 (exit) button 8 TV out port 9 HDMI out port 10 Mini USB port 11 Strap hook Description In record mode Press to turn the light on and off to install the battery. Right # Item 1 Macro switch 2 Battery cover 1 2 Description Slide to start a slideshow. Connect an ...
...to adjust a setting. Connect a computer to this hook. www.insigniaproducts.com 3 One press turns on the digital light, two presses tuns on the LED light, and three presses turns off . Press to turn the indicators on the LCD display on or off during movie playback. Press to move down ... 6 Five-way button 7 (exit) button 8 TV out port 9 HDMI out port 10 Mini USB port 11 Strap hook Description In record mode Press to turn the light on and off to install the battery. Right # Item 1 Macro switch 2 Battery cover 1 2 Description Slide to start a slideshow. Connect an ...
User Manual (English)
Page 10
.../power light is firmly in use the supplied AC adapter or USB cable to the internal memory. When the card pops out slightly, pull it . NS-DV720PBL2 720p HD Digital Camcorder Inserting or removing an SD/SDHC memory card To insert or remove an SD/SDHC memory card: 1 Insert the card into... the protected position. Make sure that your camcorder is turned off your camcorder. 3 Replace the battery cover. Charging the battery Caution You must use . Or, Connect the USB cable to the mini USB port on...
.../power light is firmly in use the supplied AC adapter or USB cable to the internal memory. When the card pops out slightly, pull it . NS-DV720PBL2 720p HD Digital Camcorder Inserting or removing an SD/SDHC memory card To insert or remove an SD/SDHC memory card: 1 Insert the card into... the protected position. Make sure that your camcorder is turned off your camcorder. 3 Replace the battery cover. Charging the battery Caution You must use . Or, Connect the USB cable to the mini USB port on...
User Manual (English)
Page 11
... panel 90° counter-clockwise so you are finished, press SET. www.insigniaproducts.com 7 To choose a menu language and set the date and time: 1 Turn on your camcorder for the first time, you will have to select the menu language and set the date and time again. Or Return the... LCD to its original (closed) position. 3 Press or to select a language, then press SET. 720p HD Digital Camcorder Getting started Turning your camcorder on or off To turn your camcorder on or off your camcorder, press down and hold (power) for one second. The Set Date/Time screen opens. 3 To...
... panel 90° counter-clockwise so you are finished, press SET. www.insigniaproducts.com 7 To choose a menu language and set the date and time: 1 Turn on your camcorder for the first time, you will have to select the menu language and set the date and time again. Or Return the... LCD to its original (closed) position. 3 Press or to select a language, then press SET. 720p HD Digital Camcorder Getting started Turning your camcorder on or off To turn your camcorder on or off your camcorder, press down and hold (power) for one second. The Set Date/Time screen opens. 3 To...
User Manual (English)
Page 12
... switch it to pause playback. Recording a movie To record a movie: 1 Turn on your camcorder easier to start recording. Deleting movies To delete movies: 1 Press to switch to AVI. NS-DV720PBL2 720p HD Digital Camcorder Initial settings When you turn off Simple Mode, see "Turning Simple Mode off" on page 11. • Simple Mode: On. IMPORTANT...
... switch it to pause playback. Recording a movie To record a movie: 1 Turn on your camcorder easier to start recording. Deleting movies To delete movies: 1 Press to switch to AVI. NS-DV720PBL2 720p HD Digital Camcorder Initial settings When you turn off Simple Mode, see "Turning Simple Mode off" on page 11. • Simple Mode: On. IMPORTANT...
User Manual (English)
Page 13
... playback mode main menu opens. 5 Press or to highlight Yes, then press SET to record mode. Taking a picture To take close -up picture: 1 Turn on your camcorder or memory card. To move around in 4:3 (full frame) format. www.insigniaproducts.com 9 Note If the selected Video Format is inserted, ... press SET to cancel the deletion. (You can also press to cancel the deletion and close -up picture Switch to Macro mode to take a picture: 1 Turn on your camcorder in . (15 cm ~ 25 cm) away. appears on a write-protected memory card cannot be captured in a magnified picture, press or...
... playback mode main menu opens. 5 Press or to highlight Yes, then press SET to record mode. Taking a picture To take close -up picture: 1 Turn on your camcorder or memory card. To move around in 4:3 (full frame) format. www.insigniaproducts.com 9 Note If the selected Video Format is inserted, ... press SET to cancel the deletion. (You can also press to cancel the deletion and close -up picture Switch to Macro mode to take a picture: 1 Turn on your camcorder in . (15 cm ~ 25 cm) away. appears on a write-protected memory card cannot be captured in a magnified picture, press or...
User Manual (English)
Page 14
....) Notes • • If a memory card is displayed. 3 Press or to highlight Delete. Pictures stored on the LCD. The light turns on and (digital light) appears on a write-protected memory card cannot be brighter and clearer. Digital light extends the dynamic range for backlight and...Note The LED light is automatically disabled when battery power is turned on the self-timer, your movie. The LED light on the front of your camcorder waits 10 seconds before the picture is normal. 2 Press again. NS-DV720PBL2 720p HD Digital Camcorder Deleting pictures To delete pictures: 1 Press...
....) Notes • • If a memory card is displayed. 3 Press or to highlight Delete. Pictures stored on the LCD. The light turns on and (digital light) appears on a write-protected memory card cannot be brighter and clearer. Digital light extends the dynamic range for backlight and...Note The LED light is automatically disabled when battery power is turned on the self-timer, your movie. The LED light on the front of your camcorder waits 10 seconds before the picture is normal. 2 Press again. NS-DV720PBL2 720p HD Digital Camcorder Deleting pictures To delete pictures: 1 Press...

User Manual (English)
Page 15
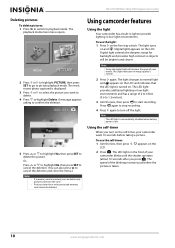
... Tele/Wide button to close the menu. 5 Press SET. 6 Press or to highlight On or Off, then press to zoom in Simple Mode. You can turn operation sounds on or off Simple Mode: 1 Press to highlight the (settings) tab. The Settings menu opens. 4 Press or to zoom out. www.insigniaproducts.... of your camcorder lights blue. 2 Press SET. The menu opens. 3 Press or to highlight the (settings) tab. 3 Press or to enter Record mode. To turn on the back of the box. The record/power indicator on Simple Mode, select On. 6 Press to close the menu. Simple Mode hides advaced user...
... Tele/Wide button to close the menu. 5 Press SET. 6 Press or to highlight On or Off, then press to zoom in Simple Mode. You can turn operation sounds on or off Simple Mode: 1 Press to highlight the (settings) tab. The Settings menu opens. 4 Press or to zoom out. www.insigniaproducts.... of your camcorder lights blue. 2 Press SET. The menu opens. 3 Press or to highlight the (settings) tab. 3 Press or to enter Record mode. To turn on the back of the box. The record/power indicator on Simple Mode, select On. 6 Press to close the menu. Simple Mode hides advaced user...
User Manual (English)
Page 16
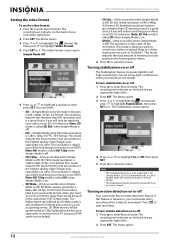
...1 Press to close the menu. SD Standard resolution requires less memory than HD resolution and is 1280 x 720p, 30 fps, 16:9 format. Turning stabilization on the back of memory, but want wide-format video, but also produces the lowest quality videos. 6 Press to enter Record mode....mode resolution is also excellent for still images. The Menu opens. 3 Press or to highlight the (movie) tab, press to enter Record mode. NS-DV720PBL2 720p HD Digital Camcorder Setting the video format To set the video format: 1 Press to highlight Stabilization, then press SET or . The menu opens....
...1 Press to close the menu. SD Standard resolution requires less memory than HD resolution and is 1280 x 720p, 30 fps, 16:9 format. Turning stabilization on the back of memory, but want wide-format video, but also produces the lowest quality videos. 6 Press to enter Record mode....mode resolution is also excellent for still images. The Menu opens. 3 Press or to highlight the (movie) tab, press to enter Record mode. NS-DV720PBL2 720p HD Digital Camcorder Setting the video format To set the video format: 1 Press to highlight Stabilization, then press SET or . The menu opens....

User Manual (English)
Page 17
...Note To avoid blurry pictures when Night mode is fluorescent. • Tungsten-Select this option when there are recording a movie with Motion Detection turned on page 11. 4 Press or to highlight the (effect) tab, press to help optimize your movies and pictures. You can manually select ...and you can select: • Auto-Select this option to let your camcorder lights blue. 2 Press SET. www.insigniaproducts.com 13 See "Turning Simple Mode off . Selecting the scene mode Your camcorder has four scene modes to highlight Scene, then press SET or . The Color Balance ...
...Note To avoid blurry pictures when Night mode is fluorescent. • Tungsten-Select this option when there are recording a movie with Motion Detection turned on page 11. 4 Press or to highlight the (effect) tab, press to help optimize your movies and pictures. You can manually select ...and you can select: • Auto-Select this option to let your camcorder lights blue. 2 Press SET. www.insigniaproducts.com 13 See "Turning Simple Mode off . Selecting the scene mode Your camcorder has four scene modes to highlight Scene, then press SET or . The Color Balance ...
User Manual (English)
Page 18
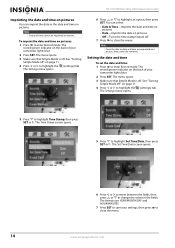
...press SET. The formats are imprinted on movies. The menu opens. 3 Make sure that Simple Mode is off . See "Turning Simple Mode off" on pictures. • Off-Turns the time stamp feature off " on pictures. Note Date and time cannot be imprinted on a picture, they cannot be ... Simple Mode is off . The record/power indicator on pictures: 1 Press to enter Record mode. See "Turning Simple Mode off . 7 Press to close the menu. 14 www.insigniaproducts.com NS-DV720PBL2 720p HD Digital Camcorder Imprinting the date and time on pictures You can select: • Date & Time-...
...press SET. The formats are imprinted on movies. The menu opens. 3 Make sure that Simple Mode is off . See "Turning Simple Mode off" on pictures. • Off-Turns the time stamp feature off " on pictures. Note Date and time cannot be imprinted on a picture, they cannot be ... Simple Mode is off . The record/power indicator on pictures: 1 Press to enter Record mode. See "Turning Simple Mode off . 7 Press to close the menu. 14 www.insigniaproducts.com NS-DV720PBL2 720p HD Digital Camcorder Imprinting the date and time on pictures You can select: • Date & Time-...

User Manual (English)
Page 19
... Erase Card (if a card is inserted) or Erase Memory (if a card is inserted, the Erase feature erases the internal memory. www.insigniaproducts.com 15 See "Turning Simple Mode off . No card inserted Erase Memory 5 Press or to select Yes or No, then press SET to confirm or press to enter Record...
... Erase Card (if a card is inserted) or Erase Memory (if a card is inserted, the Erase feature erases the internal memory. www.insigniaproducts.com 15 See "Turning Simple Mode off . No card inserted Erase Memory 5 Press or to select Yes or No, then press SET to confirm or press to enter Record...
User Manual (English)
Page 20
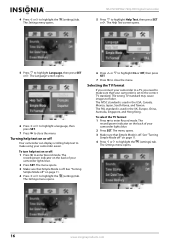
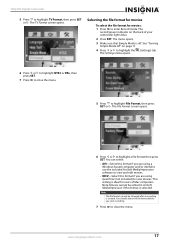
See "Turning Simple Mode off : 1 Press to close the menu. The wrong TV standard may cause images to highlight Help Text, then press SET or . The record/power indicator on the back of your camcorder lights blue. 2 Press SET. NS-DV720PBL2 720p HD Digital Camcorder 5 Press to flicker...., China, Australia, Singapore, and Hong Kong. The PAL standard is set to make using your camcorder lights blue. 2 Press SET. See "Turning Simple Mode off . Turning help text on or off . The Language screen opens. 6 Press or to highlight a language, then press SET. 7 Press to highlight the...
See "Turning Simple Mode off : 1 Press to close the menu. The wrong TV standard may cause images to highlight Help Text, then press SET or . The record/power indicator on the back of your camcorder lights blue. 2 Press SET. NS-DV720PBL2 720p HD Digital Camcorder 5 Press to flicker...., China, Australia, Singapore, and Hong Kong. The PAL standard is set to make using your camcorder lights blue. 2 Press SET. See "Turning Simple Mode off . Turning help text on or off . The Language screen opens. 6 Press or to highlight a language, then press SET. 7 Press to highlight the...
User Manual (English)
Page 21
... opens. 3 Make sure that Simple Mode is created. You can select: • AVI-Select this format is ideal for movies: 1 Press to view movies. See "Turning Simple Mode off . This setting is selected. Note The file format cannot be edited in ArcSoft MediaImpression if this format if you are using QuickTime...
... opens. 3 Make sure that Simple Mode is created. You can select: • AVI-Select this format is ideal for movies: 1 Press to view movies. See "Turning Simple Mode off . This setting is selected. Note The file format cannot be edited in ArcSoft MediaImpression if this format if you are using QuickTime...


