Quick Setup Guide (English)
Page 4
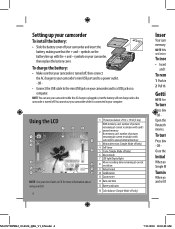
... + and - Using the LCD NOTE: See your User Guide on your computer. OR Close the Initial When yo Simple M Turnin When yo and set th NS-DV720PBL2_10-0624_QSG_V1_EN.indd 4 7/13/2010 10:03:48 AM Setting up with camcorder's unused internal memory 3 Motion detection (Simple Mode off only) 4 Self-timer....You cannot use your camcorder while the AC charger is plugged in 2 Pull th Getti NOTE: Rem To turn Press dow - symbols on a computer. To charge the battery: • Make sure that the + and - OR - • Connect the USB cable to the mini USB jack on your camcorder and to ...
... + and - Using the LCD NOTE: See your User Guide on your computer. OR Close the Initial When yo Simple M Turnin When yo and set th NS-DV720PBL2_10-0624_QSG_V1_EN.indd 4 7/13/2010 10:03:48 AM Setting up with camcorder's unused internal memory 3 Motion detection (Simple Mode off only) 4 Self-timer....You cannot use your camcorder while the AC charger is plugged in 2 Pull th Getti NOTE: Rem To turn Press dow - symbols on a computer. To charge the battery: • Make sure that the + and - OR - • Connect the USB cable to the mini USB jack on your camcorder and to ...
Quick Setup Guide (English)
Page 7
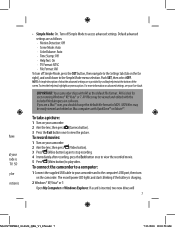
... record/power LED lights and starts blinking if the battery is provided by scrolling help text at your mode is inserted, two new drives will 7 NS-DV720PBL2_10-0624_QSG_V1_EN.indd 7 7/13/2010 10:03:50 AM SD y be easily viewed and edited on your camcorder. 2 Aim the lens, then press (... camcorder and to the computer's USB port, then turn off Simple Mode to MOV. have at the bottom of what the advanced settings are is charging. 2 Windows® XP, Vista® or 7: Open My Computer or Windows Explorer. Default advanced settings are as the default file format. IMPORTANT:Your ...
... record/power LED lights and starts blinking if the battery is provided by scrolling help text at your mode is inserted, two new drives will 7 NS-DV720PBL2_10-0624_QSG_V1_EN.indd 7 7/13/2010 10:03:50 AM SD y be easily viewed and edited on your camcorder. 2 Aim the lens, then press (... camcorder and to the computer's USB port, then turn off Simple Mode to MOV. have at the bottom of what the advanced settings are is charging. 2 Windows® XP, Vista® or 7: Open My Computer or Windows Explorer. Default advanced settings are as the default file format. IMPORTANT:Your ...
User Manual (English)
Page 2
... 1 Features 1 Package contents 1 System requirements 1 Front 2 Back 2 Right 3 Left 4 Bottom 4 LCD recording mode icons 4 LCD playback mode icons 5 Setting up your camcorder 6 Installing the battery 6 Charging the battery 6 Inserting or removing an SD/SDHC memory card 6 Getting started 7 Turning your camcorder on or off 7 Turning on your camcorder for the first...
... 1 Features 1 Package contents 1 System requirements 1 Front 2 Back 2 Right 3 Left 4 Bottom 4 LCD recording mode icons 4 LCD playback mode icons 5 Setting up your camcorder 6 Installing the battery 6 Charging the battery 6 Inserting or removing an SD/SDHC memory card 6 Getting started 7 Turning your camcorder on or off 7 Turning on your camcorder for the first...
User Manual (English)
Page 7
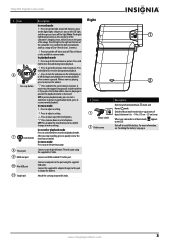
... 6. Connect a computer to turn the light on or off . When your camcorder is paused. Press to this port using the supplied USB cable. Press to charge the battery. Connect the supplied AC adapter/charger to this port. A movie must be stopped (not paused) in Macro mode, appears on the LED light...
... 6. Connect a computer to turn the light on or off . When your camcorder is paused. Press to this port using the supplied USB cable. Press to charge the battery. Connect the supplied AC adapter/charger to this port. A movie must be stopped (not paused) in Macro mode, appears on the LED light...
User Manual (English)
Page 10
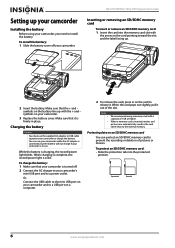
NS-DV720PBL2 720p HD Digital Camcorder Inserting or removing an SD/SDHC memory card To insert or remove an SD/SDHC memory card: 1 Insert the card into the protected position. To charge the battery: 1 Make sure that it is inserted, movies and pictures are automatically saved to the card rather than to power...a USB port on a computer. 2 To remove the card, press in use your camcorder while the AC adapter is connected, but the battery will not charge if your camcorder is turned off your camcorder and to a power outlet. symbols on the card to release it out of 1 GB or higher. You...
NS-DV720PBL2 720p HD Digital Camcorder Inserting or removing an SD/SDHC memory card To insert or remove an SD/SDHC memory card: 1 Insert the card into the protected position. To charge the battery: 1 Make sure that it is inserted, movies and pictures are automatically saved to the card rather than to power...a USB port on a computer. 2 To remove the card, press in use your camcorder while the AC adapter is connected, but the battery will not charge if your camcorder is turned off your camcorder and to a power outlet. symbols on the card to release it out of 1 GB or higher. You...
User Manual (English)
Page 24
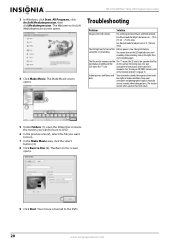
... Indoor pictures look blurry and dark Your camcorder extends the exposure time under low-light or indoor conditions. Keep your LCD shows the "!" NS-DV720PBL2 720p HD Digital Camcorder 3 In Windows, click Start, All Programs, click ArcSoft MediaImpression, then clickMediaImpression. Troubleshooting Problem Solution Image on the ...of a computer. The files on page 15. icon camcorder to format your card instead of the Battery power is burned to Disc (4). Charge the battery. Your movie is low. The Welcome to Disc screen opens. 9 Click Start. The LED light on the LED light ...
... Indoor pictures look blurry and dark Your camcorder extends the exposure time under low-light or indoor conditions. Keep your LCD shows the "!" NS-DV720PBL2 720p HD Digital Camcorder 3 In Windows, click Start, All Programs, click ArcSoft MediaImpression, then clickMediaImpression. Troubleshooting Problem Solution Image on the ...of a computer. The files on page 15. icon camcorder to format your card instead of the Battery power is burned to Disc (4). Charge the battery. Your movie is low. The Welcome to Disc screen opens. 9 Click Start. The LED light on the LED light ...

User Manual (English)
Page 27
...United States. The purchase date is determined to be determined by an authorized Insignia repair center or store personnel, Insignia will (at no charge to you. This feature is the warranty valid? Contact Insignia: For customer service please call 1-877-467-4289 www.insigniaproducts.com Distributed...to be defective by Insignia) will have an Insignia-approved repair person dispatched to your original receipt and the Product to the address listed on the web site. If you purchased the Product at no charge with all labor and parts charges. Warranty coverage terminates if...
...United States. The purchase date is determined to be determined by an authorized Insignia repair center or store personnel, Insignia will (at no charge to you. This feature is the warranty valid? Contact Insignia: For customer service please call 1-877-467-4289 www.insigniaproducts.com Distributed...to be defective by Insignia) will have an Insignia-approved repair person dispatched to your original receipt and the Product to the address listed on the web site. If you purchased the Product at no charge with all labor and parts charges. Warranty coverage terminates if...


