Quick Setup Guide (English)
Page 4
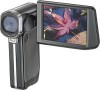
OR Close the Initial When yo Simple M Turnin When yo and set th NS-DV720PBL2_10-0624_QSG_V1_EN.indd 4 7/13/2010 10:03:48 AM Using the LCD NOTE: See ...NOTE: Whe card instea To inse • Insert and t To rem 1 Push in , but the battery will not charge unless the camcorder is turned off , then connect the AC charger to the mini USB jack on CD for more information ...Pull th Getti NOTE: Rem To turn Press dow - OR Open the Rotate th movies. To turn Press dow - To charge the battery: • Make sure that your camcorder is connected to your camcorder's mini USB port and to a USB ...
OR Close the Initial When yo Simple M Turnin When yo and set th NS-DV720PBL2_10-0624_QSG_V1_EN.indd 4 7/13/2010 10:03:48 AM Using the LCD NOTE: See ...NOTE: Whe card instea To inse • Insert and t To rem 1 Push in , but the battery will not charge unless the camcorder is turned off , then connect the AC charger to the mini USB jack on CD for more information ...Pull th Getti NOTE: Rem To turn Press dow - OR Open the Rotate th movies. To turn Press dow - To charge the battery: • Make sure that your camcorder is connected to your camcorder's mini USB port and to a USB ...
Quick Setup Guide (English)
Page 7
The record/power LED lights and starts blinking if the battery is inserted, two new drives will 7 NS-DV720PBL2_10-0624_QSG_V1_EN.indd 7 7/13/2010 10:03:50 AM Push SET, then select OFF. To take a picture: 1 Turn on your camcorder. 2 Aim the lens, ...stop recording. 4 Immediately after recording, press the Exit button once to view the recorded movie. 5 Press (Video button) to view the picture. If a card is charging. 2 Windows® XP, Vista® or 7: Open My Computer or Windows Explorer. MOV files may be viewed and edited with the included MediaImpression software. To...
The record/power LED lights and starts blinking if the battery is inserted, two new drives will 7 NS-DV720PBL2_10-0624_QSG_V1_EN.indd 7 7/13/2010 10:03:50 AM Push SET, then select OFF. To take a picture: 1 Turn on your camcorder. 2 Aim the lens, ...stop recording. 4 Immediately after recording, press the Exit button once to view the recorded movie. 5 Press (Video button) to view the picture. If a card is charging. 2 Windows® XP, Vista® or 7: Open My Computer or Windows Explorer. MOV files may be viewed and edited with the included MediaImpression software. To...
User Manual (English)
Page 2
... 1 Features 1 Package contents 1 System requirements 1 Front 2 Back 2 Right 3 Left 4 Bottom 4 LCD recording mode icons 4 LCD playback mode icons 5 Setting up your camcorder 6 Installing the battery 6 Charging the battery 6 Inserting or removing an SD/SDHC memory card 6 Getting started 7 Turning your camcorder on or off 7 Turning on your camcorder for the first...
... 1 Features 1 Package contents 1 System requirements 1 Front 2 Back 2 Right 3 Left 4 Bottom 4 LCD recording mode icons 4 LCD playback mode icons 5 Setting up your camcorder 6 Installing the battery 6 Charging the battery 6 Inserting or removing an SD/SDHC memory card 6 Getting started 7 Turning your camcorder on or off 7 Turning on your camcorder for the first...
User Manual (English)
Page 7
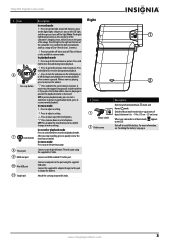
... a setting. Press to turn the light on and off. In menu mode Press to start a slideshow. Connect a non-high-definition TV to this port to charge the battery. Right # Item 1 Macro switch 2 Battery cover 1 2 Description Slide to switch between record and playback mode. In record or playback mode Press to switch...
... a setting. Press to turn the light on and off. In menu mode Press to start a slideshow. Connect a non-high-definition TV to this port to charge the battery. Right # Item 1 Macro switch 2 Battery cover 1 2 Description Slide to switch between record and playback mode. In record or playback mode Press to switch...
User Manual (English)
Page 10
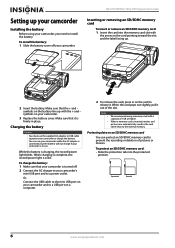
... Slide the battery cover off . 2 Connect the AC charger to the mini USB port on the card to power your camcorder is in place. NS-DV720PBL2 720p HD Digital Camcorder Inserting or removing an SD/SDHC memory card To insert or remove an SD/SDHC memory card: 1 Insert the card into...out of 1 GB or higher. While the battery is connected, but the battery will not charge if your camcorder or charge the battery. Notes • • We recommend using your camcorder, you need to a power outlet. To charge the battery: 1 Make sure that the + and - Protecting data on your camcorder's ...
... Slide the battery cover off . 2 Connect the AC charger to the mini USB port on the card to power your camcorder is in place. NS-DV720PBL2 720p HD Digital Camcorder Inserting or removing an SD/SDHC memory card To insert or remove an SD/SDHC memory card: 1 Insert the card into...out of 1 GB or higher. While the battery is connected, but the battery will not charge if your camcorder or charge the battery. Notes • • We recommend using your camcorder, you need to a power outlet. To charge the battery: 1 Make sure that the + and - Protecting data on your camcorder's ...
User Manual (English)
Page 24
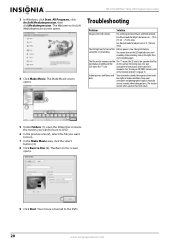
Troubleshooting Problem Solution Image on the card are the wrong type. Charge the battery. Keep your LCD shows the "!" Your movie is blurry Try switching between 6 in. ~ 10 in. (15 cm ~ 25 cm) away. Use Macro mode ... contains the movies you want to burn. 7 In the Make Movie area, click the select button (3). 8 Click Burn to the DVD. 20 www.insigniaproducts.com NS-DV720PBL2 720p HD Digital Camcorder 3 In Windows, click Start, All Programs, click ArcSoft MediaImpression, then clickMediaImpression. The Make Movie screen opens. The LED light on the...
Troubleshooting Problem Solution Image on the card are the wrong type. Charge the battery. Keep your LCD shows the "!" Your movie is blurry Try switching between 6 in. ~ 10 in. (15 cm ~ 25 cm) away. Use Macro mode ... contains the movies you want to burn. 7 In the Make Movie area, click the select button (3). 8 Click Burn to the DVD. 20 www.insigniaproducts.com NS-DV720PBL2 720p HD Digital Camcorder 3 In Windows, click Start, All Programs, click ArcSoft MediaImpression, then clickMediaImpression. The Make Movie screen opens. The LED light on the...

User Manual (English)
Page 27
...diagnose and correct the issue over the phone or will (at a retail store location, take your Insignia Product during the Warranty Period of Insignia brand products and packaged with all labor and parts charges. This warranty does not cover: • Customer instruction • Installation • Set up adjustments... consumers residing in some countries. How long does the coverage last? or (2) replace the Product at no charge with the Product. INSIGNIA PRODUCTS MAKES NO OTHER EXPRESS WARRANTIES WITH RESPECT TO THE PRODUCT, ALL EXPRESS AND IMPLIED WARRANTIES FOR THE PRODUCT, ...
...diagnose and correct the issue over the phone or will (at a retail store location, take your Insignia Product during the Warranty Period of Insignia brand products and packaged with all labor and parts charges. This warranty does not cover: • Customer instruction • Installation • Set up adjustments... consumers residing in some countries. How long does the coverage last? or (2) replace the Product at no charge with the Product. INSIGNIA PRODUCTS MAKES NO OTHER EXPRESS WARRANTIES WITH RESPECT TO THE PRODUCT, ALL EXPRESS AND IMPLIED WARRANTIES FOR THE PRODUCT, ...


