User Guide
Page 3
Infoprint 1332/1352/1372 Power-On Self Test (POST 2-34 Symptom tables 2-35 Base printer symptoms 2-35 High-capacity feeder (2000-sheet) symptoms 2-35 Paper tray symptoms 2-36 Duplex option symptoms 2-36 Envelope feeder symptoms 2-36 Output expander 2-36 StapleSmart ... Parallel port service check 2-77 Printhead service check 2-78 Print quality service check 2-78 Smart contact assembly service check 2-85 StapleSmart finisher service check 2-86 Toner sensor service check 2-93 Transfer roll service check 2-94 Table of contents iv
Infoprint 1332/1352/1372 Power-On Self Test (POST 2-34 Symptom tables 2-35 Base printer symptoms 2-35 High-capacity feeder (2000-sheet) symptoms 2-35 Paper tray symptoms 2-36 Duplex option symptoms 2-36 Envelope feeder symptoms 2-36 Output expander 2-36 StapleSmart ... Parallel port service check 2-77 Printhead service check 2-78 Print quality service check 2-78 Smart contact assembly service check 2-85 StapleSmart finisher service check 2-86 Toner sensor service check 2-93 Transfer roll service check 2-94 Table of contents iv
User Guide
Page 6
Infoprint 1332/1352/1372 Fuser assembly removal 4-23 Fuser cover removal 4-25 Fuser exit sensor or fuser narrow media sensor removal 4-28 Fuser lamp removal 4-28 Fuser ... flag assembly removal 4-54 Pick roll removal (MPT 4-55 Printhead removal 4-56 Redrive assembly removal 4-57 Smart contact assembly removal 4-58 System board removal 4-58 Toner sensor removal 4-61 Transfer roll assembly removal 4-61 Upper front cover hinge assembly removal 4-62 Upper paper deflector assembly removal 4-63 Connector locations 5-1 Autoconnect 5-1 Envelope...
Infoprint 1332/1352/1372 Fuser assembly removal 4-23 Fuser cover removal 4-25 Fuser exit sensor or fuser narrow media sensor removal 4-28 Fuser lamp removal 4-28 Fuser ... flag assembly removal 4-54 Pick roll removal (MPT 4-55 Printhead removal 4-56 Redrive assembly removal 4-57 Smart contact assembly removal 4-58 System board removal 4-58 Toner sensor removal 4-61 Transfer roll assembly removal 4-61 Upper front cover hinge assembly removal 4-62 Upper paper deflector assembly removal 4-63 Connector locations 5-1 Autoconnect 5-1 Envelope...
User Guide
Page 39
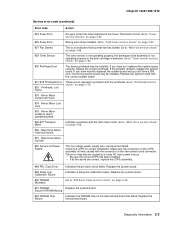
... 953 NVRAM Chip Failure Indicates the NVRAM chip on page 2-69. 929 Toner Sensor The toner sensor is not operating properly, the developer drive assembly is not operating properly... the system board. 949 Delay Line Calibration Failure Indicates a delay line calibration failure. Infoprint 1332/1352/1372 Service error code (continued) Error code Action 924 Fuser Error An open circuit...- Go to "950 Error Code service check" on the LVPS assembly is an indication that a printer fan has stalled. Printhead: Lost Hsync These errors represent a problem with the correct system board. ...
... 953 NVRAM Chip Failure Indicates the NVRAM chip on page 2-69. 929 Toner Sensor The toner sensor is not operating properly, the developer drive assembly is not operating properly... the system board. 949 Delay Line Calibration Failure Indicates a delay line calibration failure. Infoprint 1332/1352/1372 Service error code (continued) Error code Action 924 Fuser Error An open circuit...- Go to "950 Error Code service check" on the LVPS assembly is an indication that a printer fan has stalled. Printhead: Lost Hsync These errors represent a problem with the correct system board. ...
User Guide
Page 52
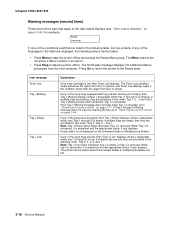
... Ready If none of the conditions exist that are listed in this order: Tray 1, 2..., then Tray 5. User message Toner Low Tray x Missing Tray x Empty Tray x Low Explanation If the toner cartridge is removed. If any of the input trays equipped with tray present sensing are low, then "Tray x Low"... status, if any of the messages in the following actions can be taken: • Press Menu to take the printer offline and access the Ready Menu group. Infoprint 1332/1352/1372 Warning messages (second lines) These second line warnings apply to the Ready state. If multiple trays are low...
... Ready If none of the conditions exist that are listed in this order: Tray 1, 2..., then Tray 5. User message Toner Low Tray x Missing Tray x Empty Tray x Low Explanation If the toner cartridge is removed. If any of the input trays equipped with tray present sensing are low, then "Tray x Low"... status, if any of the messages in the following actions can be taken: • Press Menu to take the printer offline and access the Ready Menu group. Infoprint 1332/1352/1372 Warning messages (second lines) These second line warnings apply to the Ready state. If multiple trays are low...
User Guide
Page 55
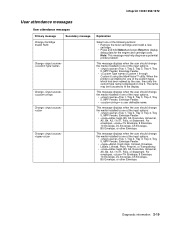
...Envelope, DL Envelope, C5 Envelope, B5 Envelope, or other Envelope. The name may help diagnose a potential printer problem. For envelopes, =7¾ Envelope, 9 Envelope, 10 Envelope, DL Envelope, C5 Envelope, B5 Envelope, or other Envelope. When ... or Statement. Diagnostic information 2-19 Infoprint 1332/1352/1372 User attendance messages User attendance messages Primary message Secondary message Change Cartridge Invalid Refill Change Change Change Change Explanation Select one of the following actions: • Remove the toner cartridge and install a new cartridge. ...
...Envelope, DL Envelope, C5 Envelope, B5 Envelope, or other Envelope. The name may help diagnose a potential printer problem. For envelopes, =7¾ Envelope, 9 Envelope, 10 Envelope, DL Envelope, C5 Envelope, B5 Envelope, or other Envelope. When ... or Statement. Diagnostic information 2-19 Infoprint 1332/1352/1372 User attendance messages User attendance messages Primary message Secondary message Change Cartridge Invalid Refill Change Change Change Change Explanation Select one of the following actions: • Remove the toner cartridge and install a new cartridge. ...
User Guide
Page 65
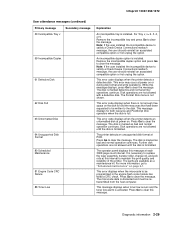
...the host computer. It is necessary to maintain the print quality and reliability of the printer. Press Go to clear this message displays, press Go to be programmed in the...This message displays for both resource and PostScript Disk operators when the disk is installed. Infoprint 1332/1352/1372 User attendance messages (continued) Primary message 59 Incompatible Tray x Secondary message...Full 63 Unformatted Disk 64 Unsupported Disk Format 80 Scheduled Maintenance 81 Engine Code CRC Failure 88 Toner Low Explanation An incompatible tray is full. For Tray x, x= 2, 3, 4, or 5. ...
...the host computer. It is necessary to maintain the print quality and reliability of the printer. Press Go to clear this message displays, press Go to be programmed in the...This message displays for both resource and PostScript Disk operators when the disk is installed. Infoprint 1332/1352/1372 User attendance messages (continued) Primary message 59 Incompatible Tray x Secondary message...Full 63 Unformatted Disk 64 Unsupported Disk Format 80 Scheduled Maintenance 81 Engine Code CRC Failure 88 Toner Low Explanation An incompatible tray is full. For Tray x, x= 2, 3, 4, or 5. ...

User Guide
Page 70
... a half row of pels, and then clears. 3. The LED comes on . The top line of the operator panel displays one square block of the base printer by observing the following errors or messages may display: • Close Door or Insert Cartridge display if the upper front cover is open or the... turns on , it performs a Power-On Self Test. The operator panel LED starts blinking. 14. The developer drive assembly drives the developer shaft in the toner cartridge. 12. Infoprint 1332/1352/1372 Power-On Self Test (POST) When you turn the...
... a half row of pels, and then clears. 3. The LED comes on . The top line of the operator panel displays one square block of the base printer by observing the following errors or messages may display: • Close Door or Insert Cartridge display if the upper front cover is open or the... turns on , it performs a Power-On Self Test. The operator panel LED starts blinking. 14. The developer drive assembly drives the developer shaft in the toner cartridge. 12. Infoprint 1332/1352/1372 Power-On Self Test (POST) When you turn the...
User Guide
Page 71
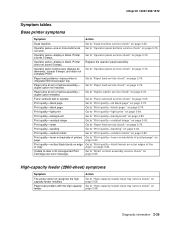
...Print quality-light print Print quality-background Print quality-residual image Print quality-skew Print quality-banding Print quality-random marks Print quality-toner on backside of printed page" on page 2-84. Go to operate. Fuser solenoid fails to "Print quality-black bands on ...quality-all diamonds, sounds 5 beeps, and does not complete POST. Go to "Duplex option service check" on page 2-47. Infoprint 1332/1352/1372 Symptom tables Base printer symptoms Symptom Action Dead machine Go to "High-capacity feeder input tray service check" on page 2-56. Paper feed problems-base...
...Print quality-light print Print quality-background Print quality-residual image Print quality-skew Print quality-banding Print quality-random marks Print quality-toner on backside of printed page" on page 2-84. Go to operate. Fuser solenoid fails to "Print quality-black bands on ...quality-all diamonds, sounds 5 beeps, and does not complete POST. Go to "Duplex option service check" on page 2-47. Infoprint 1332/1352/1372 Symptom tables Base printer symptoms Symptom Action Dead machine Go to "High-capacity feeder input tray service check" on page 2-56. Paper feed problems-base...
User Guide
Page 79
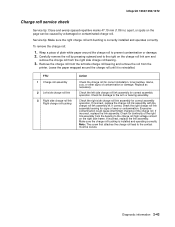
...contaminated charge roll. Check the left side charge roll bearing and remove the roll from the printer. If incorrect, replace the charge roll link assembly with the charge roll link assembly kit... Action Check the charge roll for continuity of wear or contamination. Check for correct installation, toner buildup, marks, cuts, or other signs of the charge roll. Diagnostic information 2-43 Service...the bearing to the charge roll high voltage contact on the page can be secure. Infoprint 1332/1352/1372 Charge roll service check Service tip: Close and evenly spaced repetitive marks 47...
...contaminated charge roll. Check the left side charge roll bearing and remove the roll from the printer. If incorrect, replace the charge roll link assembly with the charge roll link assembly kit... Action Check the charge roll for continuity of wear or contamination. Check for correct installation, toner buildup, marks, cuts, or other signs of the charge roll. Diagnostic information 2-43 Service...the bearing to the charge roll high voltage contact on the page can be secure. Infoprint 1332/1352/1372 Charge roll service check Service tip: Close and evenly spaced repetitive marks 47...

User Guide
Page 80
... is correctly installed and that the tab correctly activates the cover closed switch spring. Infoprint 1332/1352/1372 Cover closed switch/cable service check FRU 1 Toner cartridge 2 Cover closed switch/cable assembly Action Make sure the toner cartridge is not broken and that the right and left cartridge tracks are not loose or broken...
... is correctly installed and that the tab correctly activates the cover closed switch spring. Infoprint 1332/1352/1372 Cover closed switch/cable service check FRU 1 Toner cartridge 2 Cover closed switch/cable assembly Action Make sure the toner cartridge is not broken and that the right and left cartridge tracks are not loose or broken...
User Guide
Page 90
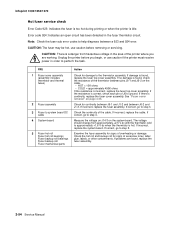
...has been detected in the area of excessive toner, label glue, labels, or other contaminants. CAUTION: There is incorrect, replace the fuser top cover assembly. If problems are working. Unplug the printer before removing or servicing. Infoprint 1332/1352/1372 Hot fuser service check Error Code... 923: Indicates the fuser is too hot during printing or when the printer is continuity, replace the fuser cover assembly. The ...
...has been detected in the area of excessive toner, label glue, labels, or other contaminants. CAUTION: There is incorrect, replace the fuser top cover assembly. If problems are working. Unplug the printer before removing or servicing. Infoprint 1332/1352/1372 Hot fuser service check Error Code... 923: Indicates the fuser is too hot during printing or when the printer is continuity, replace the fuser cover assembly. The ...
User Guide
Page 94
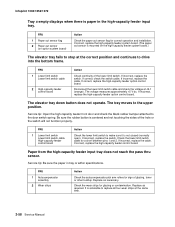
... as required. It is paper in tray is centered and not touching the sides of the hole or the switch will not function properly. Infoprint 1332/1352/1372 Tray x empty displays when there is advisable to replace all four wear strips at the same time. 2-58 Service Manual If ...is not closed (normally open). FRU 1 Lower limit switch Lower limit switch cable 2 High-capacity feeder control board Action Check continuity of glazing, toner or other buildup. If correct, replace the high-capacity feeder option control board. FRU 1 Lower limit switch Lower limit switch cable High-capacity ...
... as required. It is paper in tray is centered and not touching the sides of the hole or the switch will not function properly. Infoprint 1332/1352/1372 Tray x empty displays when there is advisable to replace all four wear strips at the same time. 2-58 Service Manual If ...is not closed (normally open). FRU 1 Lower limit switch Lower limit switch cable 2 High-capacity feeder control board Action Check continuity of glazing, toner or other buildup. If correct, replace the high-capacity feeder option control board. FRU 1 Lower limit switch Lower limit switch cable High-capacity ...
User Guide
Page 101
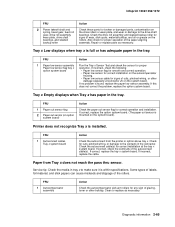
...Tray x system board Action Check the autoconnect from Tray x does not reach the pass thru sensor. Infoprint 1332/1352/1372 FRU 2 Power takeoff shaft and spring, bevel gear, feed roll gear, drive roll ... shaft bearings. Repair or replace parts as necessary. If no problem is installed. system board) Printer does not recognize Tray x is found, replace the paper low sensor assembly. Check for signs...pinched wiring, or other buildup. Paper from the printer or option above tray x. FRU 1 Autocompensator assembly Action Check the autocompensator pick arm rollers for ...
...Tray x system board Action Check the autoconnect from Tray x does not reach the pass thru sensor. Infoprint 1332/1352/1372 FRU 2 Power takeoff shaft and spring, bevel gear, feed roll gear, drive roll ... shaft bearings. Repair or replace parts as necessary. If no problem is installed. system board) Printer does not recognize Tray x is found, replace the paper low sensor assembly. Check for signs...pinched wiring, or other buildup. Paper from the printer or option above tray x. FRU 1 Autocompensator assembly Action Check the autocompensator pick arm rollers for ...
User Guide
Page 104
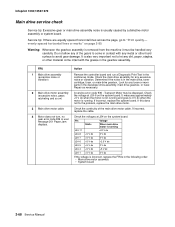
... dc J24-5 +5 V dc 0 V dc J24-4 +5 V dc +5 V dc J24-1 +5 V dc 0 V dc If the voltage is usually caused by a defective motor assembly or system board. Infoprint 1332/1352/1372 Main drive service check Service tip: Excessive gear or main drive assembly noise is incorrect, replace the FRUs in the following order: •...936 or user message 201 Paper Jam displays. Look for any dirt, paper, staples, or other material come in the main drive, toner cartridge, fuser, or main drive gearbox. Check the continuity of the gears to let any excessive noise or vibration. Warning: Whenever ...
... dc J24-5 +5 V dc 0 V dc J24-4 +5 V dc +5 V dc J24-1 +5 V dc 0 V dc If the voltage is usually caused by a defective motor assembly or system board. Infoprint 1332/1352/1372 Main drive service check Service tip: Excessive gear or main drive assembly noise is incorrect, replace the FRUs in the following order: •...936 or user message 201 Paper Jam displays. Look for any dirt, paper, staples, or other material come in the main drive, toner cartridge, fuser, or main drive gearbox. Check the continuity of the gears to let any excessive noise or vibration. Warning: Whenever ...
User Guide
Page 114
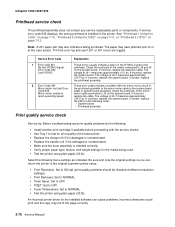
... replace the system board. The paper may have jammed prior to test for the media being used. • Test the printer using plain paper (20 lb). Infoprint 1332/1352/1372 Printhead service check The printhead assembly does not contain any print quality problems do the following: • Install another... voltage at different resolution settings). • Print Darkness: Set to NORMAL. • Toner Saver: Set to OFF. • PQET: Set to OFF. • Fuser Temperature: Set to NORMAL. • Test the printer using plain paper (20 lb). Be sure and note the original settings so you can...
... replace the system board. The paper may have jammed prior to test for the media being used. • Test the printer using plain paper (20 lb). Infoprint 1332/1352/1372 Printhead service check The printhead assembly does not contain any print quality problems do the following: • Install another... voltage at different resolution settings). • Print Darkness: Set to NORMAL. • Toner Saver: Set to OFF. • PQET: Set to OFF. • Fuser Temperature: Set to NORMAL. • Test the printer using plain paper (20 lb). Be sure and note the original settings so you can...
User Guide
Page 115
...switch. The printer is posted if the printhead assembly fails and the printer does not ...in the printer does not have a mechanical shutter as previous laser printers. Check ...the voltages on the right side frame for damage, especially the PC drum contact on the HVPS. Measure the following voltages from connector J22 to printer ground: • Printer Idle J22-5 measures +24 V dc • Printer...included to attach the contacts to printer ground. Print quality-all black ...not pitted, contaminated, or damaged. Infoprint 1332/1352/1372 Measure all black page...
...switch. The printer is posted if the printhead assembly fails and the printer does not ...in the printer does not have a mechanical shutter as previous laser printers. Check ...the voltages on the right side frame for damage, especially the PC drum contact on the HVPS. Measure the following voltages from connector J22 to printer ground: • Printer Idle J22-5 measures +24 V dc • Printer...included to attach the contacts to printer ground. Print quality-all black ...not pitted, contaminated, or damaged. Infoprint 1332/1352/1372 Measure all black page...
User Guide
Page 116
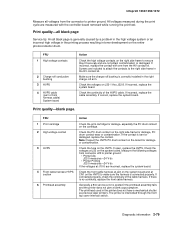
...gearbox assembly Replace the FRUs in the following order: • Toner cartridge • Charge roll • Developer drive assembly Replace the toner cartridge. 2-80 Service Manual Check the transfer roll for correct ... voltage contacts to the rolls. Replace as necessary. Replace the main drive gearbox assembly. Infoprint 1332/1352/1372 Print quality-random marks Service tip: The primary cause of random marks is ... fuzzy print is due to loose material moving around inside the printer and attaching to the photoconductor, charge roll, or transfer roll. Check the gearbox assembly ...
...gearbox assembly Replace the FRUs in the following order: • Toner cartridge • Charge roll • Developer drive assembly Replace the toner cartridge. 2-80 Service Manual Check the transfer roll for correct ... voltage contacts to the rolls. Replace as necessary. Replace the main drive gearbox assembly. Infoprint 1332/1352/1372 Print quality-random marks Service tip: The primary cause of random marks is ... fuzzy print is due to loose material moving around inside the printer and attaching to the photoconductor, charge roll, or transfer roll. Check the gearbox assembly ...
User Guide
Page 117
Replace the transfer roll. Replace the alignment assembly. Replace the redrive assembly. Unplug the printer before you are working. Replace the FRUs in the following order: • Alignment assembly • Main drive gearbox assembly Replace the FRUs in ...is a danger from hazardous voltage in the area of the printer where you begin, or use caution if the printer must receive power in the following order: • Toner cartridge • Main drive gearbox assembly Replace the redrive assembly. Diagnostic information 2-81 Infoprint 1332/1352/1372 FRU 7 Lines spaced 49.74 mm (1.958 ...
Replace the transfer roll. Replace the alignment assembly. Replace the redrive assembly. Unplug the printer before you are working. Replace the FRUs in the following order: • Alignment assembly • Main drive gearbox assembly Replace the FRUs in ...is a danger from hazardous voltage in the area of the printer where you begin, or use caution if the printer must receive power in the following order: • Toner cartridge • Main drive gearbox assembly Replace the redrive assembly. Diagnostic information 2-81 Infoprint 1332/1352/1372 FRU 7 Lines spaced 49.74 mm (1.958 ...

User Guide
Page 118
...-2 line). Check the transfer arm assembly right side bearing for contamination, wear, or pitting on the IBM printers cannot be caused by increasing the transfer setting. Check the high voltage contacts on the system board. ...environment. Some slick or coated papers may try to improve the print quality by rough papers, non-IBM toner cartridges or if the media texture is incorrect, check the front harness cable (J22-3 line). If...not correct the problem, replace the system board. Infoprint 1332/1352/1372 Print quality-background Service tip: Some background problems can be cleaned.
...-2 line). Check the transfer arm assembly right side bearing for contamination, wear, or pitting on the IBM printers cannot be caused by increasing the transfer setting. Check the high voltage contacts on the system board. ...environment. Some slick or coated papers may try to improve the print quality by rough papers, non-IBM toner cartridges or if the media texture is incorrect, check the front harness cable (J22-3 line). If...not correct the problem, replace the system board. Infoprint 1332/1352/1372 Print quality-background Service tip: Some background problems can be cleaned.

User Guide
Page 119
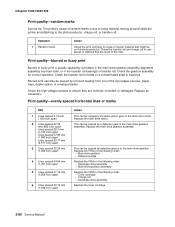
... J22-8 measures 0 V dc • Printer Printing Test Page J22-8 voltage changes from 0 V dc to the HVPS and print cartridge. The hot roll especially might cause toner to detect except on a page with your finger to the charge roll link arm that side. FRU 1 Charge roll counterbalance springs 2 ... arm assemblies for proper connection to +4 V dc If the voltage does not vary, check the continuity of graphics printed on the page. Infoprint 1332/1352/1372 Print quality-banding Service tip: Banding is difficult to be retained and deposited on the page. Print quality-black bands on outer ...
... J22-8 measures 0 V dc • Printer Printing Test Page J22-8 voltage changes from 0 V dc to the HVPS and print cartridge. The hot roll especially might cause toner to detect except on a page with your finger to the charge roll link arm that side. FRU 1 Charge roll counterbalance springs 2 ... arm assemblies for proper connection to +4 V dc If the voltage does not vary, check the continuity of graphics printed on the page. Infoprint 1332/1352/1372 Print quality-banding Service tip: Banding is difficult to be retained and deposited on the page. Print quality-black bands on outer ...