User Guide
Page 5
... 1332/1352/1372 Maintenance page count 3-17 Setting configuration ID 3-18 Restore EP Factory Defaults 3-18 Print tests 3-19 Print quality test pages 3-20 Printing menu settings page 3-20 Theory 3-21 Autocompensator operation 3-21 Autoconnect system, paper tray options, envelope feeder-electrical 3-21 Autoconnect cabling and connectors 3-21 Duplex Option 3-21 Option microcode 3-22 Paper feed jams 3-22 Paper jams-base printer 3-23 Paper jams-options 3-24 Error Message 23x Paper Jam - Check MP Feeder 3-25 Error Message 260 Paper Jam - Check Bin x 3-25 Error Message 28x Paper Jam...
... 1332/1352/1372 Maintenance page count 3-17 Setting configuration ID 3-18 Restore EP Factory Defaults 3-18 Print tests 3-19 Print quality test pages 3-20 Printing menu settings page 3-20 Theory 3-21 Autocompensator operation 3-21 Autoconnect system, paper tray options, envelope feeder-electrical 3-21 Autoconnect cabling and connectors 3-21 Duplex Option 3-21 Option microcode 3-22 Paper feed jams 3-22 Paper jams-base printer 3-23 Paper jams-options 3-24 Error Message 23x Paper Jam - Check MP Feeder 3-25 Error Message 260 Paper Jam - Check Bin x 3-25 Error Message 28x Paper Jam...

User Guide
Page 19
... error indicator table, symptom tables, and service checks used to isolate failing field replaceable units (FRUs). 3. Diagnostic aids contains tests and checks used to locate or repeat symptoms of the printer and the maintenance approach used to repair it. CAUTION: A caution identifies something that might damage the product hardware or software. Infoprint 1332/1352/1372 Preface This manual contains maintenance procedures for making printer adjustments and removing and installing FRUs. 5. Connector locations uses illustrations to prevent problems. 7. Warning: A warning...
... error indicator table, symptom tables, and service checks used to isolate failing field replaceable units (FRUs). 3. Diagnostic aids contains tests and checks used to locate or repeat symptoms of the printer and the maintenance approach used to repair it. CAUTION: A caution identifies something that might damage the product hardware or software. Infoprint 1332/1352/1372 Preface This manual contains maintenance procedures for making printer adjustments and removing and installing FRUs. 5. Connector locations uses illustrations to prevent problems. 7. Warning: A warning...
User Guide
Page 21
..., 002 4529-N01, N02 Lexmark T634 Lexmark T634n Lexmark Machine type 4060-000 4060-010 4060-200 4060-210 4060-400 4060-410 Maintenance approach The diagnostic information in this manual leads you complete the repair, perform tests as needed to determine the printer problem and repair the failure. Infoprint 1332/1352/1372 1. Use the service error codes, user status messages, user error messages, service checks, and diagnostic aids to verify the...
..., 002 4529-N01, N02 Lexmark T634 Lexmark T634n Lexmark Machine type 4060-000 4060-010 4060-200 4060-210 4060-400 4060-410 Maintenance approach The diagnostic information in this manual leads you complete the repair, perform tests as needed to determine the printer problem and repair the failure. Infoprint 1332/1352/1372 1. Use the service error codes, user status messages, user error messages, service checks, and diagnostic aids to verify the...

User Guide
Page 37
... user with information that error. User status messages provide the user with a print cartridge, paper jam, option, port, and so on the current status of the printer. If a user error message displays, go to the printer. Make sure your fingers are indicated by a three-digit error code. If a service error code appears while you connect or disconnect any cable or electronic board or assembly for that explains a problem with information on . Service error codes are working on the machine, go to "Service error codes" on page...
... user with information that error. User status messages provide the user with a print cartridge, paper jam, option, port, and so on the current status of the printer. If a user error message displays, go to the printer. Make sure your fingers are indicated by a three-digit error code. If a service error code appears while you connect or disconnect any cable or electronic board or assembly for that explains a problem with information on . Service error codes are working on the machine, go to "Service error codes" on page...
User Guide
Page 39
.... Check the LVPS for correct installation. Infoprint 1332/1352/1372 Service error code (continued) Error code Action 924 Fuser Error An open circuit has been detected in the Fuser Thermistor Circuit. If you still have not replaced the system board recently, replace the correct printhead. Secure NVRAM Missing 953 NVRAM Chip Failure Indicates the NVRAM chip on page 2-69. 929 Toner Sensor The toner sensor is not operating properly, the developer drive...
.... Check the LVPS for correct installation. Infoprint 1332/1352/1372 Service error code (continued) Error code Action 924 Fuser Error An open circuit has been detected in the Fuser Thermistor Circuit. If you still have not replaced the system board recently, replace the correct printhead. Secure NVRAM Missing 953 NVRAM Chip Failure Indicates the NVRAM chip on page 2-69. 929 Toner Sensor The toner sensor is not operating properly, the developer drive...
User Guide
Page 40
.... If the memory in slot 2 now works correctly, replace the failing DIMM that was in network card x. • 978 - If this does not fix the problem, replace the system board. 964 Emulation Error Indicates a failure within the Download Emulation which is experiencing unreliable communications to "Disabling Download Emulations" on page 3-3. 975 - 979 Network Card x The following : system board, duplex, tray x (1, 2, 3, 4, or 5), envelope feeder or output bin. 2-4 Service Manual Go to the specified device. 981...
.... If the memory in slot 2 now works correctly, replace the failing DIMM that was in network card x. • 978 - If this does not fix the problem, replace the system board. 964 Emulation Error Indicates a failure within the Download Emulation which is experiencing unreliable communications to "Disabling Download Emulations" on page 3-3. 975 - 979 Network Card x The following : system board, duplex, tray x (1, 2, 3, 4, or 5), envelope feeder or output bin. 2-4 Service Manual Go to the specified device. 981...

User Guide
Page 74
... 2xx error codes" on page 2-5 to help diagnose the problem. • Print quality problems: Go to "Print quality test pages" on page 3-20 and print a test page to help diagnose problems before changing any settings or working on the printer. • Use the resident diagnostics test provided to help isolate a problem before attempting to service the unit. Go to make sure the ESD brush is configured correctly before taking the machine apart or removing any service checks. • Paper feed problems (especially paper jams): Go...
... 2xx error codes" on page 2-5 to help diagnose the problem. • Print quality problems: Go to "Print quality test pages" on page 3-20 and print a test page to help diagnose problems before changing any settings or working on the printer. • Use the resident diagnostics test provided to help isolate a problem before attempting to service the unit. Go to make sure the ESD brush is configured correctly before taking the machine apart or removing any service checks. • Paper feed problems (especially paper jams): Go...

User Guide
Page 75
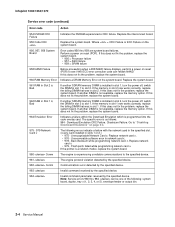
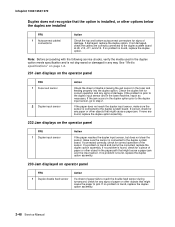
... voltages are correct, replace the control board. If incorrect, repair as installed. Remove the left rear of the toroid on the top left and right side covers and check the two autoconnects for the failing output option. Check Bin 4 displays Service tip: When a 274 Paper Jam Check Bin 4 message displays, a problem exists with this service check or go to the service check for damage, especially the connector pins. Infoprint 1332/1352/1372 The printer does not recognize one...
... voltages are correct, replace the control board. If incorrect, repair as installed. Remove the left rear of the toroid on the top left and right side covers and check the two autoconnects for the failing output option. Check Bin 4 displays Service tip: When a 274 Paper Jam Check Bin 4 message displays, a problem exists with this service check or go to the service check for damage, especially the connector pins. Infoprint 1332/1352/1372 The printer does not recognize one...

User Guide
Page 77
... between power on the control board. If none of support. Check the "Base printer sub error codes" on the display. This resets the non-critical areas of Sub Error Codes on page 2-6. If correct, replace the mechanical linkage/ DC motor assembly. 900 Error Code service check FRU 1 Printer POR 2 System board 3 Factory defaults 4 Sub error codes Action Turn the printer off . If Error Code 900 continues to display, go to step 2. Record the complete list of the user NVRAM...
... between power on the control board. If none of support. Check the "Base printer sub error codes" on the display. This resets the non-critical areas of Sub Error Codes on page 2-6. If correct, replace the mechanical linkage/ DC motor assembly. 900 Error Code service check FRU 1 Printer POR 2 System board 3 Factory defaults 4 Sub error codes Action Turn the printer off . If Error Code 900 continues to display, go to step 2. Record the complete list of the user NVRAM...
User Guide
Page 84
... , replace the duplex option. If the problem is found , replace the duplex option assembly. 2-48 Service Manual If none are found and cannot be corrected, replace the duplex option assembly. If no problem is prior to the duplex input sensor and in the fuser and feeding properly into the duplex option. See "Media specifications" on page 1-8. 231 Jam displays on the operator panel FRU 1 Fuser exit sensor 2 Duplex input sensor Action Check the sheet of paper or other objects that might cause a paper jam...
... , replace the duplex option. If the problem is found , replace the duplex option assembly. 2-48 Service Manual If none are found and cannot be corrected, replace the duplex option assembly. If no problem is prior to the duplex input sensor and in the fuser and feeding properly into the duplex option. See "Media specifications" on page 1-8. 231 Jam displays on the operator panel FRU 1 Fuser exit sensor 2 Duplex input sensor Action Check the sheet of paper or other objects that might cause a paper jam...
User Guide
Page 99
... thru sensor flag or 202 Paper Jam Open Rear Door displays, a sheet of paper feeds out to the standard bin even though bin x is selected and paper exits half way out of problem check the "Base printer sub error codes" on page 2-6. Disconnect the pass thru sensor cable and check the voltage at J3-2. The voltage measures approximately 0 V dc. Check the belt tension spring to J3 on the lower control board. If incorrect, replace the...
... thru sensor flag or 202 Paper Jam Open Rear Door displays, a sheet of paper feeds out to the standard bin even though bin x is selected and paper exits half way out of problem check the "Base printer sub error codes" on page 2-6. Disconnect the pass thru sensor cable and check the voltage at J3-2. The voltage measures approximately 0 V dc. Check the belt tension spring to J3 on the lower control board. If incorrect, replace the...

User Guide
Page 100
... sensor cable to the option system board. Infoprint 1332/1352/1372 Input sensor service check Service tip: Run the Base Sensor Test. The display changes from the diagnostics menu. If a problem is found, repair as the sensor flag is manually moved in the following order: • Autocompensator assembly option • Option system board. 24x Paper Jam displays, paper jammed over the pass thru sensor. (The printer displays the value of the sensor. If correct, replace the input sensor assembly. For 990 Error Code- Replace...
... sensor cable to the option system board. Infoprint 1332/1352/1372 Input sensor service check Service tip: Run the Base Sensor Test. The display changes from the diagnostics menu. If a problem is found, repair as the sensor flag is manually moved in the following order: • Autocompensator assembly option • Option system board. 24x Paper Jam displays, paper jammed over the pass thru sensor. (The printer displays the value of the sensor. If correct, replace the input sensor assembly. For 990 Error Code- Replace...

User Guide
Page 103
... paper size parts for damage or broken parts. Select the paper size and corresponding paper switch from table, below. Tray 1 Missing should not be displayed. Replace the spring if damaged. Check continuity of the ITC/Autocomp cable. FRU 1 Back restraint Side restraint Snap-in the printer. make sure the parts operate correctly. Set the tray for the paper size that is not damaged, go to step 3. If correct, replace the ITC assembly. If a problem...
... paper size parts for damage or broken parts. Select the paper size and corresponding paper switch from table, below. Tray 1 Missing should not be displayed. Replace the spring if damaged. Check continuity of the ITC/Autocomp cable. FRU 1 Back restraint Side restraint Snap-in the printer. make sure the parts operate correctly. Set the tray for the paper size that is not damaged, go to step 3. If correct, replace the ITC assembly. If a problem...

User Guide
Page 110
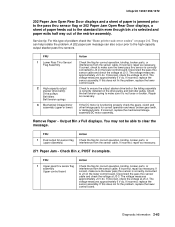
Output Bin x is displayed, POST incomplete, unable to J3 on the cable connector: J4-1 to J4-2 (measures between 115 and 135 ohms.) Also check J4-1 and J4-2 to replace the control board. 2-74 Service Manual If this does not fix the problem, replace the control board. 271 Paper jam - Sensor Test: NF = Near Full (Upper part of sensor assembly) F = Full (Lower part of paper feeds into output bin x. If correct, disconnect J4 from the option board...
Output Bin x is displayed, POST incomplete, unable to J3 on the cable connector: J4-1 to J4-2 (measures between 115 and 135 ohms.) Also check J4-1 and J4-2 to replace the control board. 2-74 Service Manual If this does not fix the problem, replace the control board. 271 Paper jam - Sensor Test: NF = Near Full (Upper part of sensor assembly) F = Full (Lower part of paper feeds into output bin x. If correct, disconnect J4 from the option board...
User Guide
Page 114
... cause problems. Incorrect characters could print and the copy may not fit the page correctly. 2-78 Service Manual If service error code 930 displays, the wrong printhead is installed correctly. • Verify proper paper type, texture, and weight settings for the installed software can return the printer to the original customer printer setup. • Print Resolution: Set to 300 dpi (print quality problems should be checked at different resolution settings). • Print Darkness: Set to NORMAL. • Toner Saver: Set to...
... cause problems. Incorrect characters could print and the copy may not fit the page correctly. 2-78 Service Manual If service error code 930 displays, the wrong printhead is installed correctly. • Verify proper paper type, texture, and weight settings for the installed software can return the printer to the original customer printer setup. • Print Resolution: Set to 300 dpi (print quality problems should be checked at different resolution settings). • Print Darkness: Set to NORMAL. • Toner Saver: Set to...
User Guide
Page 115
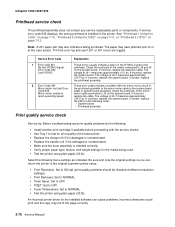
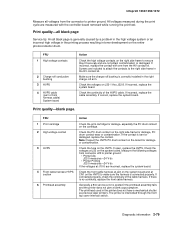
Print quality-all black page Service tip: An all voltages from the connector to the right side frame in the HV contact kit. Print quality-blank page. If open, replace the HVPS. Measure the following voltages from connector J22 to make sure the harness is correctly installed in the printer does not have a mechanical shutter as previous laser printers. If incorrect, replace the cable assembly. FRU 1 Print cartridge 2 High voltage contact 3 HVPS 4 Front...
Print quality-all black page Service tip: An all voltages from the connector to the right side frame in the HV contact kit. Print quality-blank page. If open, replace the HVPS. Measure the following voltages from connector J22 to make sure the harness is correctly installed in the printer does not have a mechanical shutter as previous laser printers. If incorrect, replace the cable assembly. FRU 1 Print cartridge 2 High voltage contact 3 HVPS 4 Front...

User Guide
Page 140
... servicer observe the paper path as the laser turns off during this message displays, the servicer can manually actuate each sensor. Input Tray Sensor Test This test is feeding through the printer. Tray sensor support by hand, however a sheet of media from the selected source) or Continuous (continues feeding media from the sources displayed on the Feed Test menu. All installed sources are working correctly. Select either Single (feeds one sheet of paper can be actuated by source Source Tray 1 Tray 2 Tray 3 Tray 4 Tray 5 Multipurpose tray Envelope feeder Tray empty sensor...
... servicer observe the paper path as the laser turns off during this message displays, the servicer can manually actuate each sensor. Input Tray Sensor Test This test is feeding through the printer. Tray sensor support by hand, however a sheet of media from the selected source) or Continuous (continues feeding media from the sources displayed on the Feed Test menu. All installed sources are working correctly. Select either Single (feeds one sheet of paper can be actuated by source Source Tray 1 Tray 2 Tray 3 Tray 4 Tray 5 Multipurpose tray Envelope feeder Tray empty sensor...
User Guide
Page 147
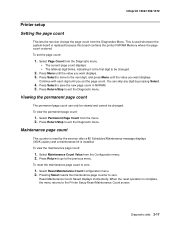
... it is complete, the menu returns to the next digit, and press Menu until you want displays. 3. When the reset operation is the first digit to zero. Press Select to save the new page count in NVRAM. 5. Viewing the permanent page count The permanent page count can skip any digit by the servicer after a 80 Scheduled Maintenance message displays (300K copies) and a maintenance kit is stored. To set the page count.
... it is complete, the menu returns to the next digit, and press Menu until you want displays. 3. When the reset operation is the first digit to zero. Press Select to save the new page count in NVRAM. 5. Viewing the permanent page count The permanent page count can skip any digit by the servicer after a 80 Scheduled Maintenance message displays (300K copies) and a maintenance kit is stored. To set the page count.
User Guide
Page 148
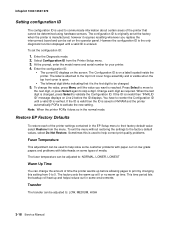
... verified. Infoprint 1332/1352/1372 Setting configuration ID The configuration ID is used to : LOW, MEDIUM, HIGH 3-18 Service Manual At the prompt, enter the model name and serial number for your printer. 4. You have to validate the Configuration ID. To set at 0 or no warm up at the factory when the printer is invalid then "INVALID ID" message displays on Line 2 before allowing pages to print by changing this is used to help...
... verified. Infoprint 1332/1352/1372 Setting configuration ID The configuration ID is used to : LOW, MEDIUM, HIGH 3-18 Service Manual At the prompt, enter the model name and serial number for your printer. 4. You have to validate the Configuration ID. To set at 0 or no warm up at the factory when the printer is invalid then "INVALID ID" message displays on Line 2 before allowing pages to print by changing this is used to help...

User Guide
Page 151
..., the counterbalance spring is not to be realistically set and always guarantee there is factory set to exert no more than having a fixed spring force for feeding problems. Autoconnect system, paper tray options, envelope feeder-electrical Autoconnect cabling and connectors The printer options make electrical connection automatically, requiring no longer recognizes the option and deletes associated messages. Duplex Option The duplex option interface is a six pin autoconnector that the pick arm cannot fall...
..., the counterbalance spring is not to be realistically set and always guarantee there is factory set to exert no more than having a fixed spring force for feeding problems. Autoconnect system, paper tray options, envelope feeder-electrical Autoconnect cabling and connectors The printer options make electrical connection automatically, requiring no longer recognizes the option and deletes associated messages. Duplex Option The duplex option interface is a six pin autoconnector that the pick arm cannot fall...


