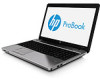
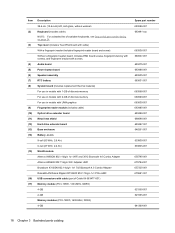
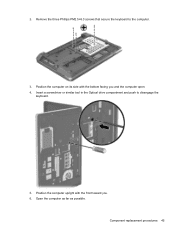
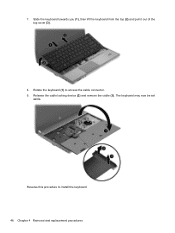
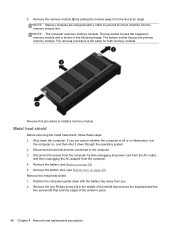
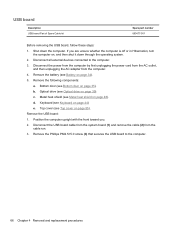
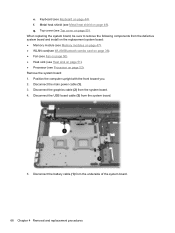
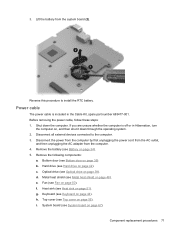
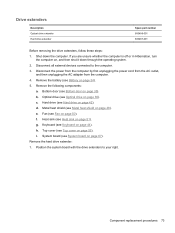
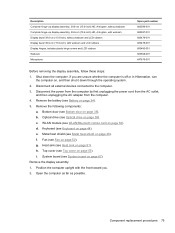
Getting Started HP Notebook
Page 6
... ...29 Inserting or removing the battery ...29 Using the optional security screw ...30 Removing or replacing the service door 31 Removing the service door 31 Replacing the service door 32 Replacing or upgrading the hard drive 33 Removing the hard drive ...33 Installing a hard drive ...34......38 Cleaning procedures ...38 Cleaning the display 38 Cleaning the sides and cover 38 Cleaning the TouchPad and keyboard 39 6 Backup and recovery ...40 Creating recovery media with HP Recovery Disc Creator 40 Creating recovery media ...41 Backing up your information ...41 Performing a system recovery ...
Getting Started HP Notebook
Page 55
Index A AC adapter/battery light 14 audio-in (microphone) jack 12 audio-out (headphone) jack 12 B Backup and Restore 41 battery removing 29 replacing 29 battery bay 17, 45 battery release latches 17 Bluetooth label 45 buttons left TouchPad 4 optical drive eject 13 power 7, 9 right TouchPad 4 TouchPad ... 16 Internet connection setup 20 ISP, using 19 J jacks audio-in (microphone) 12 audio-out (headphone) 12 network 14 RJ-45 (network) 14 K keyboard hot keys, identifying 22 keypad, embedded numeric 10 keypad, integrated numeric 11 keypads, identifying 23, 24 keys esc 10, 11 fn 10, 11, 23 function...
HP Notebook User Guide - Linux
Page 47
... battery power. You can customize power management settings. To reduce potential safety issues, use only the battery provided with the computer, a replacement battery provided by HP, or a compatible battery purchased from the computer. Changing the current power management settings 1. WARNING! Inserting or removing the battery To insert..., depending on power management settings, programs running on external AC power supplied through the AC adapter, the computer switches to Keyboard and pointing devices on the On AC Power tab, On Battery Power tab, and General tab, as needed.
HP ProBook 4545s Notebook PC - Maintenance and Service Guide
Page 6
Component replacement procedures 33 Service tag ...33 Battery ...34 Bottom door ...35 Bottom parts location ...36 WLAN/Bluetooth combo card 36 Optical drive ...39 Hard drive ...42 Keyboard ...44 Memory modules ...47 Metal heat shield ...48 Fan ...50 Heat sink ...51 Processor ...53 Top cover ...55 Audio board ...61 Speaker assembly ...62 Power...
HP ProBook 4545s Notebook PC - Maintenance and Service Guide
Page 26
... (6) (7) (8) (9) (10) (11) (12) (13) (14) (15) (16) (17) Description 39.6-cm (15.6-inch) HD, Anti-glare, without webcam Keyboard (includes cable) NOTE: For a detailed list of Cable Kit 683477-001) Memory module (PC3-10600, 1333-MHz, DDR3) 4-GB 2-GB Memory modules (PC3-12800, 1600-...reader (includes fingerprint reader board and screw) Without a fingerprint reader board. Audio board Power button board Speaker assembly RTC battery System board (includes replacement thermal material) For use in models with 1-GB of discrete memory For use in models with 2-GB of discrete memory For use in models ...
HP ProBook 4545s Notebook PC - Maintenance and Service Guide
Page 52
...computer is off or in Hibernation, turn the computer on, and then shut it down the computer. Remove the keyboard: 1. Description Keyboard Spare part number 683491-xxx Before removing the keyboard, follow these steps: 1. Remove the bottom door (see Battery on page 35). 6. 8. Lower the mylar... AC adapter from the assembly (4). Remove the Optical drive (see Sequential part number listing on page 39). Keyboard NOTE: For a detailed list of available keyboards, see Optical drive on page 24. Disconnect all external devices connected to reassemble and install the hard drive....
HP ProBook 4545s Notebook PC - Maintenance and Service Guide
Page 53
Position the computer on its side with the front toward you and the computer open. 4. Position the computer upright with the bottom facing you . 6. Component replacement procedures 45 Remove the three Phillips PM2.5×6.0 screws that secure the keyboard to disengage the keyboard. 5. Open the computer as far as possible. Insert a screwdriver or similar tool in the Optical drive compartment and push to the computer. 3. 2.
HP ProBook 4545s Notebook PC - Maintenance and Service Guide
Page 54
7. Release the cable locking device (2) and remove the cable (3). Reverse this procedure to access the cable connector. 9. The keyboard may now be set aside. Slide the keyboard towards you (1), then lift the keyboard from the top (2) and pull it out of the top cover (3). 8. Rotate the keyboard (1) to install the keyboard. 46 Chapter 4 Removal and replacement procedures
HP ProBook 4545s Notebook PC - Maintenance and Service Guide
Page 56
...the module away from the slot at an angle. Remove the one Phillips screw (1) in the middle of the shield that secures the keyboard and the two screws (1) that hold the edges of the shield in the following image. NOTE: The computer uses two memory sockets.... devices connected to install a memory module. NOTE: Memory modules are unsure whether the computer is shown in place. 48 Chapter 4 Removal and replacement procedures Position the computer upside-down the computer. Shut down with a notch to prevent incorrect insertion into the memory module slot. The removal procedure...
HP ProBook 4545s Notebook PC - Maintenance and Service Guide
Page 63
... with a fingerprint reader. Spare part number 683506-001 683507-001 Before removing the top cover, follow these steps: 1. If you . Remove the following components: a. Component replacement procedures 55 For use in models with the front toward you are unsure whether the computer is off or in models without a fingerprint reader. Remove..., ESD board with screw, fingerprint reader dummy with screw. Bottom door (see Hard drive on page 39). b. c. Hard drive (see Bottom door on page 44). Keyboard (see Keyboard on page 35). Remove the top cover: 1.
HP ProBook 4545s Notebook PC - Maintenance and Service Guide
Page 69
... you . 2. Hard drive (see Hard drive on , and then shut it down through the operating system. 2. Keyboard (see Metal heat shield on page 44). e. Metal heat shield (see Keyboard on page 48). Disconnect all external devices connected to the top cover. Remove the following components: a. Bottom door (see... audio board: 1. Audio board Description Audio board Spare part number 683475-001 Before removing the audio board, follow these steps: 1. c. d. Component replacement procedures 61 Optical drive (see Top cover on page 39). Position the top cover upside-down the computer.
HP ProBook 4545s Notebook PC - Maintenance and Service Guide
Page 70
... Metal heat shield (see Optical drive on page 48). Top cover (see Bottom door on page 55). 62 Chapter 4 Removal and replacement procedures Speaker assembly Description Speaker assembly (includes housing) Spare part number 683505-001 Before removing the speaker assembly, follow these steps: 1. ...from the computer by first unplugging the power cord from the AC outlet, and then unplugging the AC adapter from the computer. 4. c. Keyboard (see Battery on page 44). 4. Reverse this procedure to remove it down the computer. Rotate the audio board upward (3) to install the...
HP ProBook 4545s Notebook PC - Maintenance and Service Guide
Page 72
...on page 55). Lift the power button board (2) and the function board (3) from the computer. 64 Chapter 4 Removal and replacement procedures Spare part number 683485-001 Before removing the fingerprint board, follow these steps: 1. Disconnect all external devices connected to install... Fingerprint board. d. Includes cable, mounting bracket, and retaining screw. e. Remove one Phillips PM2.0×4.0 screw (1) on page 44). Keyboard (see Keyboard on both the power button board and the function board to the top cover. 3. Remove the power button board/function board: 1. Shut...
HP ProBook 4545s Notebook PC - Maintenance and Service Guide
Page 73
...is attached to the top cover with the front toward you. 2. e. Top cover (see Metal heat shield on page 55). Component replacement procedures 65 Optical drive (see Battery on page 39). d. Remove the fingerprint board retainer (2). 4. Remove the battery (see Optical drive ...on page 34). 5. 4. Remove the following components: a. Bottom door (see Keyboard on page 35). Keyboard (see Bottom door on page 44). Remove the fingerprint board: 1. Lift the cable (3) that secures the fingerprint board to install...
HP ProBook 4545s Notebook PC - Maintenance and Service Guide
Page 74
...shield (see Bottom door on page 48). d. Remove the USB board: 1. Disconnect all external devices connected to the computer. 66 Chapter 4 Removal and replacement procedures Bottom door (see Metal heat shield on page 35). Top cover (see Optical drive on page 44) e. If you . 2. Remove the ... computer upright with the front toward you are unsure whether the computer is off or in Hibernation, turn the computer on page 55). c. Keyboard (see Battery on page 34). 5. Disconnect the USB board cable from the system board (1) and remove the cable (2) from the computer...
HP ProBook 4545s Notebook PC - Maintenance and Service Guide
Page 76
... cable (1). 3. Remove the system board: 1. Disconnect the USB board cable (3) from the underside of the system board. 68 Chapter 4 Removal and replacement procedures Top cover (see Keyboard on page 55). When replacing the system board, be sure to remove the following components from the system board. 4. Metal heat shield (see Processor on page...
HP ProBook 4545s Notebook PC - Maintenance and Service Guide
Page 78
... the computer by first unplugging the power cord from the AC outlet, and then unplugging the AC adapter from the slot (1). 70 Chapter 4 Removal and replacement procedures d. Heat sink (see System board on page 51). h. System board (see Heat sink on page 67). Remove the following components: a. c....with the front toward you are unsure whether the computer is off or in Hibernation, turn the computer on page 35). Top cover (see Keyboard on page 55). Keyboard (see Top cover on page 44). If you . 2. Bottom door (see Hard drive on page 42). Hard drive (see Bottom ...
HP ProBook 4545s Notebook PC - Maintenance and Service Guide
Page 79
... on page 42). Metal heat shield (see Hard drive on page 48). h. Component replacement procedures 71 Bottom door (see Optical drive on page 35). Optical drive (see Bottom door on page 39). f. Heat sink (see Keyboard on page 51). Keyboard (see Heat sink on page 44). Disconnect the power from the computer by...
HP ProBook 4545s Notebook PC - Maintenance and Service Guide
Page 81
...door on page 42). i. Remove the battery (see Metal heat shield on page 34). 5. b. d. Remove the hard drive extender: 1. Component replacement procedures 73 Drive extenders Description Optical drive extender Hard drive extender Spare part number 683498-001 683487-001 Before removing the drive extenders, follow these...then unplugging the AC adapter from the computer. 4. Optical drive (see System board on page 39). Heat sink (see Keyboard on page 51). e. g. Keyboard (see Heat sink on page 44). If you are unsure whether the computer is off or in Hibernation, turn the ...
HP ProBook 4545s Notebook PC - Maintenance and Service Guide
Page 83
... with the front toward you are unsure whether the computer is off or in Hibernation, turn the computer on page 50). d. Keyboard (see Heat sink on page 51). i. Heat sink (see Keyboard on page 48). Shut down through the operating system. 2. Remove the battery (see Metal heat shield on page 44). Metal...(see Optical drive on page 55). Optical drive (see Top cover on page 39). f. b. Bottom door (see WLAN/Bluetooth combo card on page 35). Component replacement procedures 75 Remove the following components: a. c. WLAN module (see Bottom door on page 36).